Unreal-Materials--New-Features-&-Product
https://youtu.be/KYmd_LNlw2c?si=sJASbOfGFPOFIPDt

Hi, everybody. I'm Camille Kay, a technical artist on the developer relations team at Epic Games,
and today I'm going to be talking with you about Unreal Materials, new features, and productivity enhancements.

Here's an overview of what we'll be covering today. Starting with 5.6, we'll dive right into the many quality-of-life updates that we've added to the Material system this year. It'll be rather rapid fire, but like I said, it'll all be on EDC afterwards. And then I'll cover 5.7 updates, which are available as of today for you to tinker with in the preview. And these two sections will be the bulk of the material that we cover. After that, I'll talk a bit about Substrate, the new default M5.7, and then I'll share a sneak peek of what's next for the material system after that. From there, I'll highlight a few other talks at Fest that you might be interested in, since we're right at the start of the show.
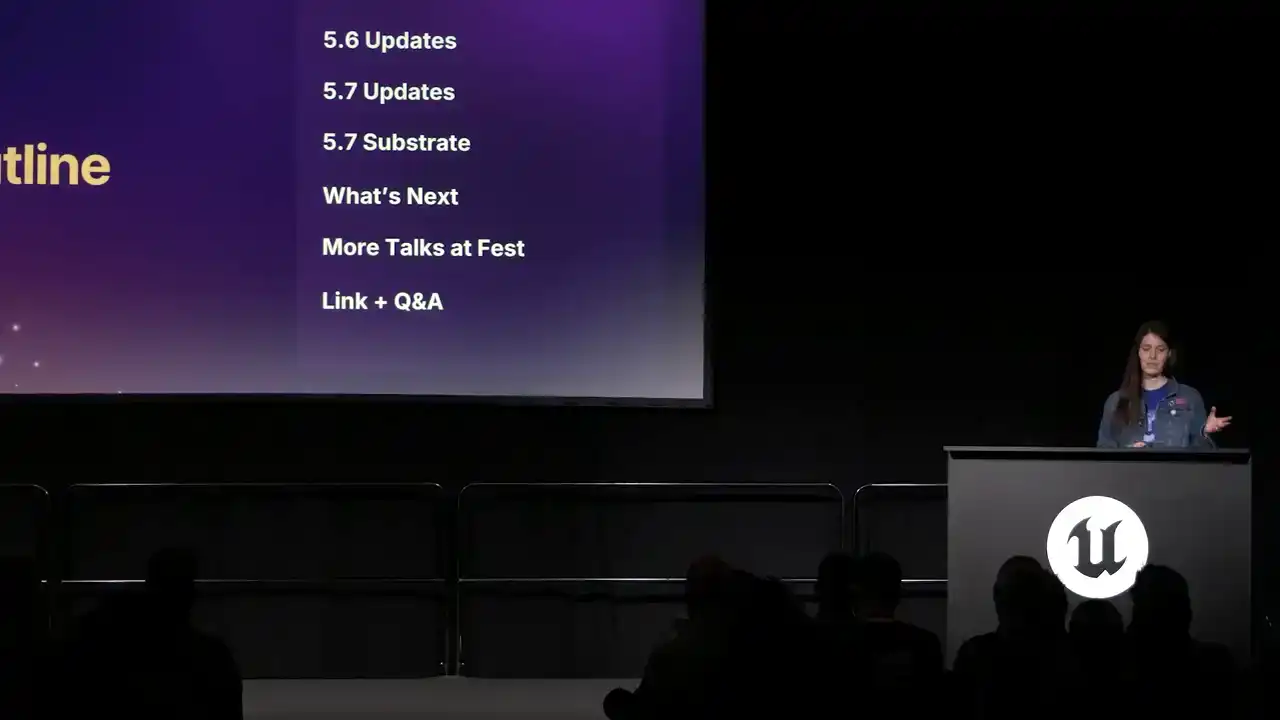
and then we will wrap up with that resource link I mentioned, and if we have some time, some Q&A. So, let's get into it.

Earlier this year, we released Unreal Engine version 5.6. It reflects a major push by the Material Dev team
to tackle new features, and like I said, a lot of quality of life improvements. These changes will hopefully make a noticeable and positive difference in your day-to-day usage of the Material system.

So, let's start with the new node. The Convert node is a time and space saver. It's a powerful, flexible node with all sorts of use cases, and it provides a more compact and direct interface for make, break, and swizzling operations and materials. So you know how you'd sometimes need to stack a bunch of append nodes to get the data how you wanted it to be? No more. We are freed. The convert node handles all of that in one place, reducing clutter and improving readability. It also helps with iteration times as well. So to use this node, I got to do is open the right click menu and search for convert. You'll see a list of related presets,
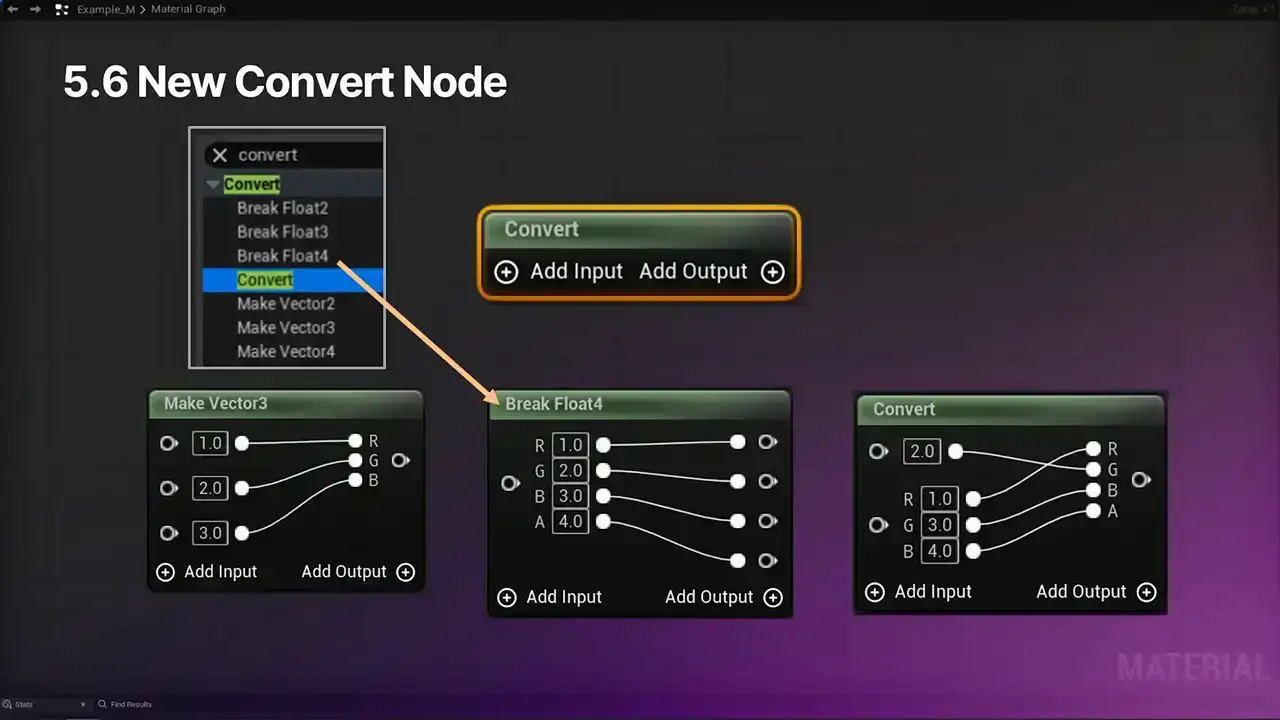
such as make vector 3 and break float 4, which are up here. But there's also an option that's just called convert. And if you select it, you'll just get this simple node in the graph with no pins preset, only the options to add inputs and add outputs. So click on either of those plus icons, and you can select which type of pins you want. So we've got scalar, vector 2, vector 3, and vector 4. And the node supports adding multiple inputs of whatever types you want on both sides. In this example, on the input side, I have a scalar input, a vector 3, and a vector 2. And on the output, I've got a vector 2 and a vector 3. So these nodes are flexible, like I said, and you can add and delete pins as you wish. Just right-click on the pin you want to remove and select Delete Pin. Do note, it's the Delete Pin option, not Delete, because that will just delete the whole node. And here are some quick examples of how this can be used. So you can change the order from RGBA to BRGA. You can make a float 3 from separate scalar parameters. You can swizzle together data using different types of inputs, like this vector 2 in a scalar.

You can also split vectors into individual floats. And worth noting is that you can just specify values directly in the node. You don't have to have pins connecting things. So in this example, there's a scalar input set to 0 without an external wire and an output pin set to three without an internal wire. And so the resulting vector would be 103.

So let's talk about some shortcuts and not the kind that get you lost in a new city. So for starters, we've made some improvements to reroute nodes. So thinking back to 5.5, if I wanted to create a reroute usage node for a reroute that I've already declared, like the one here, I'd right click in the graph, search for it by name, select the one I want from the list. So this process is fine, but it could be faster. It could be better. In 5.6, also, you can still do it this way. It's ideal for when the reroute node is somewhere far off screen and you just want to get to it. However, if you have it in view, we have an alternative where you don't have to do this. So instead, you can just right-click on the reroute node, select the Create Reroute Usage option, and ta-da, reroute node, easy peasy. Additionally, there's now a way to easily find
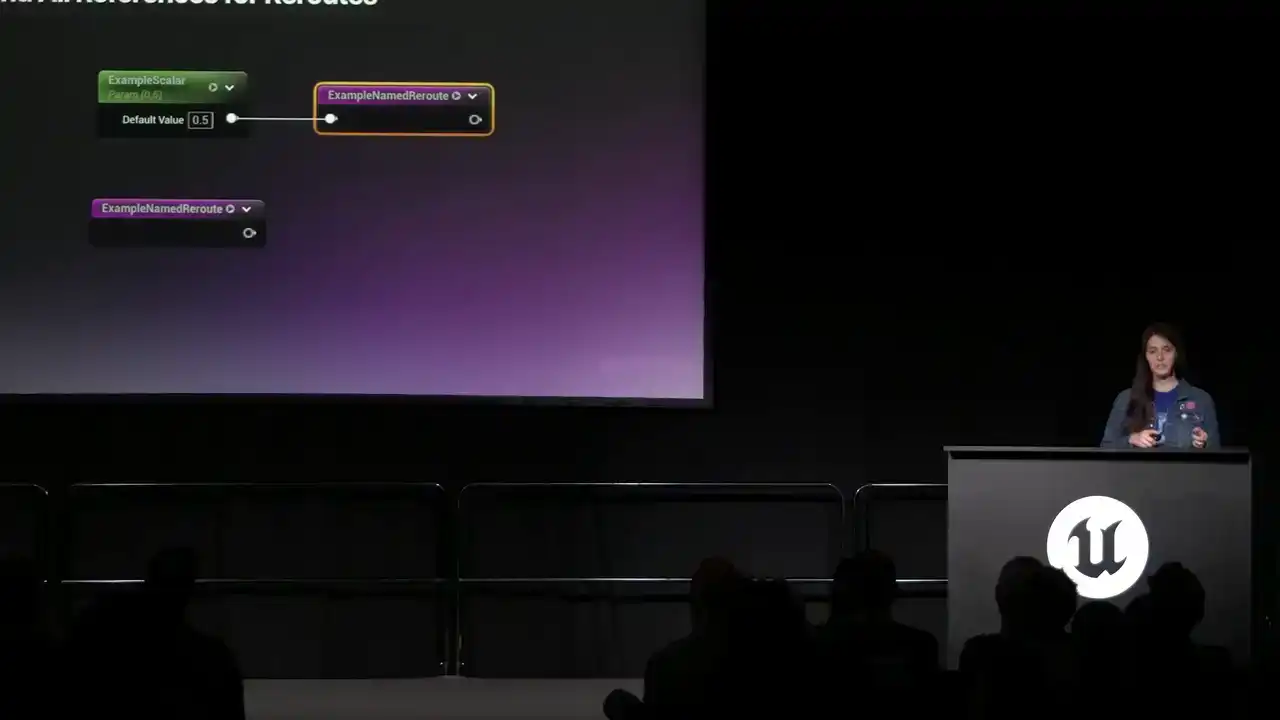
navigate to named reroutes that you've already created. Let's say we made a few more in the graph,
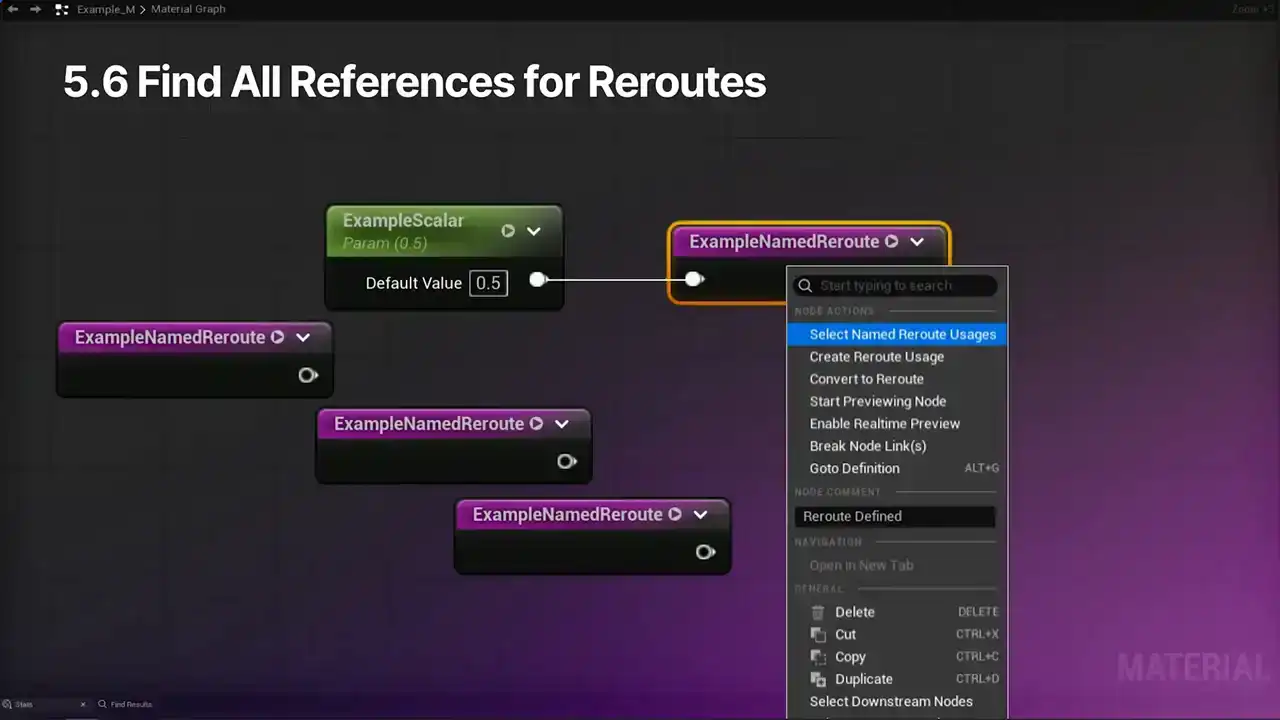
and so I could just right-click on the named reroute declaration, choose select named reroute usages, and the find results tab will have a list of all the things that have been made derived from it. Click on any of these listed node names, and then the graph will highlight whichever one you've just selected. Way easier to find stuff. We also have a new jump to node definition shortcut. brings this in parity with blueprints. For this example, I have a vector parameter in the material attribute space color. I can just right-click on the node to open the menu and then select the new Go To Definition option, give your IDE a chance to load up, and ta-da, code. You will see the relevant file. Next up, we have the Preview button and shortcut. Up until 5.6, the only way to preview a node was to right-click on it and select Start Previewing Node. When you're trying to do this rapid fire to compare stuff, it can be a little clunky. As of 5 all nodes now have a preview button in the title bar right next to the expand and collapse icon So just click on that and the preview will activate If you not already familiar with this feature preview shows the results of whatever parts of the graph are connected to the selected node, as if the selected node were plugged into the base color material attribute. It's super helpful for debugging and iteration. You can also preview a node via the new keyboard shortcut. Hover over any node. You don't even have to click on it. And then press Shift and Space. This further reduces the number of clicks you need to preview your work. The team also put together a new shortcut for connecting new nodes. So in 5.5 and earlier, you'd either need to drag out a wire from the existing node, search for it, select it, there you go. Or you'd search for and create the nodes separately and then manually drag a wire between them. But now in 5.6, you can select an existing node, right-click somewhere in the graph to open up the context menu and just highlight the node that you want, arrow keys, mouse, whatever you want. Then hold Shift while either clicking on the menu option or pressing Enter. And this will create a new node in that spot automatically connected to the previously selected thing without having to fiddle with dragging out a wire. So next in 5.6, double-clicking on the name of a parameter in the Parameters tab will now select and focus the graph
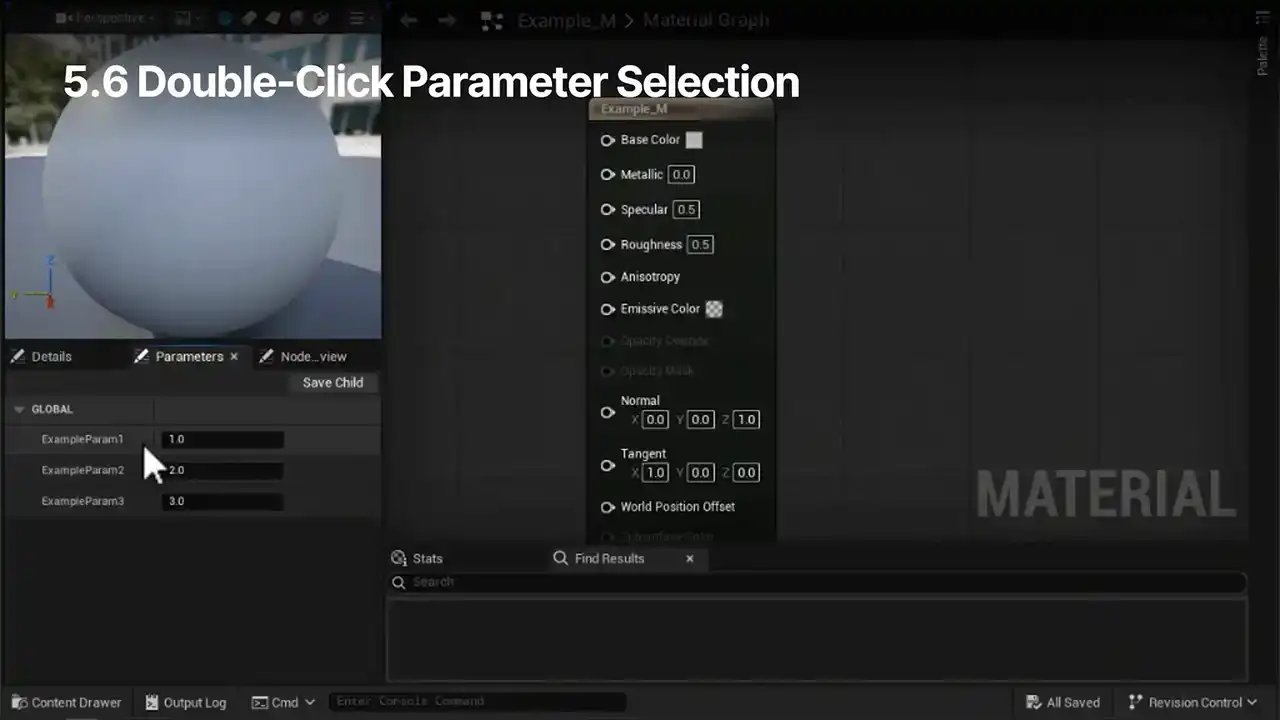
on the Material node that it comes from. and this works with both materials and material functions. If the parameter is defined in a sub-function or a different material asset, it'll open that corresponding asset, select the node in the new editor.
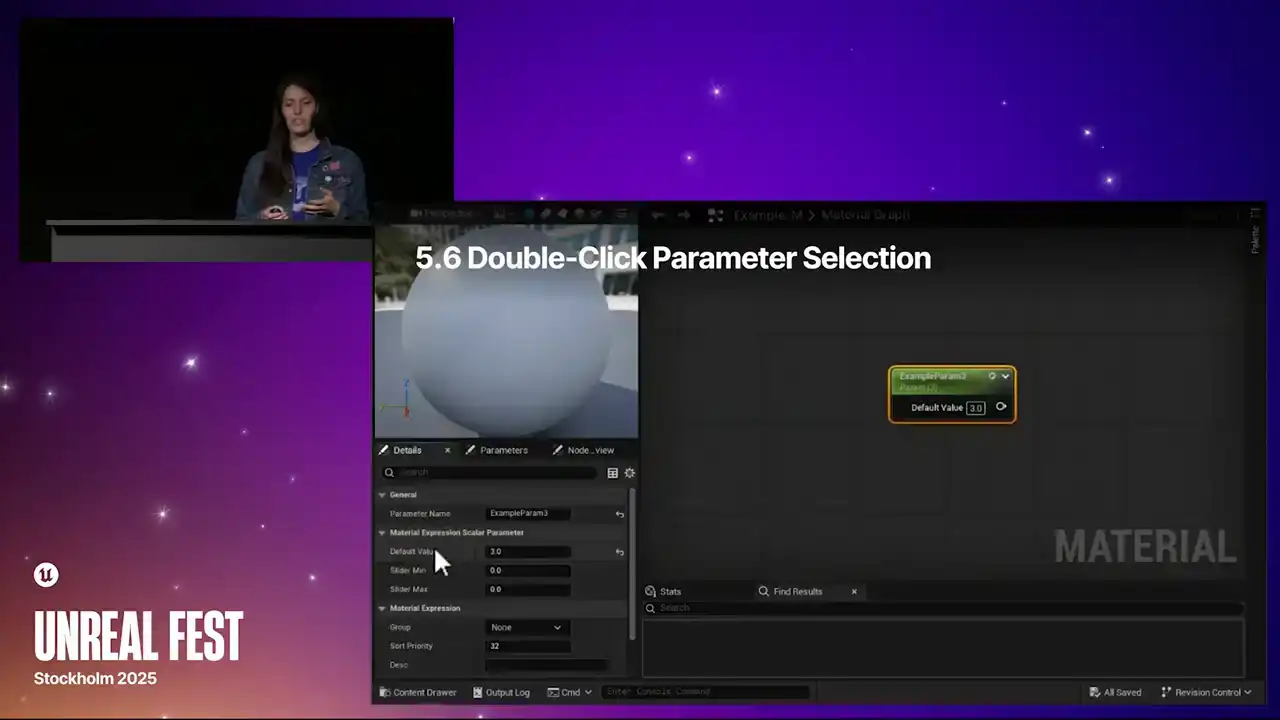
And if the asset is already open, the editor will switch to that tab or window

and focus on the node there. So in this example, I'm just clicking through different parameter names, and you can see that the graph responds

accordingly. Next up, we have improvements to live updates, the engine's ability to show the visual results of changes in real time without waiting for manual saves, reopens, or manual recompilations.
The first of these three changes we'll cover
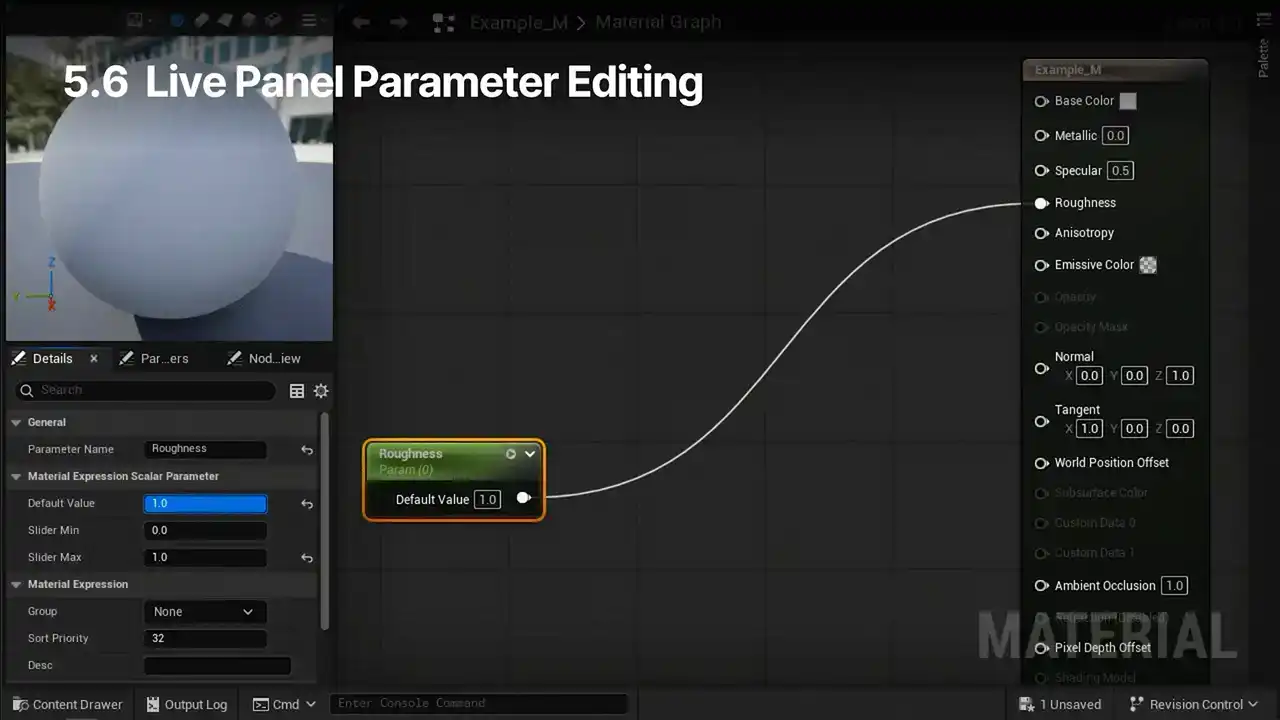
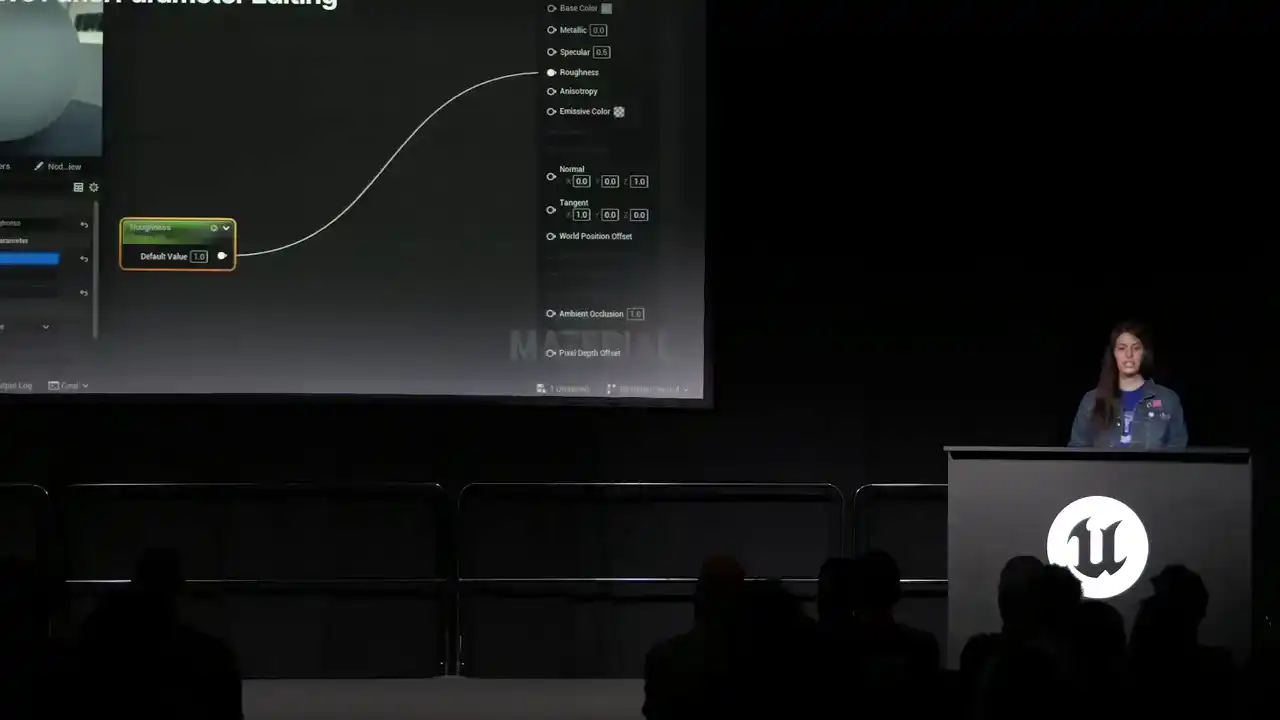
is live in-panel parameter editing, so fresh in 5.6. A scrubbed value in the details panel will now also update within the node
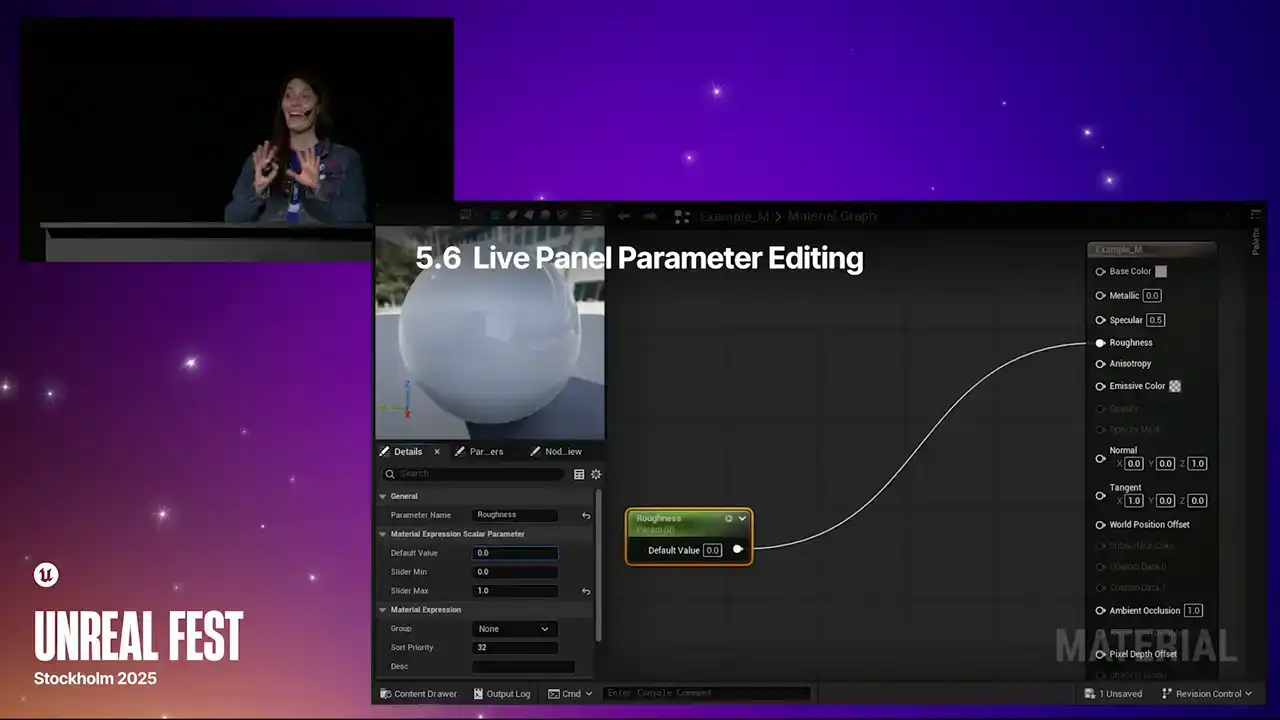
and the material preview at the same time. It's great. Gone are the days of using material instances

just to hone in on parent material values, so definitely a productivity boost that I was excited about.
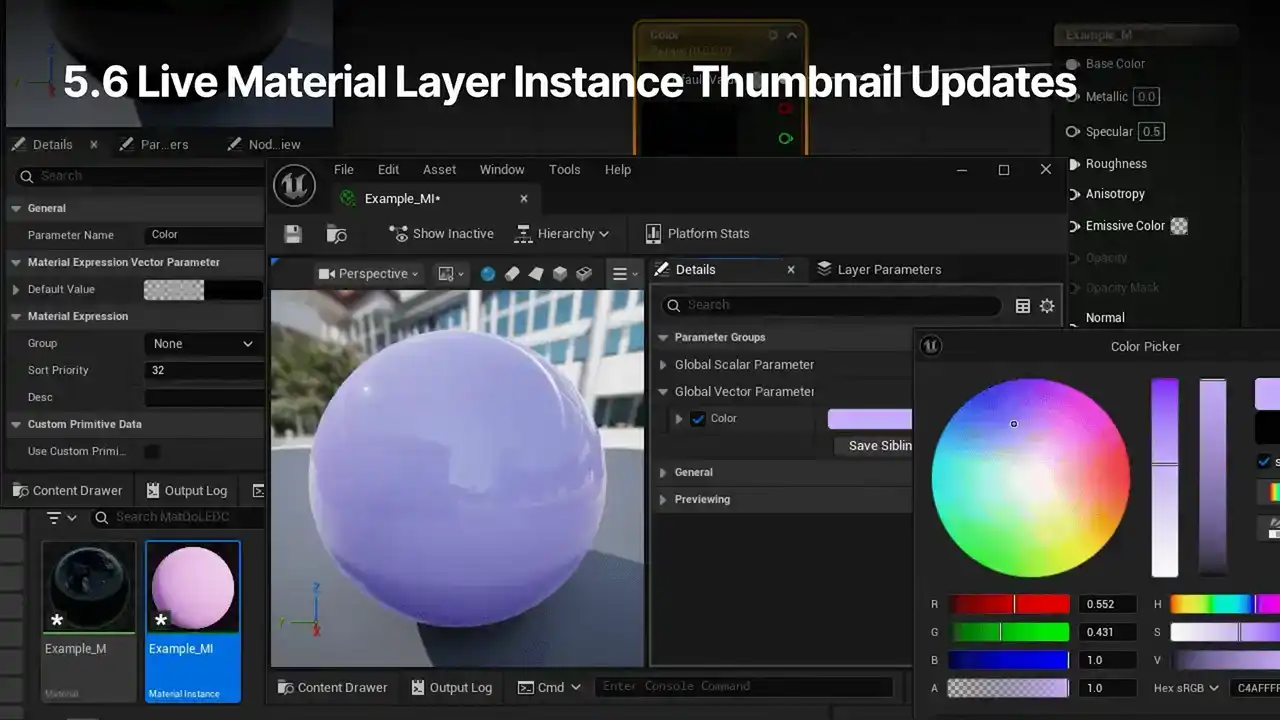
In the same vein of things, parameter changes will now be reflected in the MaterialLayer instance thumbnails as well. This brings MaterialLayers into parity with regular old Material instances.
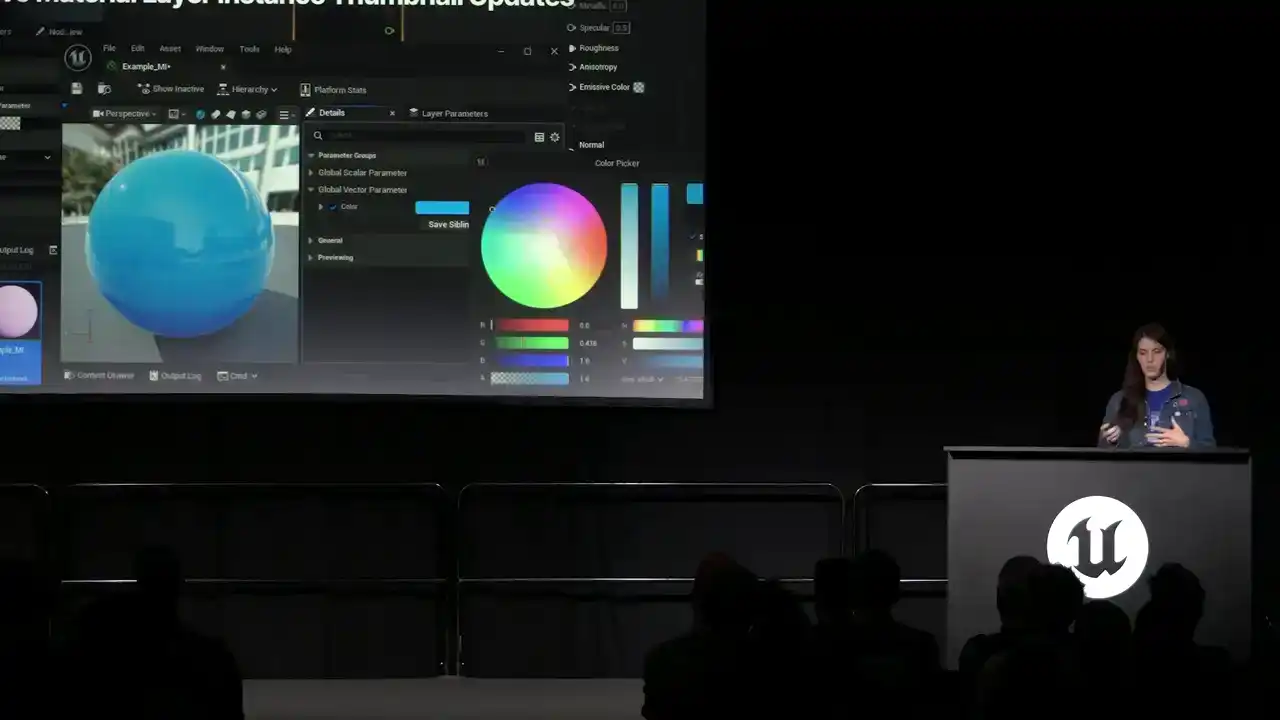
It helps keep visual consistency between what's in the viewport and what's in the content browser, makes life easier.
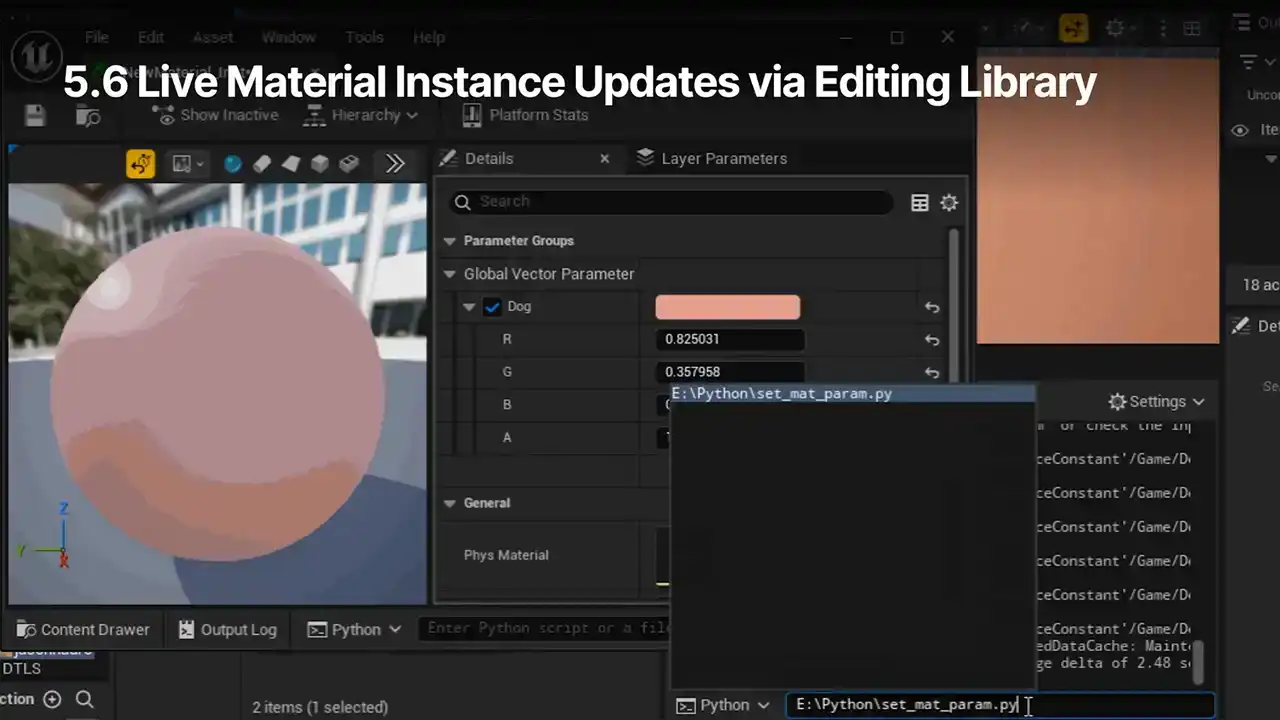
The last one of this set, live MaterialInstanceUpdates via the editing library. When setting MaterialInstanceParameters via the MaterialEditingLibrary,
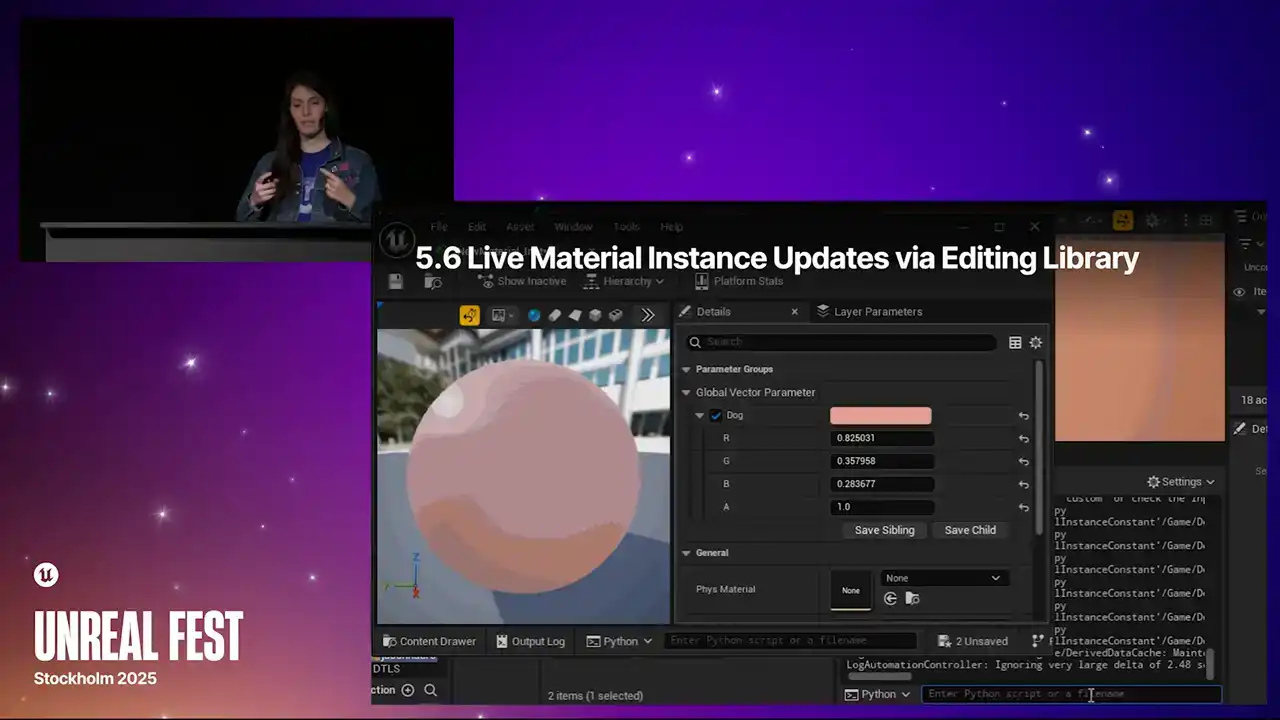
the Material Instance Editor will now show those updated visuals without manual recompiles or saves. And you can change those parameters via Python or Blueprints. As you can see in the example here,

the values are being set via a Python script in that background window. And the preview updates accordingly.

So in 5.6, the dev team has also made some improvement to searches. When searching for nodes in the right-click context menu in 5.5 and earlier, the search waiting would sometimes prioritize less intuitive results. So for example, searching for object posse would highlight the object scale material function instead of what I actually wanted. Now in 5.6, this same search will highlight the object position WS node, which is what I wanted. The search results are based on weighted information, including the node's title, description, category, et cetera, which are set in the editor preferences. And title matches are now weighted more heavily than they used to be. You're also further welcome to tinker with these settings to best suit your needs as well. In 5.6, keywords are now included in property searches. So let's say as someone new to Unreal, I wanted to enable this displacement pin in the material attributes. In 5.5, if I went to the Details panel and searched for Displace, I'd get some settings about it, but nothing about actually enabling it. So we've noticed that this sort of thing has been a sticking point for folks, so we've made some changes in 5.6. If I put in that same exact search, the results now include enable tessellation, which is the setting that you'd need. The Details panel will now search the Keywords Meta Specifier. So that's the main change here. Previously, only Blueprints and Variables would take these keywords into account. So now there's Feature Parity. And this change also includes adding that Displacement keyword onto the enable tessellation option in the Materials. So next up, the parameters within a Material Parameter collection are now searchable in the material editor. So if I drag and drop a material parameter collection into the graph, create an MPC node, go to the Details panel, click on the parameter name, and I can see all of my options. In this example, I have a lot of very similarly named parameters, so scrolling and manually picking out the proper one might be tedious or just prone to error. So instead, I can now type a query into the search bar, and the list will filter out the results appropriately. This should make it much faster and easier to find and select what you want. Next, the Material Editor Settings module is now registered at Engine Startup. This affects whether the things you search for show up. So in 5 if you went to the Editor Preferences before opening any Materials in that Engine session the Material Editor settings they were just missing So you have to go out of your way to open up a Material asset before actually getting access to your options in the GUI. So in 5.6, this has been fixed. The Material Editor module is now included in the settings list automatically. And to wrap up this section about 5.6, we have some miscellaneous updates to share. So as of 5.6, texture sample nodes now support custom channel names. So in the graph, you can select your texture sample node and open the Details panel. In the expandable section labeled Parameter Customization, there are four fields, RGB and A. Type what you wish into the fields, and they'll be reflected in the node next to their respective pin. Any fields with custom data will use that specific text, and any fields without it will just use the default as the fallback. These fields can also be localized. so just click on the flag icon to see your options. And this feature is super helpful for teams that really want to better support and enforce packed texture mask orders throughout their projects. The view near plane is now included as an option in the view property node. So you can get to this by adding a view property node into your graph, use the drop-down icon to expand the node, open that drop-down menu, and you can select view near plane right at the bottom of the list. and the node will change to reflect it. If I scoot this over, we can talk about it a bit. The view near plane value is the same as the near clip plane setting. You can check and set this using CVars like I have here. You can also take a look at these sorts of outputs by using the debug scalar values nodes. These are great, super useful for prototyping and iteration. Hook that up to something like the base color and apply the material to an object in the level, and you'll see the values match up. So this view in your property node is particularly useful for things like fading translucent VFX, like floating dust or snow, before they clip into the camera.
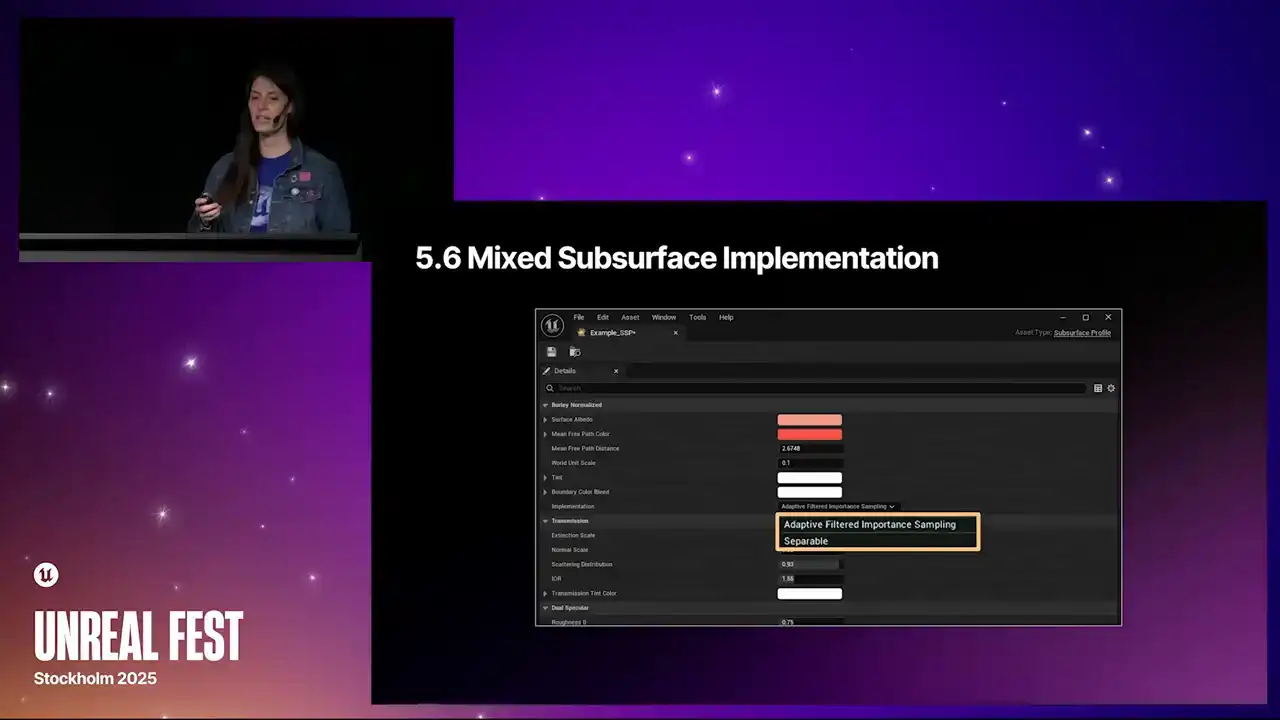
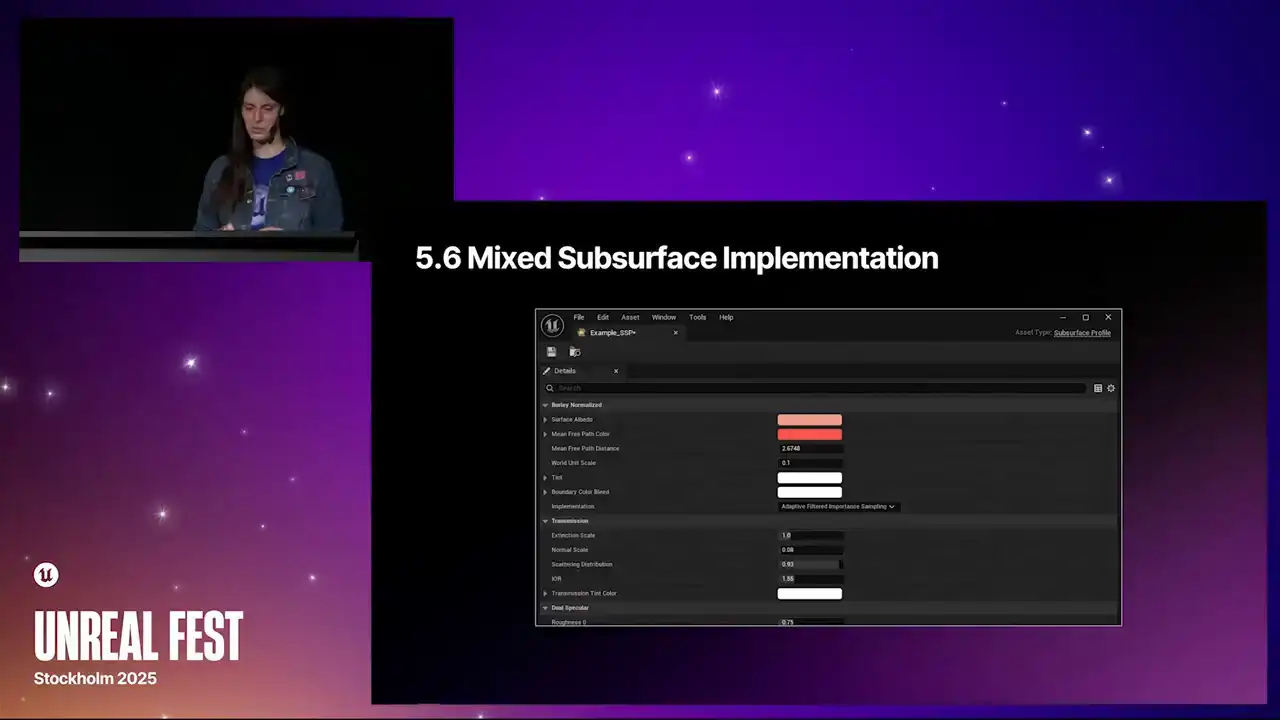
We've also added mixed subsurface implementation options for balancing quality with performance needs.
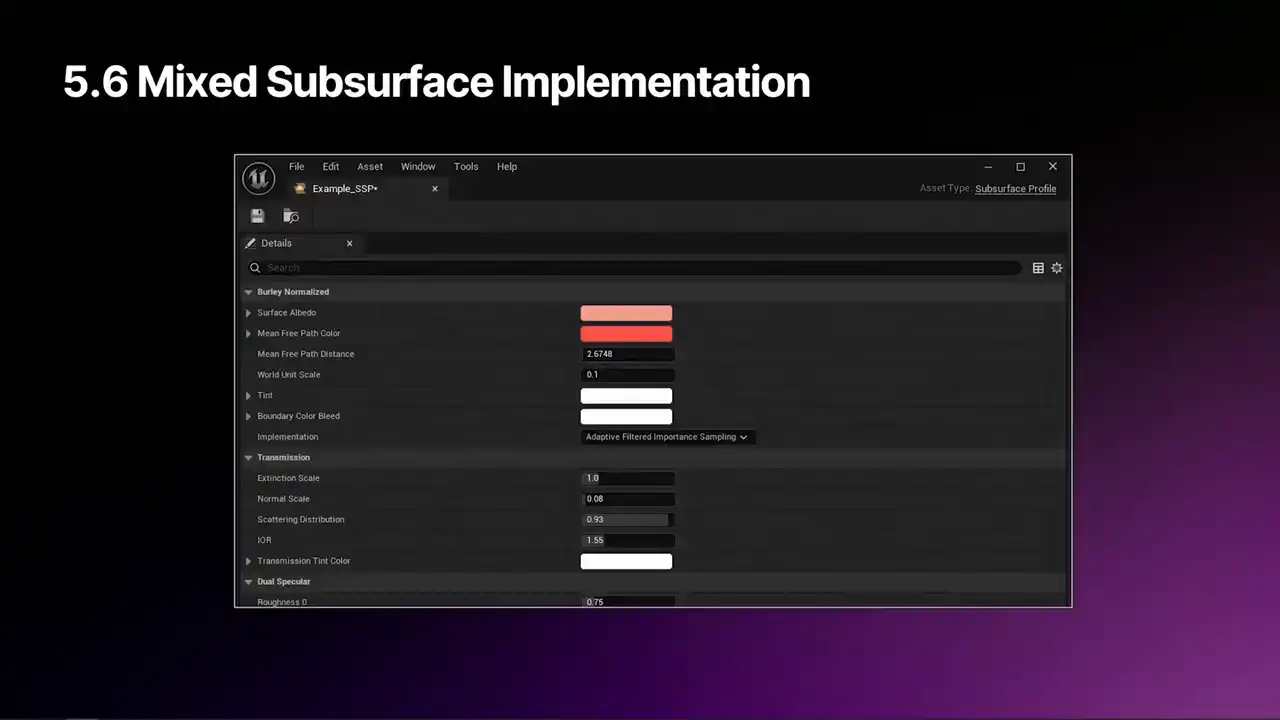
So in subsurface profile assets, there's a new option in the Burley Normalize section called Implementation. There's a drop-down menu here with two options, Adaptive Filtered Importance Sampling and Separable.
AFIS is the higher quality option, and it's great for important assets like the subsurface scattering on the skin of a hero character.
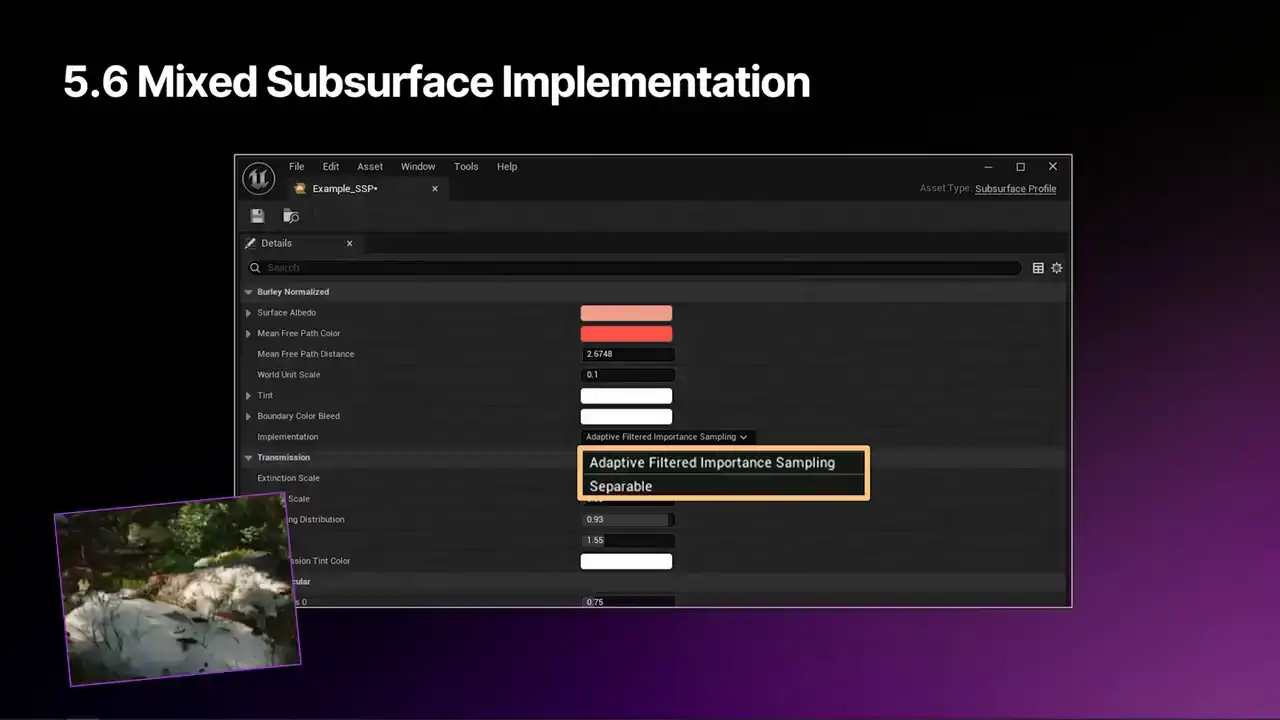
Separable is the more performant option, which is more useful for assets with less important subscattering needs, but you still want some, such as snow.
And we used this feature earlier this year for one of our demos. The last update in 5.6 is actually one of my favorites,
comment box alignment. So as much as I love productivity boosts, and I do, I really love well-aligned graphs.
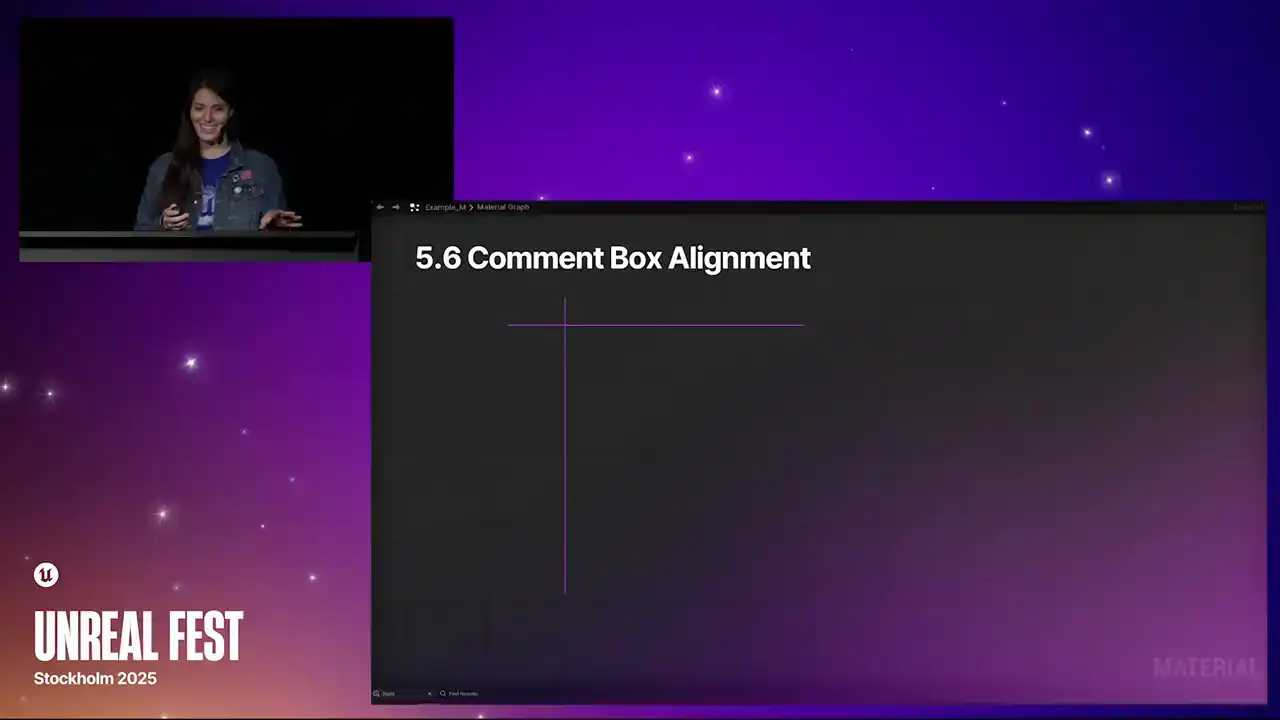
So I'll highlight the grid here. Creating a comment, especially when using the C key shortcut, would result in a box that wasn't quite grid aligned. And this would cause a cascade of misalignment issues with nodes that would have to be fixed manually.
And it is my joy to share in 5.6, This is no longer the case. Yeah! So here is the grid highlighted again in 5.6. Look at it. It is beautiful.
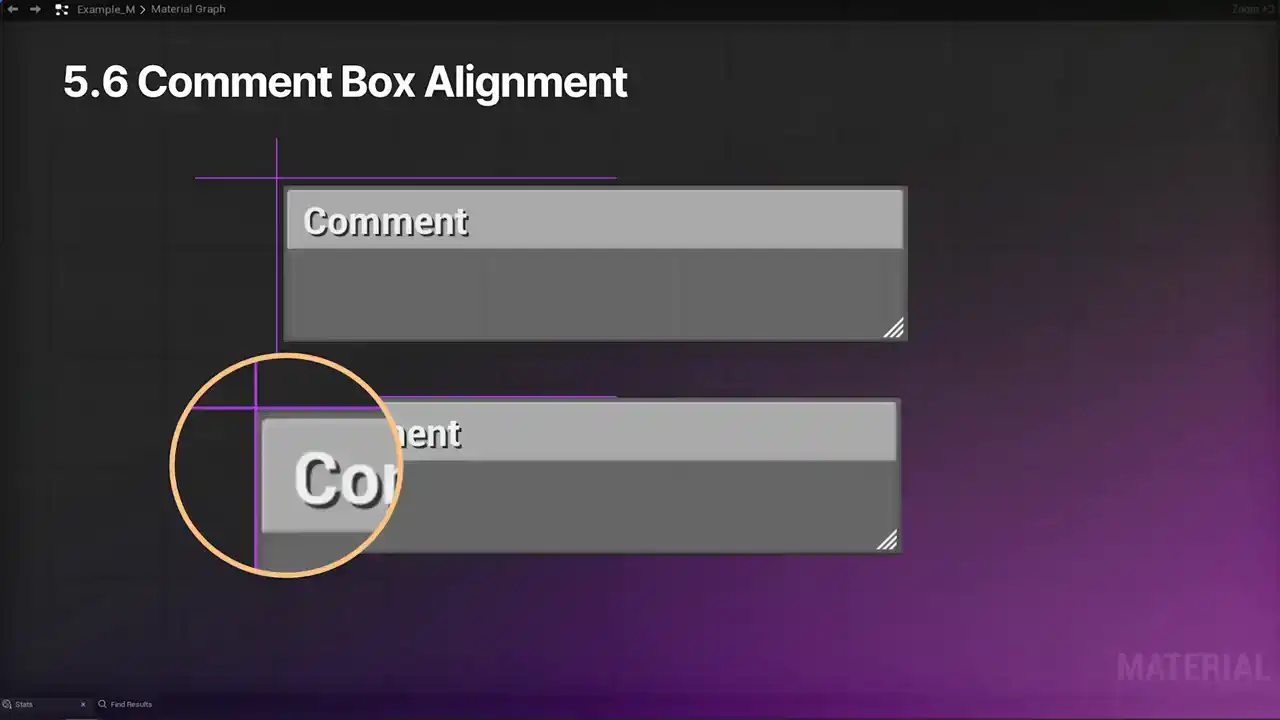
The comment box, perfection.
All right. So that wraps up the 5.6 updates. And now we can take a look at what is new in 5.7.

So these are the changes that you can start tinkering with in the preview. First off, we will start again with two new experimental nodes.
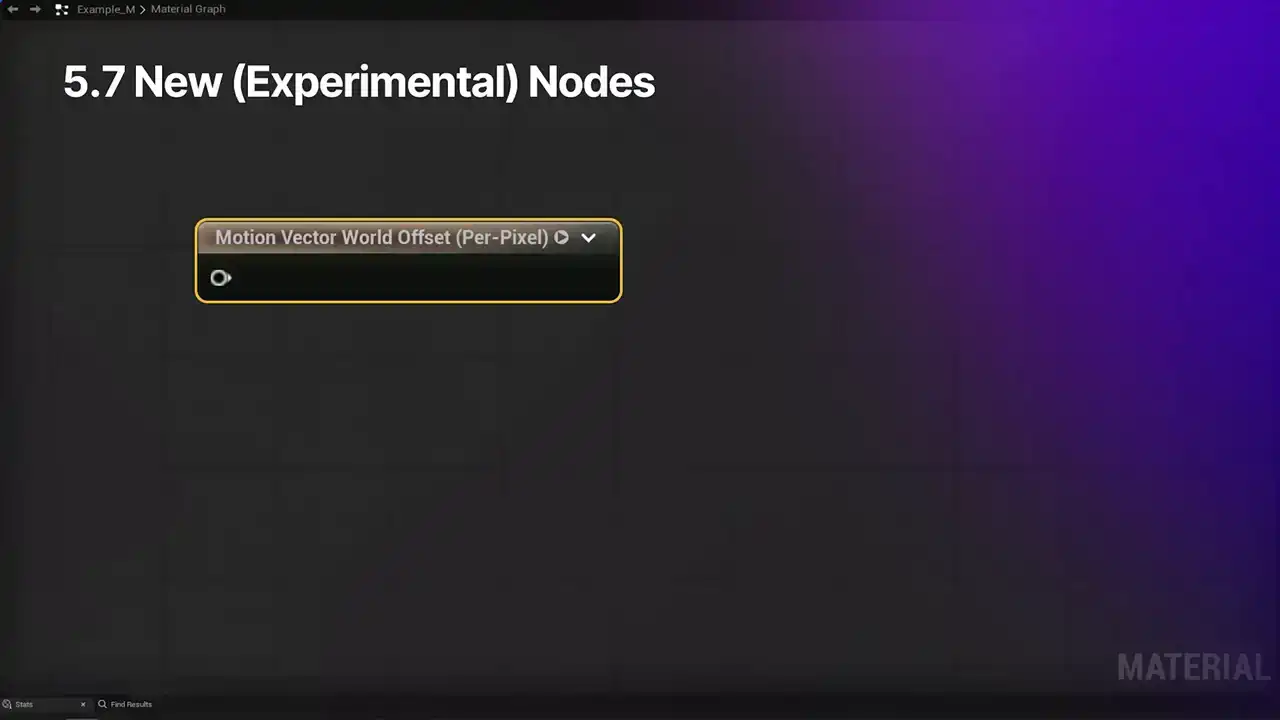
These are the MotionVectorWorldOffsetPerPixel node, it is a bit of a tongue twister, bear with me, and the TemporalResponsiveness node. Both of these were developed to help solve some of the smearing issues with certain materials when using TSR. Let's take a closer look at the MotionVectorWorldOffsetPerPixel node, which I will refer to as MVW, New thing. Without any modifications, like we showed before, this is what a material can look like when using TSR. It has pretty severe ghosting problems. Not ideal. We can somewhat address this by using previous frame switch. It definitely improves the output, but we end up with some smearing in the middle due to slightly inaccurate motion factor situation.
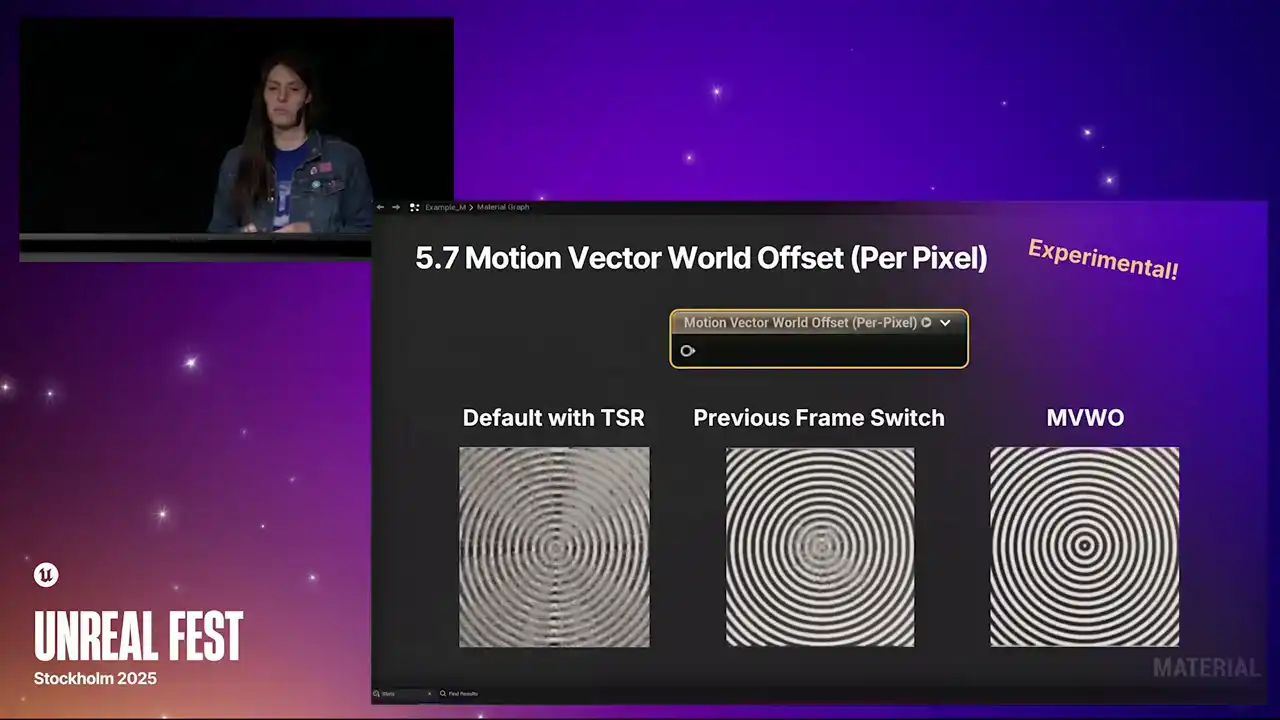
So in contrast, here is what the MVWO node
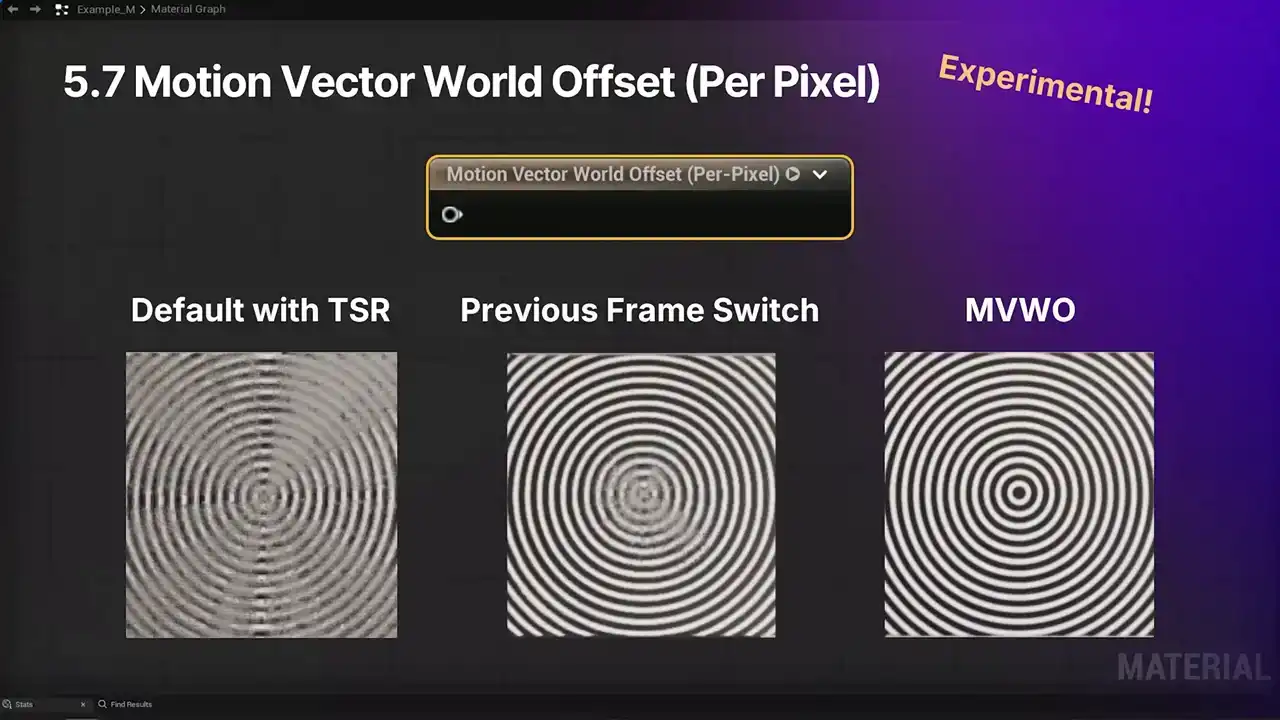
looks like in action, much clearer visuals.
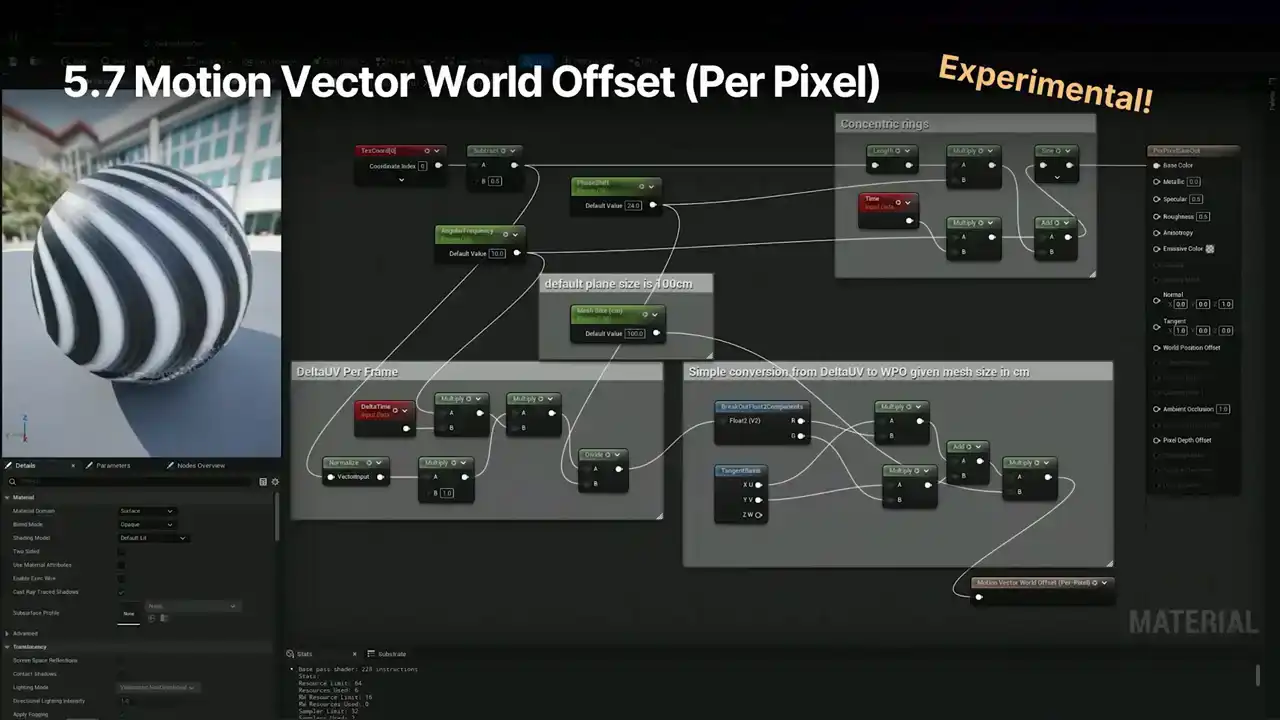
So how is this Material set up? The gist of it is, without going through absolutely everything, for the rings, we use your usual texture coordinate, time, mathy stuff, plug it into the base color, great. Then we calculate the delta UV per frame, convert from delta UV to WPO based on the size of the mesh, and then plug that into the MVWO node. Ta-da!
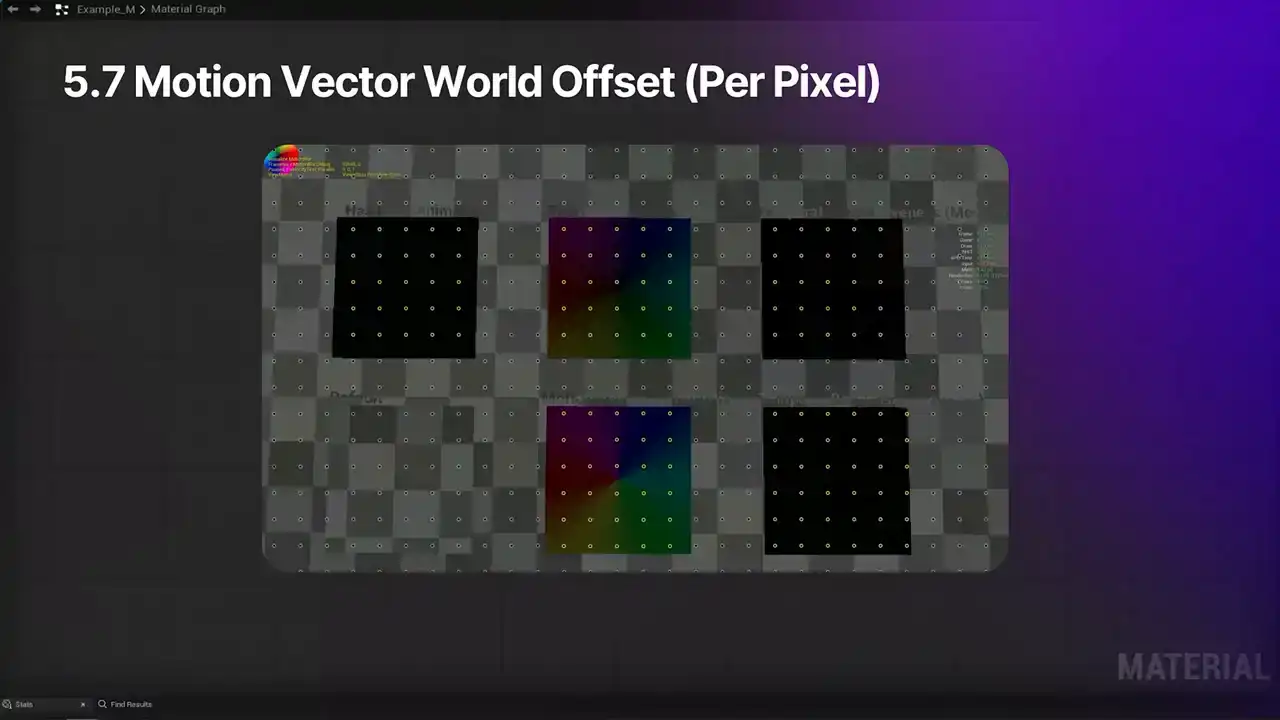
So while working with this node, it will probably be helpful to take a look at what's going on with the motion vectors in your scene. So to do so, you can use r.motionblur.visualize, set to one. Or you can turn on a more colorful view which is brand new show flag motionblur set it to one good to go you get this visual And here are some other last important notes about the motion vector world offset per pixel node It a bit expensive compared to the other one that we look at so just, you know, be mindful of it. It provides a higher quality motion vector, better than the previous frame switch as we saw earlier, and better history stability. It's not compatible with Nanite, and it's great for anything that has pixel animation with, like, known motion vectors, such as water simulation. Let's take a look at the Experimental Temporal Responsiveness node. Without any modifications, this is what the material with fast animating text might look like when using TSR. You've got that ghosting, that smearing issue. We can somewhat address this by using hasPixelAnimation. It's pretty good, but there's still some slight issues with it. It could be better. This is what the Temporal Responsiveness node looks like when it's in use. Nice and crisp. As for the materials implementation of the temporal responsiveness node, let's take a quick look. Up top, we've got some custom code to figure out which digits are changing. And then we selectively mask out the regions where the digits are changing. And then the combined results are multiplied with a scalar responsiveness parameter and piped into the temporal responsiveness node. The TR node has three discrete levels. is zero, so normal temporal accumulation, no changes being made. Then we've got medium, zero to 0.5. It assumes medium level mismatch of motion vectors for pixel animation and rejects the temporal history more aggressively, especially for small features, but not completely. And the tr full is 0.5 to 1, and the motion vector is considered fully unreliable. The
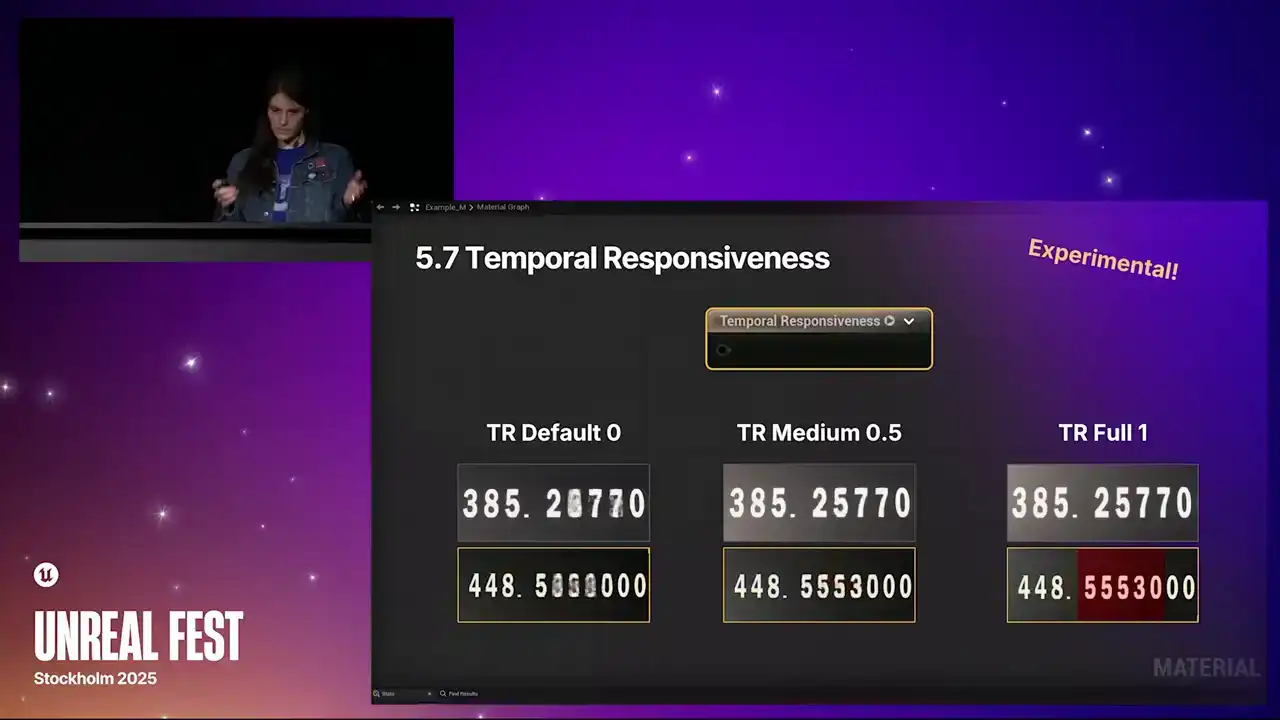
The digits highlighted in red here show that, and you can take a look at this by using the
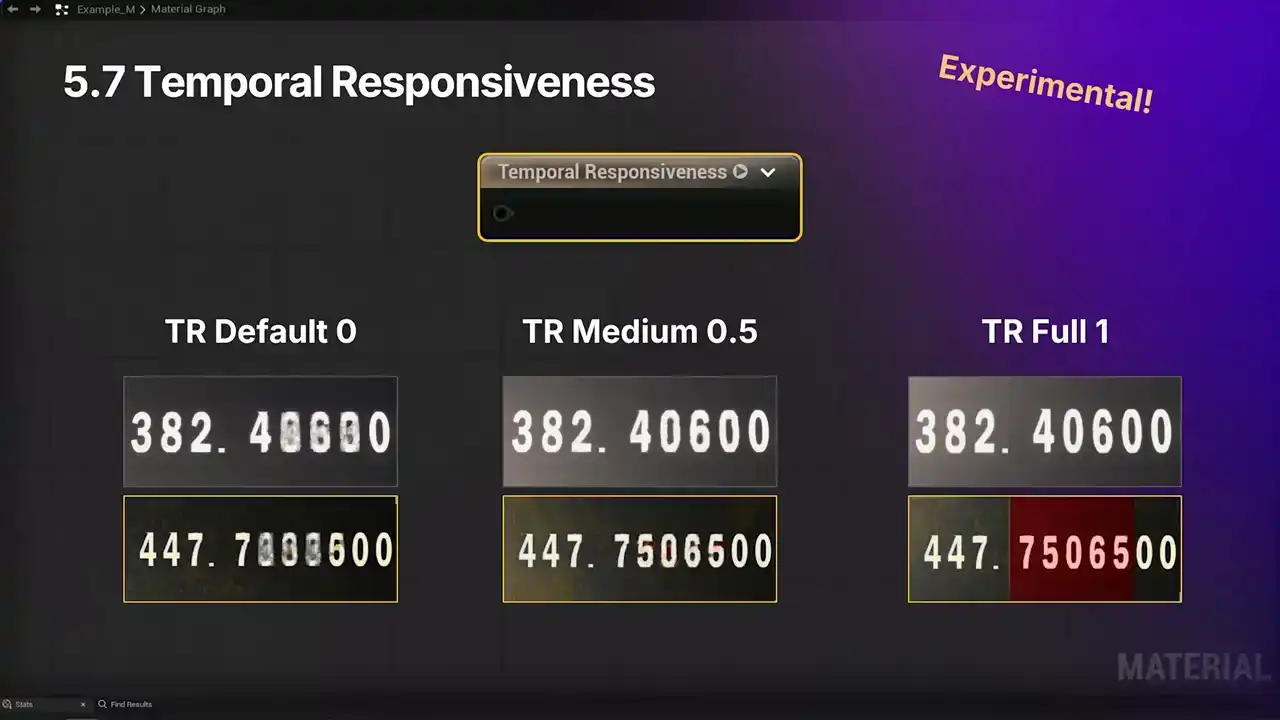
TSR rejection weights view. A few final notes on the temporal responsiveness node. It is the cheaper of the two options. It has full non-nanite support with limited nanite support. One of the risks is that it can actually look a little jittery occasionally, depending on the use case. so we recommend using it selectively. And it's great for things like fast-changing text or video playing in a game. And next up, we've got node improvements for 5.7.
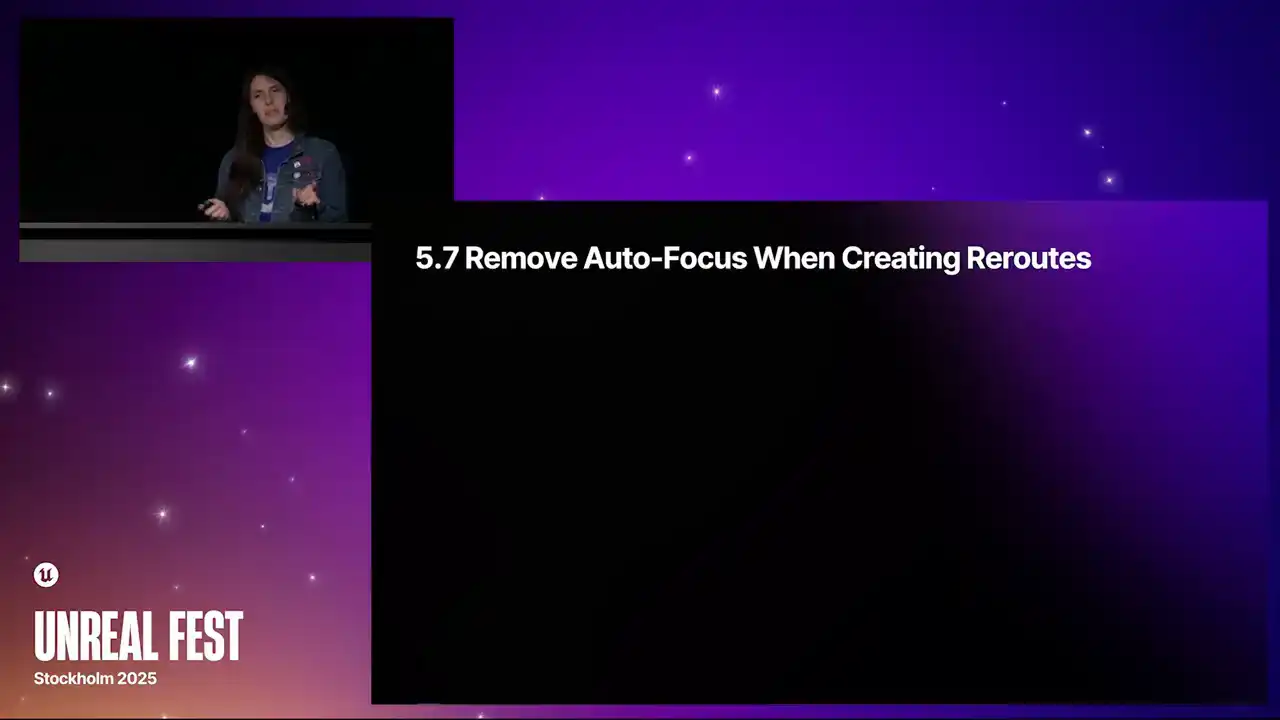
One of the maybe less flashy, but I think helpful quality of life changes is that we removed autofocus when creating reroute nodes. So in 5.6, when you create a reroute node usage,
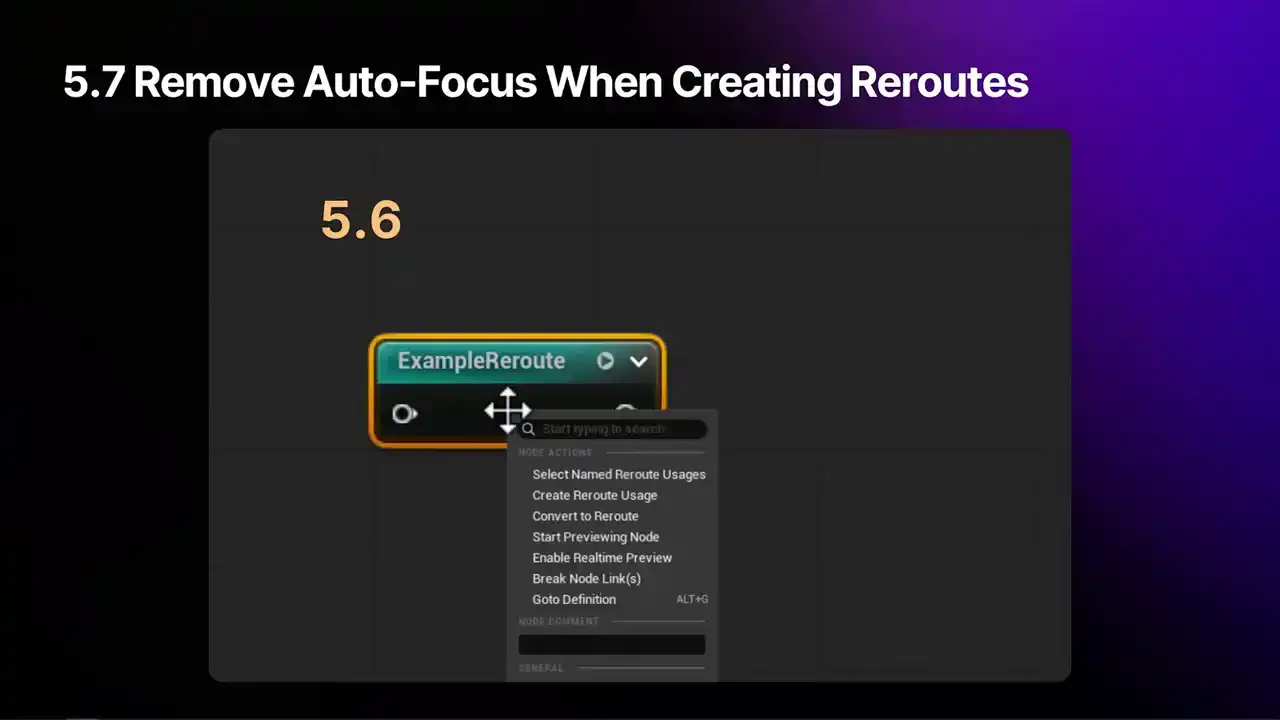
it will cause the graph's view to move, and it would reset the graph's zoom setting, despite the usage node always appearing right next to the thing that you're working with. So in 5.7, the graph's position in the viewport won't change, and the zoom setting will no longer be reset. So it's a little more comfortable to use. We've also made improvements to the vector parameter node and its corresponding constant. So in 5.6, here's a vector parameter. For starters, the pins weren't labeled with anything. So for those with CVD, color blindness, it might be difficult to tell some of these pins apart from each other. And for folks who are new to Unreal, these gray and white pins, I don't know, right? They're not self-explanatory. So there were also three functionality issues. First, although the documentation and the pin type indicate that it's a vector 4, because it has four floats, the top pin only ever output three of the values. Folks might already be familiar with this little quirk. and the fourth value was just omitted. So users would need to manually, once again, the append node, append the alpha value to the RGB output to actually use all of the values in here. Also, when the vector4 parameter was converted into a constant, it would turn into a vector3 node. Same issue as the parameter, and the alpha value would get dropped entirely. So this could lead to data loss and unexpected node incompatibilities in the graph, as the expectation was that it would turn into a Vector4. Lastly, the converted constant node would always display 0 for the constant values, which would be a bit confusing, not ideal, rather than values from the parameter. So in 5.7, pins are labeled, removing ambiguity and making them more accessible. There's now an RGBA pin, providing a way to access the full Vector4 parameter without using an append. And converting this node to a constant results in a proper Vector4 node, fixing the data loss and typing compatibility issues. And the in-node value display is now a color picker, the same as in the parameter. Do note that the RGBA is on the bottom of the parameter, but the top of the constant. This keeps things situated as they have been for the parameter, and the vector is the same as the other vectors. So a little quirk, but it's there, and it's labeled. Another change to the Vector4 node, it now has custom parameter name fields that can be localized, just like the Texture Sample node in 5.6. In 5.7, we have an update for how channel mask parameters appear in instances. So, in a 5.6 Material instance, this mask parameter would be displayed on two separate lines, named the same thing. One was a drop-down and one was a color picker. Not super intuitive.

So in 5.7, we've cleaned this up. It only displays a single option just with a drop-down. It's a little something that'll give you some more vertical space and clarity in your Material instances.
We also have some cool efficiency boosts in 5.7. We now have a much more automatic way to fix up mismatch sampler type errors.
And it happens to everybody now and then, right?
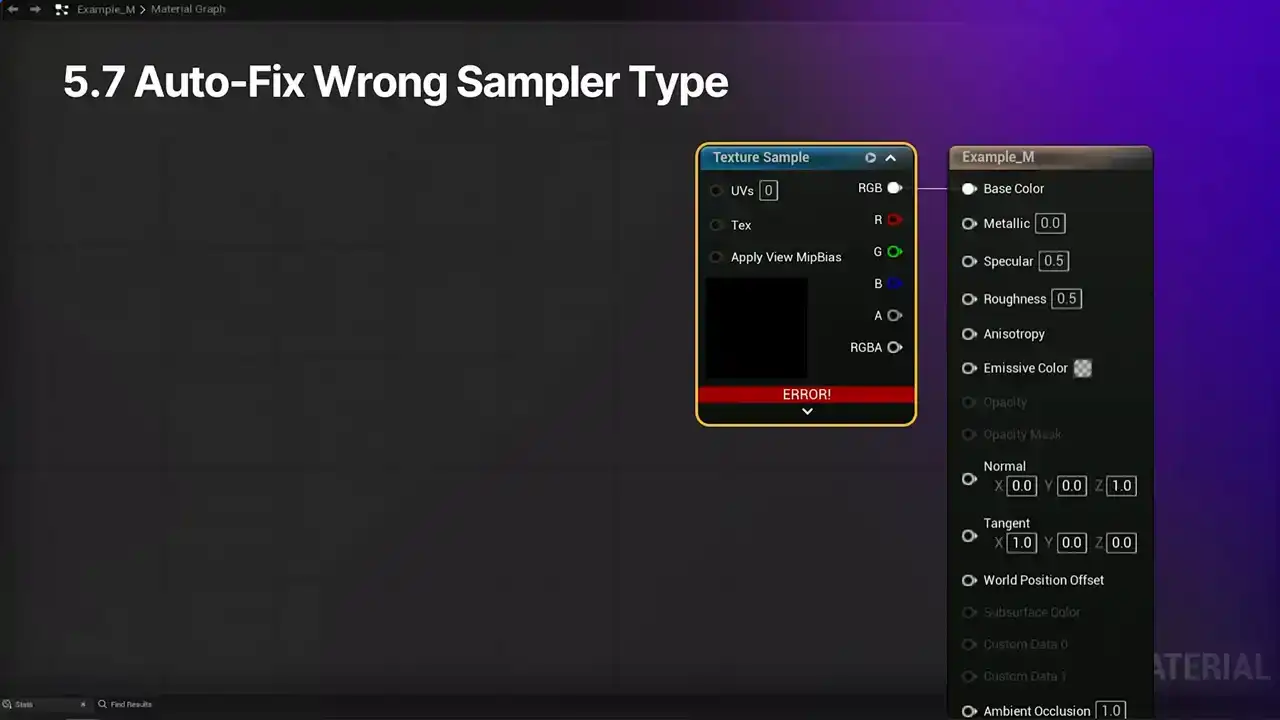
We're in our material, we connect a texture sample up to something, and oh no, error. We check the stats panel and we're told that the sampler type doesn't match the texture. At this point in 5.6, we'd open the details panel and manually change the value to the rate thing. As of 5.7, we can instead open up the clean graph menu at the top, like so, and select fix up mismatched samplers. A message will pop up letting you know how many texture samplers would be affected, and it provides the option to continue or cancel the operation. If you confirm, ta-da! The sampler type has been changed to linear grayscale, you didn't have to pick it, and the node looks good, and the stats panel is happy. Next, 5.7 adds subsearch queries for material functions in the editor.
It can pick up results buried within layers of functions, letting you know which nodes or related material functions have the search result inside of them.
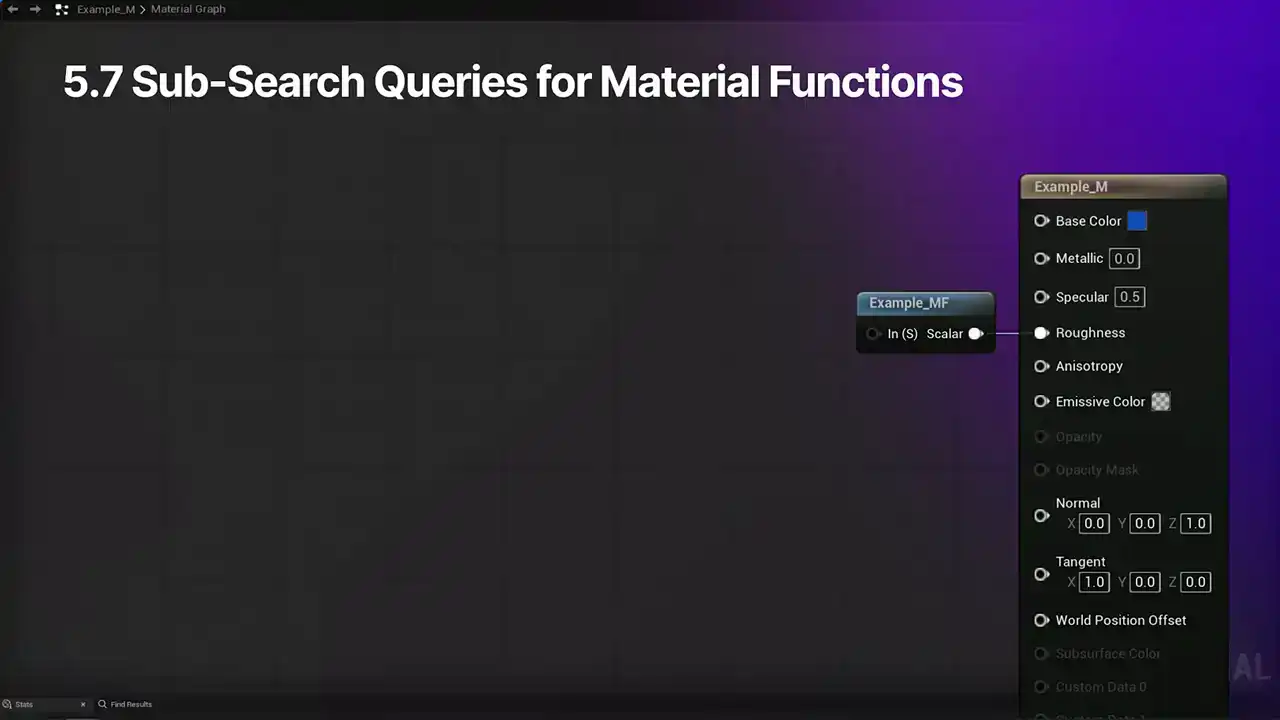
So in this example material, we have a material function. In the Find Results panel, let's say I search for Layer 2. If I single click on this result, the material function will be focused in the graph. If I double click on that result, it'll open up the material function that the result is inside of. And from there, I can follow the search to that material function and to the Layer 2 parameter that I was originally searching for. One of the coolest new interactions that we have lined up for 5.7
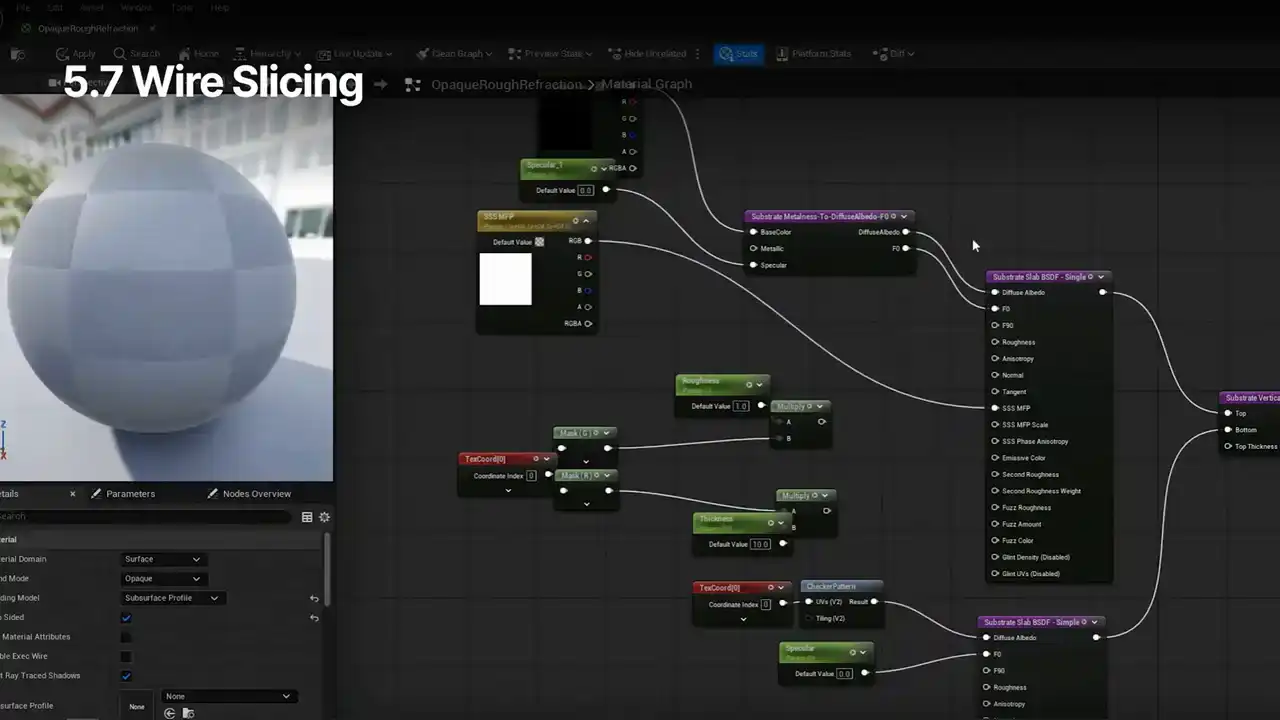
is the new slice to disconnect shortcut. Right?
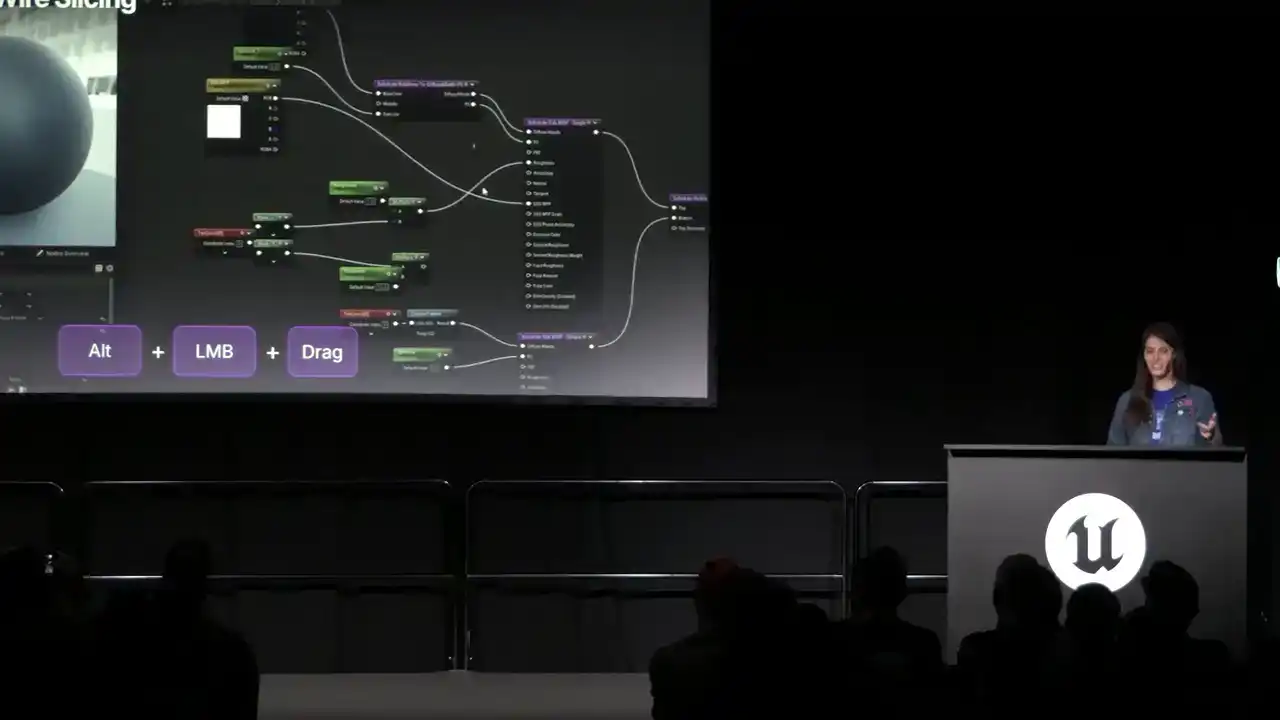
To get to this, press the Alt key, left mouse button at the same time,
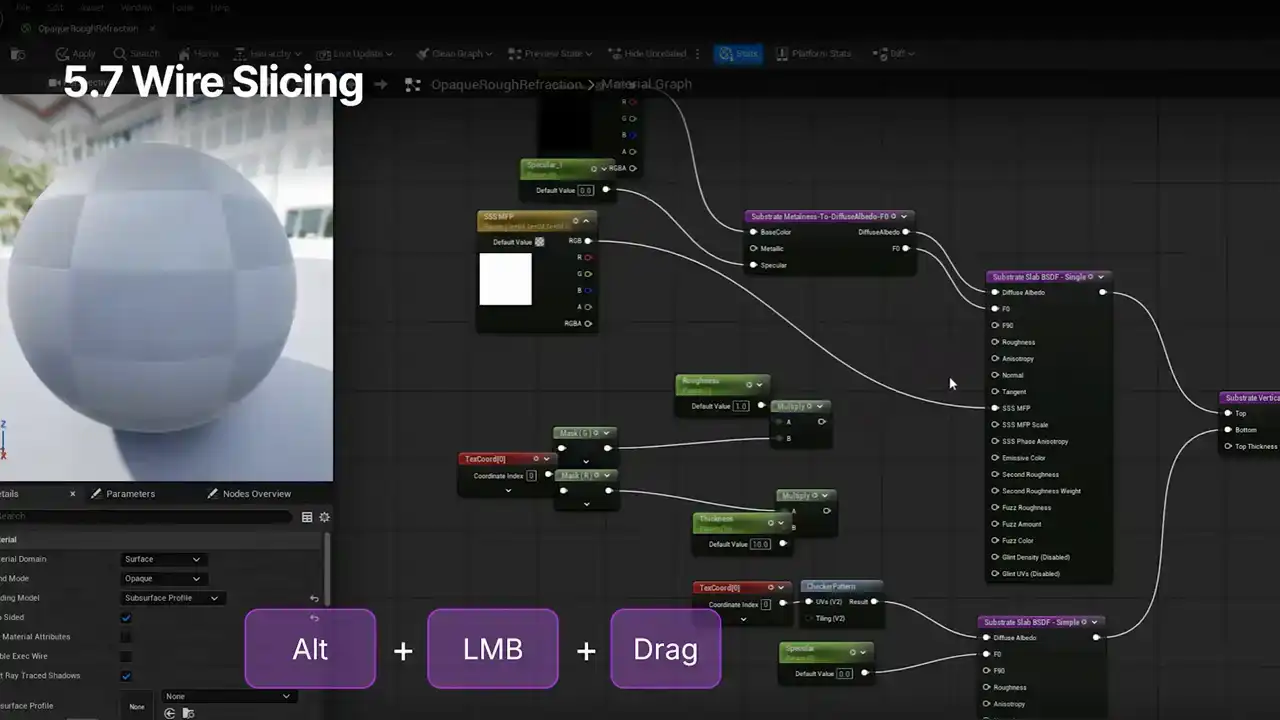
and then drag across whatever wires you want to disconnect. They will show up dimmed before you release to let you know which ones you are affecting, And note that this is just a straight point A to point B line. It's not a wiggly freeform draw thing.

And next up, we have two tag feature updates. 5.7 introduces the, also a bit of a tongue twister, has static permutation resource asset registry tag. So in the content browser, you'll be able to hover over any material instance and see whether or not it's been labeled as has static permutation resource true or false. If true, this means the material instance has elements that may cause permutations when used, such as static switch parameters or base property overrides. In this example, parent material, we have a vector parameter, let's say a texture sample, and we pop in a static switch parameter to decide which of these two we want to use for the base color. And the default value is true. And the static switch is a potential source of permutations, which of course can have performance costs, so it's good to know about them. So in the content browser, we can take a look at this first material instance, and we can see that hasStaticPermutationResource is false.
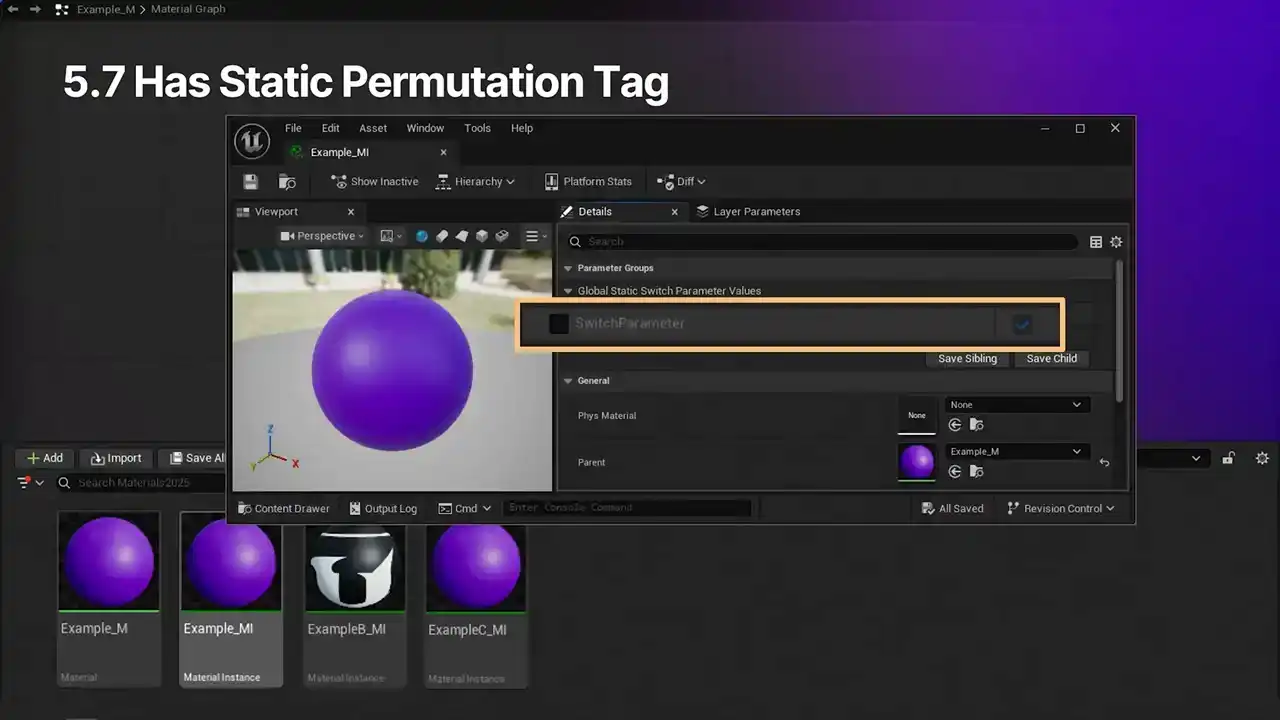
In the material instance, the switch parameter totally left alone. There's no change to the default, no expected risk of permutation from it. And we can compare this to the next material. HasStaticPermutationResource is set to true. In this asset, the switch parameter has been marked as edible, editable, and the value is different from the default. Therefore, tag is true. But this last one's a little different. May have been a bit of a surprise for folks. So lastly, we have this material instance is set to true, but it looks like it's using the default value, right? So if I open this up, I am using the default value, but I've also marked it as editable.
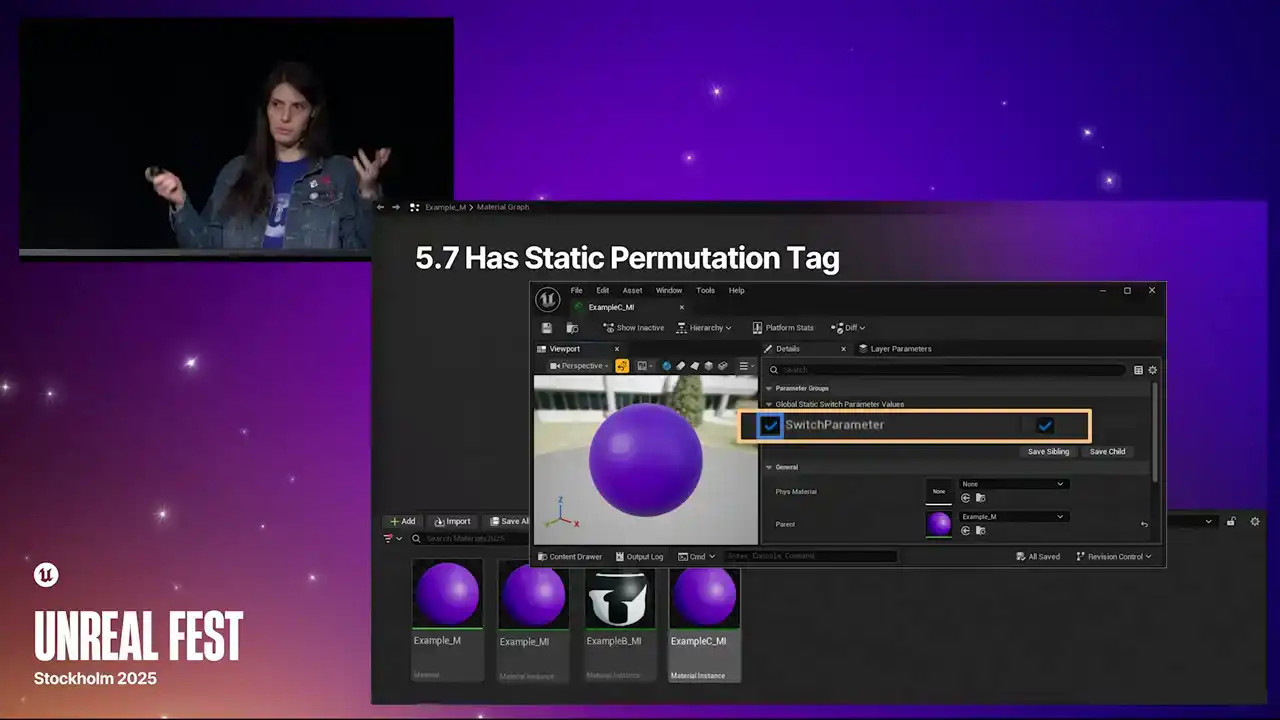
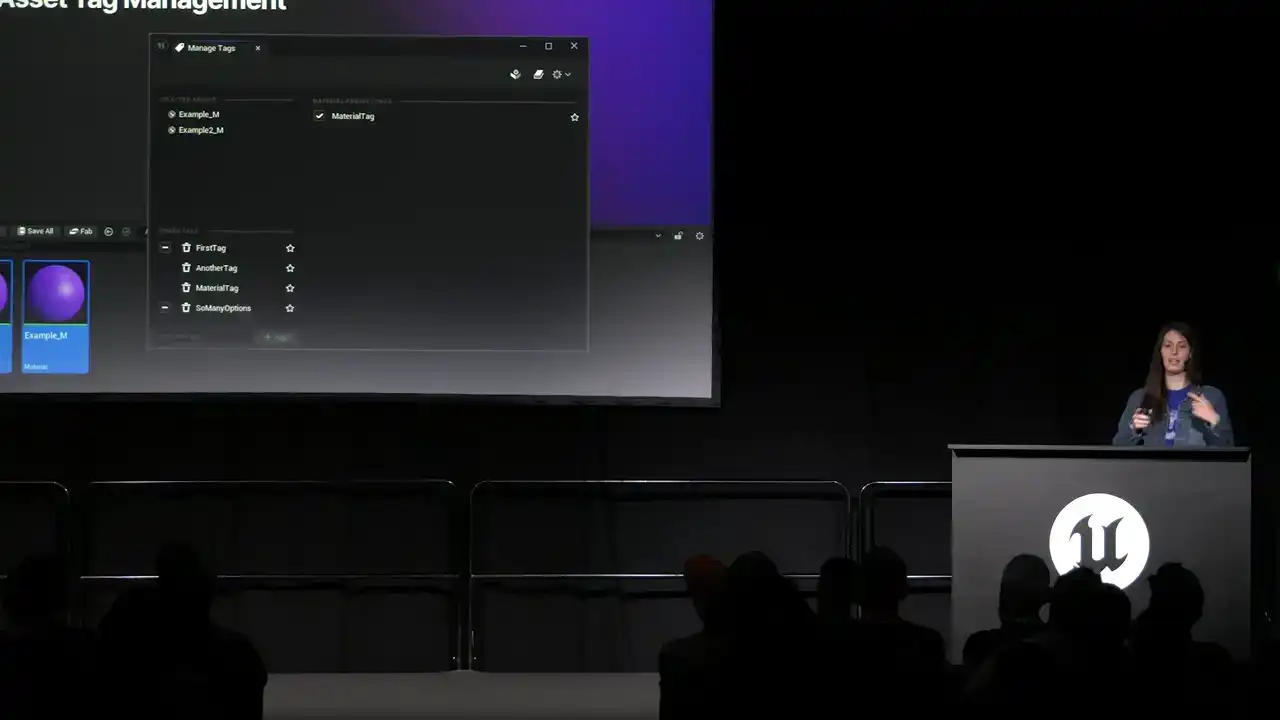
And so it's flagging the potential for this to be a permutation source that you need to care about. Next up, we have a new asset tag management system.
So this is available on all asset types, but it also affects materials. So I'm going to go over it here since it's shiny and new and exciting.
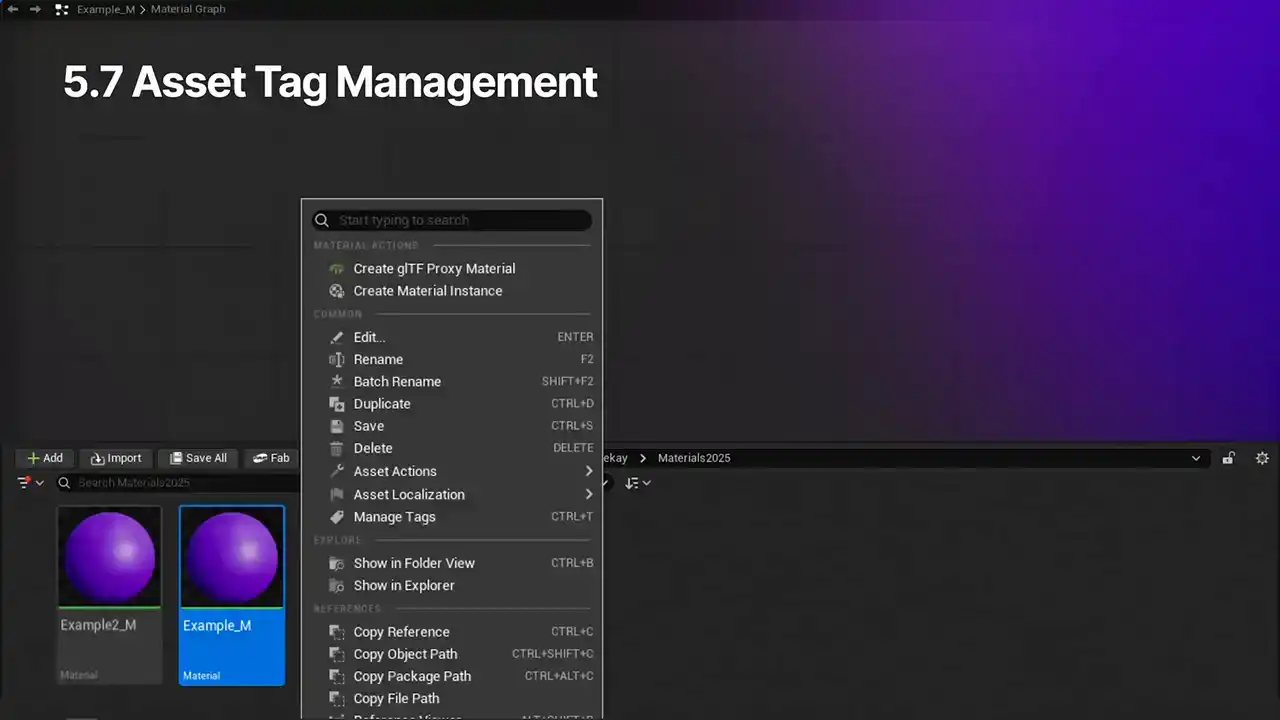
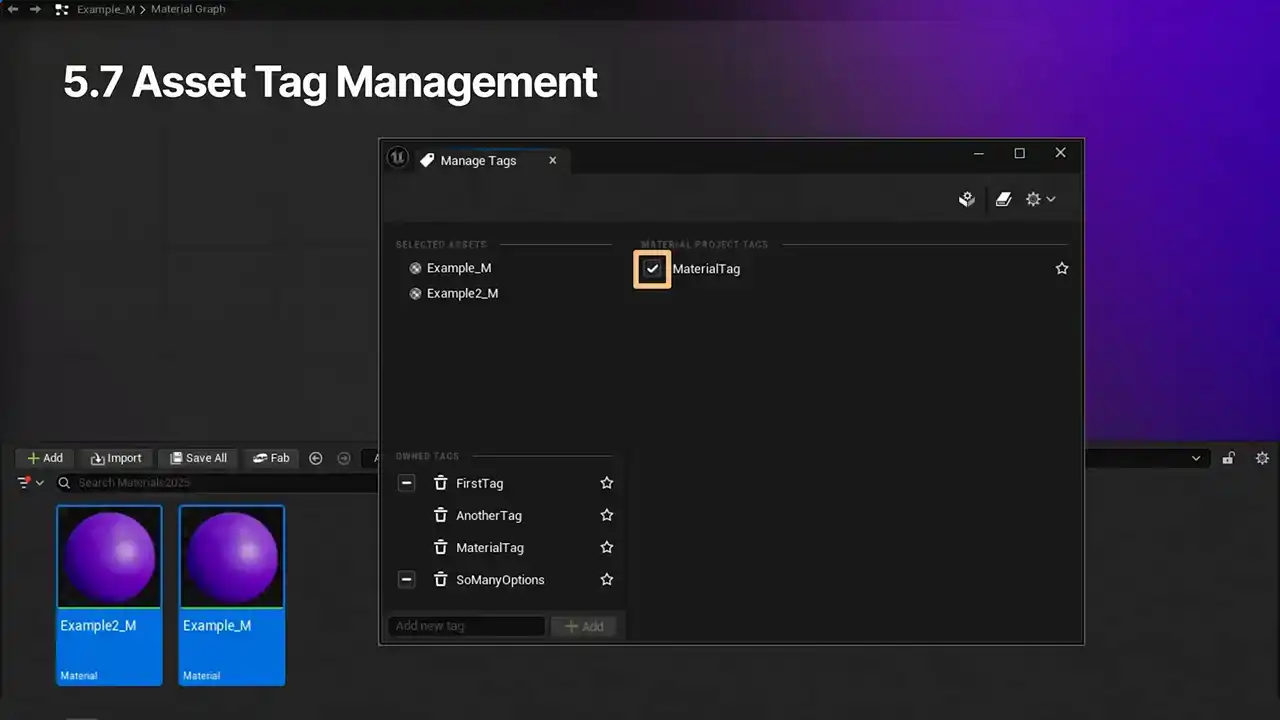
So to access this manager, go to your content browser, right-click, and select Manage Tags from the menu. That'll bring up the Manage Tags window. You can also use control T to open this up. In the first section at the top left, you can see which asset or assets are currently selected. And below that, we have the owned tag section, which includes all the tags associated with that specific asset. Within that section, there's an add tag option, type, hit the button, it gets applied. And on the right, we have the material project tags. So this refers to tags at the project level associated with the
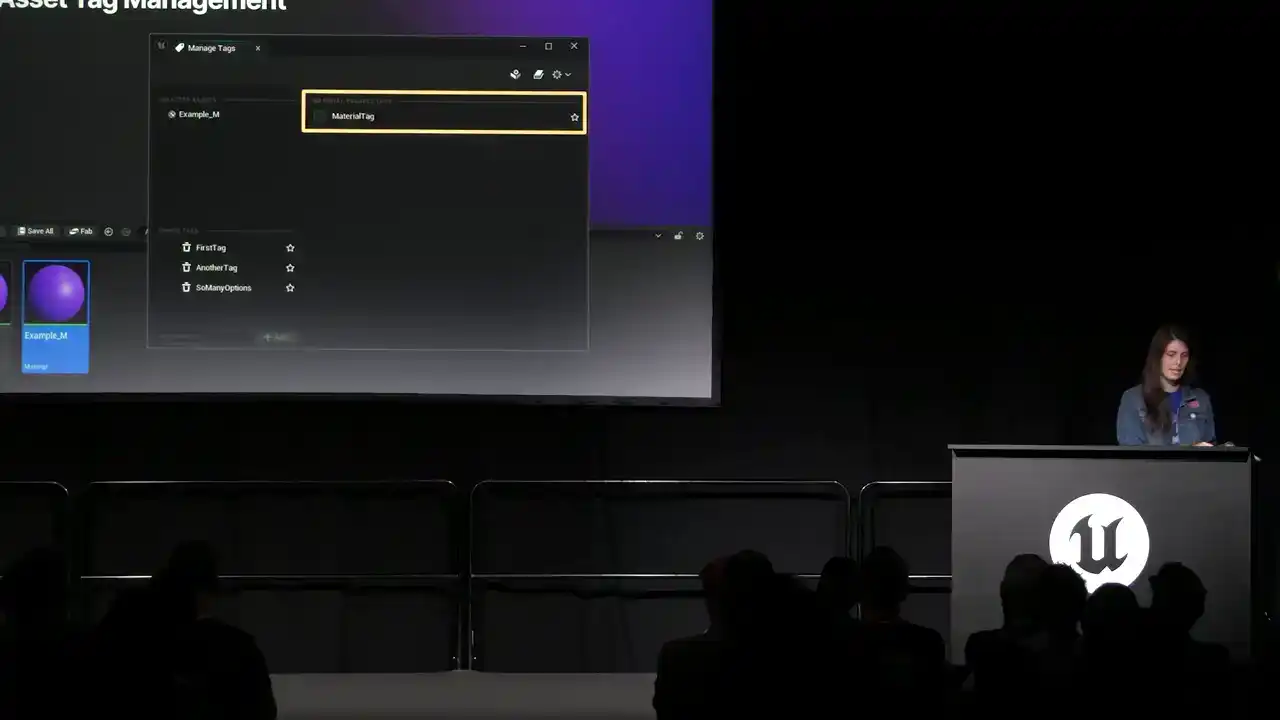
material asset type. So to add tags within this section,
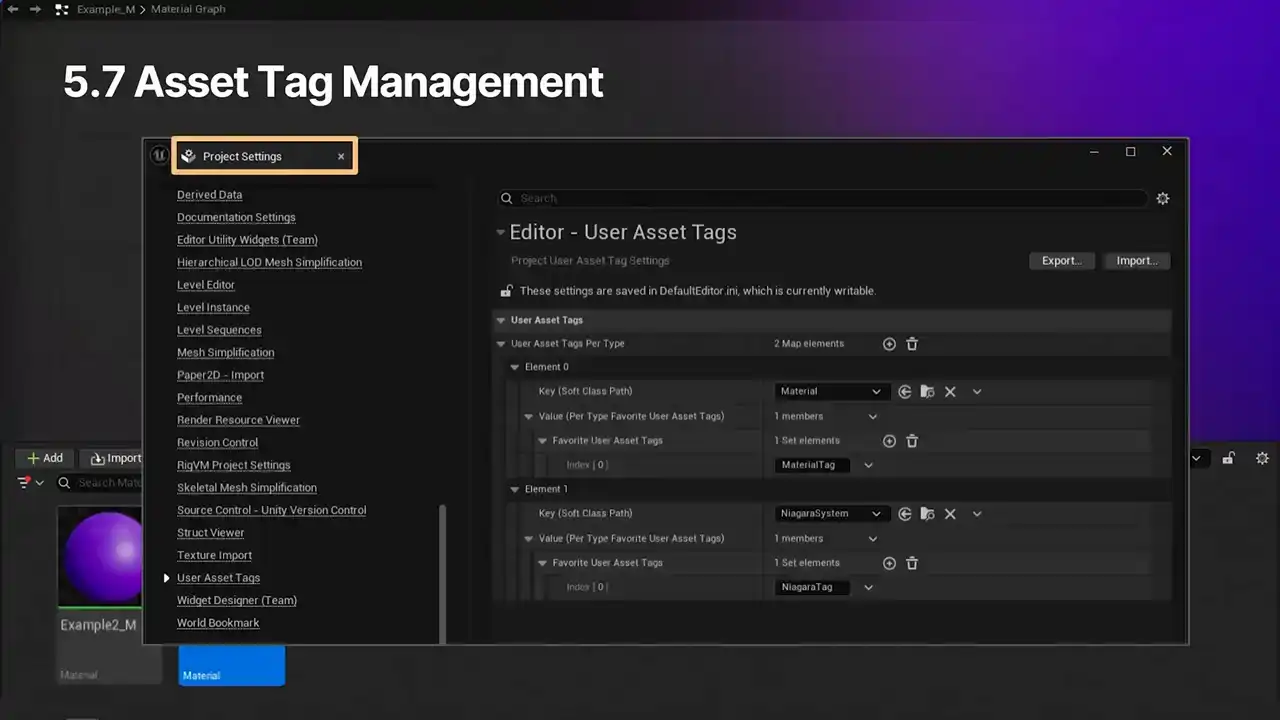
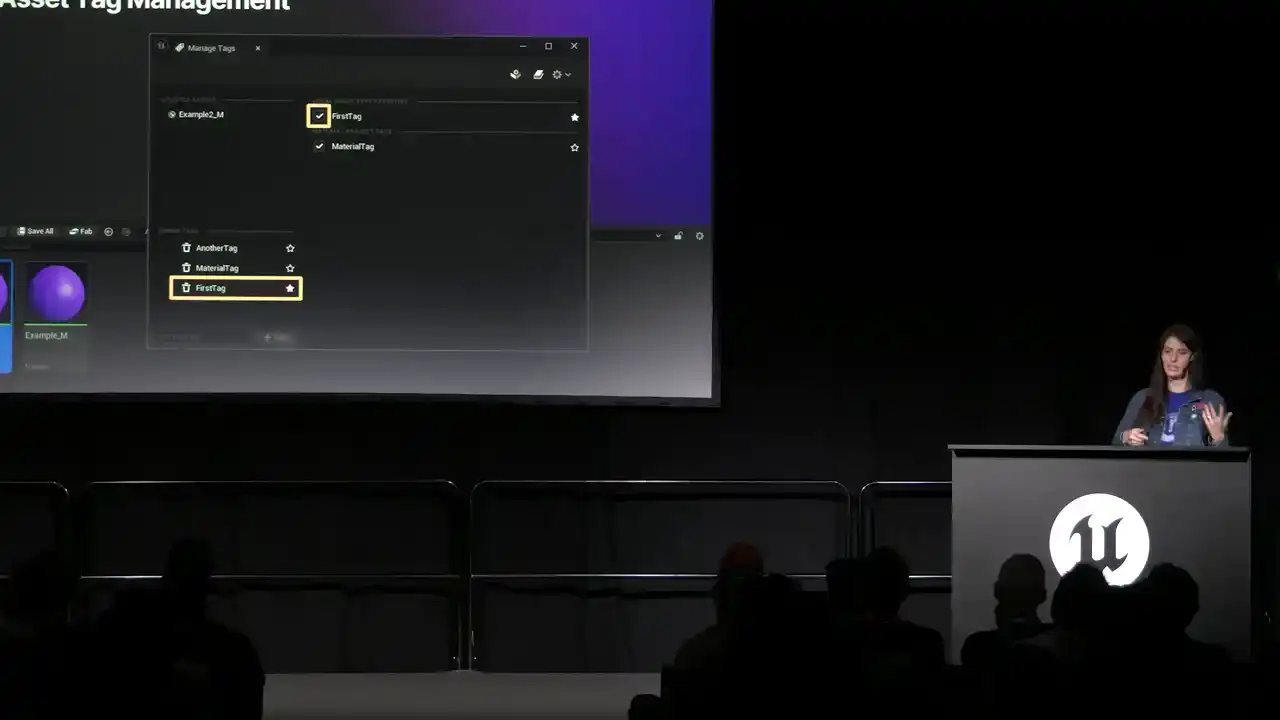
you go to the project settings window, go to the editor section, user asset tag settings, use the plus icon in the user asset tags per type section and add assets to the list In this case I selected the material asset type and the Niagara system asset type just for funsies And in the material section, I created a new asset tag called material tag. Very exciting names, I know. So back in our manage tag window, I can check the material tag box, which will then add it to the owned tags section, meaning it's now associated with that specific asset. In the content browser, I can also select more than one asset at a time. These are both materials, but you can select assets of different types as well if you'd like. The selected assets section will now reflect that. The owned tags section will reflect all of the tags associated with all of those selected assets. A dashed checkbox in any of these means the tag is only used in some but not all of the assets selected. In this case, material tag is used by example material but not by example two.
If I click on one of those dashes, that tag will be applied to all the selected assets.
To show this, the material project tag goes from a dash to a checkmark, and the relevant tag in the owned section has the dash removed to show that it's on all of them now. One other helpful feature with this is favorites. So if you click on an empty star icon, the icon will fill in and that tag will be added to the local asset type favorites section. So if nothing is favorited, this section won't be visible. It appears when you favorite something for the first time. As shown here, the one called first tag is included in this new list and it's the same dash checkbox indicating that it's not on all selected assets. If I go back to the content browser and select only the example 2 material, we can see the first tag that I favorited is still listed in that favorites section. This is because it is associated with the type of asset and it is local. If I had a Niagara asset selected instead, the tag, this section, wouldn't show up. If I have a favorite that isn't already applied, I can just check the box and that will easily stick it on to the asset that's selected. So it makes it super quick to add tags to other material
assets later in production.
These tags can technically be used for searches too. Might be helpful. So let's say you wanted to find all the assets with a tag that you made in project settings, like this material tag I made earlier. And so in the search bar, you could type uat.materialTag equals quote, quote. In our example here, the results would be the two example materials with this tag applied. Basically, the content browser asset registry always assumes that a tag is a key value pair, but the tags are just keys, so to speak. So the content browser will pick up on the key and provide autocomplete, but it's up to you to type in a value after it equals at least something. But they only have empty values, so it just needs equals, quote, quote. So this was originally developed for the tagged asset browser that appears when you create a new Niagara system or emitter. Tags are shown up in the corner here, which filter the assets accordingly. So you can use these to author asset registry tag-based system, use it during runtime to query and use assets and UI or other stuff. Basically wherever a gameplay system wants to treat assets based on some innate property of the asset, you can just use these user asset tags to manage these properties.
All right, so we have an update to material parameter collections in 5.7.
As of this version, you can now override material parameter collections inside material instances. So let's talk about it. For this example, I've made a material parameter collection called base, and within the asset I've defined one parameter, base scaler, set to 0.1. I dragged and dropped this asset into my graph, hooked it up to my roughness pin, and in the details panel, set the MPC to use this specific parameter. I get a shiny sphere, yay. Next, I'll create another material parameter collection asset called derived MPC. Might see where this is going. In the asset, we have the usual material parameters section, settings that you're used to, and right below that, there's an option called base. I've assigned the base MPC that was added to that parent material earlier. And in this section, I changed the base scalar parameter in there from 0.1 to 1. So next up, I create a material instance based on that parent material. And as shown here, there's a new section called parameter collection overrides. And I can mark this for editing, then assign the derived MPC from the dropdown. So the result, the sphere went from a shiny roughness of 0.1 to a matte roughness of 1, demonstrating that the value has successfully overridden what was in the base MPC. So this is something that will allow
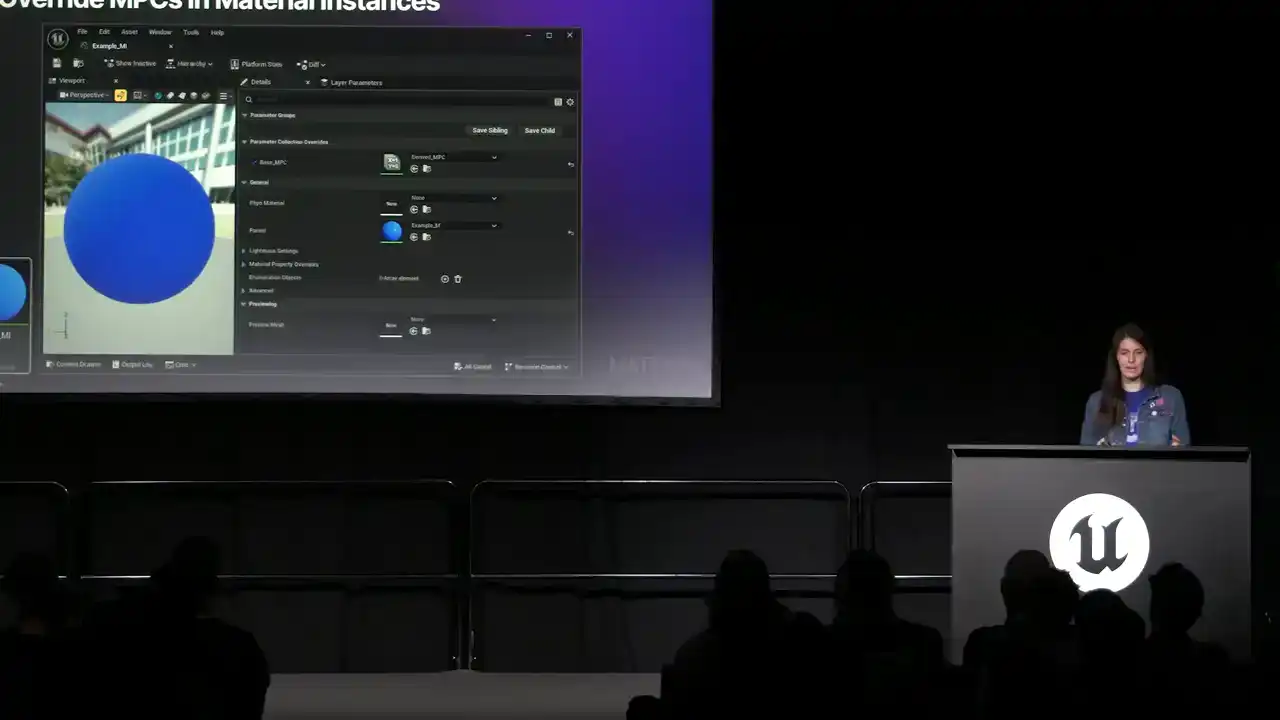
for even more flexible, dynamic, controllable visuals, and I'm really excited to see what stuff you'll make and manage with this new feature.
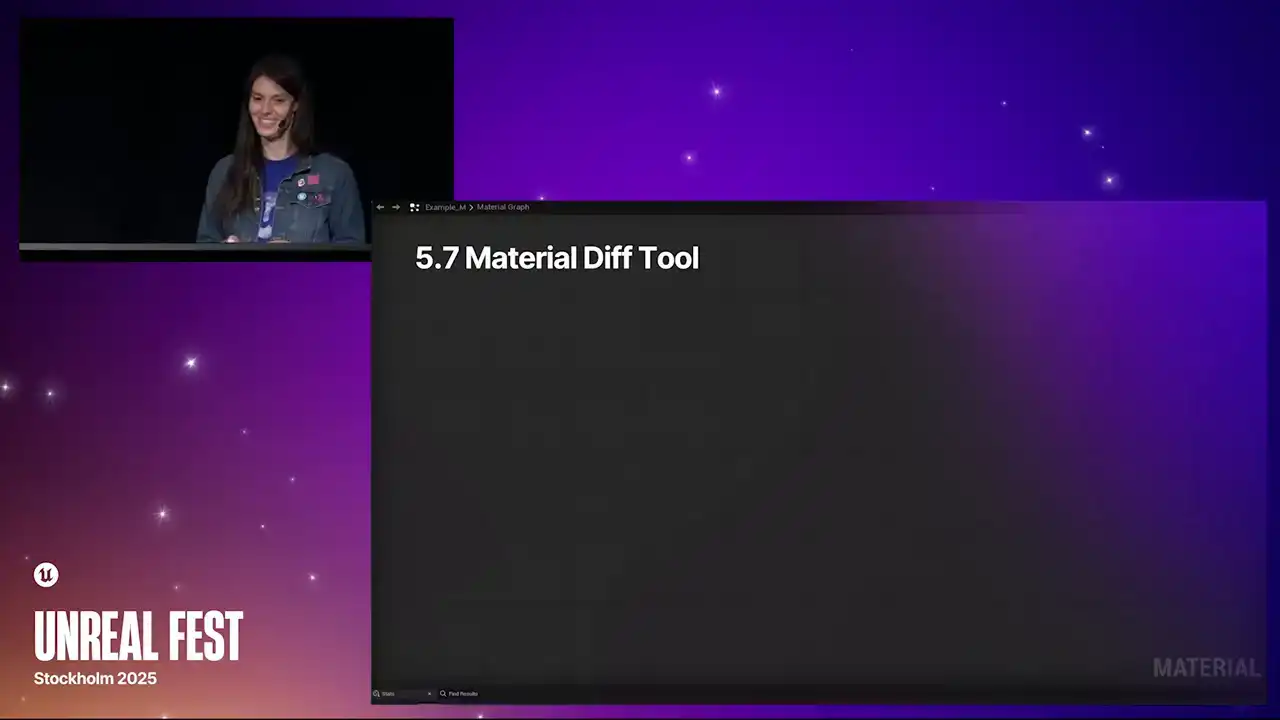
As of 5 Unreal Engine also has a new tool It a material diff tool So to access this feature go to a Material that you want right-click on the asset, and hover over Diff Against, then select whichever asset that you want to compare it to. And this will open up the Material Diff window. Let's take a look at what's here. In the top left corner, we have a list of changes and arrow buttons to step through them. Changes are written out and color-coded. So red is for removals, green for additions, cyan for moved links, and gray is for moved nodes. These colors are reflected in the graph view as well.
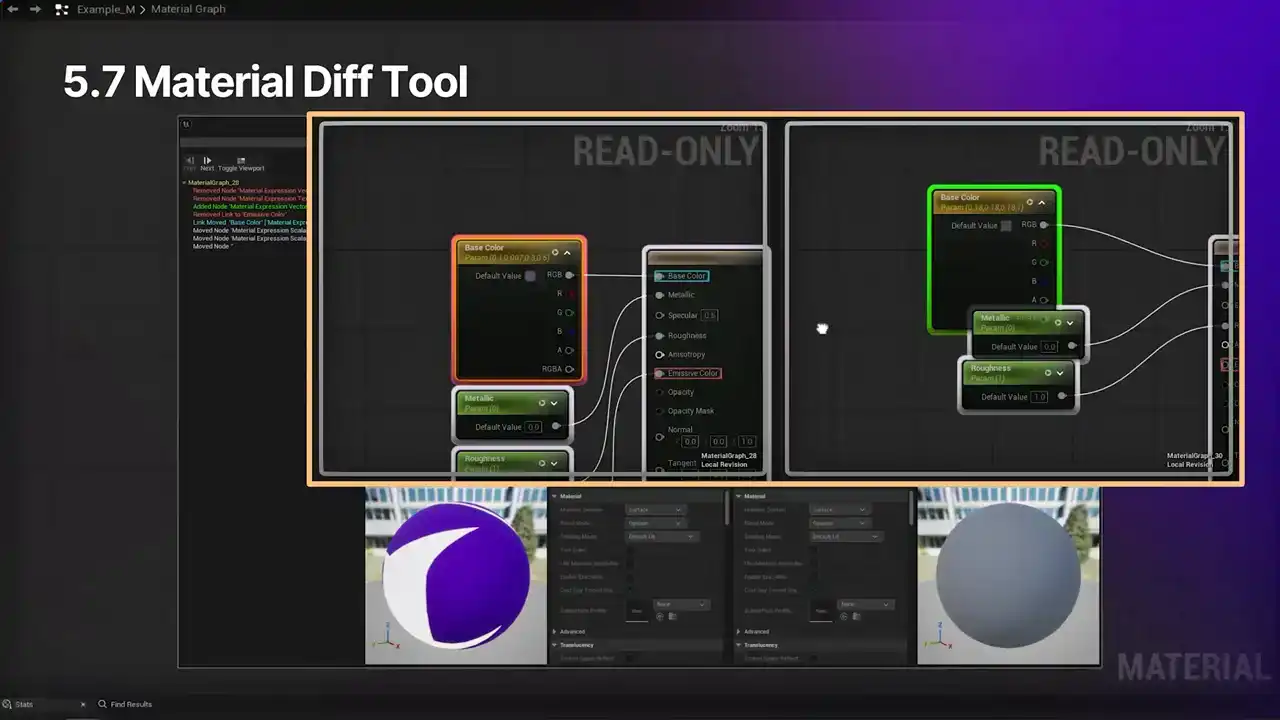
So just like with regular material graphs, you can drag and zoom within the views. And by default, the graphs are set to locked. So this means that if you move one, the other will move with it,
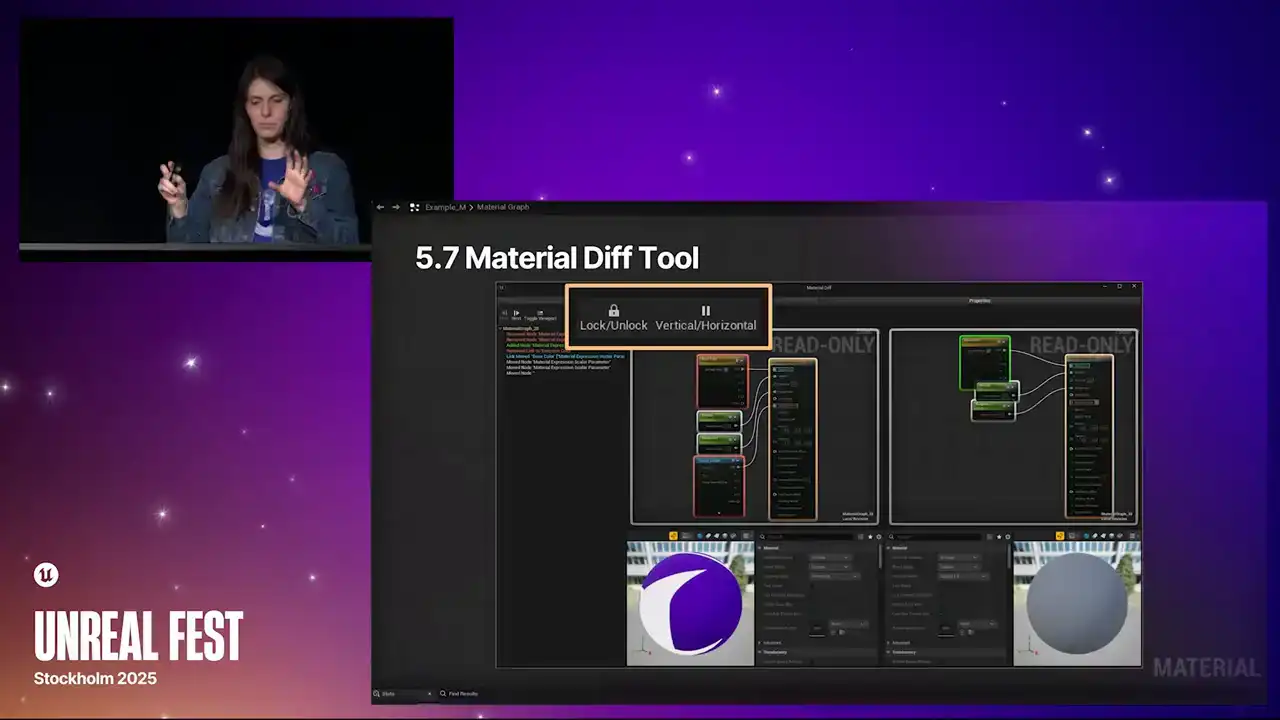
so the view is matched. You can compare things a little more easily. You can also unlock this if you wish.
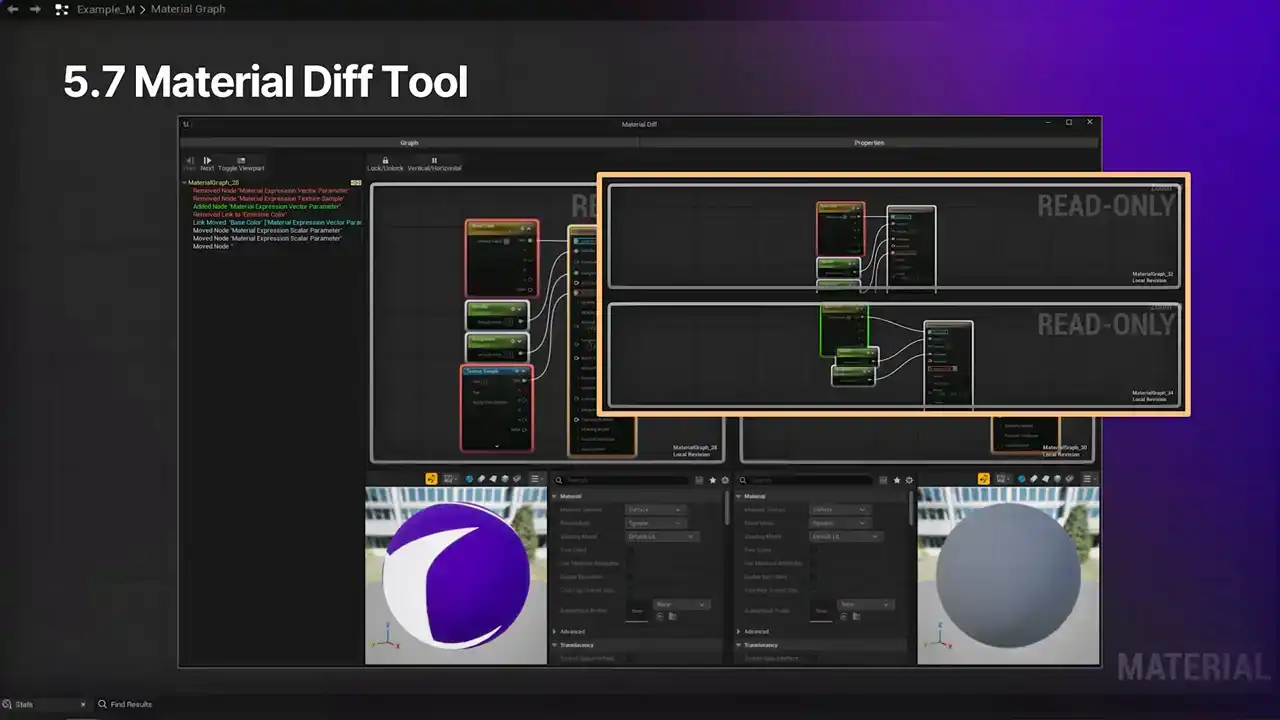
We also have the option to view this as a horizontal layout rather than a vertical layout. And in the lower portion of the window, there's a comparison of the material settings along with material viewports for visual previews. So this should help parse material changes much more efficiently.

OK. We're going to round out our coverage today by talking about one of the big changes, substrate.
So substrate will be the new default for all materials in 5.7.
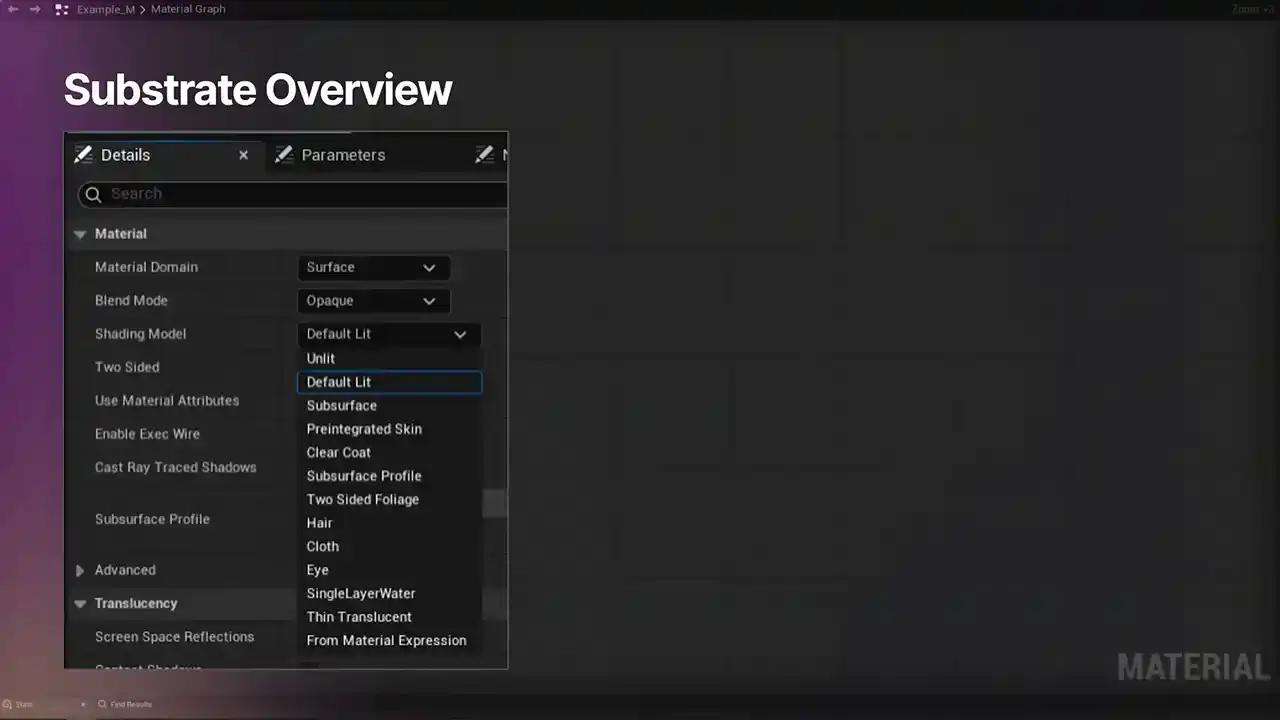
The legacy material system provided a fixed suite of shading models and blend modes, such as default lit and clear coat and all those. With substrate, that will no longer be the case. Materials and substrate are conceptualized as slabs of matter. These slabs are principled BSDF, so bi-directional scattering distribution function representation, parameterized by physical quantities
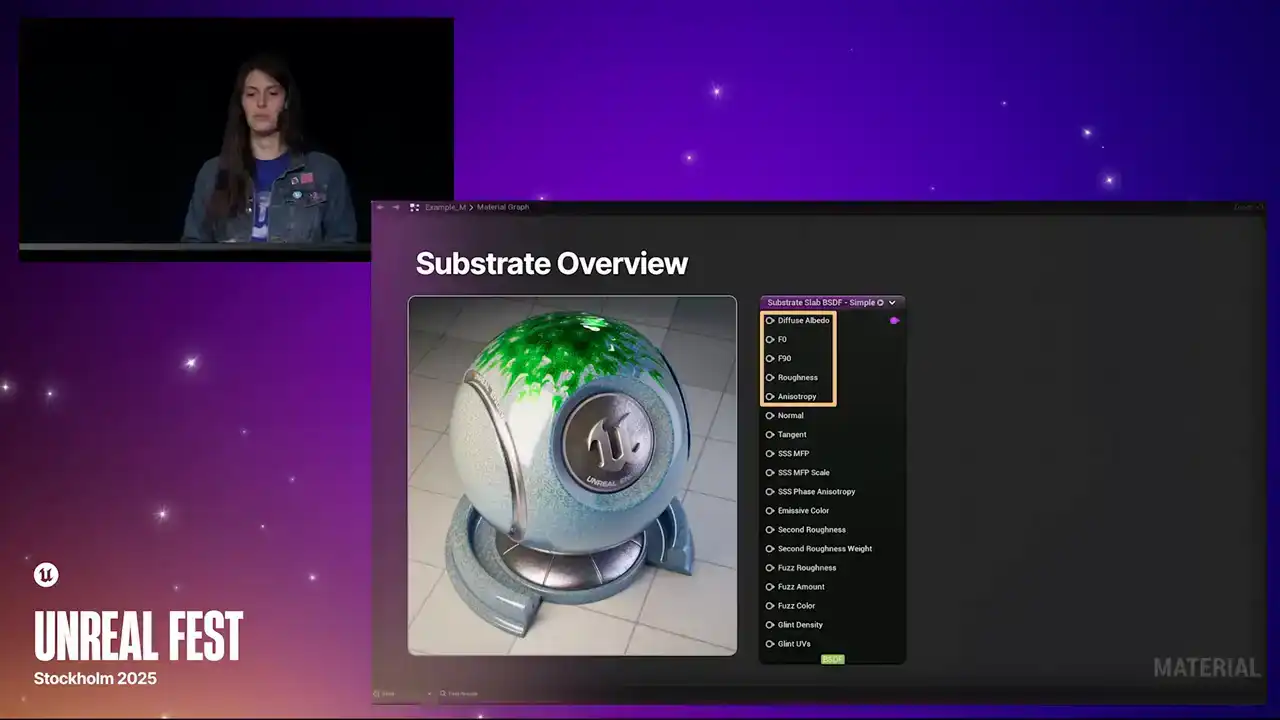
with well-defined units, replacing some of the abstractions of the legacy material system. So this makes it possible to more accurately
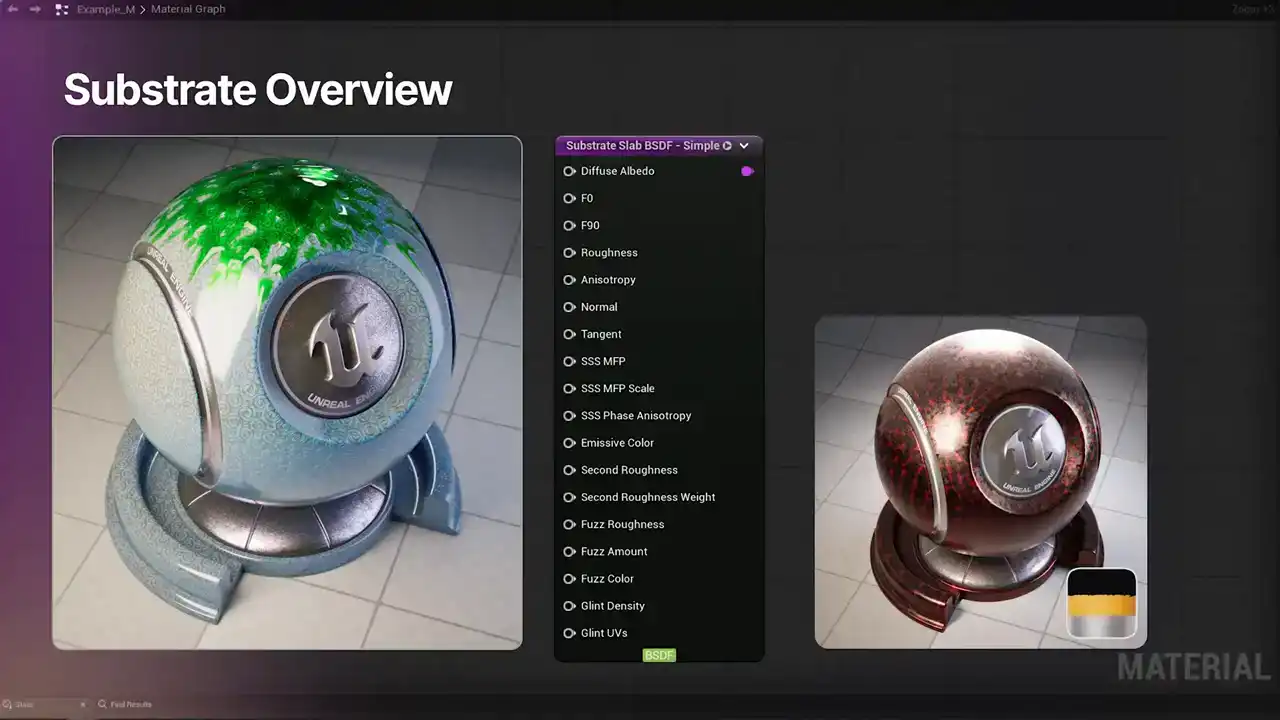
blend between discrete surface types, like metal, glass, and plastic. Substrate also streamlines the process of layering materials, making it easier to represent surfaces
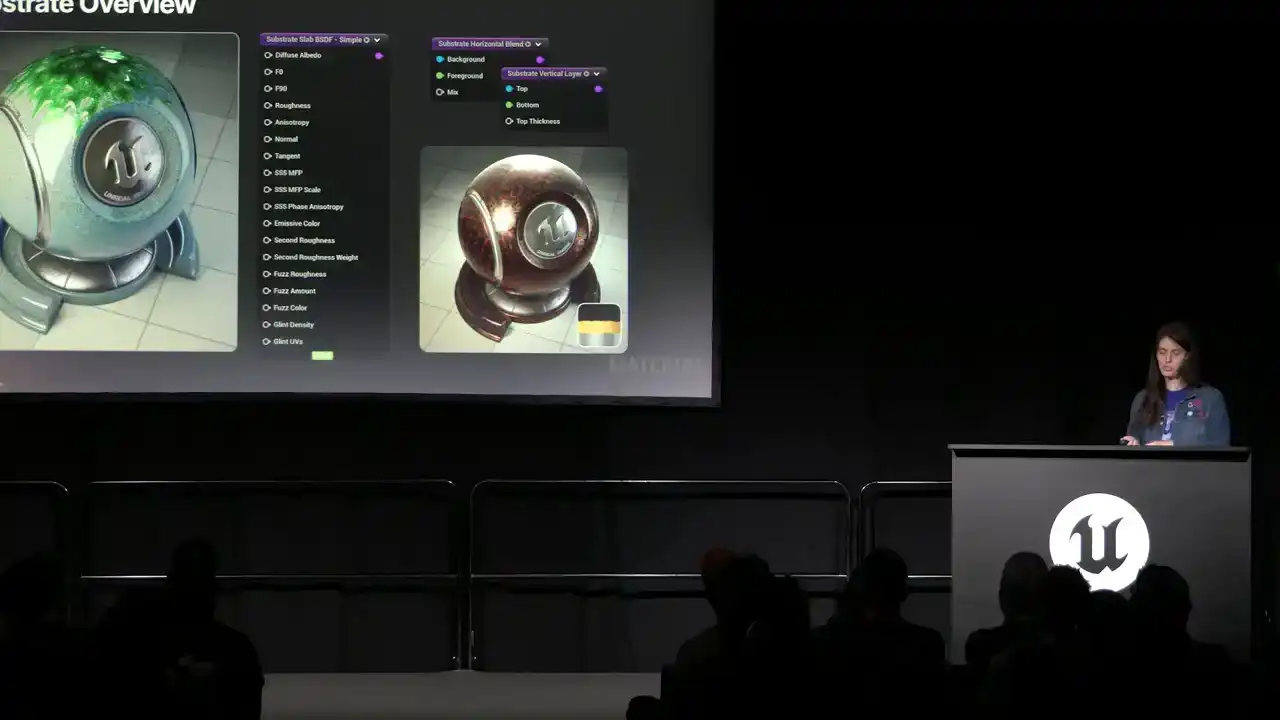
like liquid on metal or clear coat over subsurface.
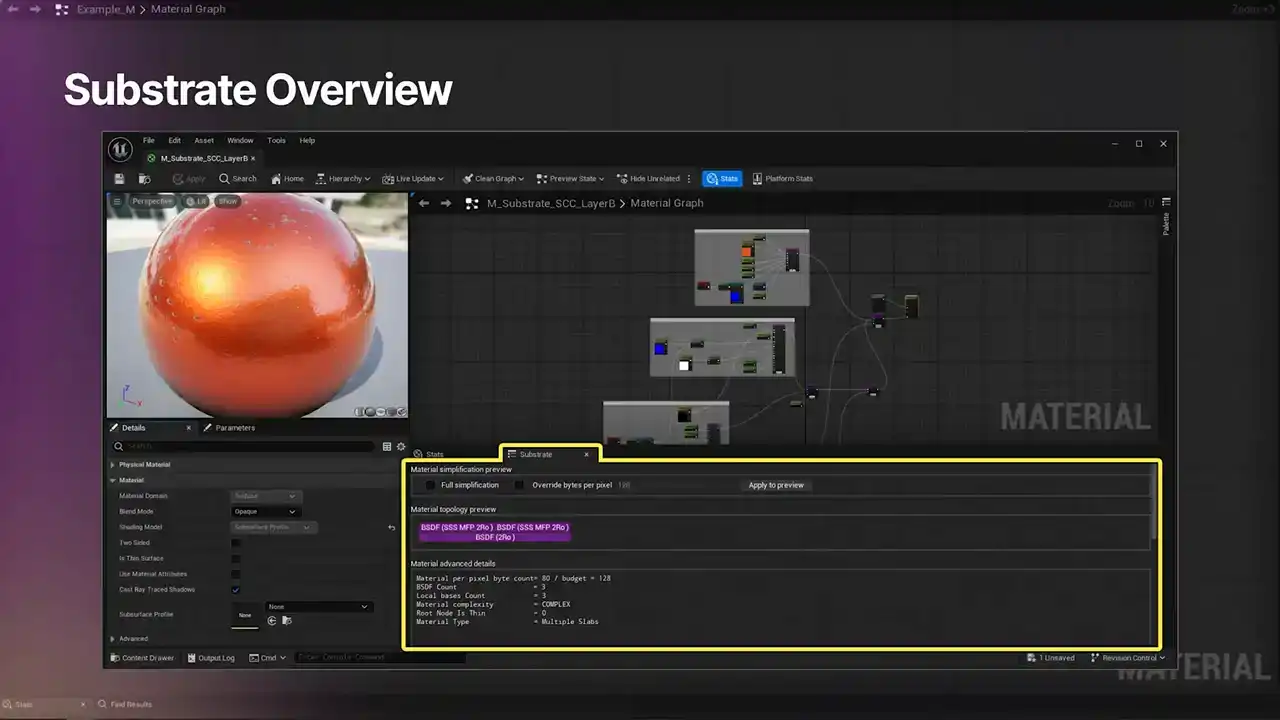
In short, substrate is a fundamental change to the technical structure of materials and provides more visually accurate rendering results. Because of their principal representation, substrate materials can be simplified according to the capacity of a platform in order to trade visual quality for performance. Related to this, in project settings, you'll be able to set the substrate gbuffer format to either adaptive gbuffer or blendable gbuffer.

Substrate's adaptive gbuffer is the fully featured substrate option. So it enables complex lighting behavior per pixel and is the heavier option because of it. It supports D-buffer decals, and it's compatible with Shader Model 6 platforms. If you set the project to adaptive,
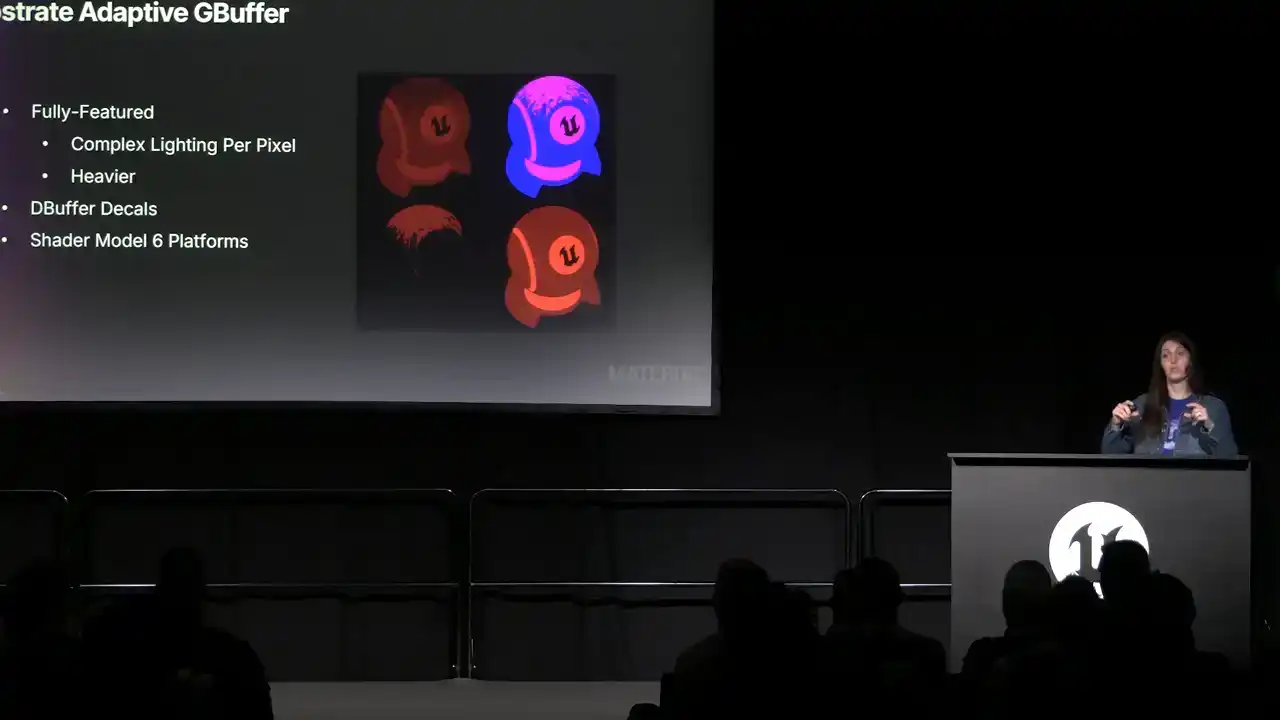
then all platforms that support this G-buffer, based on any file settings and such, will be adaptive, whereas the rest will use the blendable G-buffer
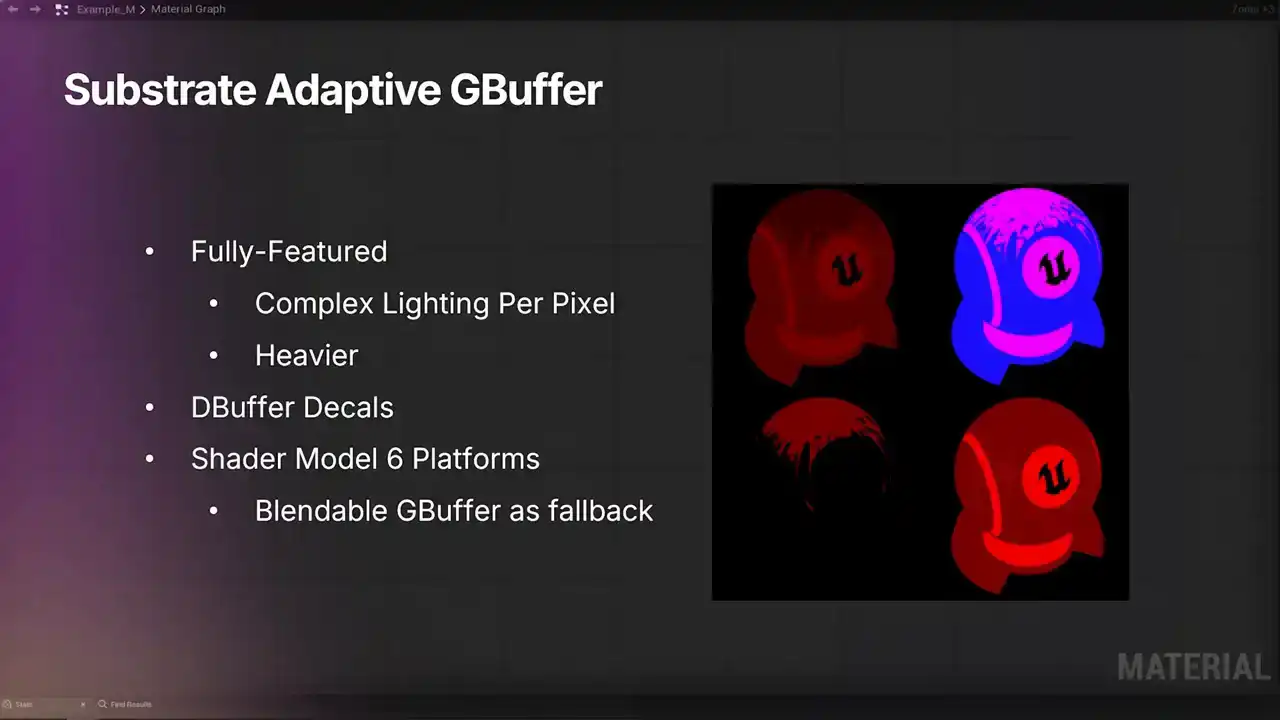
as the fallback. Substrate's blendable G-buffer is the more limited option. The trade-off here is that it has less lighting complexity, but because of it, it is the faster option.
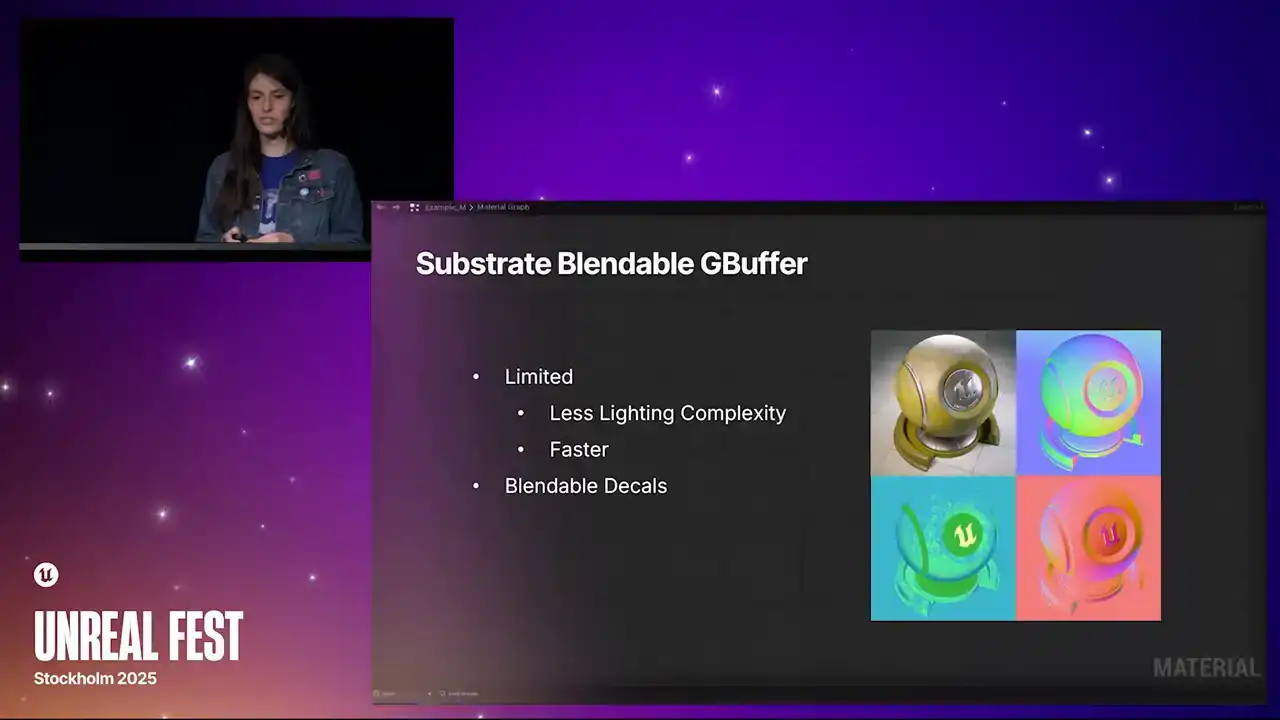
It retains the legacy gbuffer characteristics and handles substrate data through packed render targets, automatically simplifying it into a single slab. It also supports blendable decals. And if you set your project to blendable, that becomes the ceiling. And all projects will be blendable,
even if they're SM6 and could have supported adaptive gbuffer instead. So keep that in mind.
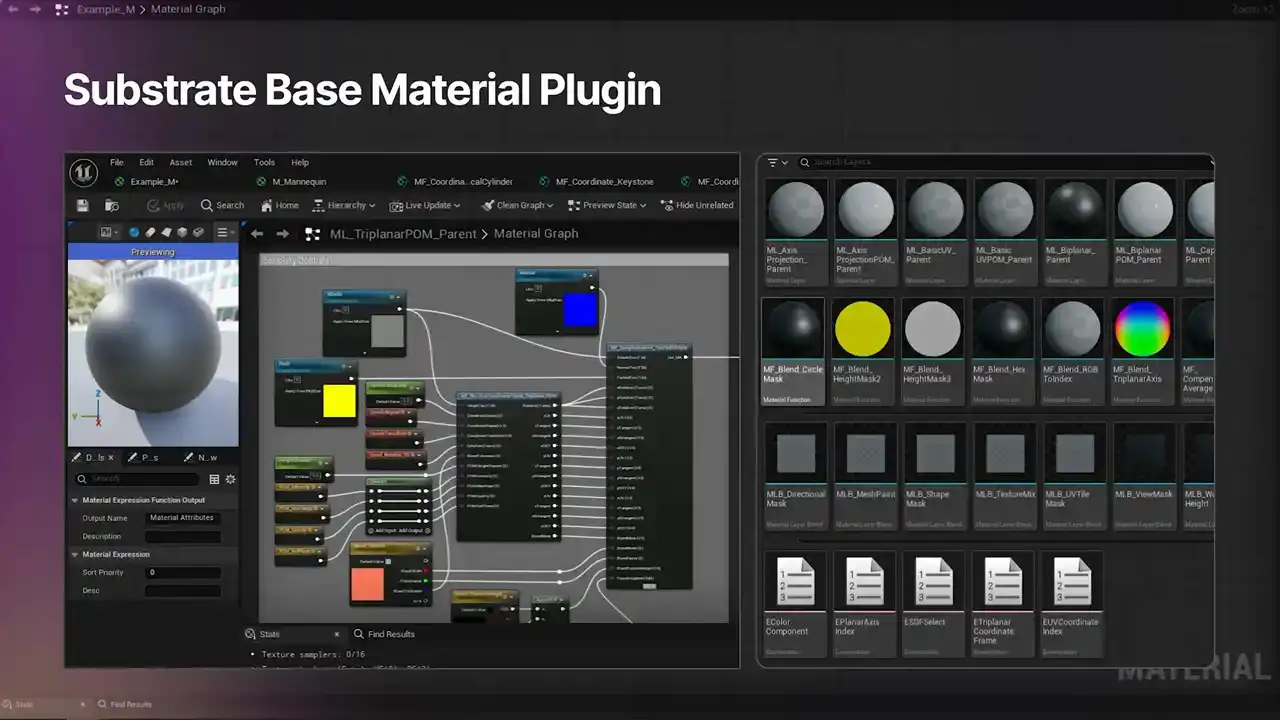
So to accompany the switch to Substrate, we'll be providing a new Substrate-Based Material plugin. It's a big collection of Material functions that can be used as starting points for explorations in Substrate.

And that's a wrap for what's new in 5.7.
So let's talk about what's next for Materials in Unreal.
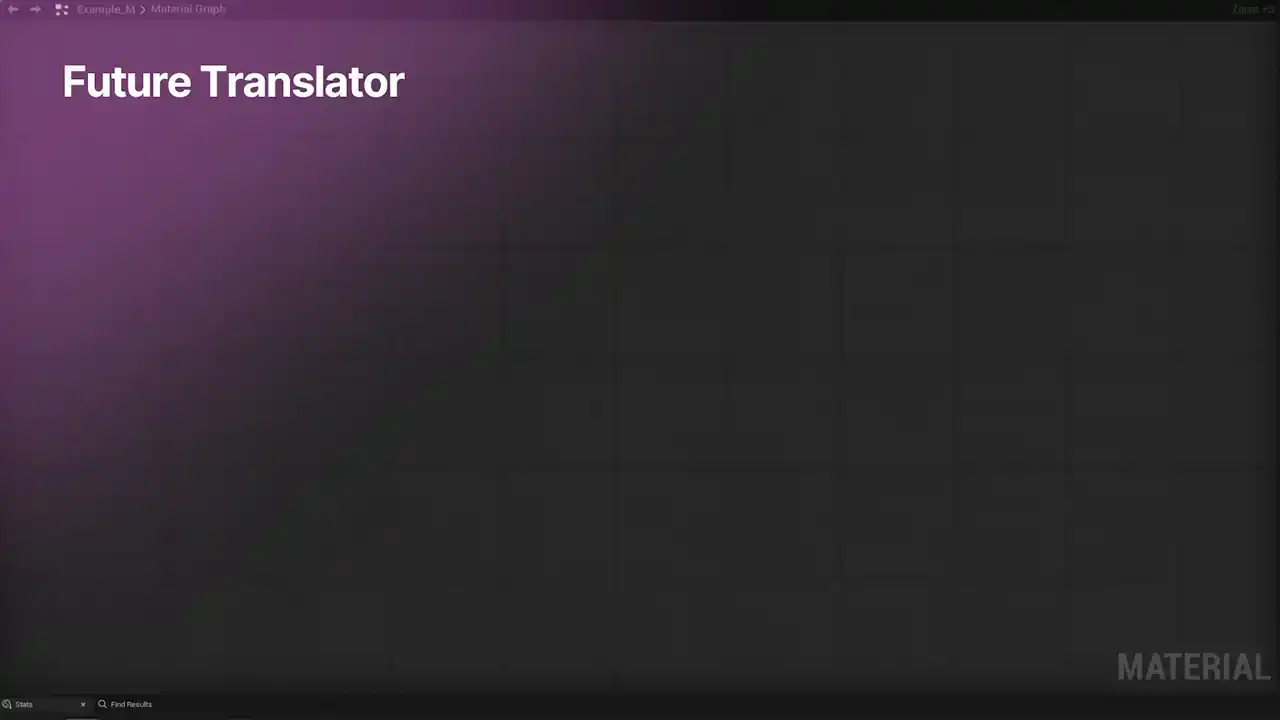
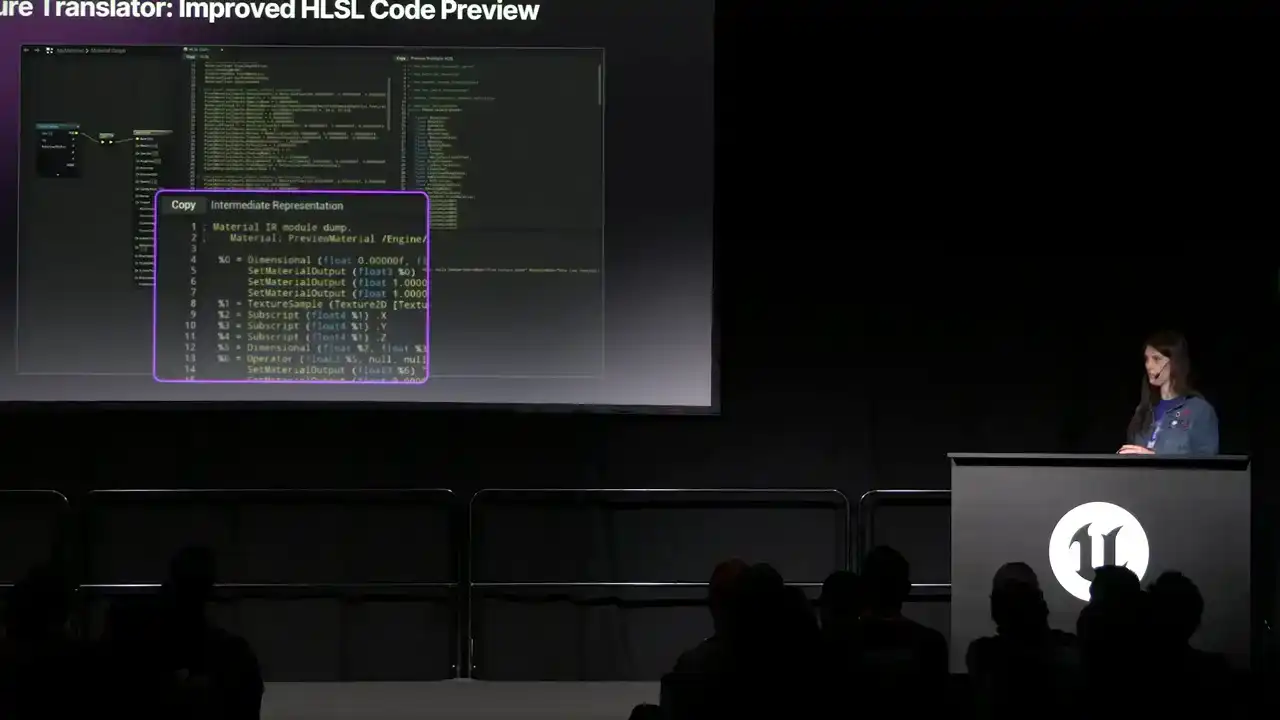
So I'm excited to share that we are working on a new translator with an experimental release targeted for sometime next year. It'll be adding a new intermediate representation, or IR, which will result in better HLSL output and include some powerful new nodes and graph features, such as a new if-then-else node, an operator node, struct support, and type-colored pins and wires, shown here. This list is not complete, just a preview of some of what we started working towards. And I'll talk a little bit about these, and then we'll move towards wrapping up. So as far as HLSL improvements go, here's what's in the works. The future translator will have three panels for working with HLSL, shown here. It'll show you the previous translator's HLSL, the new translator's HLSL, and the intermediate representation. You'll also be able to display just the relevant code generated from the material graph instead of all 4,000 lines of the material.usf. If you do want to look at the full source, though, You can get that from selecting one of the platforms
or shader models. And let's take a look at two of the nodes I mentioned.
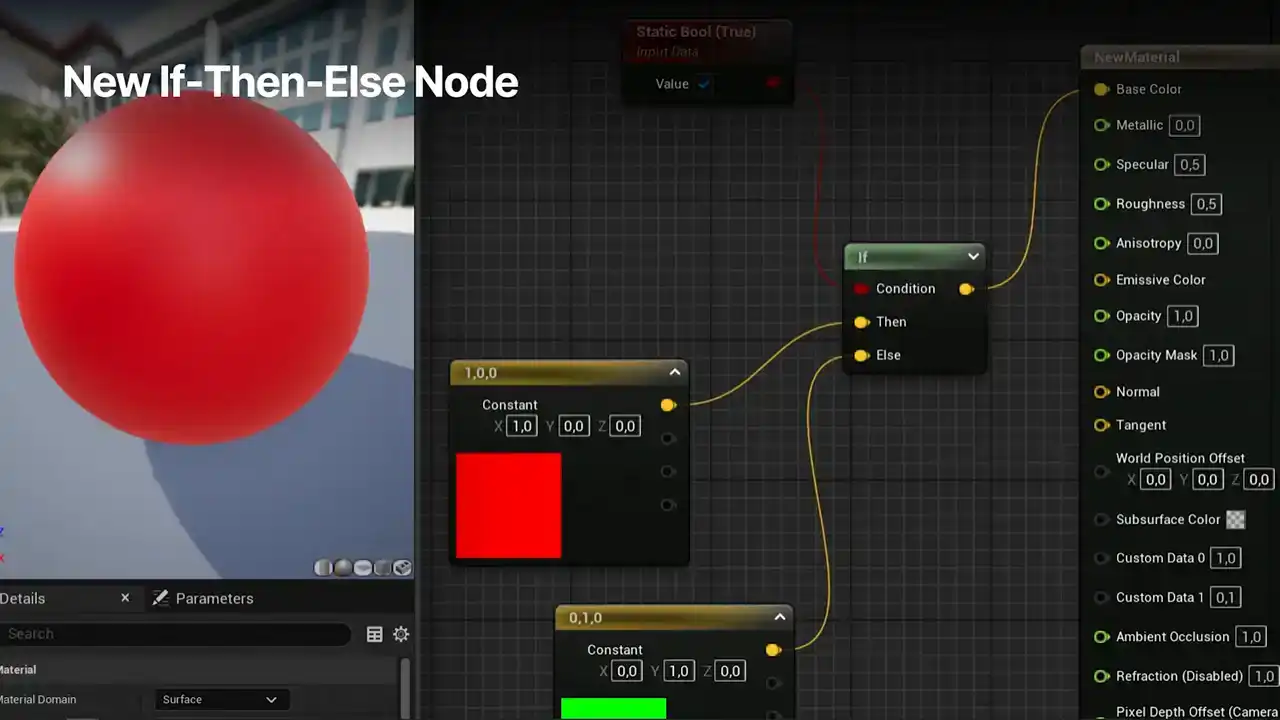
First up, we have the new if-then-else node.
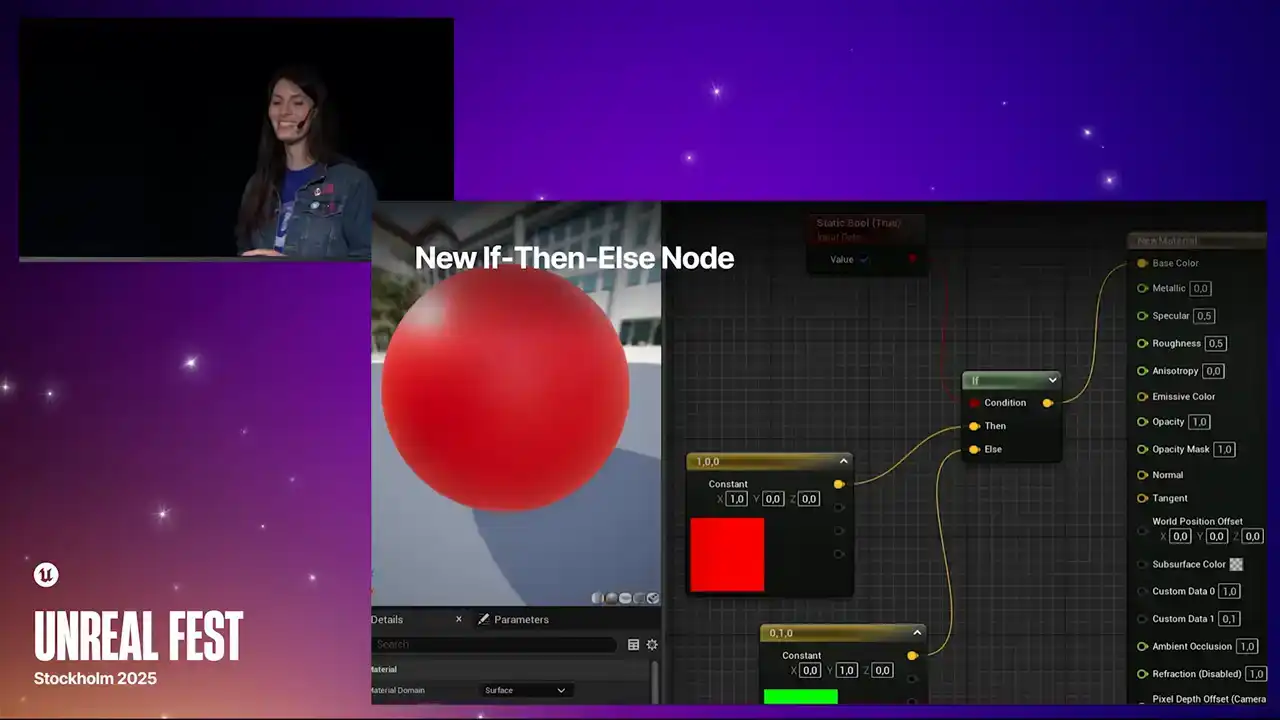
It feature proper branching meaning that the unused option won be evaluated The current if does not branch Both sides are evaluated even if only one is ultimately used So this is definitely a plus up The condition pin in this example is stepped by a static bool up there. But there will also be an option to compare two values in another node and then use that result in the if node's condition pin. And then lastly, the future translator will support a new operator node, shown here just as add, making it even easier to switch between math operation types
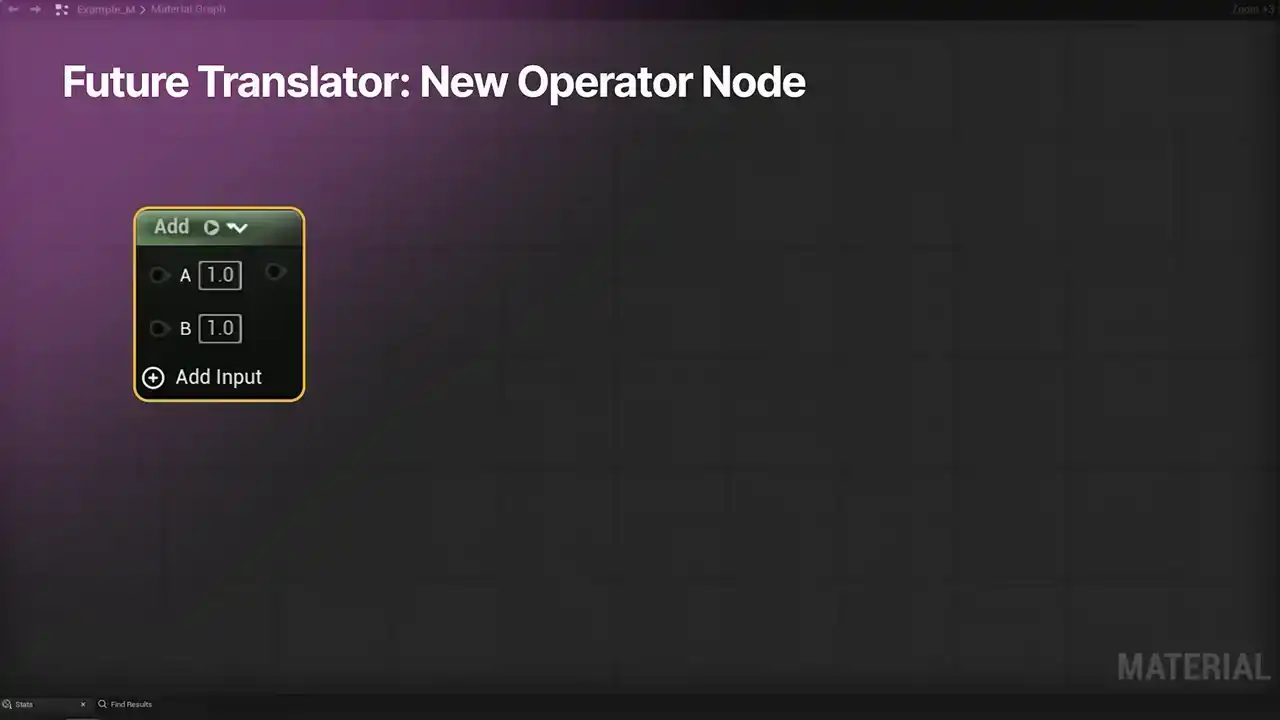
in place. So to use it, just click on the little arrow icon next to the node's title bar and select the desired operation from the list. The asset type will change in place, like I mentioned. And we have a lot of options that are in the works, including the ones pictured here, like frack, sign, not equals, bitwise, and more. and by clicking on the little plus icon, you'll be able to easily add extra input pins to the node as well.
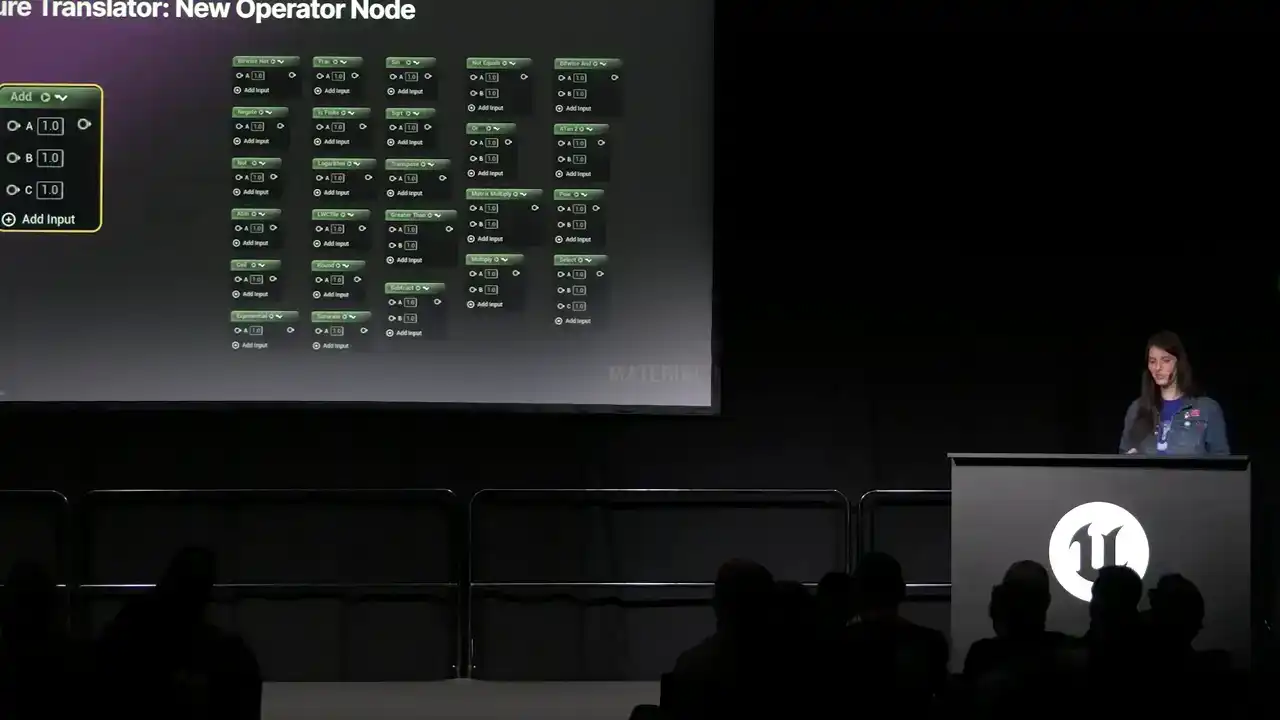
You'll still be able to search for the individual operations in the main click graph menu, so we're not losing that.
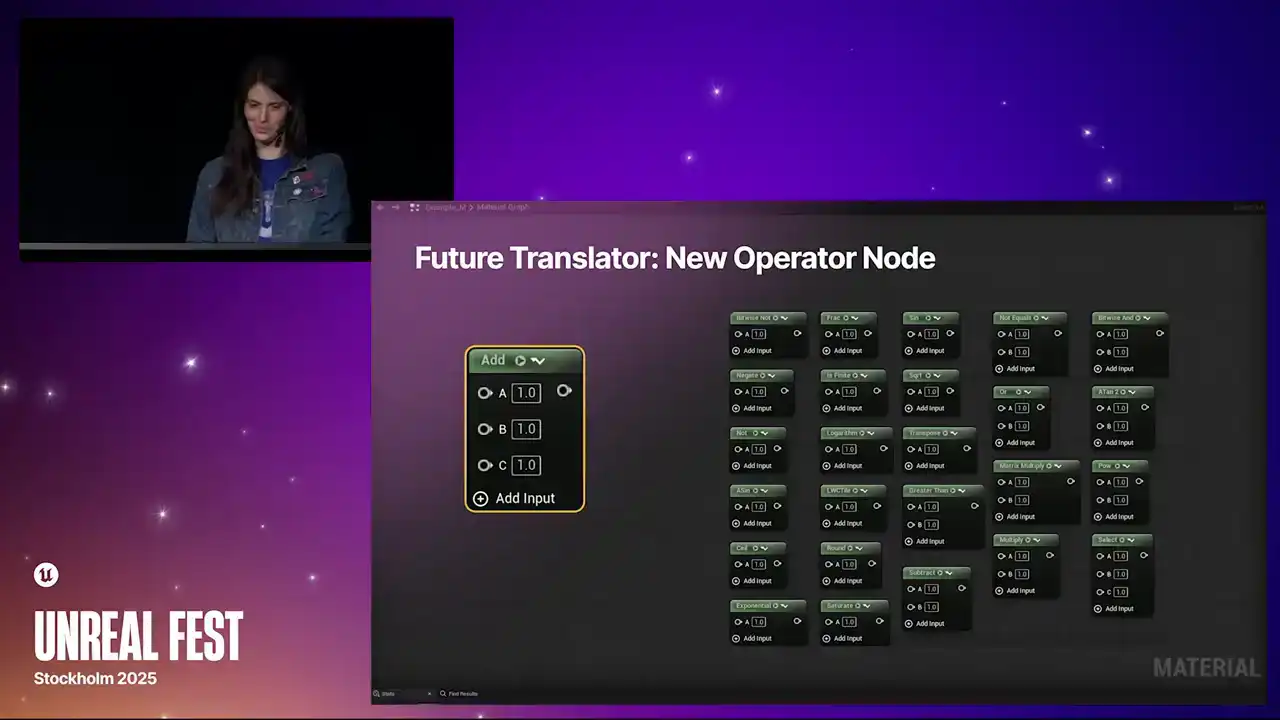
You don't have an extra step to go through. But this should really help iteration time, especially for tech artists that like to just tinker with mathy things to see what it does for cool visual effects.

It should be a lot of fun to play with, and also just really convenient to iterate and make changes to.
And that's the end of the sneak peek for the future. Before we close out the session, two more sections. So I'd like to take a moment to recognize the materials dev

team at Epic that made these features possible this year. We've got Jason, Nathaniel, Tian Tian, both Dan's, Forest, Mateo, Robert, Nick, and Jayden, along with our QA teammates, Bree and Alan. So.

And since you've attended this session about materials,

I want to highlight some other talks here at FEST that might be of interest to you since we're right at the beginning of the show, like I said. These are all included at the link
at the end of my presentation as well. So you can find these in the agenda in addition to that, too. So first up, we've got Managing Unbounded Growth,
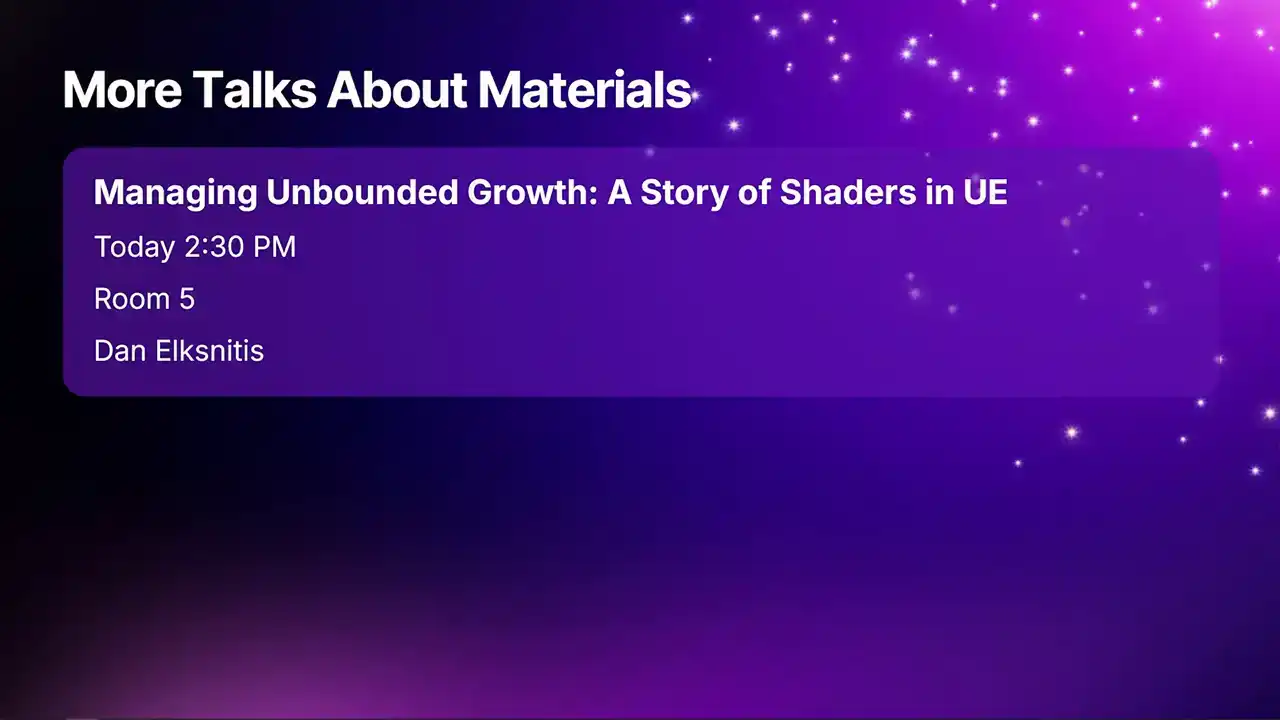
A Story of Shaders in UE, today at 2.30 p.m. in room 5. It'll be presented by Dan Elksneres, a senior rendering programmer here at Epic Games.

And then we've got Everything You Wanted to Know About Substrate, because I just touched on a teeny bit of it, taking place tomorrow at 4 p.m. in room 8. It'll be presented by Nathaniel Morgan, a principal technical artist at Epic Games as well.

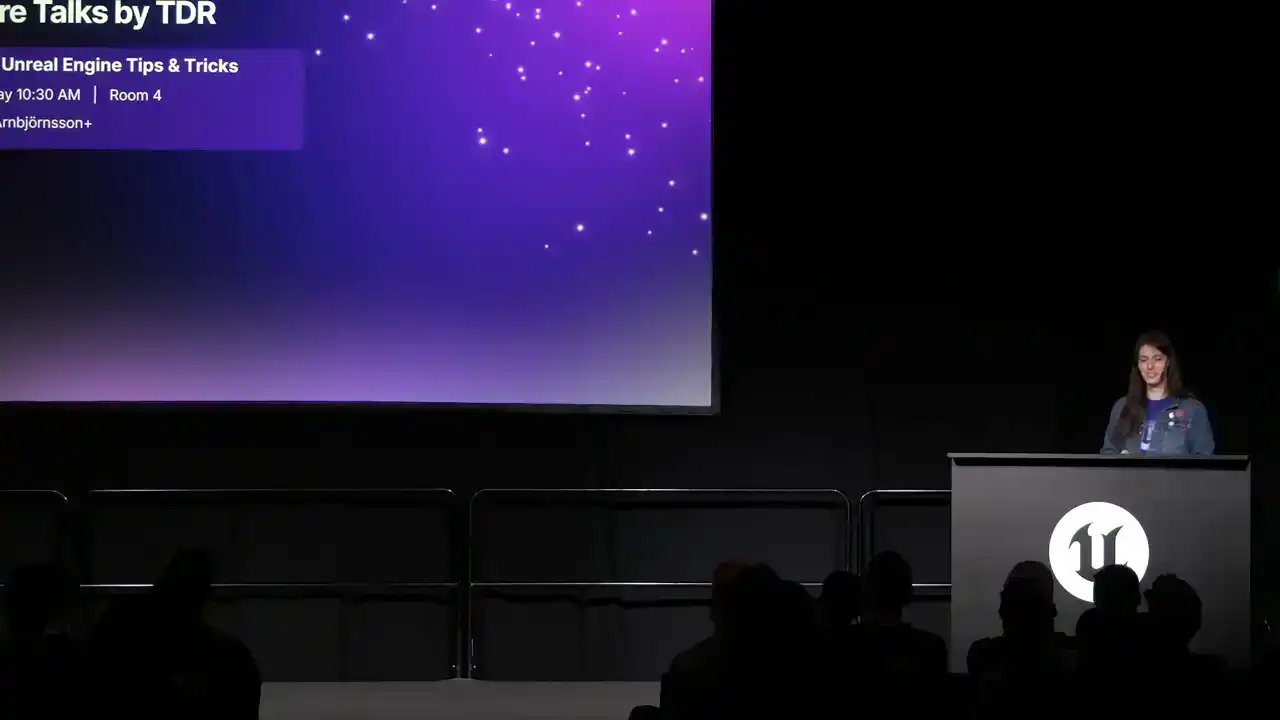
And then if you'd like to hear more talks by folks on my team, the technical developer relations team. We have four other, or six others, more were added, for you to check out. So first off, 101 Unreal Engine tips and tricks. This one has started already, but it goes on for like another hour and a half, and knowing those guys, there's a lot to talk about. They'll be there for a while. So Catch It in Room 4, presented by a group
including Ari Ambjørnsson. Then we have An Introduction to Horde, today at 4 p.m. in Room 1 by Jack Condon.

PCG, an introduction, use cases, and production best practices, today at 2.30 with Matt Ozdele. Profiling with Purpose, a performance analysis of a real Unreal project, tomorrow at 11.45 in room 5 with Adi and Matt. Creating debug tools with Slate IM, tomorrow at 2.30 in room 4, presented by Cody. And a tech artist's guide to automated performance testing tomorrow in room one with Matt once again.

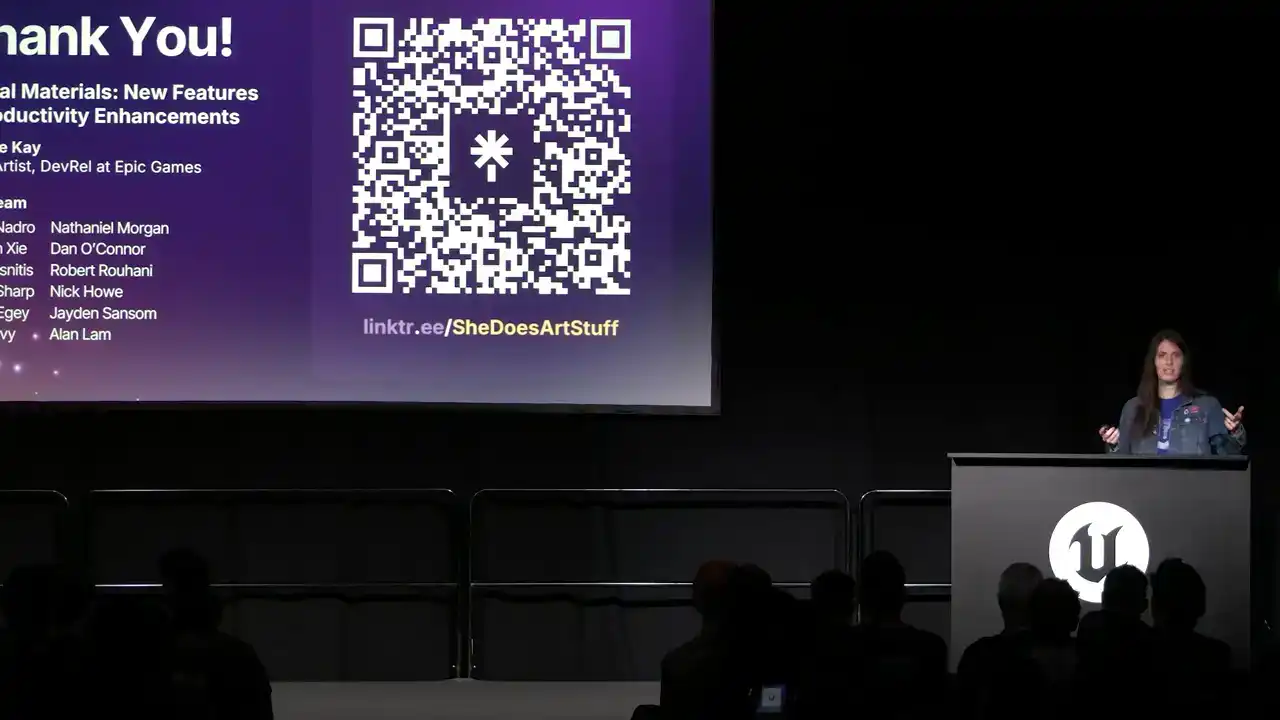
And there we go. Thank you so much for joining me today. Here's that QR code that I mentioned.

In case you're unable to see it or your phone isn't picking it up, it goes to linktree slash she does art stuff.
This page has all sorts of resources sorted by category. Relevant to this talk, it has a link to an EDC article about the 5.6 improvements.

And it's also where I'll share the 5.7 resources closer to the full release date later this year. It also has additional content that the DevRel team, my team, has published, helpful bits of documentation, more resources on the Epic Developer community, some links to sample projects, and more stuff.
I'm also on Blue Sky and Epic Developers community with the same name. She does art stuff. And I'll post there as I add new content to the link tree. So that's the easiest way to keep up with what's being added.
I also will reshare and post a bunch of stuff that the cool folks at TDR and the rest of Epic and the community share as well. Last note is that I will be available at the DevHub

after this presentation. So please do feel free to stop by, chat with me, chat with my colleagues after this talk. Also, if you don't get a chance to ask a question, because I will actually have like five minutes for questions, it's great.

If you'd rather not or don't get a chance to ask your question here, we can talk about it on the show floor as well. So with that said, thank you again, and let's start Q&A.