Terrain-Tiling-Break-Up---Terrain-Shader
https://m.youtube.com/watch?v=qPmKFRUf-zM&pp=ugUHEgVlbi1VUw%3D%3D
Today, we're going to talk about breaking up texture tiling artifacts on terrain. Let's go.
So we're in the middle of a series of videos about making terrain shaders.

Last week, I showed how to take individual terrain layers and combine them together to create a full shader. I've posted a link to the playlist for the full series down in the description if you'd like to go back and watch the full series. At the end of last week's video, we took a look at our results,
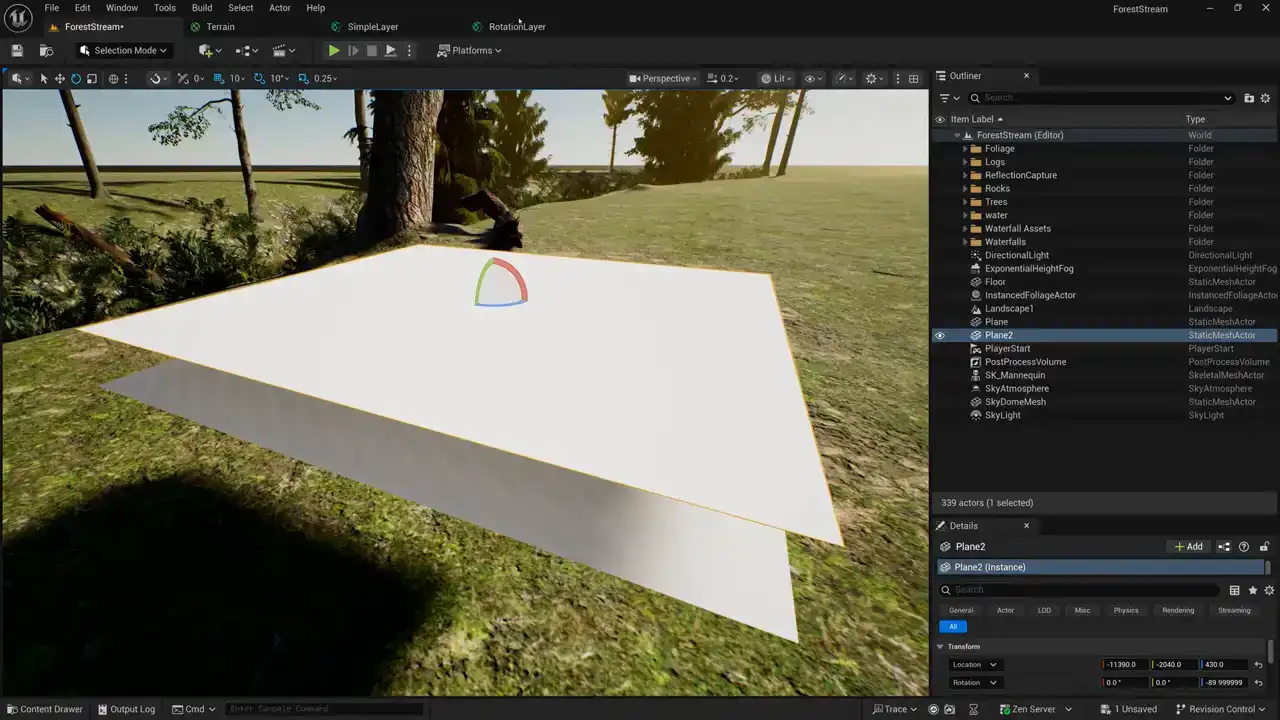
and I mentioned that we had a bit of a problem.
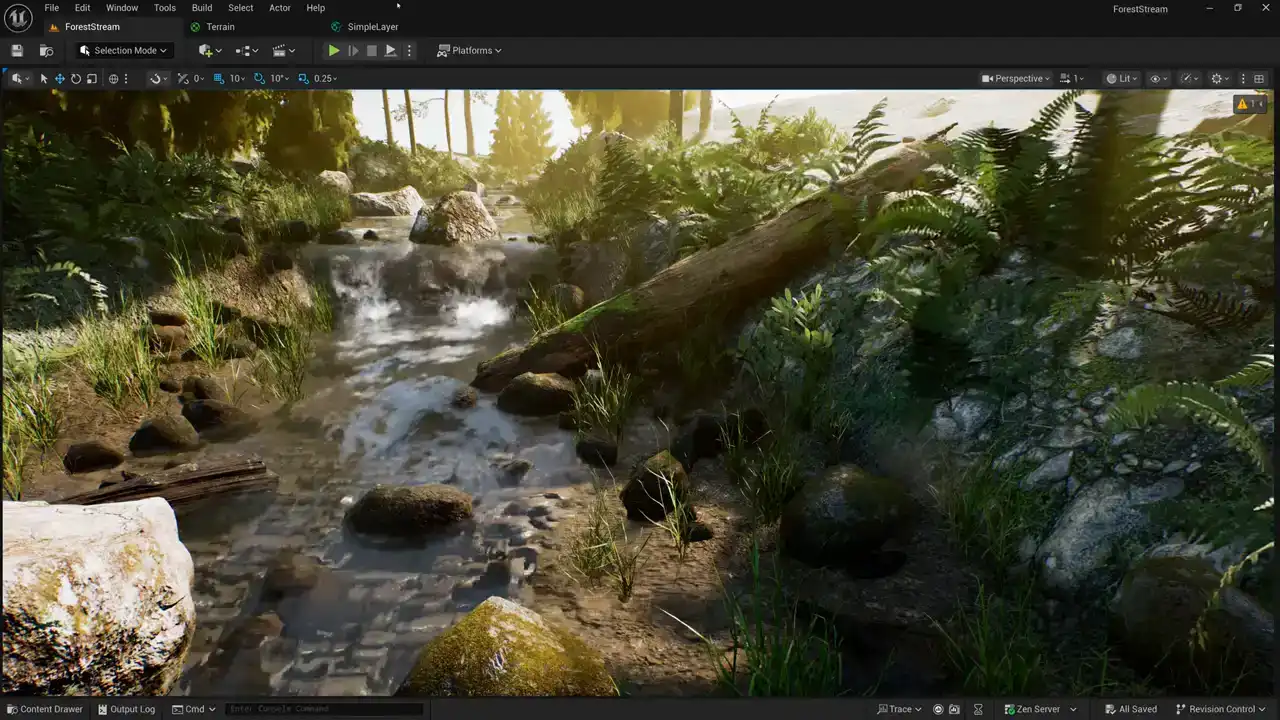
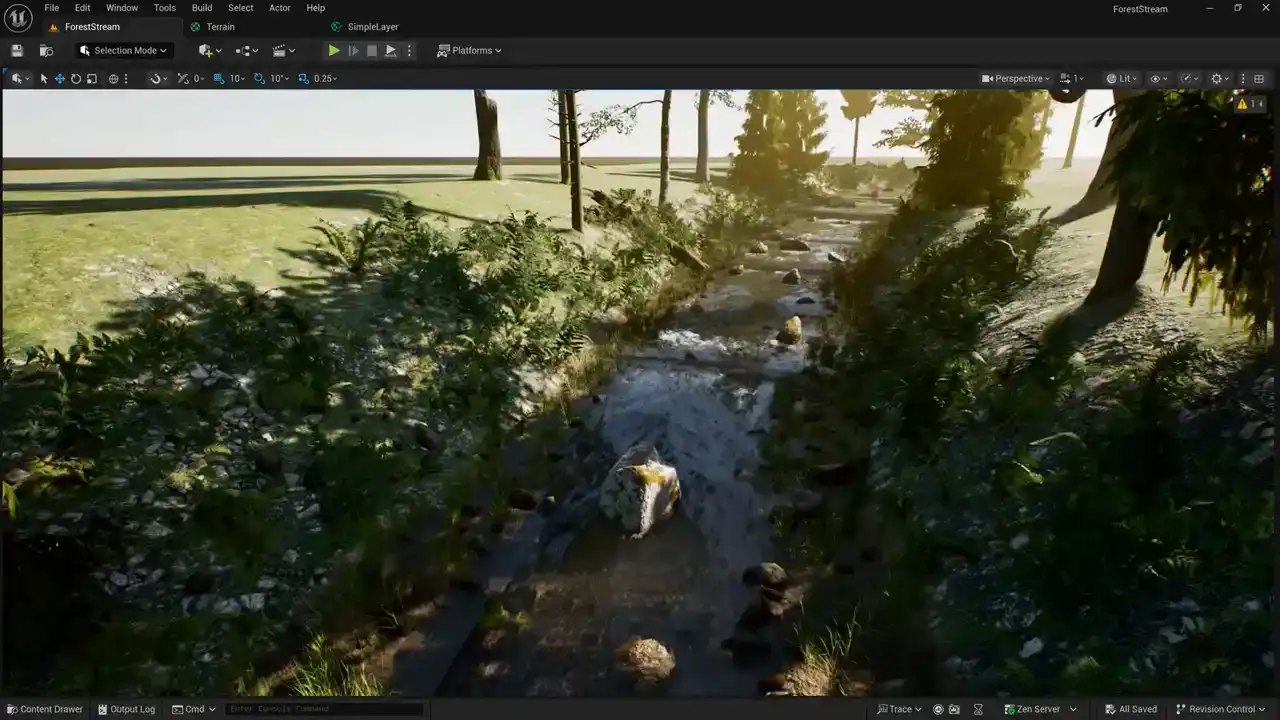
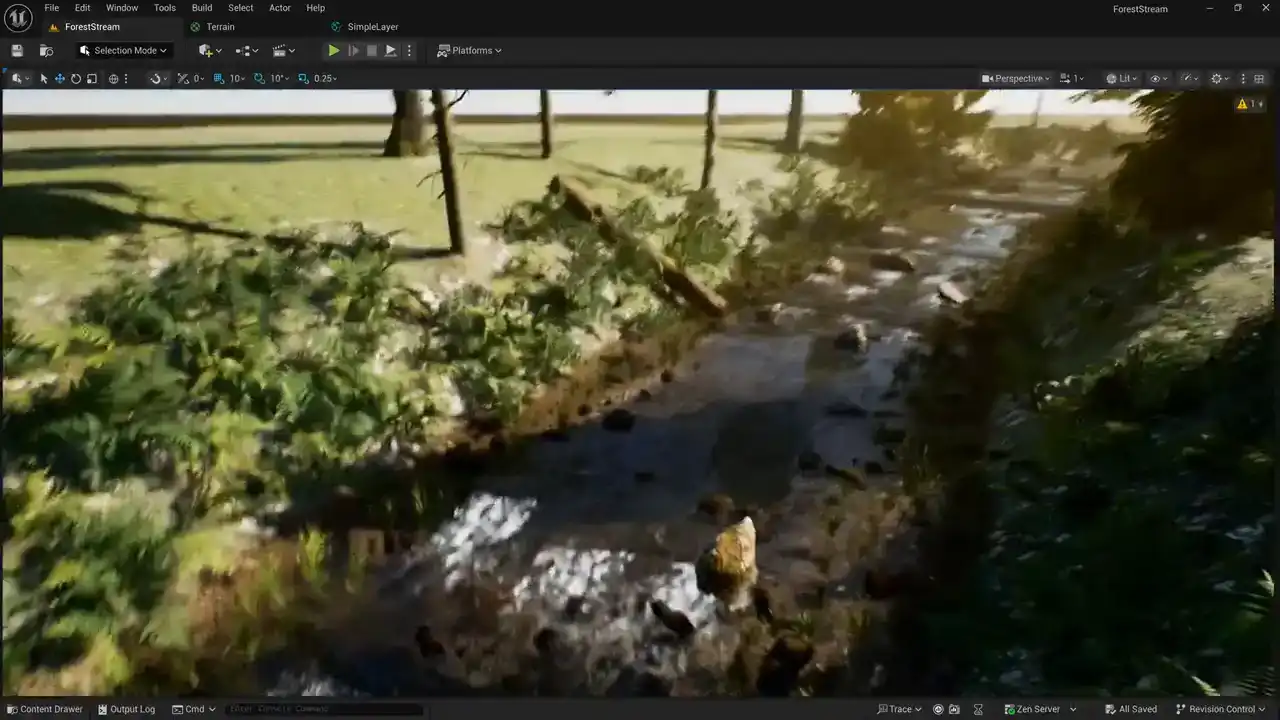
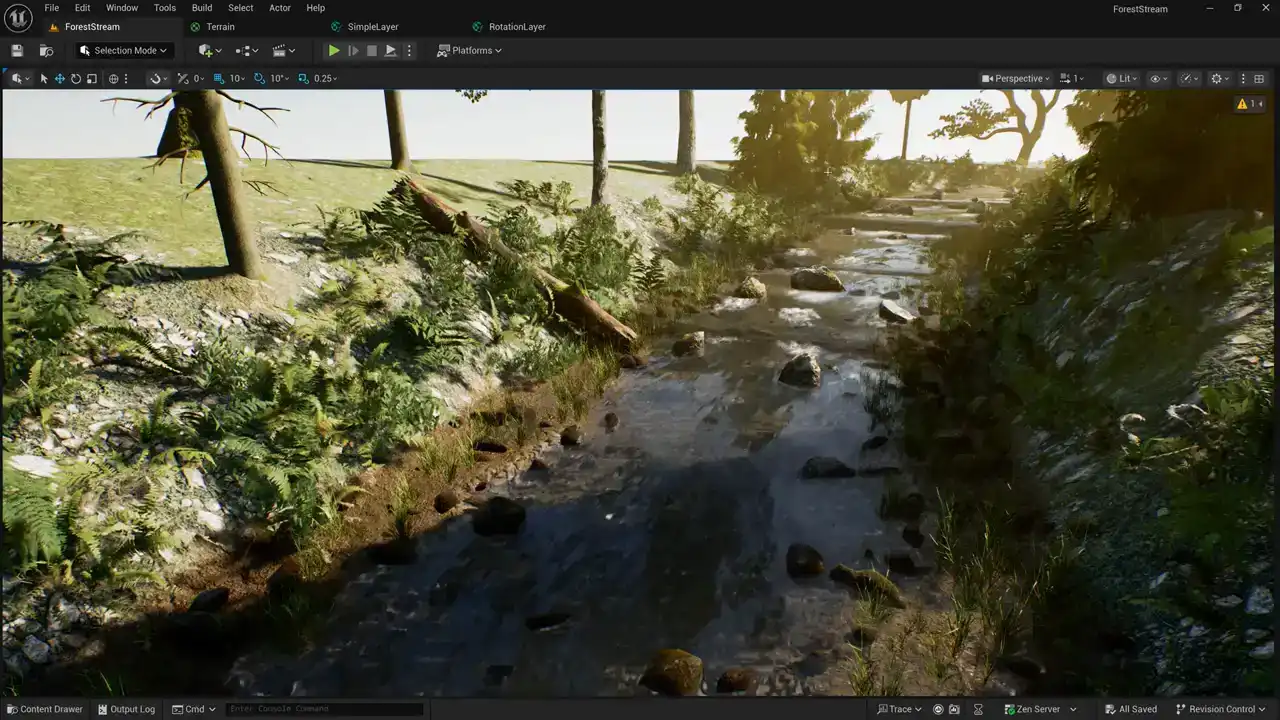
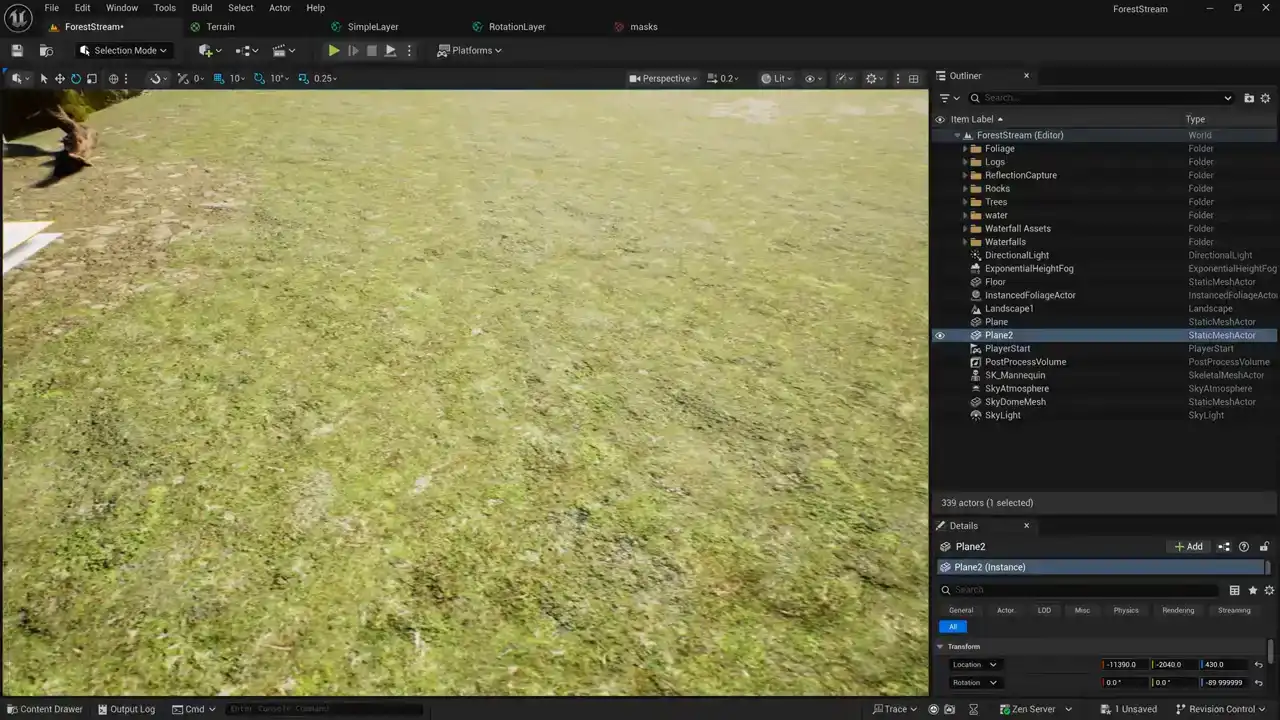
You can see here that our material is repeating over and over, and it looks unnatural. So I'm going to show you some ways of fixing that today. The first thing to know about this topic is that anything you add in the shaders to break up texture tiling is going to make the shaders more expensive to render there there's no such thing as a free solution to this so if this basic shader that i showed you last time is already too complex for your platform you may want to find some other ways to fix this problem instead of trying to make the shader do the work for example you can break up tiling by avoiding large areas like this one that we're looking at here that just have the same material repeating over and over, you know, over a long distance. If your layers all tile at different rates, you can use the layer blending itself to break up the tiling. And in areas where you see one material repeating, just paint some areas of another material, kind of like how I've done here, where I've got this other material kind of breaking up the burst one. So if we do that, we can effectively get rid of tiling artifacts without actually paying any more shader cost to do it. Another thing that you can do is break up tiling artifacts
by covering the terrain with foliage and trees,
kind of like what we're seeing here.
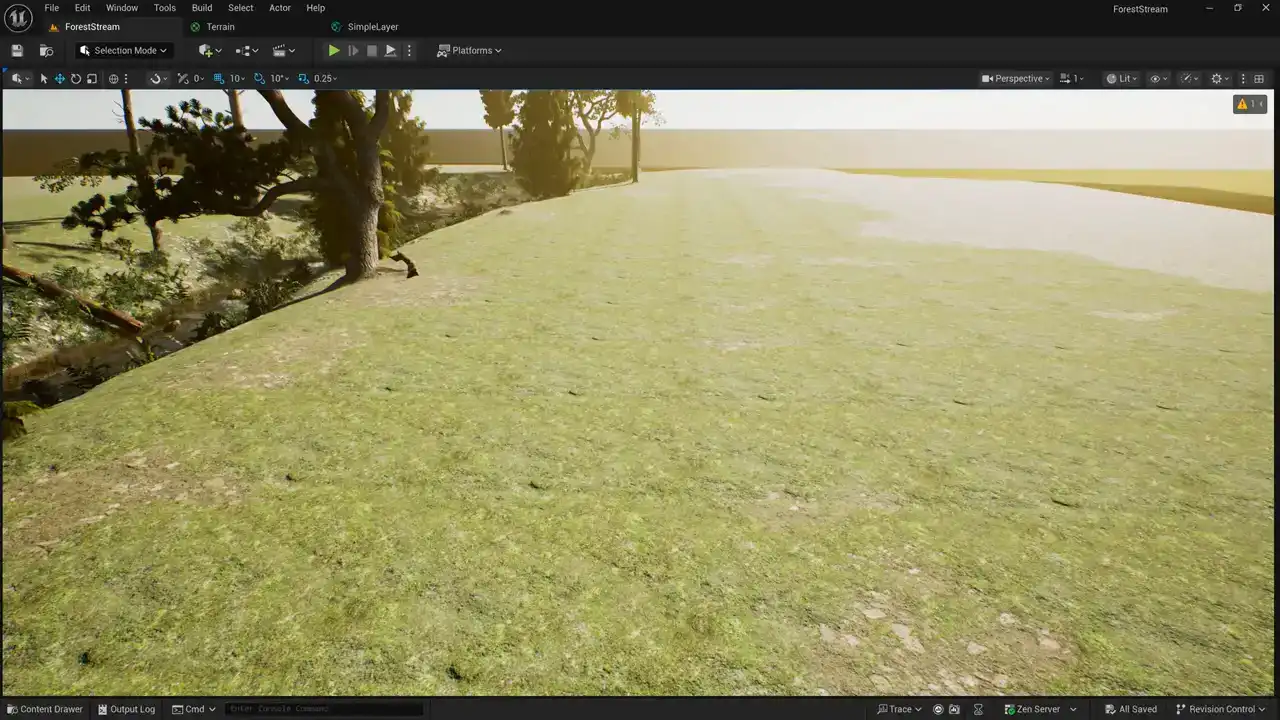
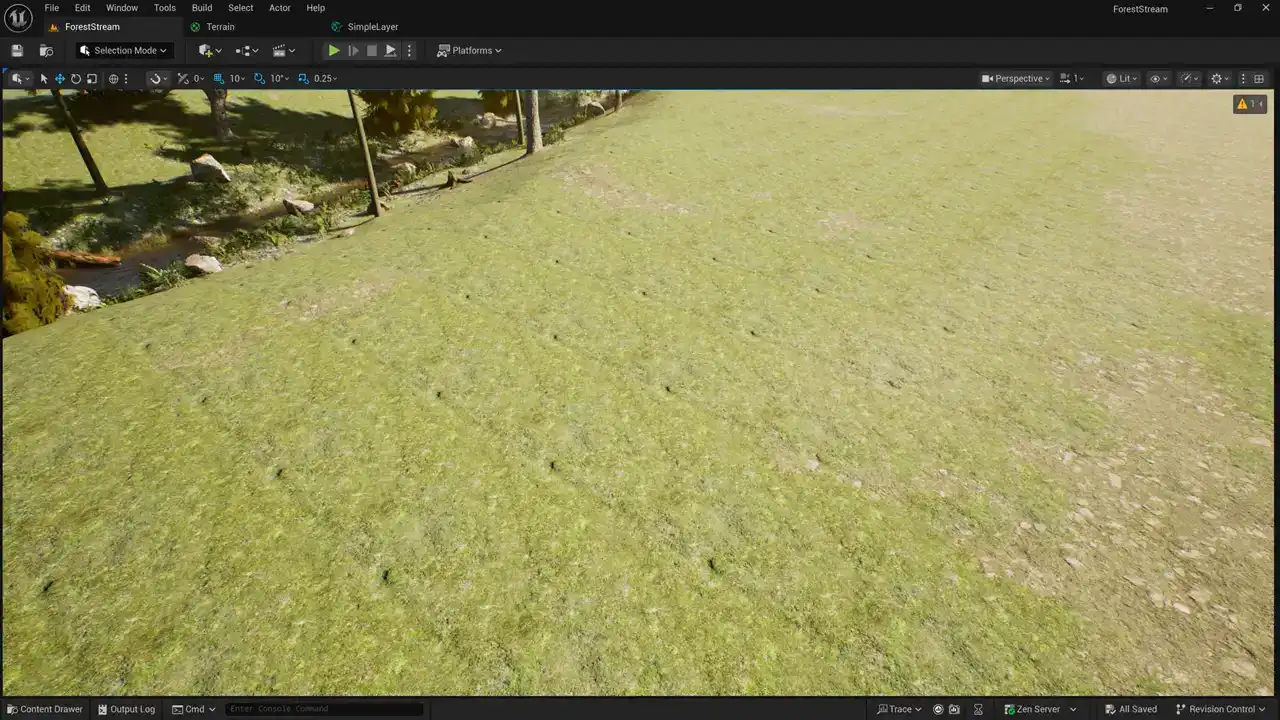
Out here, the repeating artifacts are really obvious because there's nothing else on our terrain.
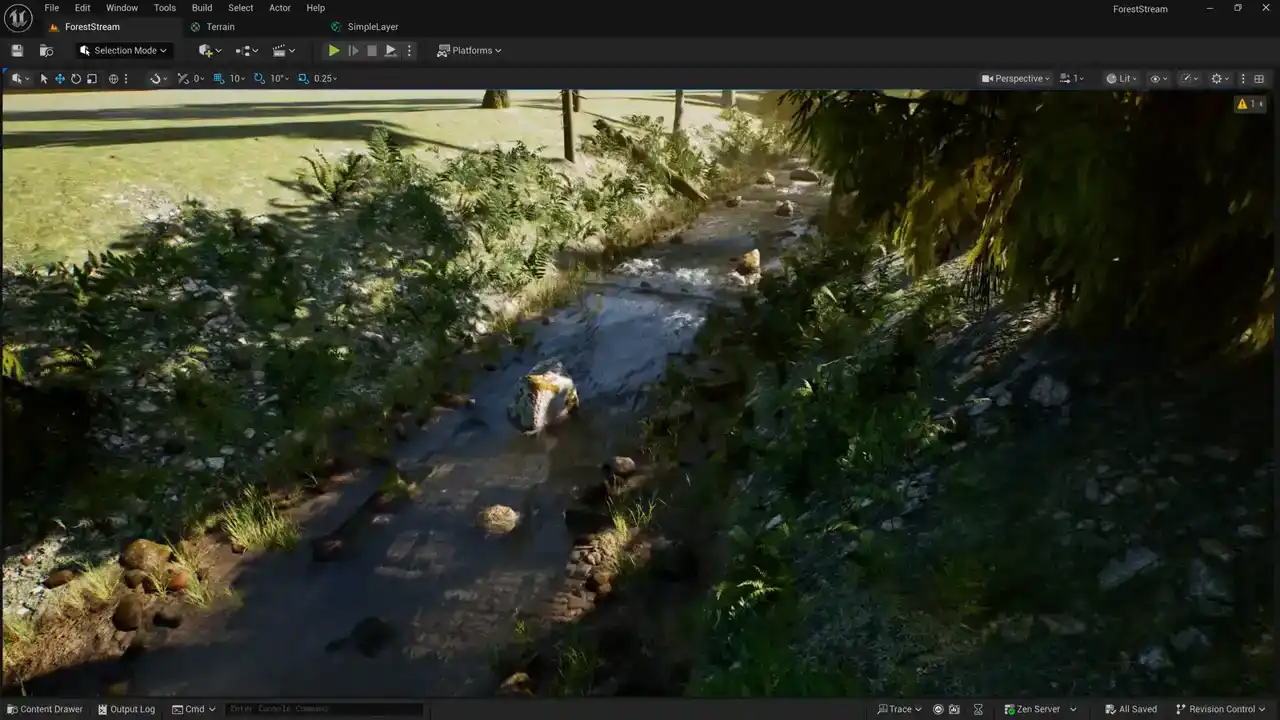
But if we come over here, you can see that I've got these ferns, I've got rocks, trees.
I've added a lot of extra complexity.
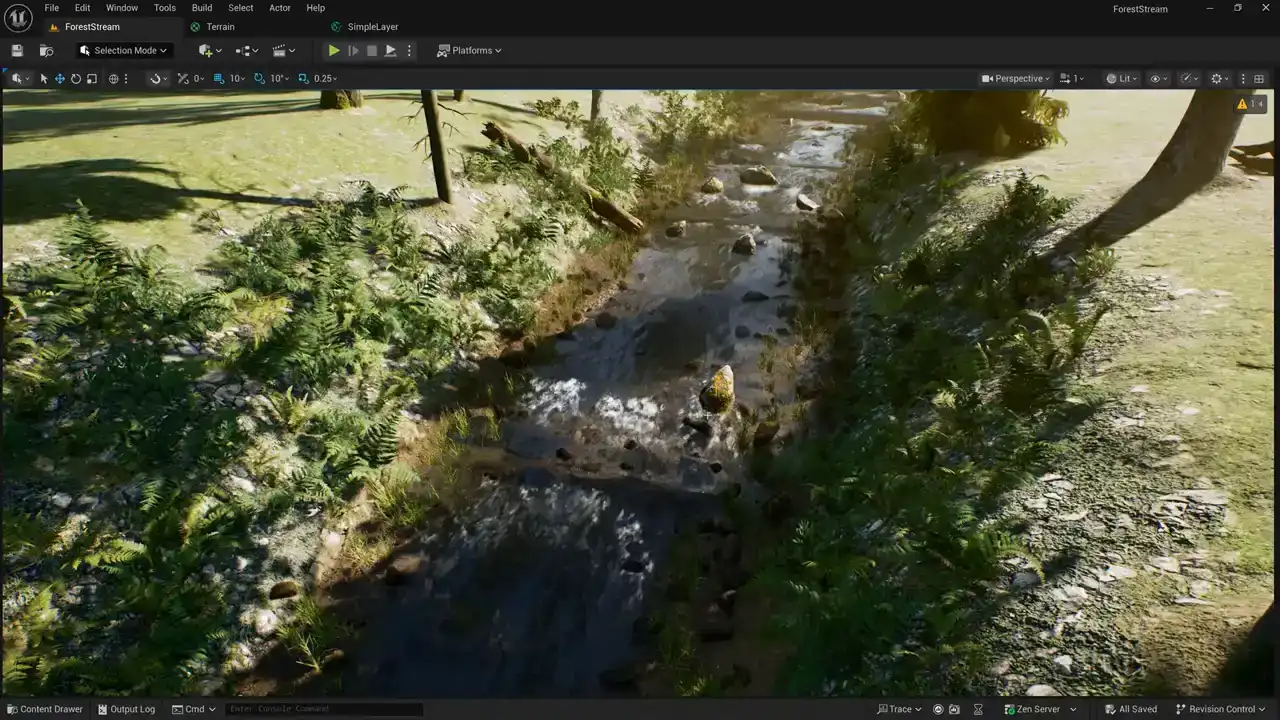
And we don't see those tiling artifacts because of all of the other things going on in the scene.
So you may be able to get away with a shader that doesn't do any sort of fancy tile breakup. if the decorations on your terrain are complex enough to hide the tiling.
But assuming that you do want to add some sort of system to your shader for breaking up tiling artifacts, let's go ahead and do that.
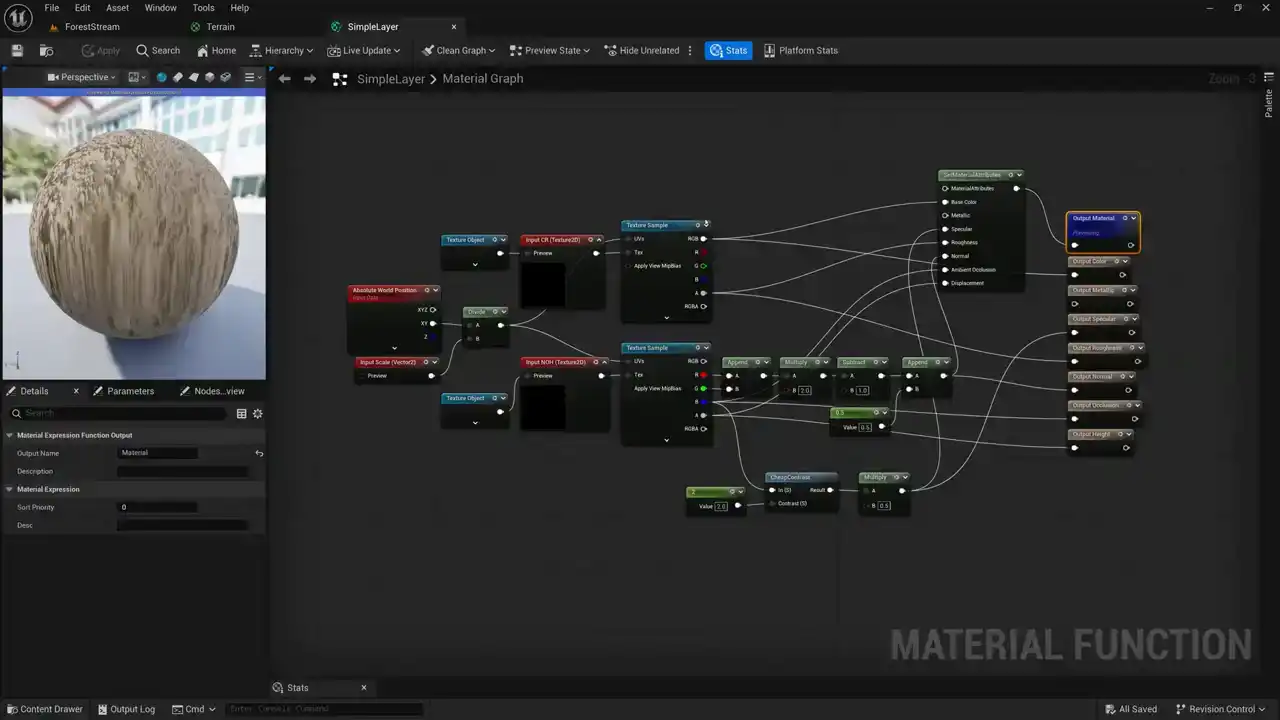
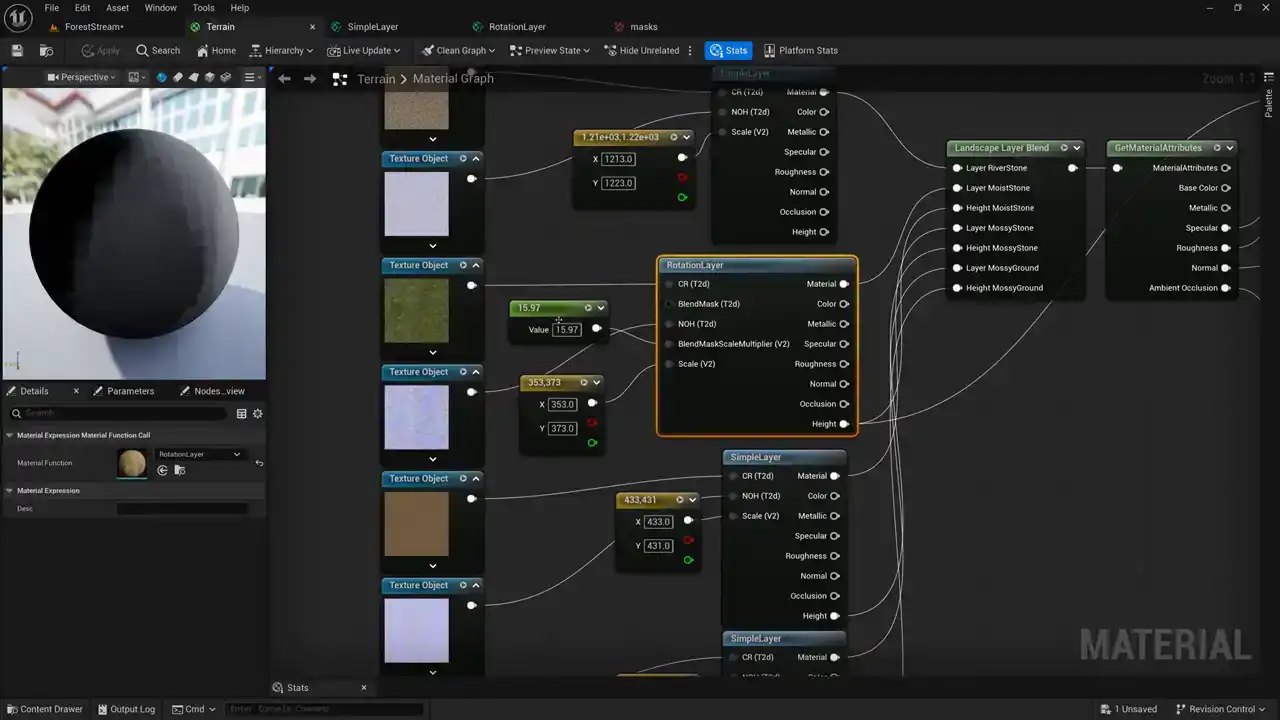
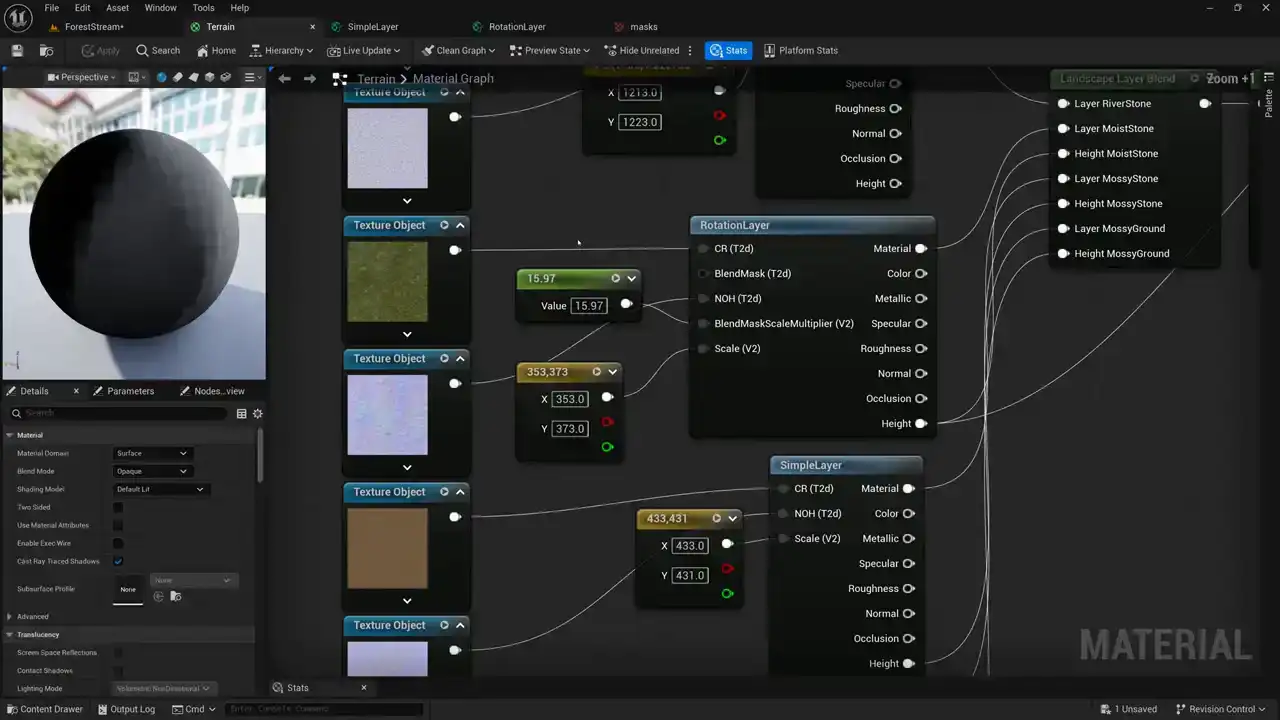
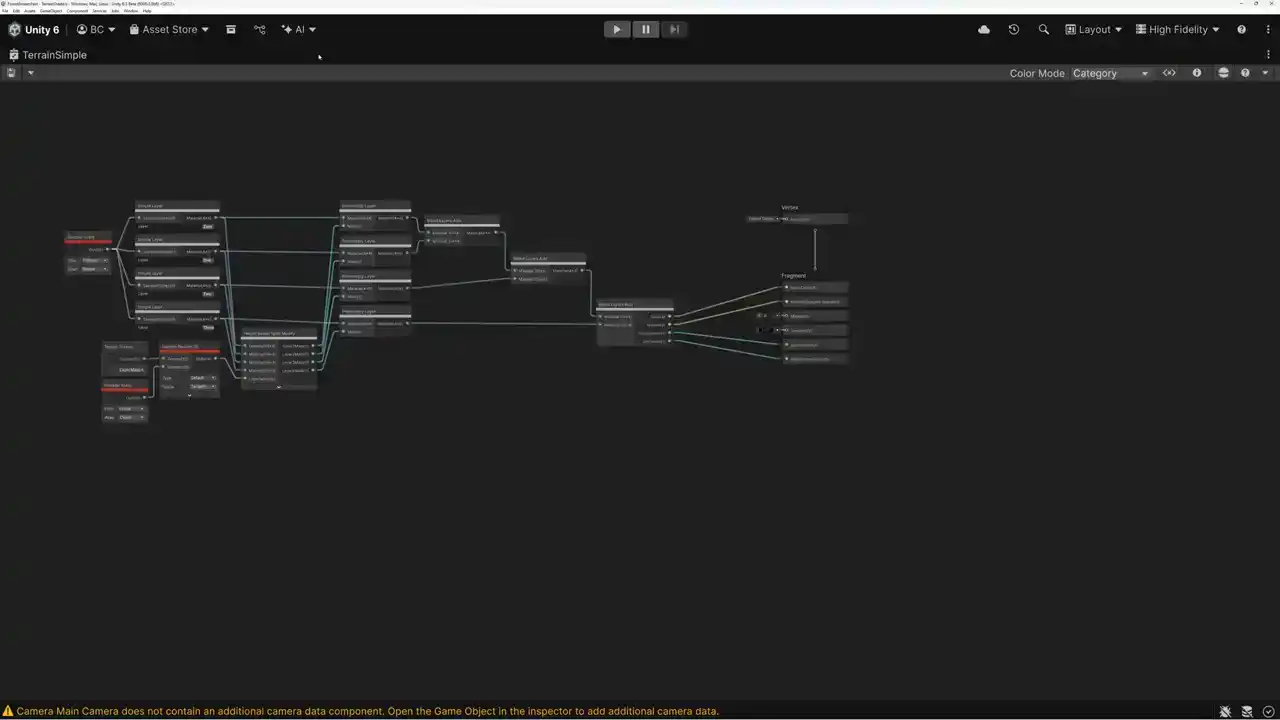
So here's the shader that we created last week. You can see that we're sampling our color and roughness texture, and we're sampling our normal occlusion and height texture. And then we unpack those and pass out the values. And then here's the terrain material that we created with our four simple layers. And then we use the built-in functions for blending those layers together. So what we can do is we can take our simple layer material function and add functionality inside that layer to break up tiling. So let's come down here to our content drawer. I'll pick our simple layer material function and just copy and paste it. And instead of simple layer, we're going to rename this one to rotation layer because that's the name that I've given to this particular technique that we're going to be using. And let's go ahead and open this. But what I want to do next is just kind of give you an illustration for what we're going to be doing to break up our materials.
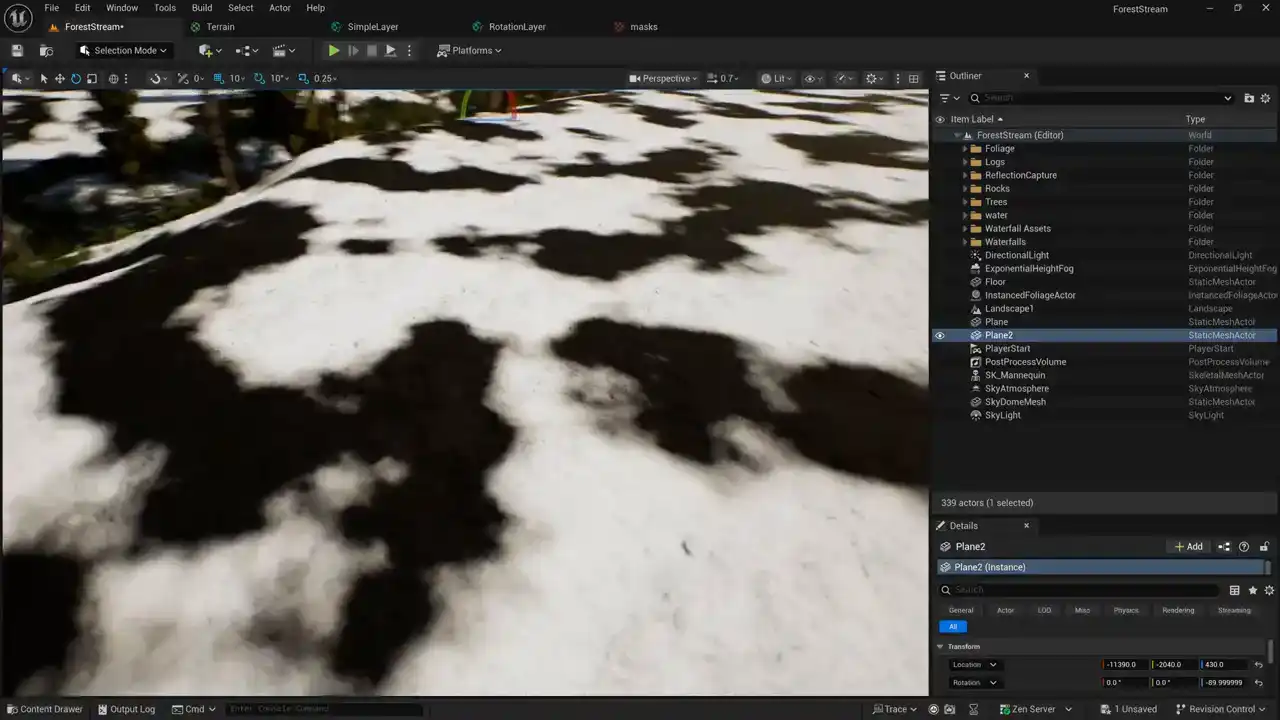
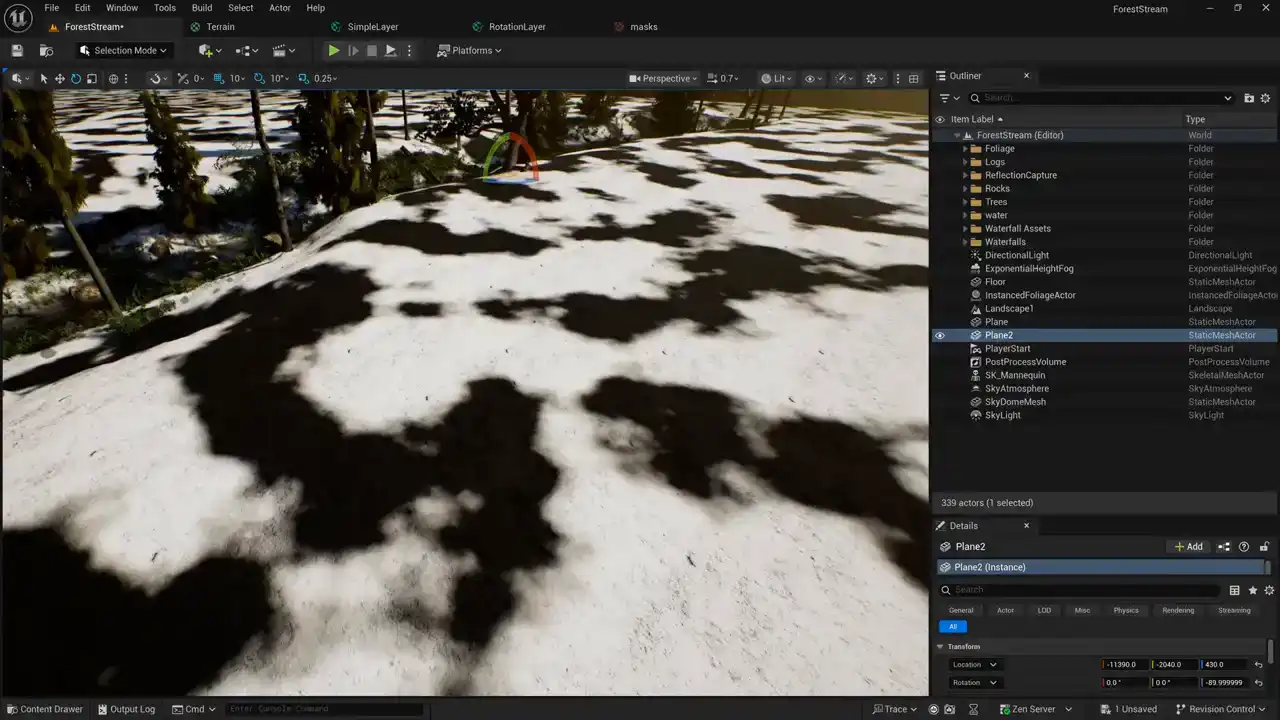
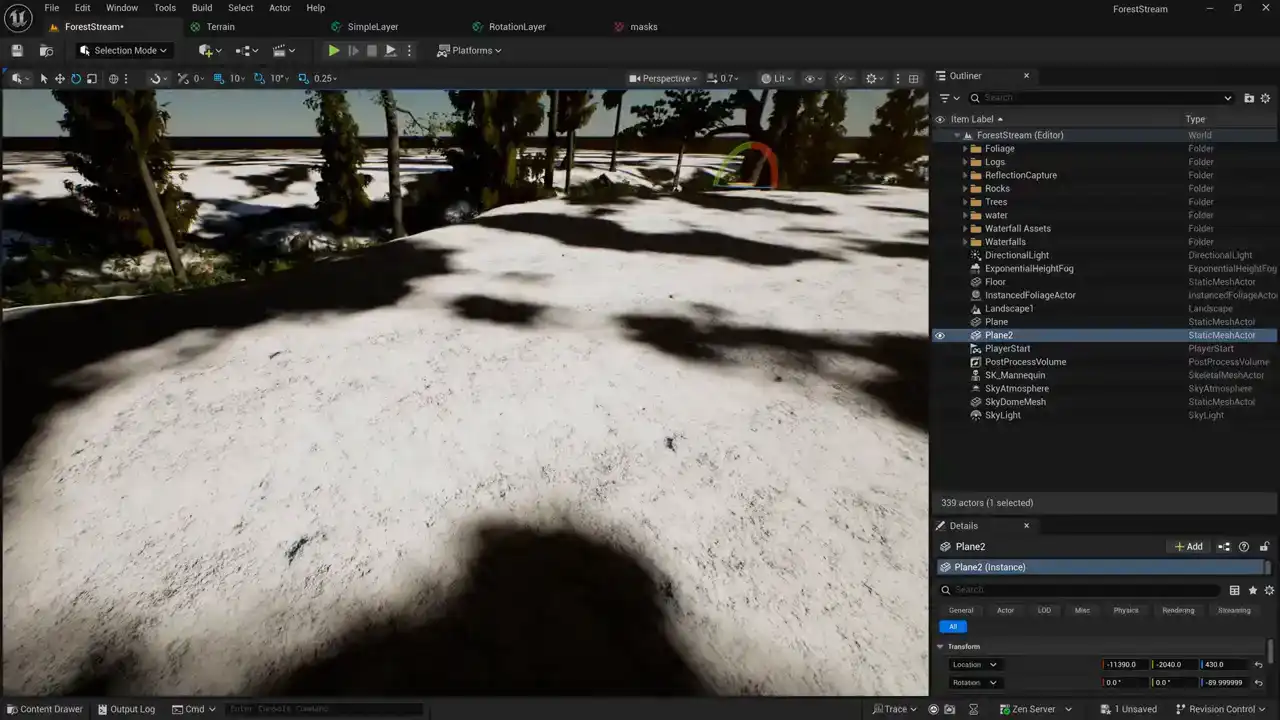
So we'll come back here to our scene, and I'm just going to add a couple of planes to our scene.
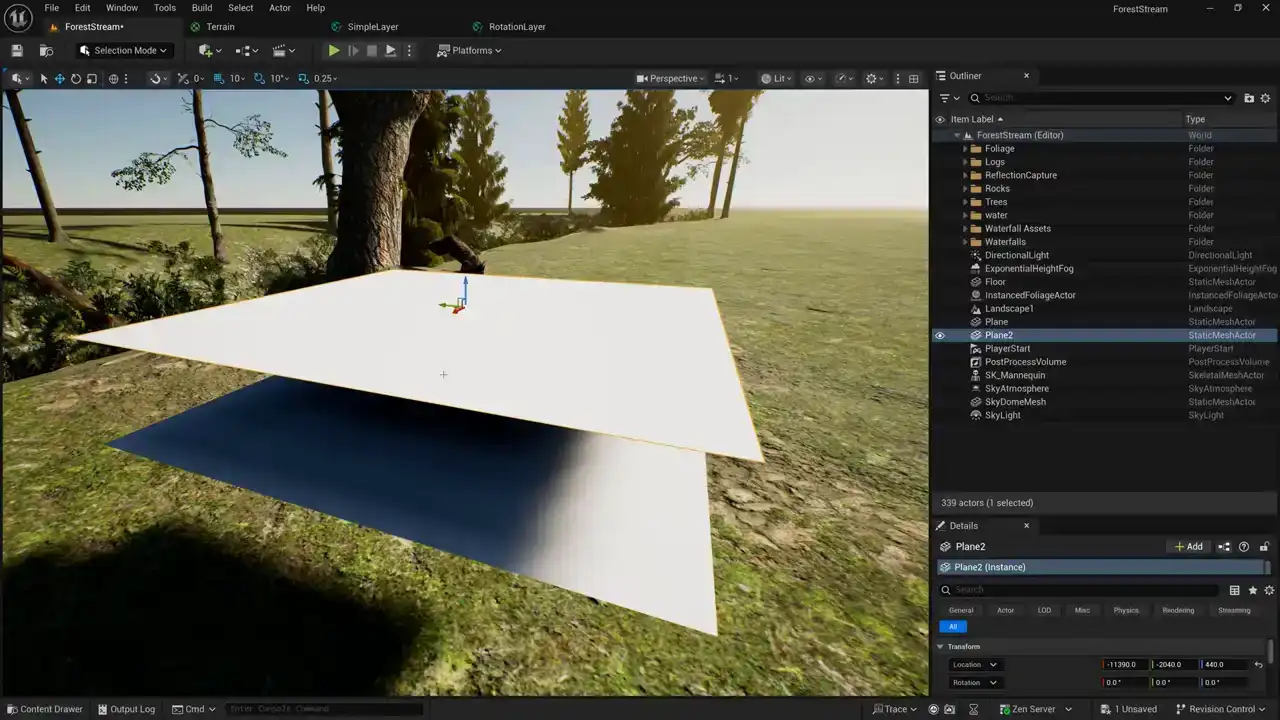
Okay, here you can see two planes, and I just created these so that I can give you
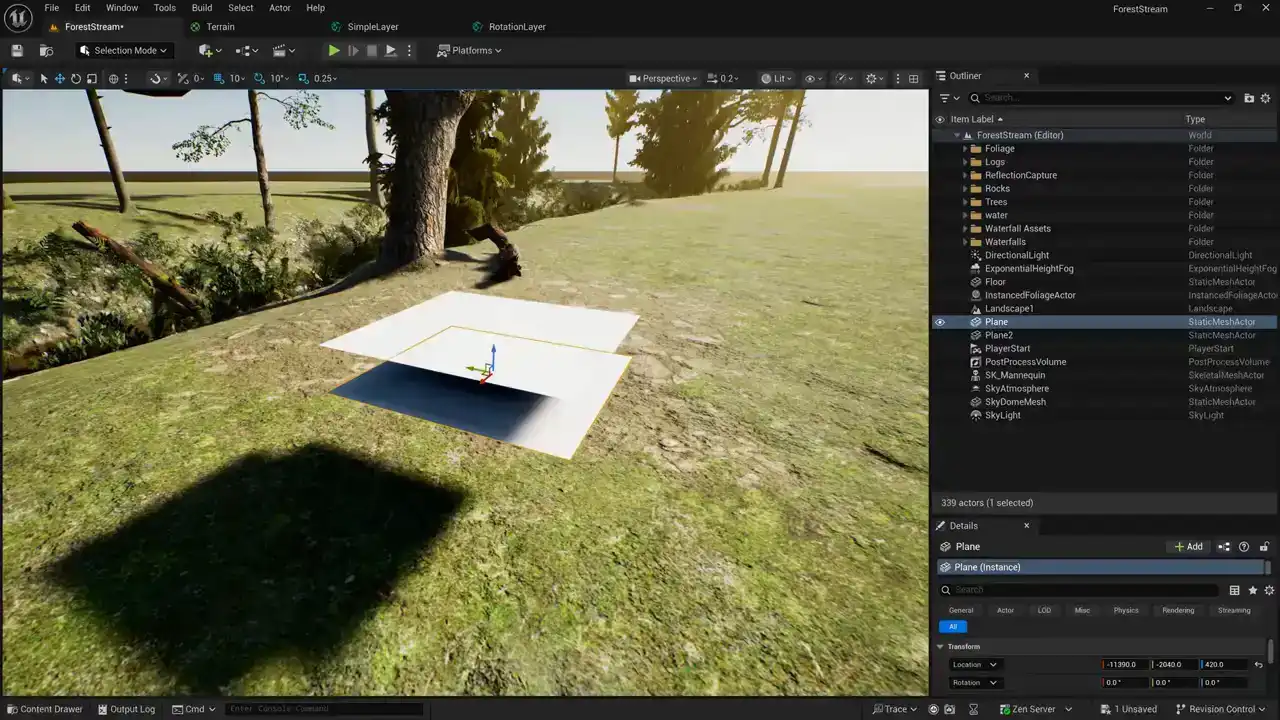
like a quick illustration of how this technique works Here our first plane down here on the bottom and this represents the uh the material that we that we created uh that we have on our terrain right now and this upper plane represents a second uh a second set of texture samples of our material so what we're going to do is we're going to sample our material once just like we're doing now and then we're going to sample the textures again but this time we're going to take our uv coordinates and rotate them 90 degrees so that this version down here on the bottom is the normal version and then this version above it is going to be rotated 90 degrees and then we're going to blend between these two planes or these two sets of texture samples using a mask so i just wanted to do a quick visual illustration so you
you could see what was happening there. All right. So here's our rotation layer.
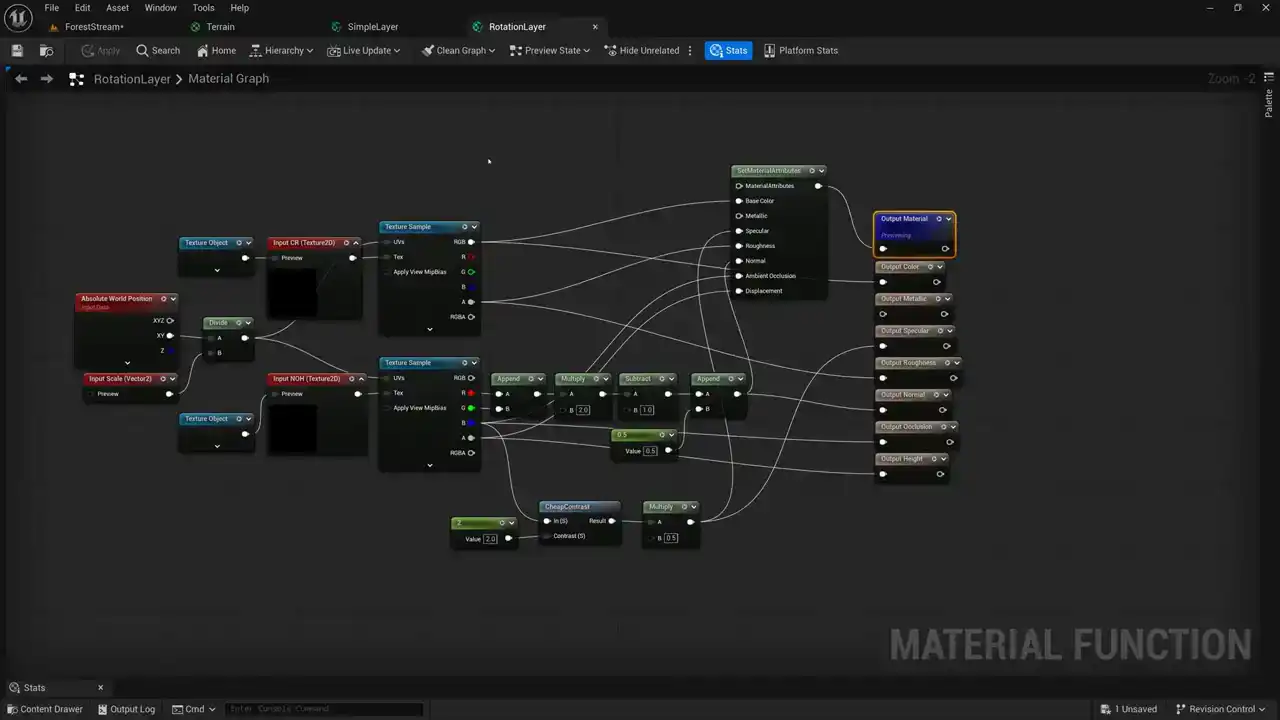
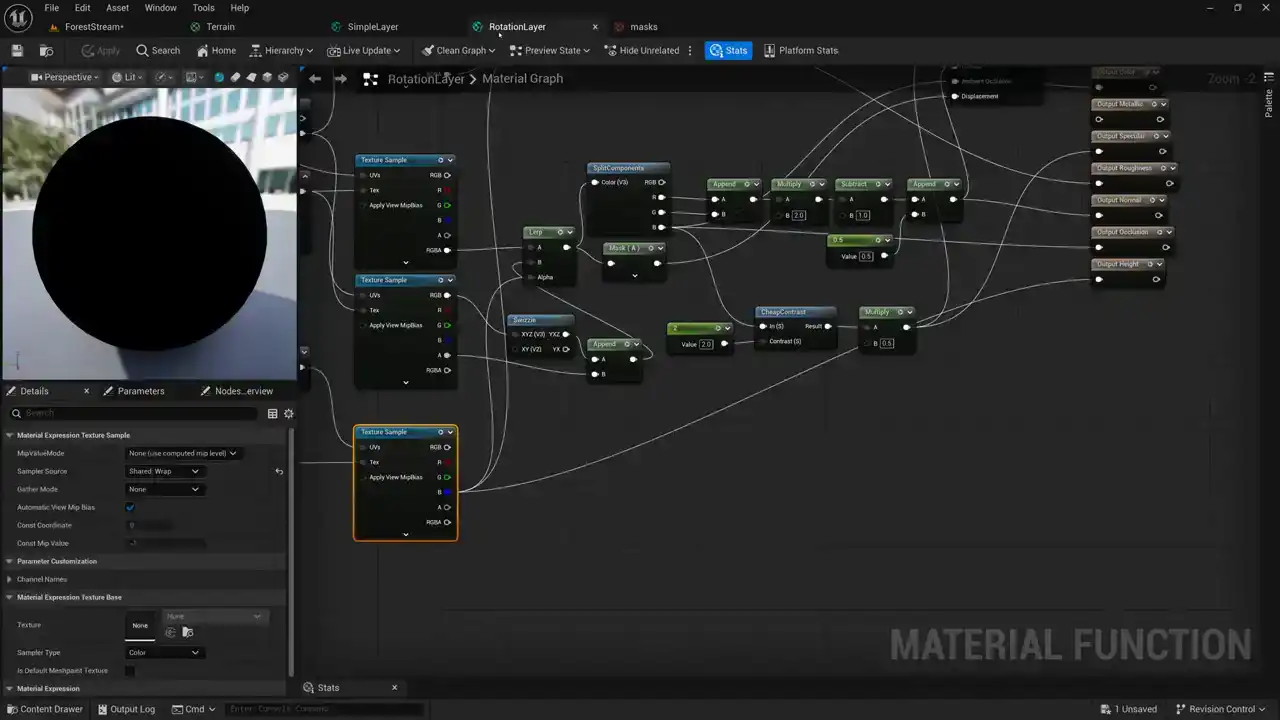
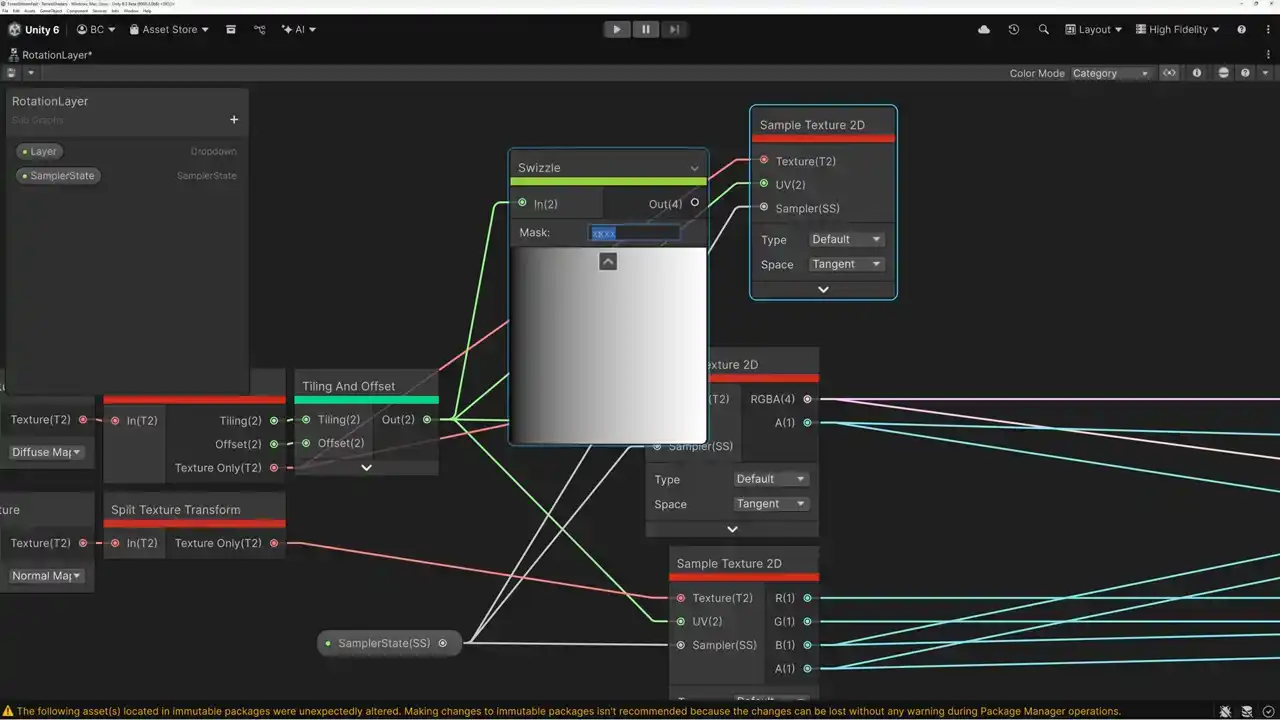
And we need to go ahead and sample our textures twice. And so I'm just going to move. So this is the part of our shader that's unpacking our textures. I'm just going to move these over here. And here's our first texture sample. I'm going to duplicate that. So we have a second one. and we're sampling the same texture asset. So I can just wire that into the texture. But for the coordinates, we actually need to swap those around. And so I'm going to add a swizzle node here and pass our coordinates into that. And you can see here, the swizzle takes an XY, and I'm going to be passing out a YX. So by swapping the X and the Y components of our coordinates, we are rotating our texture. That's a really easy, it's basically a free way of rotating the texture 90 degrees. We could do a rotation, but there's sine and cosine math involved in rotating. And so by swizzling, by just swapping the X and the Y of our coordinates, it's a really easy kind of free way of rotating 90 degrees. now the last thing that we need to do is lerp between our two textures so we're going to take our original texture sample here the rgba and we're going to take our second texture sample here which is our rotated version and we're going to blend between those two now i'm not going to set up the blend mask right now we're going to do that in a minute But first, I want to create our second texture sample for our NOH texture. So I'm going to copy this texture sample and paste it. And again, we're going to take the swizzled version of our UV coordinates, and I'll pass that in. We'll pass in our NOH texture. And now again, we need to lerp between the first sample and the second sample. So we'll add a linear interpolate node. We'll pass in the first sample and the second sample. Okay, so once we've done that, now we need to split this up. Actually, let's see. I think we can just wire in our base color like this and also wire out our color like that. And now we need the alpha. I'm going to add a component mask node and we're going to set our component mask to just give us the alpha channel. Now we can wire this into our roughness on our set material node and also our roughness output. Okay, so we've got our color and roughness set up and now we need to set up our normal occlusion and height. So we're going to pass our red and green channels for the normal, and we're going to pass our blue channel for the ambient occlusion. And then since the split component node doesn't have an alpha output, we have to use a component mask node to access our alpha channel. And we're going to pass that into our height. So we pass it into our height for our output and also our height for our set material attributes OK so now we blending between our two texture samples both for color and roughness and also for our normal occlusion height. So the last thing that's left to be done for this shader is to sample the mask that we're going to use to blend between our two different materials, the one that's normal and the one that's rotated 90 degrees. So I'm just going to create another texture sample here. And we need to create another texture input 2D. And let's come over here and we'll call this one our blend mask. And we'll pass our texture object in just like that. And then maybe we need to give it a default. So let's bring that over here and we can find a good texture to use as our default. This texture here called masks will work really nicely. Let's take a look at this in our content drawer.
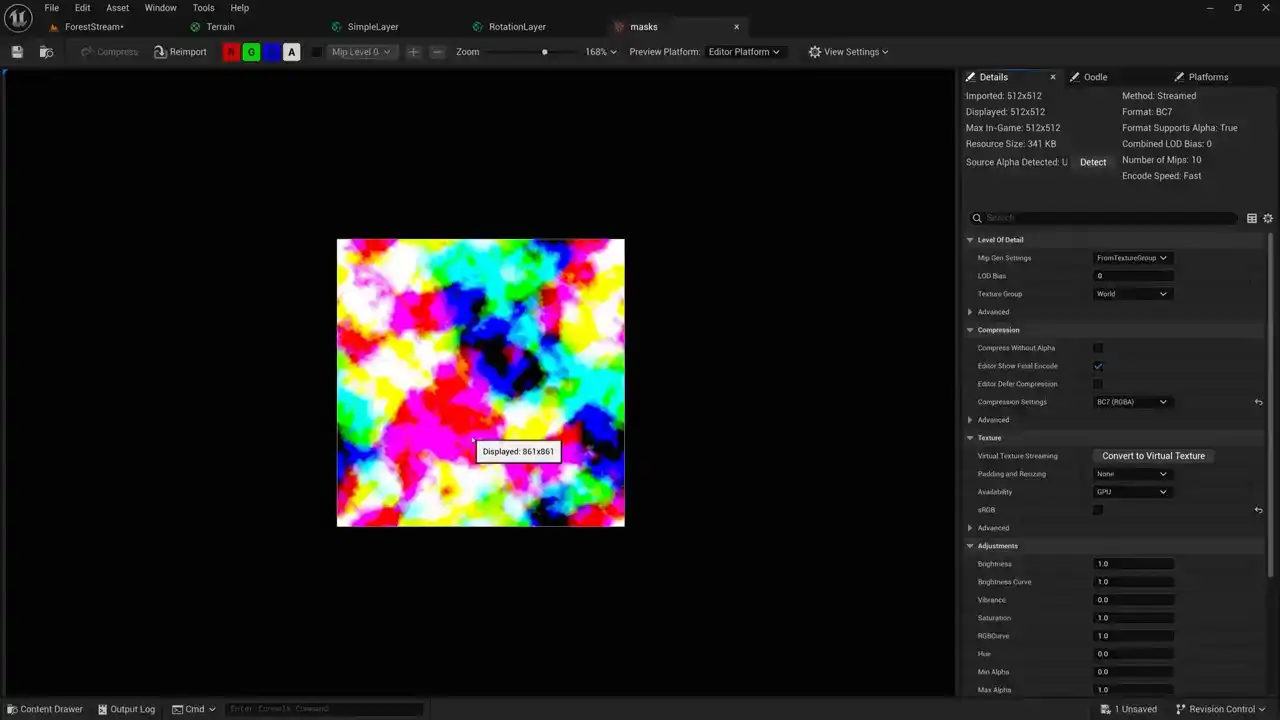
So if we open this up, we can take a look at the red, green, and blue. What I've got here is a bunch of different sizes of masks. The red mask is kind of large.
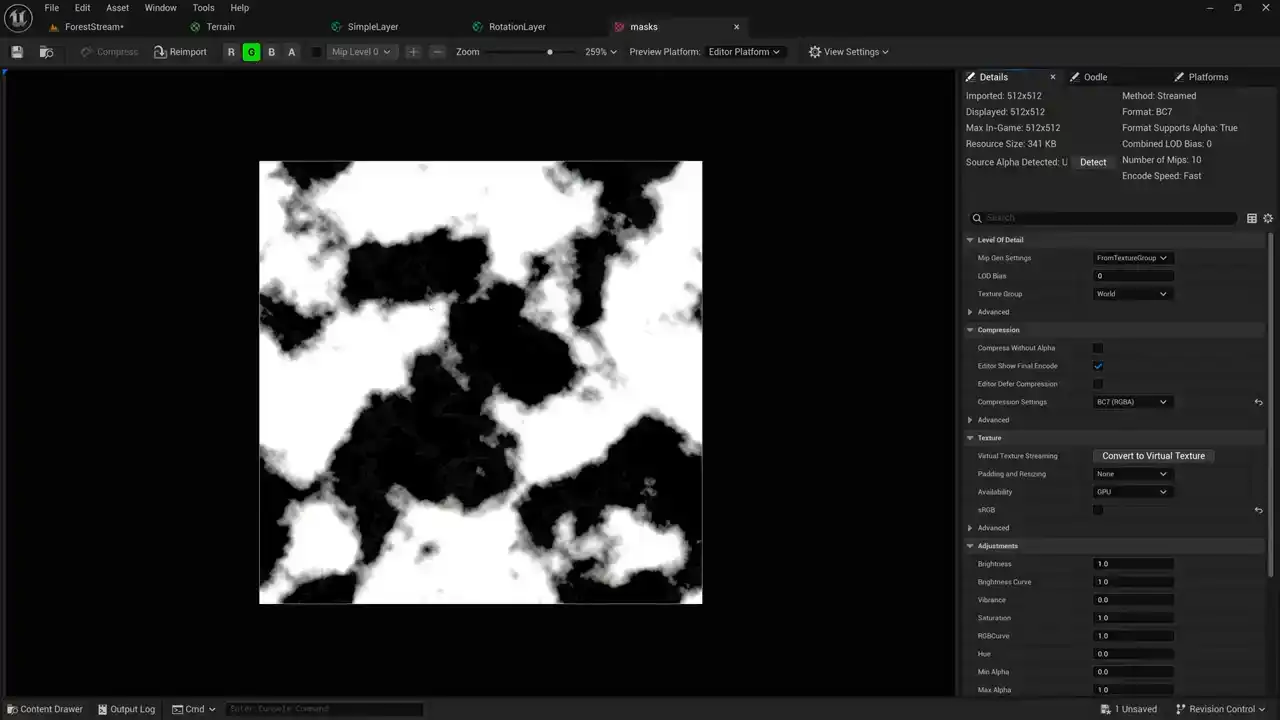
the medium mass or the green channel has a mask that's kind of medium and then the blue channel has a mass that's kind of small so i think we'll use the blue channel here you know you can choose to create any kind of mass texture you'd like but in my case i'm going to use this this blue channel
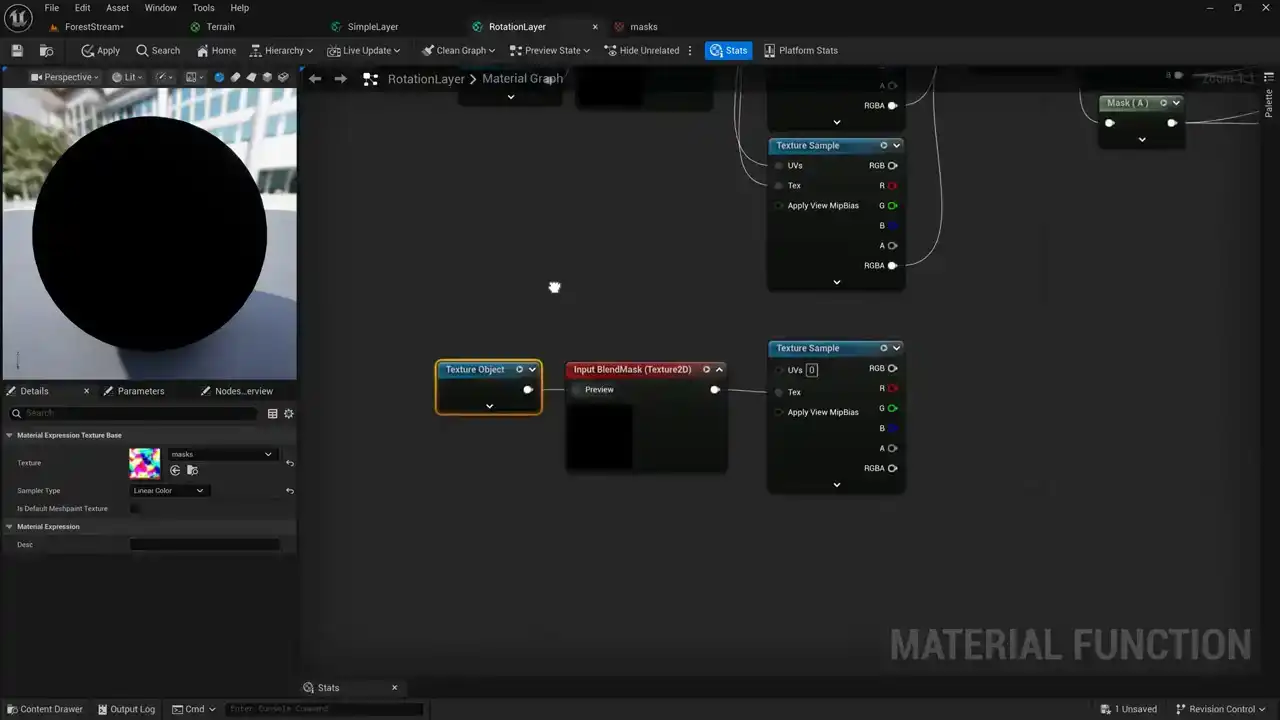
mask so we'll go back to our object here we've we're sampling our mask texture passing it in And then we're going to use the blue channel coming out of here to blend between our two different samples of our NOH texture and also to blend between our two different samples of our color and roughness texture. Okay, and then the one last thing that we need to do here is create a multiplier for our UV coordinates. So we have our UV coordinates here. We're using our absolute world position and scaling them and then passing that out. But we need to, let's see, I'm just going to grab this input scale here. And we're going to use this input value here as a multiplier. We'll call this blend mask multiplier. And then we're going to, actually we're going to divide. So I'm going to take this value here. Oh no. This value here. And we're going to divide it by this blend mask multiplier. I think I'll name this blend mask scale multiplier. So it's a little bit more clear. And we're going to give this a default value. experiment a little bit with this and figure out a good default value. But I'm going to go ahead and pass this into our UV coordinates. Now you might have noticed I've taken my coordinates, divided them by scale for the normal samples that I'm doing, and then divided them by this again for this mask that I'm doing. And the reason that I'm not taking my absolute world here, but I'm dividing this, is so that I can keep the same size ratio so as I change the scale of my textures, the mask scale goes with it. I really like that idea of not having to adjust the mask scale separately. So I can just set this value once and then I can scale my whole material up and down and the mask will go with it as I do that. All right, I think I'm all set. I've got my shader set up the way that I want it to. So let's assign it in our scene and we can adjust the scaling of our mask. So we'll come back here to our terrain shader. And now what I need to do is take our simple layer material function and replace it with the rotation layer. So I'm just going to come back over here to our terrain shaders again, and we'll drag in an instance of our rotation layer. And you can see that this one is a little bit more complicated because I have these extra inputs But let go ahead and replace our mossy texture here with our rotation layer version of our layer material function. And we'll wire this in just like that, as well as the height. and I'm going to go ahead and delete the simple layer version. And I think because I added that blend mask in the material function itself, that I don't actually need to add one here. But let's go ahead and make sure that I set that up correctly. I think I need to, for this texture object, I need to make sure that use preview value as default is checked. And then it'll just go ahead and use this mask texture. And I don't need to set up one here. If I want to, I could pass in a different mask here. But in this case, I'm just going to leave that empty. And the last thing that I need to do is set up my blend mask scale multiplier here. so i'm just going to create a uh a float value i'm going to give it a value of one and we'll pass this in just to start with and then we'll save it and let's take a look at our scene and see how we did
Okay, even with just a multiplier value of one, I can see that that technique that I added has done a pretty good job. There isn't as much artifacting as I had before. Now, off in the distance you can start seeing it repeating but here close in the foreground there is less repetition happening now i just realized that there's one thing that i forgot when you rotate a normal map you actually have to add some special handling to take care of that so let's go back to our shader really quick and fix that. So here we have our color and our roughness

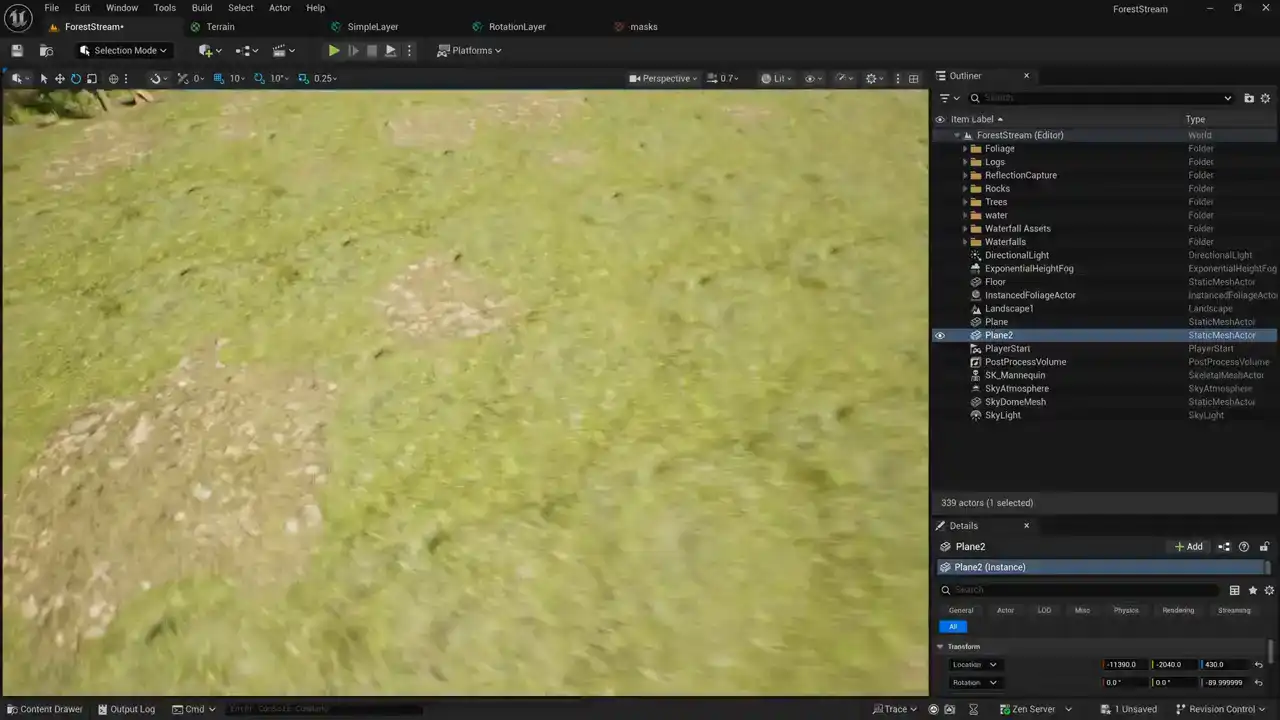
samples, and then we have our normal occlusion and height samples. And here our normals are coming out. Let's see. So here's our second sample here. And before we pass our second sample out to be combined with our first sample, we need to switch things around a little bit. Instead of red, green, blue, and alpha, we need them to go green, red, blue, and alpha. So I need to do a little bit of a swizzle right here. Okay, so here's what I did. I passed my red, green, and blue into this swizzle node and you can see the input says xyz and then the output says yxz so it's swapping my red and my green channels there and then I append the alpha channel to it before passing it into the lerp. Okay so that should take care of my normal. Now what I need to do is visualize the mask texture that I'm using. And so what I'd like to do is come down here to my sample and I'm using that blue channel of my mask. And just temporarily, what I'm going to do is pass this blue channel out as my height output so that I can debug it and test to see what it looks like. Then I'm going to go to my shader here and coming out of my height, I'm going to wire this height value directly into my base color just so I can see what my mask looks like on my terrain.
So this is the mask that I'm using to blend between the two different versions of my material layer.
And I can use this kind of debug view now to get the correct scale that I want.
So let's switch to our terrain layer here. You can see that I've set my multiplier to 15.97. If I set this multiplier to one, like we had just a minute ago,
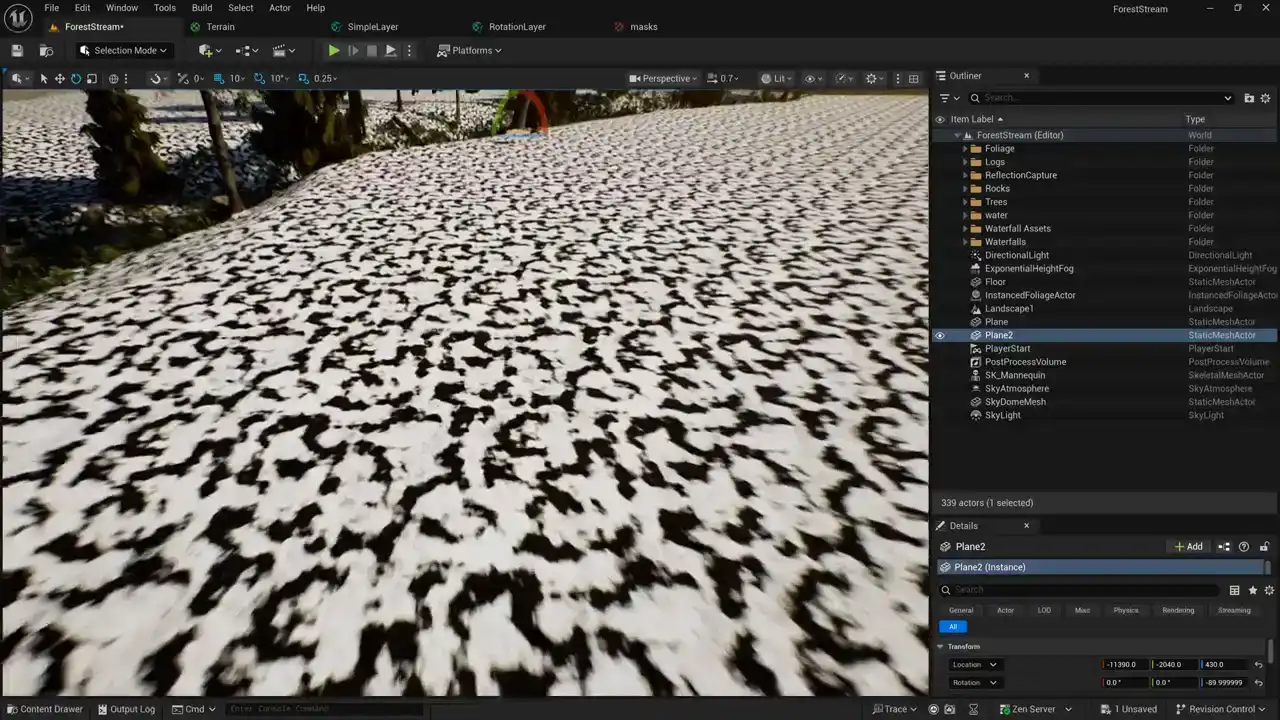
you can see that this is too small for the material that we had.
And so we want to find out find a value that that will blend between the two layers and kind of break up the Thailand so like I
like I had I'm gonna use this value of 15.97 I think this is a pretty good value because you can
you can see that the layers are repeated maybe once or twice here before we transition to the
rotated version okay so let's go ahead and switch our color back to what it's

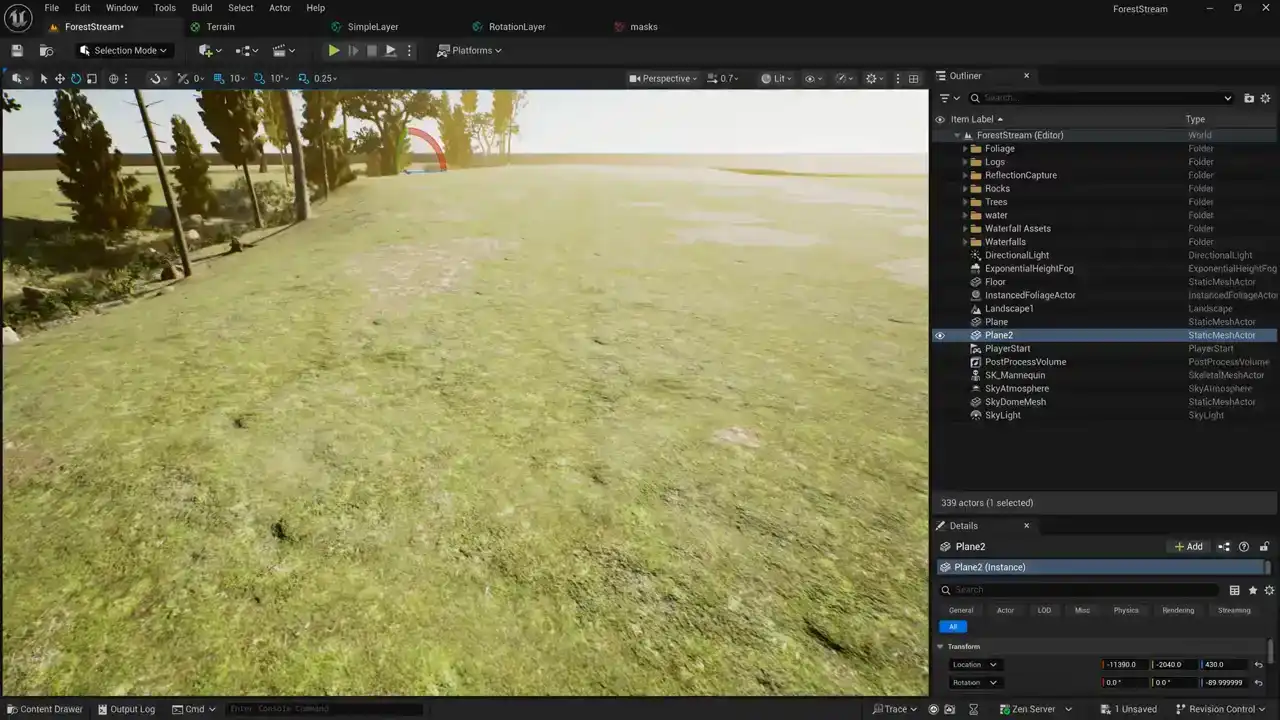
supposed to be and take a look at our result okay you can see here that there
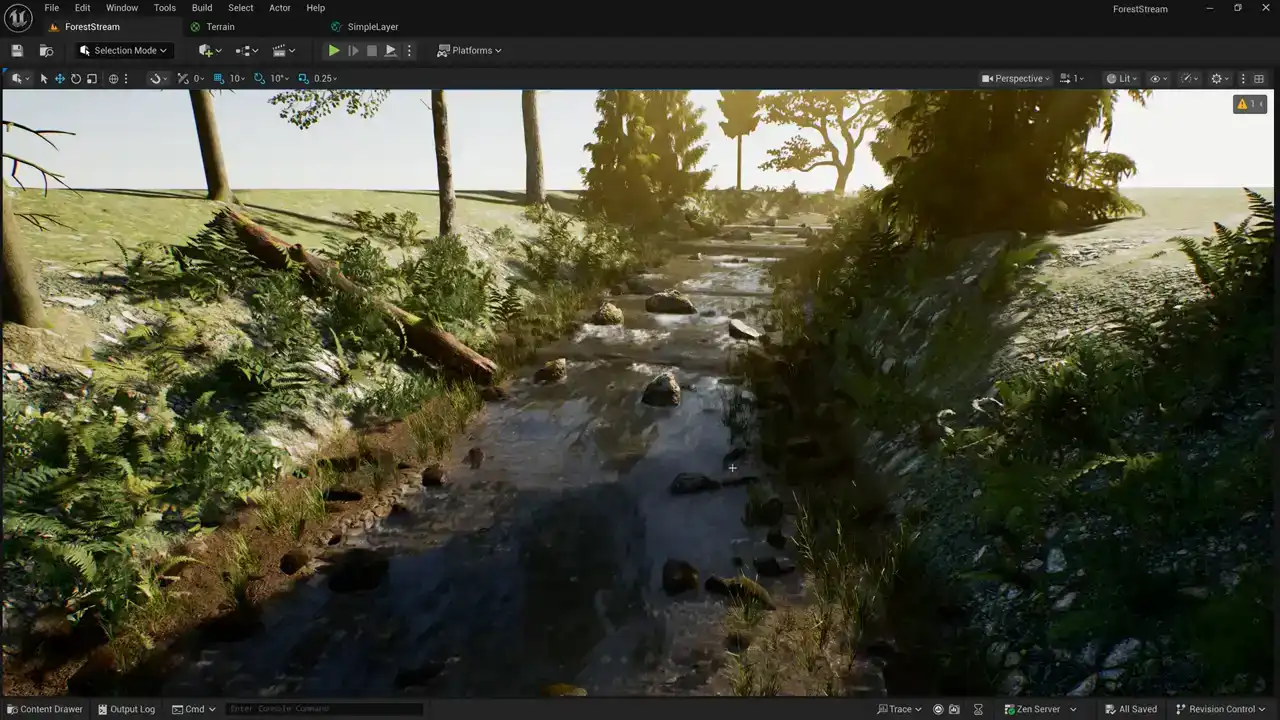
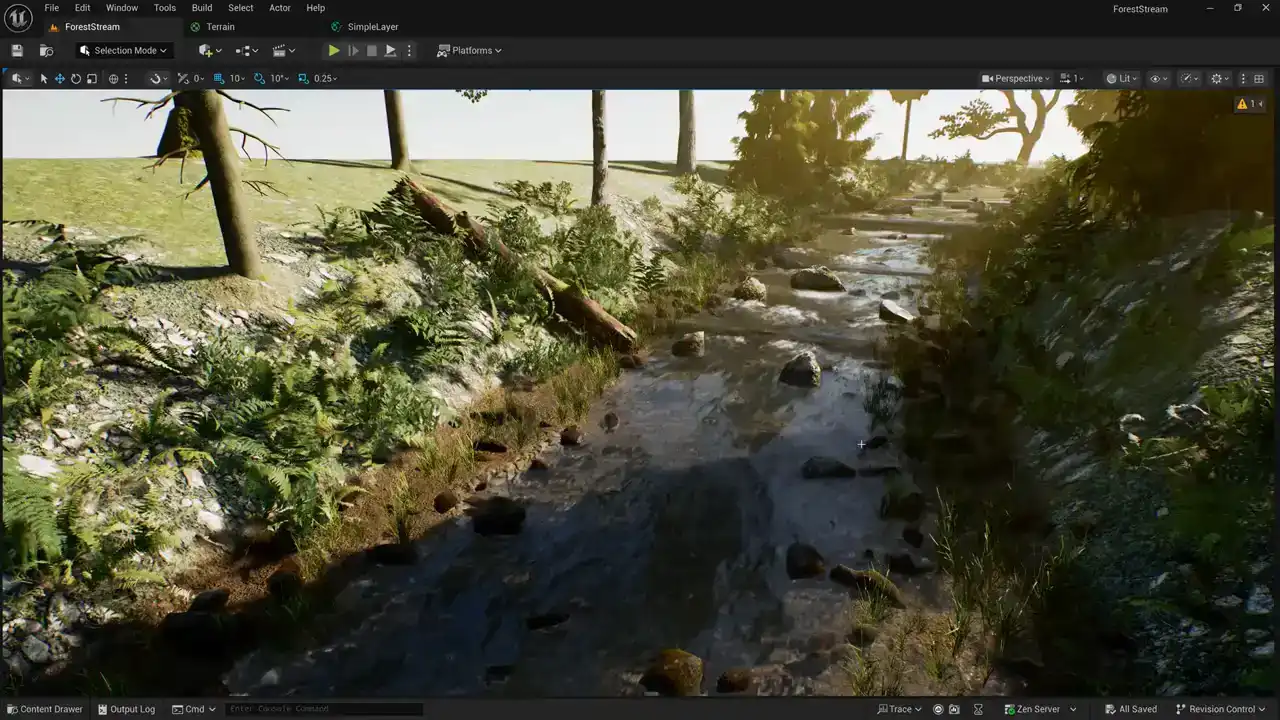
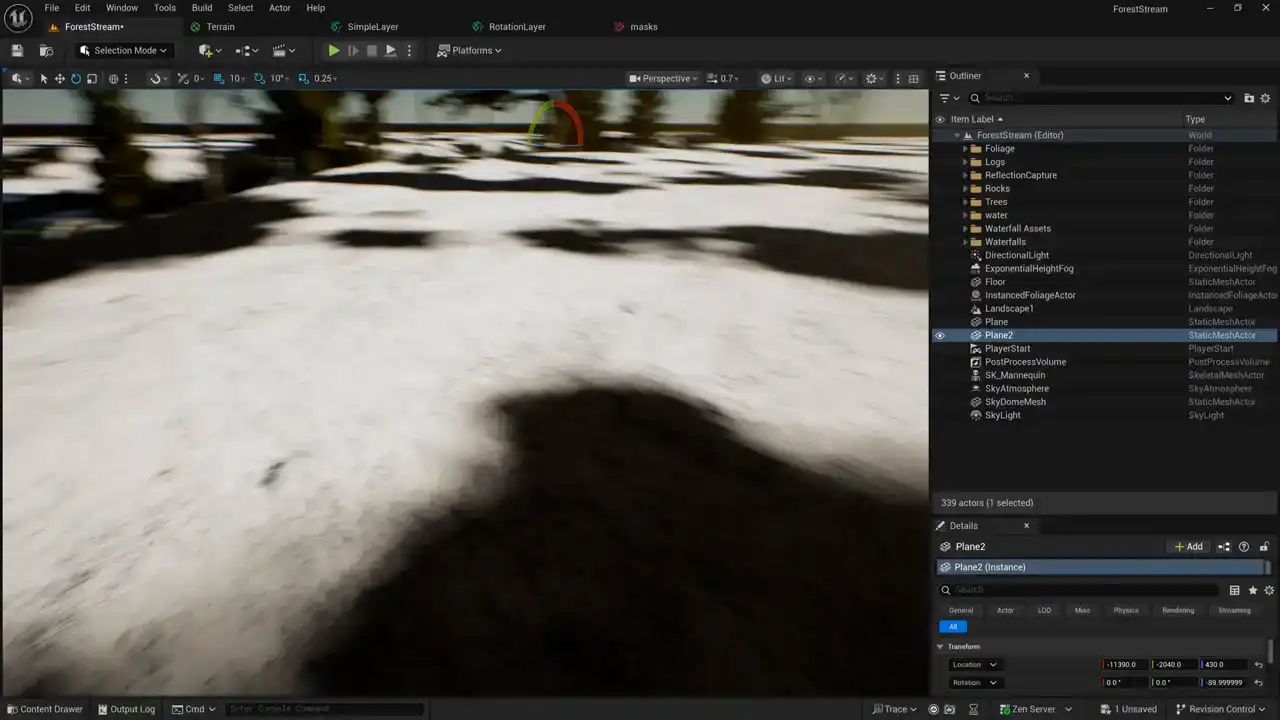
is a little bit of tiling still happening but we've done a pretty good job of breaking it up by sampling a second version of our material and and rotating it 90 degrees and then blending it back in with that mask. This solution doesn't solve distant tiling. You still see the tiling if we look off here into the distance. But here, close up, we see less material tiling by using this method of blending between a standard version and the rotated version of our materials.

Okay, so that's a pretty cool technique for breaking up material tiling.
Let's go ahead and switch over to Unity, and I'll show you how to do something similar there.

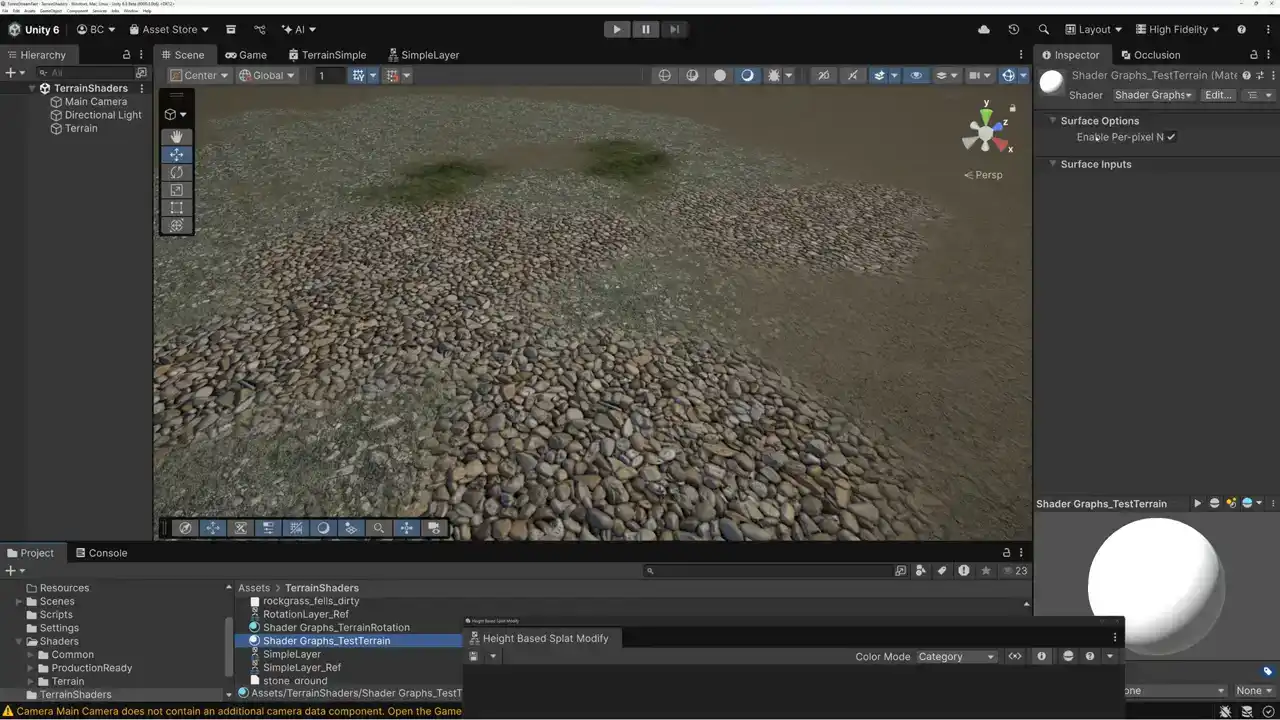
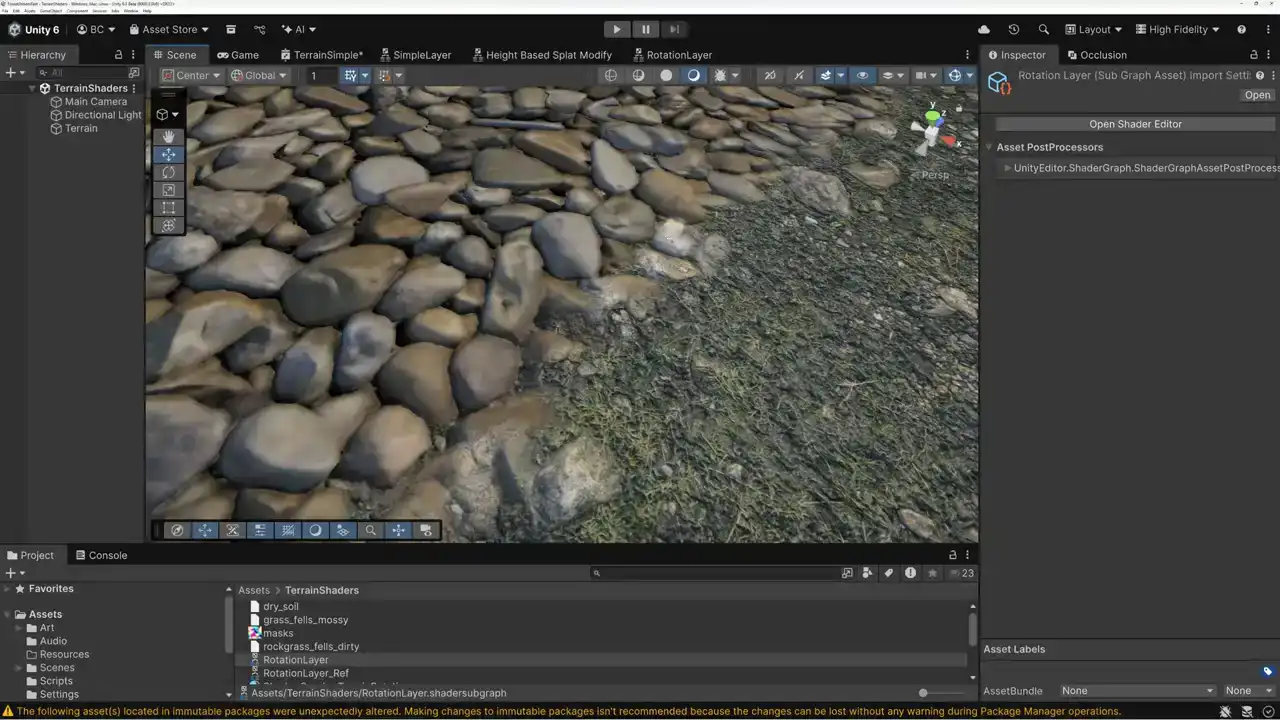
All right, so here we are in Unity. And last week, somebody mentioned down in the comments that it didn't look like the height-based blending was working at all. I don't see any height-based blending here. We're just getting like this nice, smooth, soft blending. And so I actually did take a look at it and I figured out what was going wrong. So let's take a look at our shader. We'll fix this really quickly before we start doing tile breakup.
So looking at our shader here, we can see that there's this node down here at the bottom called Height-Based Splat Modify. And this is a node that ships with Unity version 6.3. So let's open this up and take a look. If we come over here, we can see that there's this custom function node called height transition value. And let's open this up and take a look at what it's doing. So if we take a look at the code that's being generated here, we're basically trying to get a value called height transition. And this is a value that comes from the material.
But if we take a look at our material in the scene, you can see that there's no value over here on our material called height transition. This node was depending on the fact that a terrain material would have that material value added automatically, and it's not there.
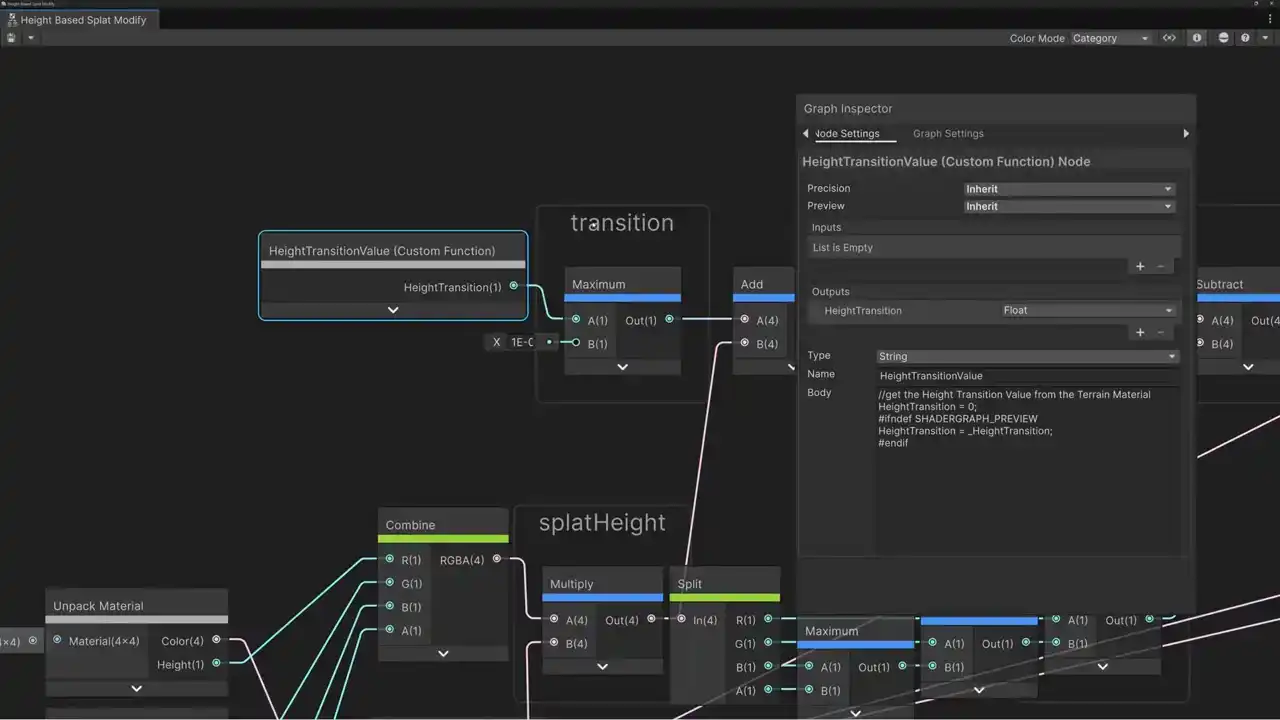
And so we need to alter our height-based splat modify to add in this value ourselves. So let's go ahead and open up the Blackboard here. And we need to add a new parameter and we'll call it, let's call it height sharpness. And we'll come over here to our inspector. And here we want to pick this promote to final shader. and then show in inspector so that our value is is exposed in our material and then we're going to set the mode to be a slider and we're going to slide between zero and one and we'll go ahead and save this oh and there is one other thing that we need to fix here let's turn off our blackboard in our inspector. And we have this value here that turns off our height-based blending based on a keyword. But again, I don't think this keyword is actually functioning correctly. And so let's just go ahead and bypass this. What this does is it turns off and on height-based blending. But I think we're only ever getting the off version of this. So let's just bypass this terrain blend height node here and we'll just skip it and actually we'll just delete it. So if I save this here now when
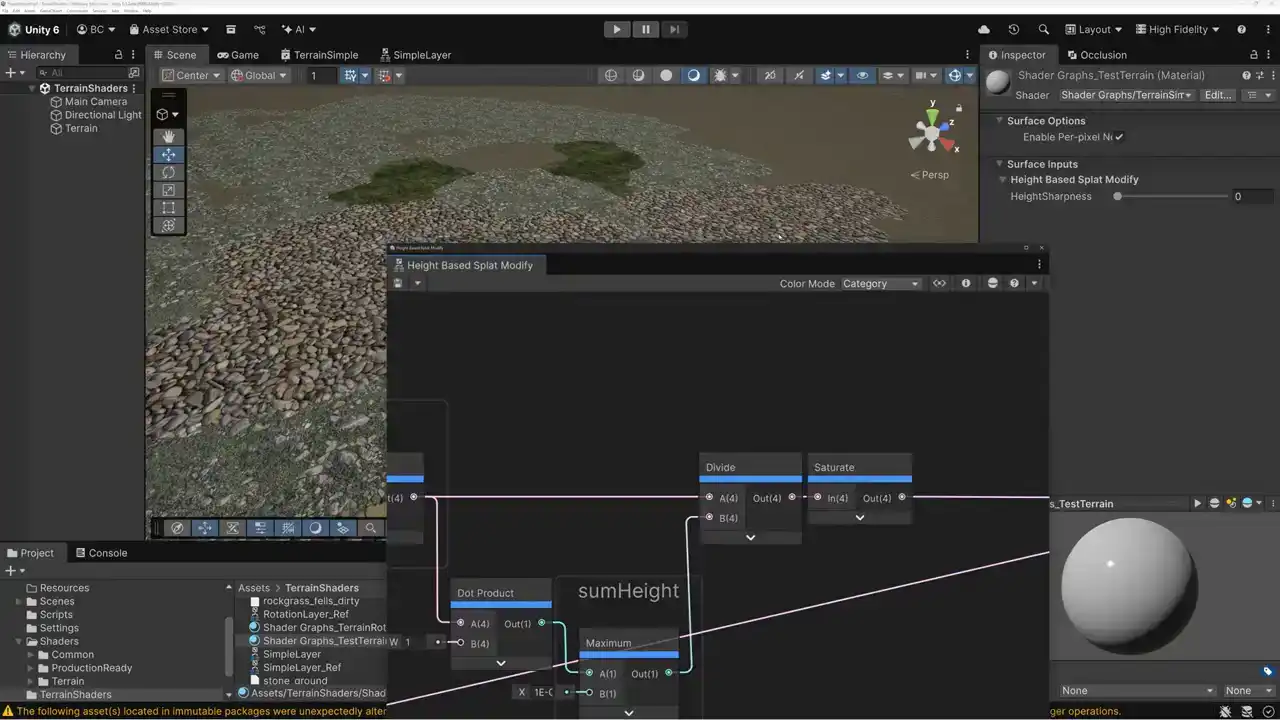
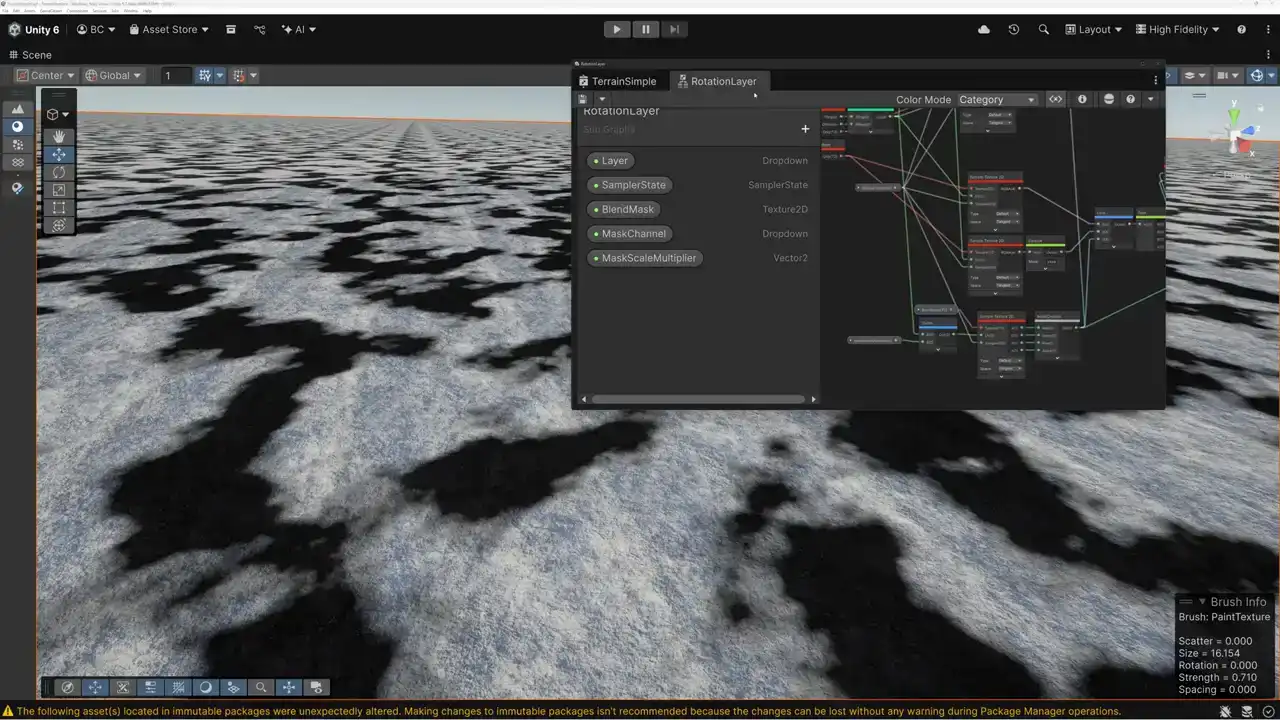
we come over to our material now you can see I have this height sharpness value that we can adjust to make our our terrain blending work Alright so we should be able to move our slider back and forth and see our height sharpness working but I created it but I forgot to add it to the graph so let's come over here here's our height sharpness in our blackboard I'll just drag it into the graph and instead of our height transition value here we're gonna pass in our height sharpness value and now we can use our heart height sharpness slider here to make our transitions nice and smooth and blended or to make them nice and sharp so as I turn this down you can see now I've got a hundred percent sharpness on the height blending and then as I increase it I can kind of blend it out and make it smoother. So that was kind of what we were hoping for last week, but we didn't get it because our height-based splat modify node was not set up correctly. Okay, I think we're ready to start doing some blending to get rid of our tiling artifacts. So let's pick our simple layer node, our simple layer subgraph here. I'm going to copy and paste it, and we're going to call this one rotation layer instead of simple layer. And then we'll open up this subgraph and get to work. So here's the portion of the subgraph that's unpacking things. I'm just going to slide this over so we have some more room. And we need to do our texture sampling twice, just like we did in Unreal. So I'm going to copy this second layer here, or this, I'm going to make a copy of our sample texture node. And the second version needs to swap the X and the Y of the coordinates. So we'll add a swizzle node.
And instead of X and Y, we're going to do Y, X. And we'll pass those coordinates in just like that. And now we need to lerp between this sampler and our second one. So we'll add a lerp node. We'll pass the red and green, the RGBA in. and into this one as well. And then we can, coming out of here, we can plug this into color in our pack material subgraph and also color on our output. And then we need the alpha channel separate. So we can add another swizzle node and just take the alpha channel. And this will pass into our smoothness on our pack material subgraph and also the smoothness on our output. Okay, that's the color and smoothness. Then we need to do the same thing down here for our NOH. So we'll copy this texture sampler and we'll pass in our swizzled texture coordinates. and then we'll add a lerp node here to blend between our first RGBA value and our second RGBA value and again we need to make sure that we take care of our normal map here since we're rotating our normals we need to swap the x and the y so I'm going to add a swizzle node here and we need y X Z W then we're going to pass that into our lerp and that is going to take care of our normals now we need to pass our values out from our lerp so we've blended between our two different layer samples now we need to split these values out and we're going to take the red and the green for the normal we're gonna take the blue or the occlusion and we're taking to take the alpha or the height all right perfect so the last thing that we need to do is create our mask texture sample And we go ahead and do that down here at the bottom So I'll copy this texture sampler here. And we need to add a couple of parameters in our Blackboard. So the first one we're going to add is a texture 2D. And we'll call this one our blend mask. and I'm going to go ahead and assign a default value for it here. We'll use our masks texture. We also need to create a subgraph drop down that will allow us to specify which channel of the texture we're going to sample or we're going to use as the mask. so I'm going to call this mask channel and then over here in our inspector we're going to we're going to name these so that it's clear what we're talking about we're going to do the red channel the green channel the blue channel and the alpha channel and I'm going to set it to default to the blue channel because I like using that one the best okay so now we're going to bring in that dropdown we just created. And for our sampler here, we're going to pass our four different channels into our dropdown. So on our subgraph, when we use that dropdown, we can choose the red, green, blue, or alpha channels as our mask. And now I can take the result of that mask channel drop down block and output those and use that as our lerp to blend between our two different samples our noh texture there and our cs texture there okay and then the last thing that we need to do is set up our a mask scale multiplier so i'm going to create a vector 2 value here and we'll call this mask scale multiplier. And again, I'm going to give this a value of 15.97 because that's the tiling value that I've found that I really like for that blue channel mask. And then we'll bring this in. And I need the coordinates that we've created up here. and we're going to divide these coordinates by our mask scale multiplier and then we're going to use this to sample our mask. Okay that's all set. So you can see that we are sampling our color and our smoothness twice and we're sampling our normal occlusion and height twice. And then we're blending between those two samples based on this mask here that we've given a different tile frequency. And all of that is working together to break up our texture tiling artifacts. So the last thing that we need to do is take this rotation layer sub graph and put it into our terrain shader so here I've got four simple layers and I can replace one or more of these simple layers with the more complex version that I just created now one thing that I will recommend here you don't have to use that rotation layer sub graph that we just created for all four of these. Maybe you have different materials and some of them look a lot more tily than others. You should only use a technique here that's more complex for the ones where you really need it. You don't necessarily have to use all four of these with this tile breakup technique. You can just replace one of them with it.
And so that's what we're going to do. Let's take a look here really quick. I think maybe this moss layer is going to be the one that displays the most tiling artifacts. So let's paint down some more of that moss just so that we can see it. So that we can see what our tiling artifacts look like. I'm going to select our Fells Mossy layer here. And we just paint down a big chunk of moss over in this area so that you can see And right now that is a pretty repetitive material there And so let's see what happens when we replace that subgraph with our rotation layer. Let's see, that's our third one. So here in our terrain sample, we need to replace this one right here with our more complex version. So we're going to set here. We've got zero one. We're going to set this to layer two. And then we're going to pass out the material from there. we need to connect up the sampler state and we've already got our default mask set and our our default uh scale multiplier set so that should be all that we need to do oh we need to pass it out to our height blending here as well okay so we just replaced our simple layer with our rotation layer let's save it and we'll switch back to our scene. And what we should see is that our tiling artifacts are significantly reduced. Now I'm still seeing a lot of tiling artifacts here. And I think that's just because we've repeated our materials so many times. But if we do zoom in here, we have less tiling close up than we did before. Now one thing that I could do is just kind of play around with is just kind of play around with our multiplier value here until we get something that works a little bit better.
Okay, I found the problem. What I had done is I created this blend mask input here, but I didn't actually hook it up to the sampler, and so it was sampling the wrong thing. But I was able to discover that by passing my mask channel out as the height and then setting or just wiring that height directly out so that it displays as color. But let's go ahead and fix that now.

So we're not passing that out anymore. But now that we're sampling that mask correctly, it's breaking up our texture tiling quite a bit more. And I really like how this is working. Let's make sure that our value is set right here. Again, I want to set this to 15.97 for both of these. Yeah, there we go. Now we've got our tile breakup going on. This is working better. Okay, whew! I'm glad we got that sorted out. All right, so you can see we're sampling our textures twice, once rotated and once normal and then blending between them based on this mask texture here. And it's a pretty decent technique. And again, you don't need to use it on all of your layers, just the one or just the few that are specifically having problems with repetition. You know, this dirt layer here, it's just using the simple one, but because there isn't a lot of like contrasty detail in it, you don't see as much texture tiling happening on that layer
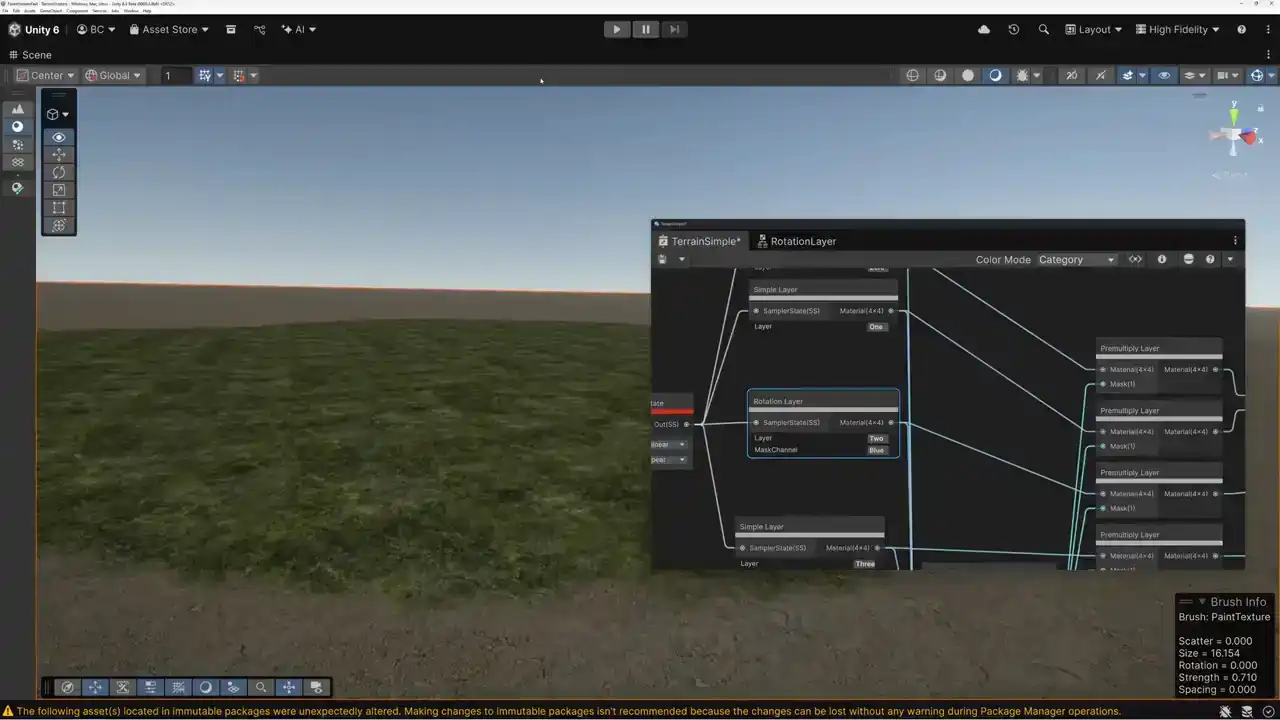
as you do on this moss layer here. So it's important that you not take a technique like this and just kind of apply it wholesale across everything. Just apply it where you need it. okay that brings us to the end of the video thanks a lot for watching today next week I may decide to show you another technique for breaking up texture tiling or I we could also I could show you a technique that I've developed for making really efficient terrain that uses fewer texture samples not more like I showed you today. Let me know down in the comments which of those two you'd like to see. And we'll go ahead and put that video together for you for next week. Thanks for watching. Have a great week, everybody.