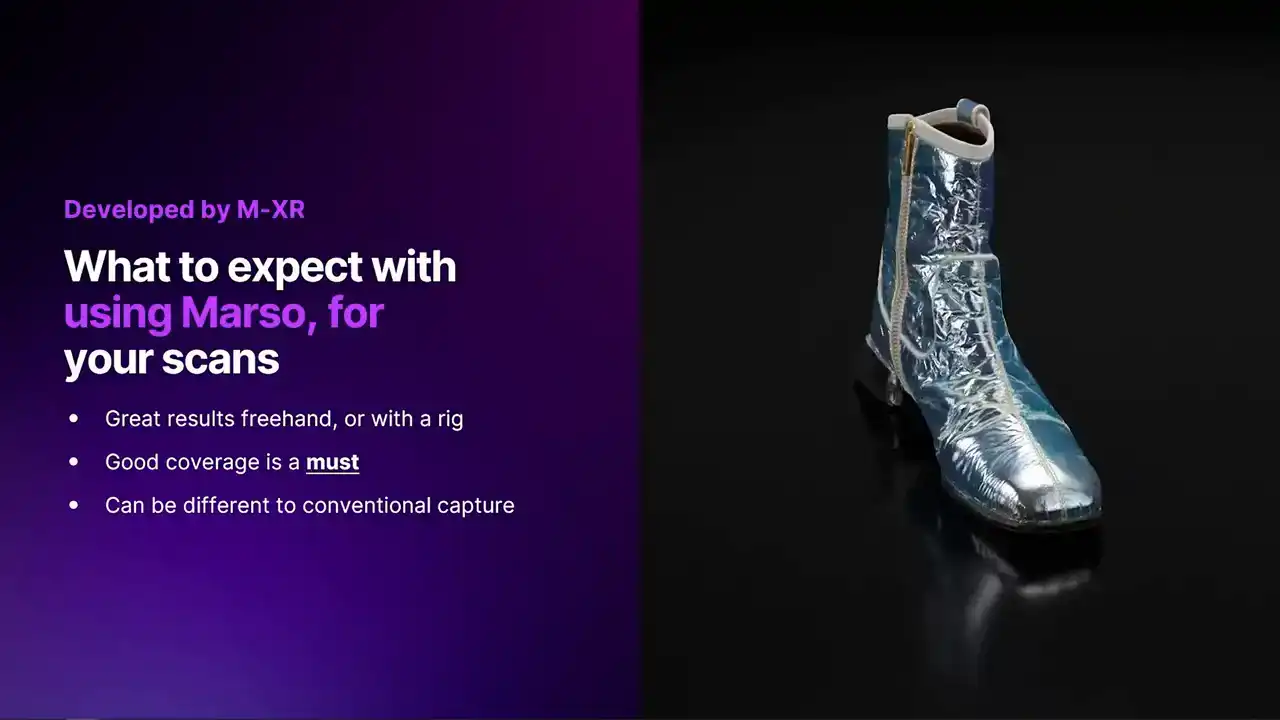
PBR-for-Photogrammetry--Marso-with-Reali
https://www.youtube.com/watch?v=kW9-FD3vulY
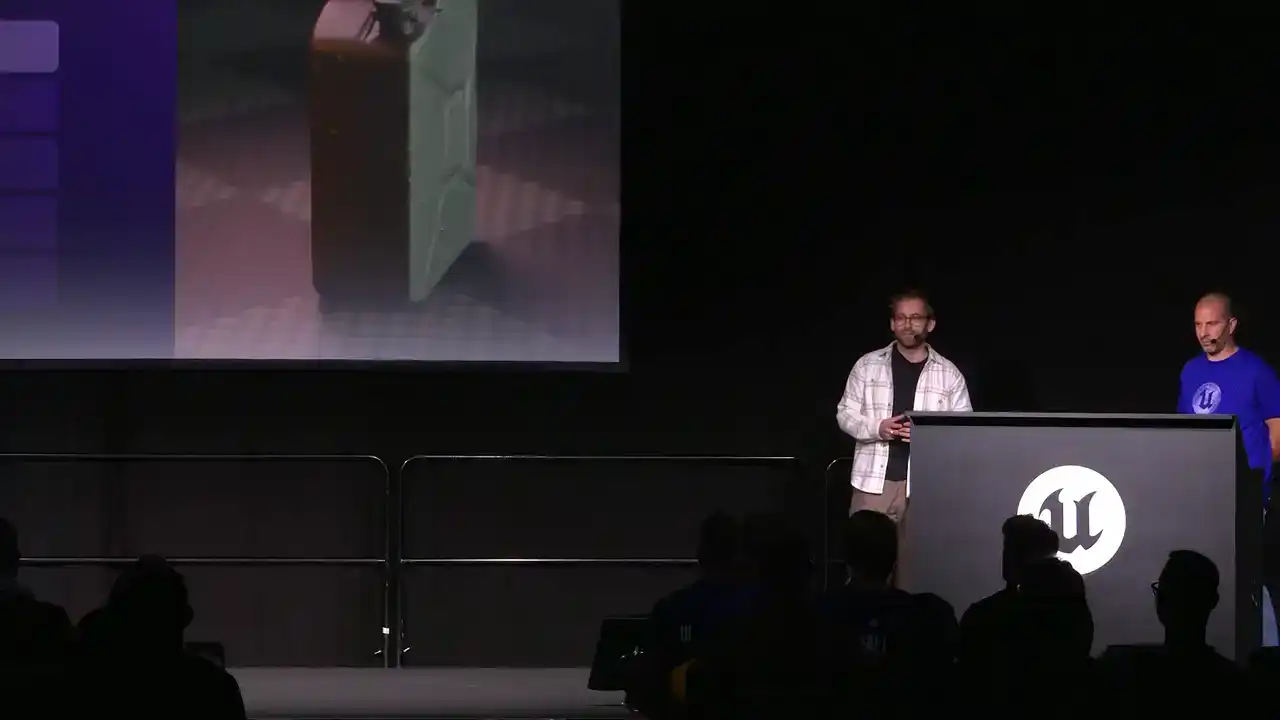
Hey there, I'm Wallace Wainhouse from Epic Games, and I am a product specialist for RealityScan Desktop. And I'm Elliot Round, the co-founder and CTO of MXR, and we build measured PBR technology.
These are some of the results
that Wallace has been capturing more recently
using Marceau and RealityCapture together. Rendered in Unreal.
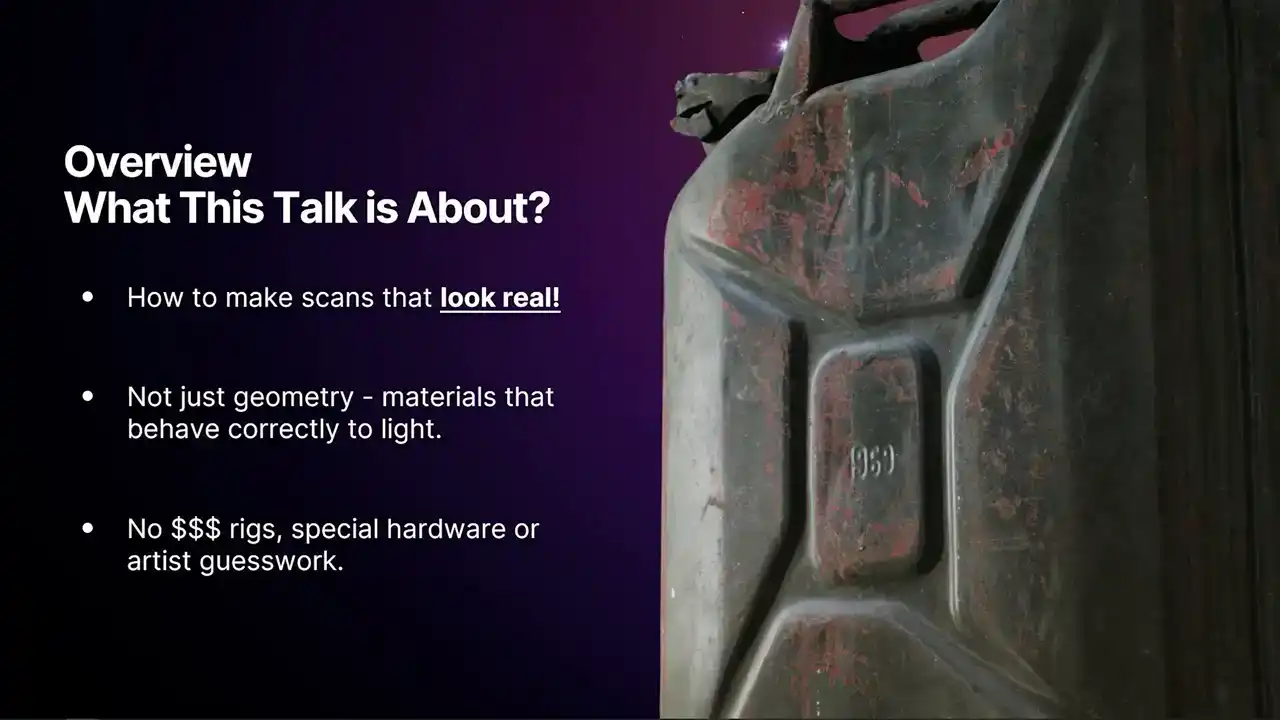
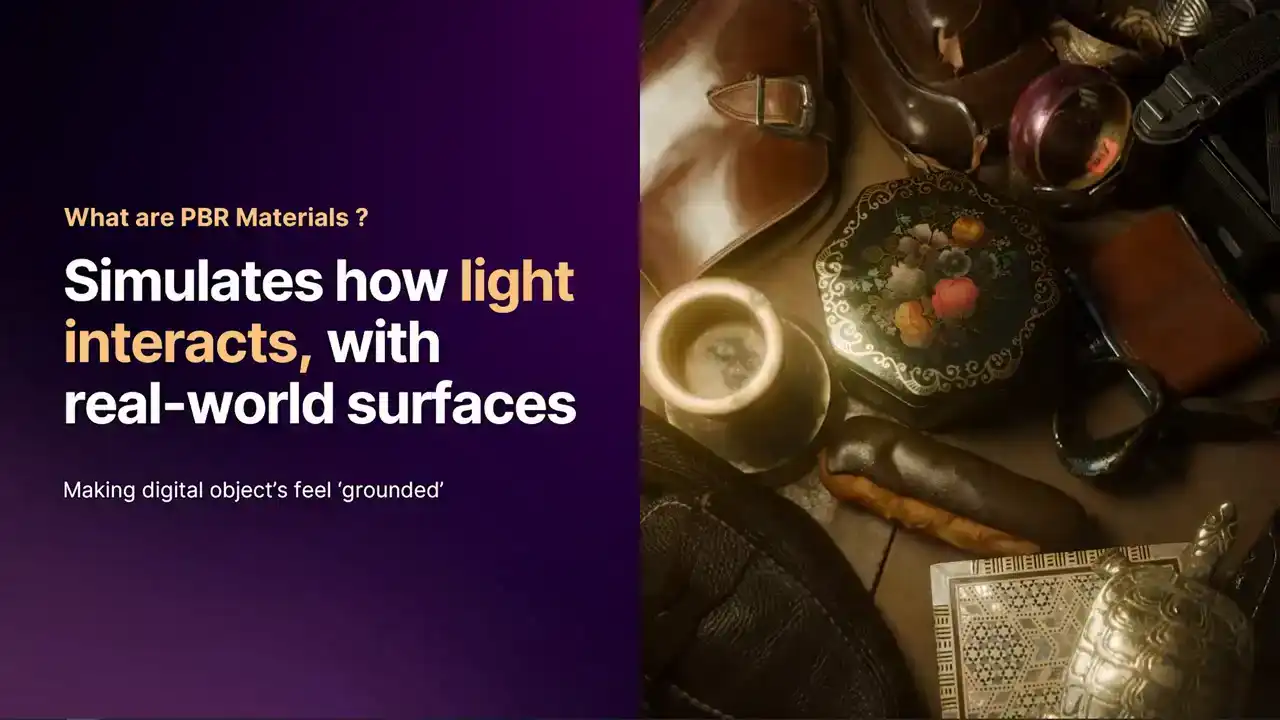
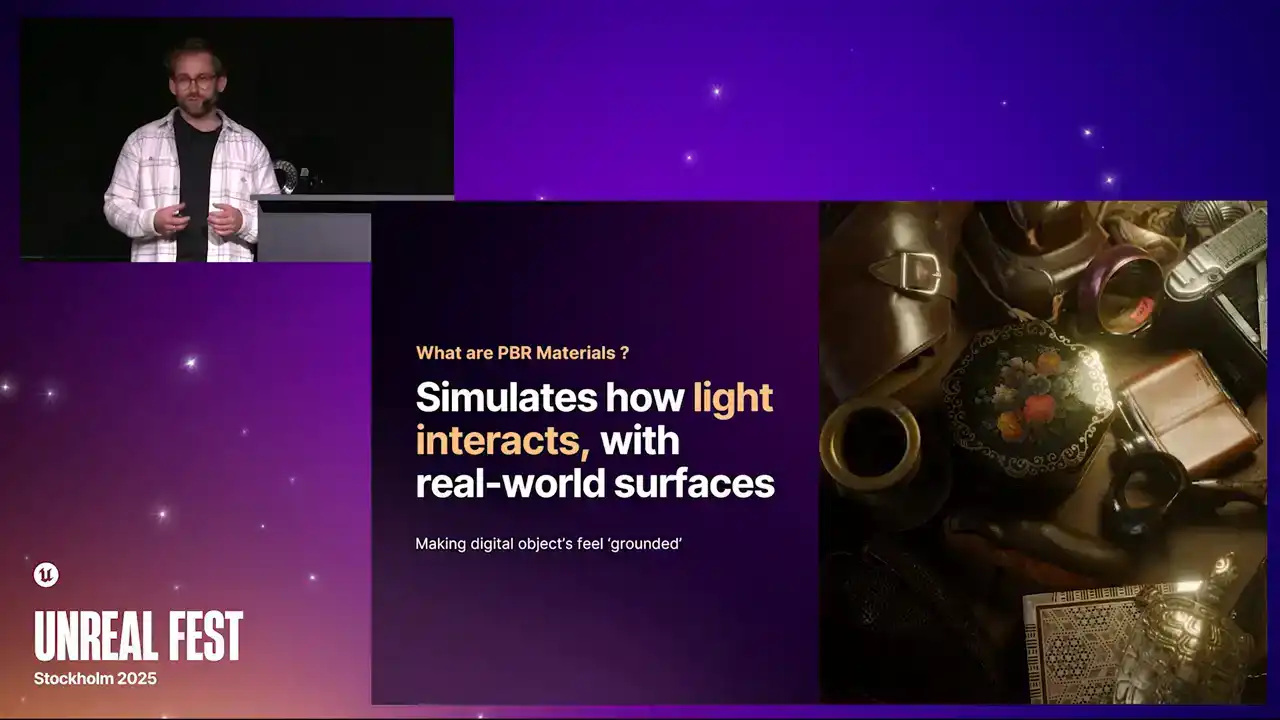
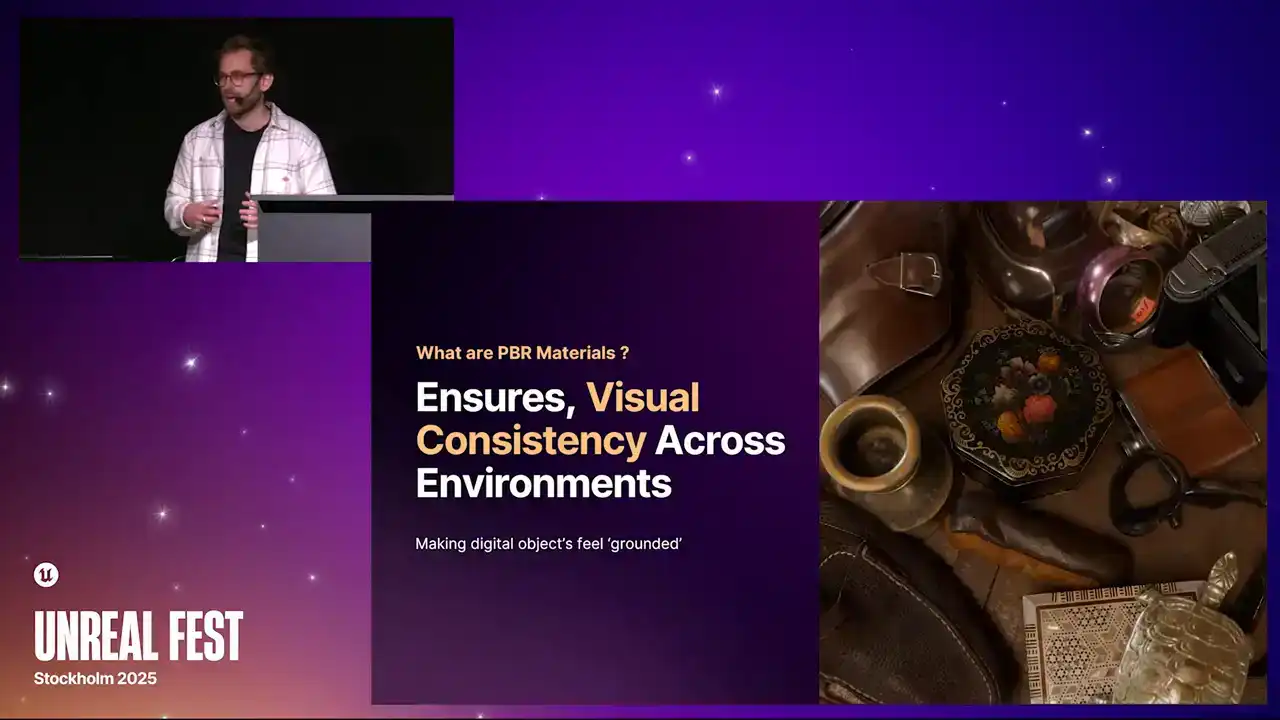
What is this talk about? It is basically about making PBR textures and how to make scans look real. That involves making materials that behave correctly according to light.
If you have any experience of making PBRs, you might know that that can involve using
extremely expensive rigs with special hardware, special expertise, or just a lot of artistic guesswork.
Before we go into the workflow, probably best to start off with what are materials.
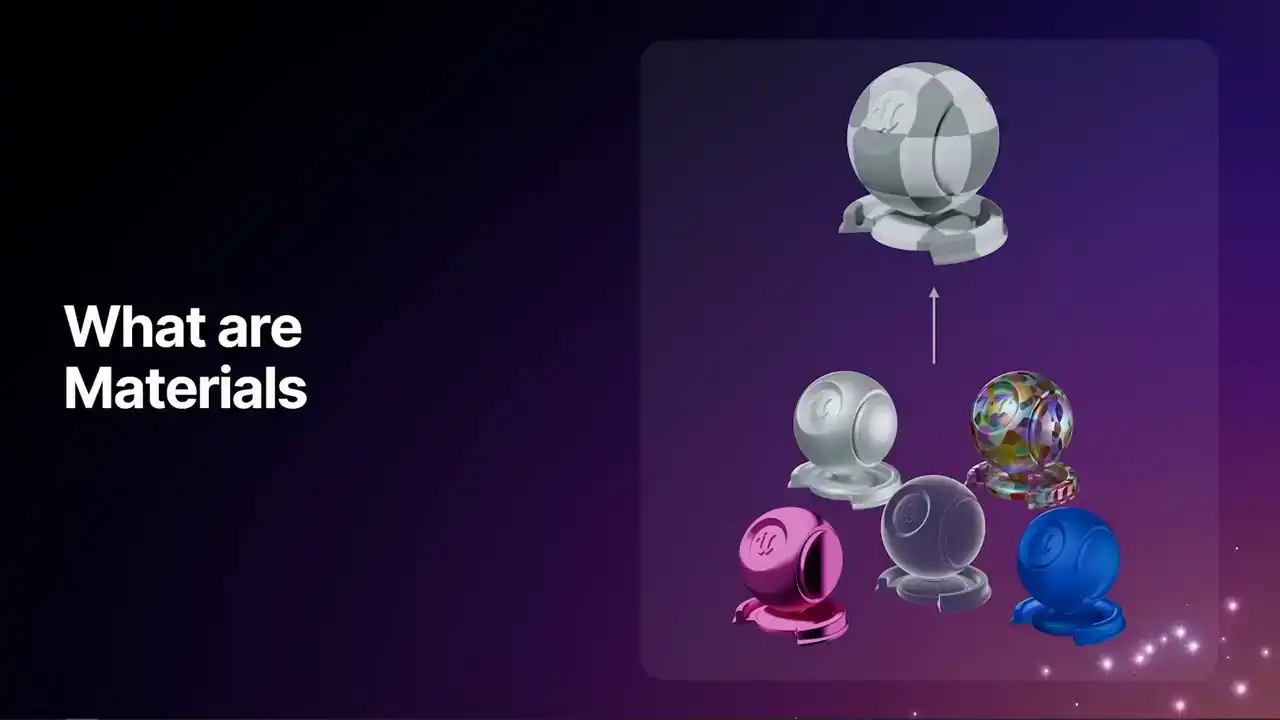
In 3D, you have your mesh, but the Engine needs to understand how best to render that mesh.
This is where shaders and materials come into play. To render a pixel, the Engine has to know, does a way of pass through?
Does a way of bounce off the surface? Does a way of reflect? Can it have a mission? We use materials to create a whole wealth of different styles.
Some of these could be fictitious, They could be fantasy, cartoons. You can do all kinds of different things. But today, we are going to be talking about PBR,

which is a sort of umbrella of Material types.
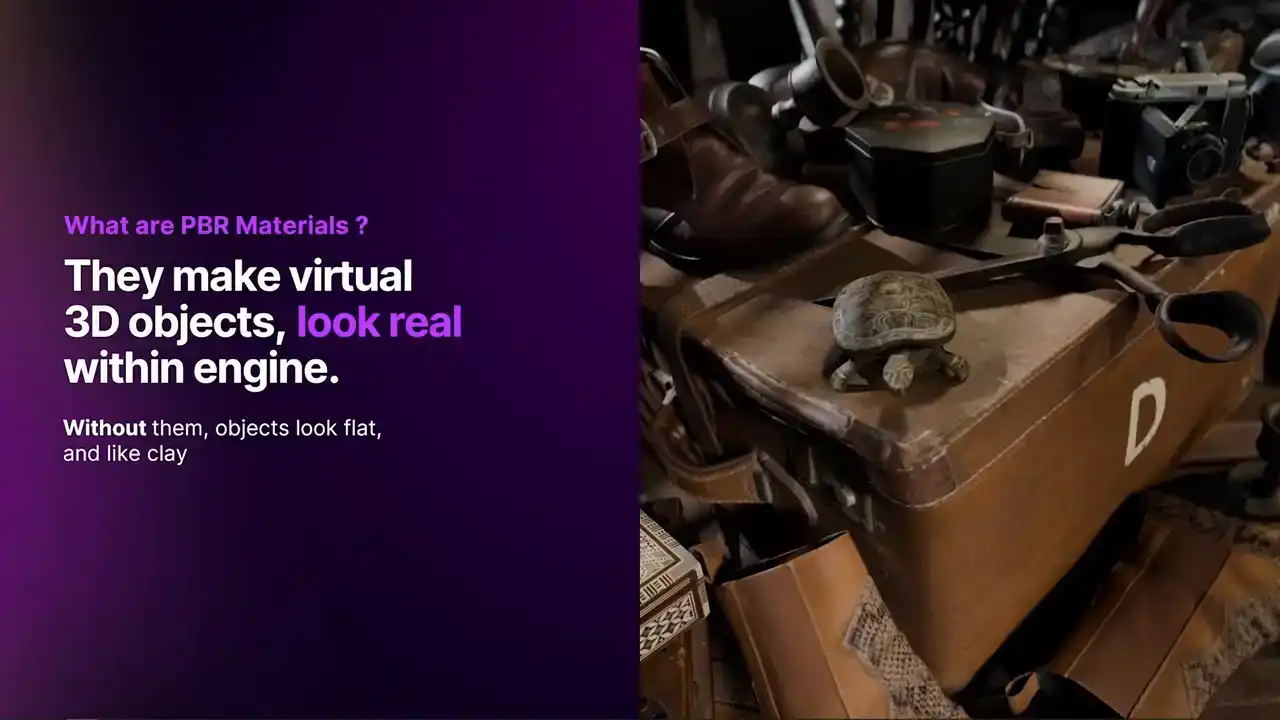
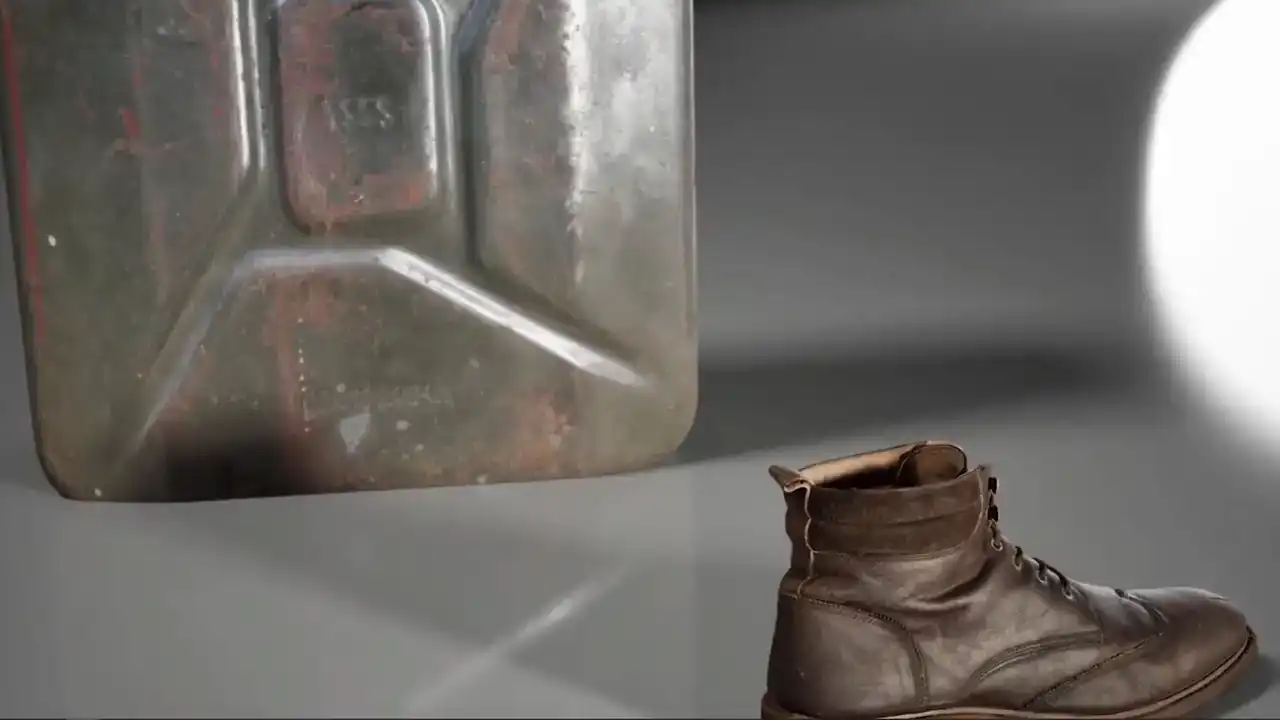
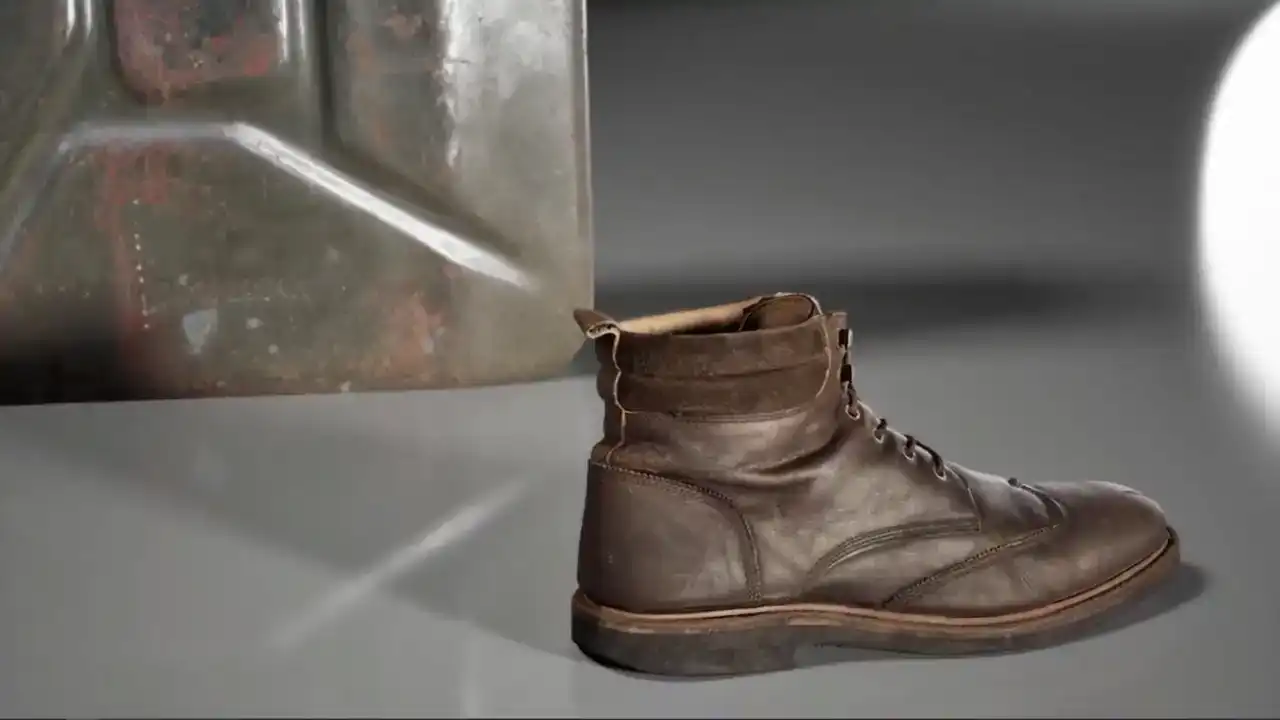
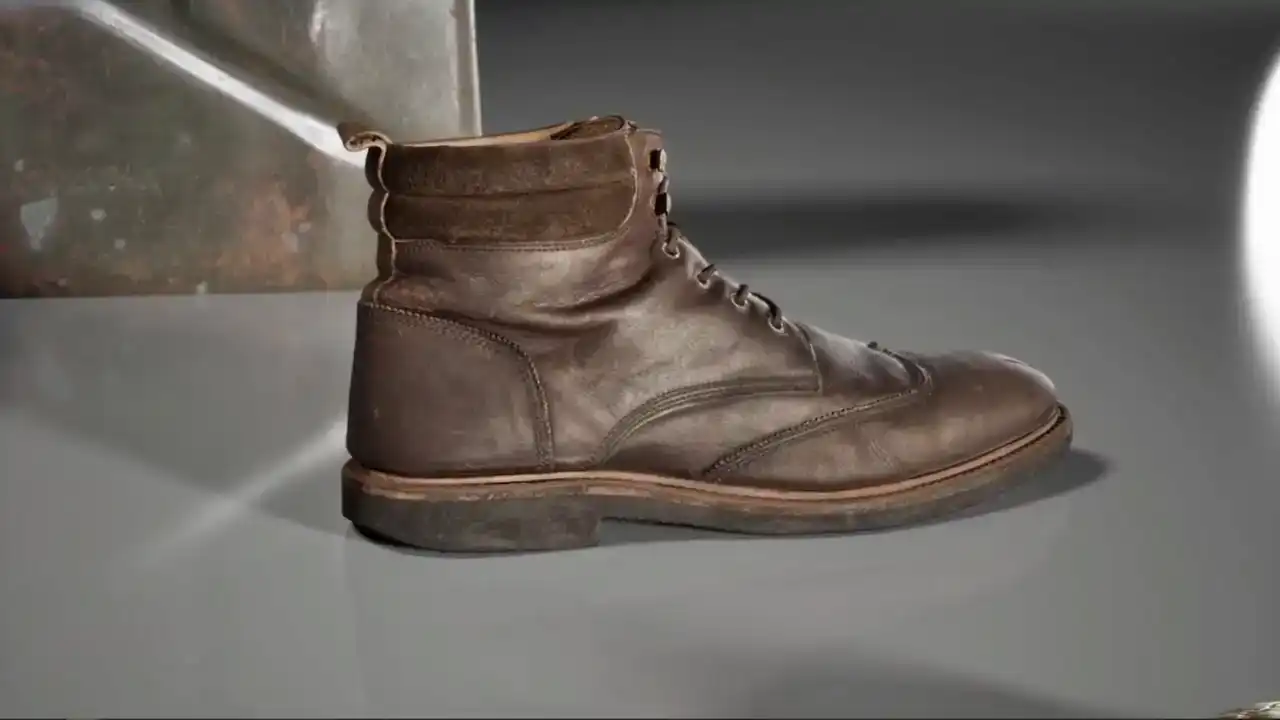
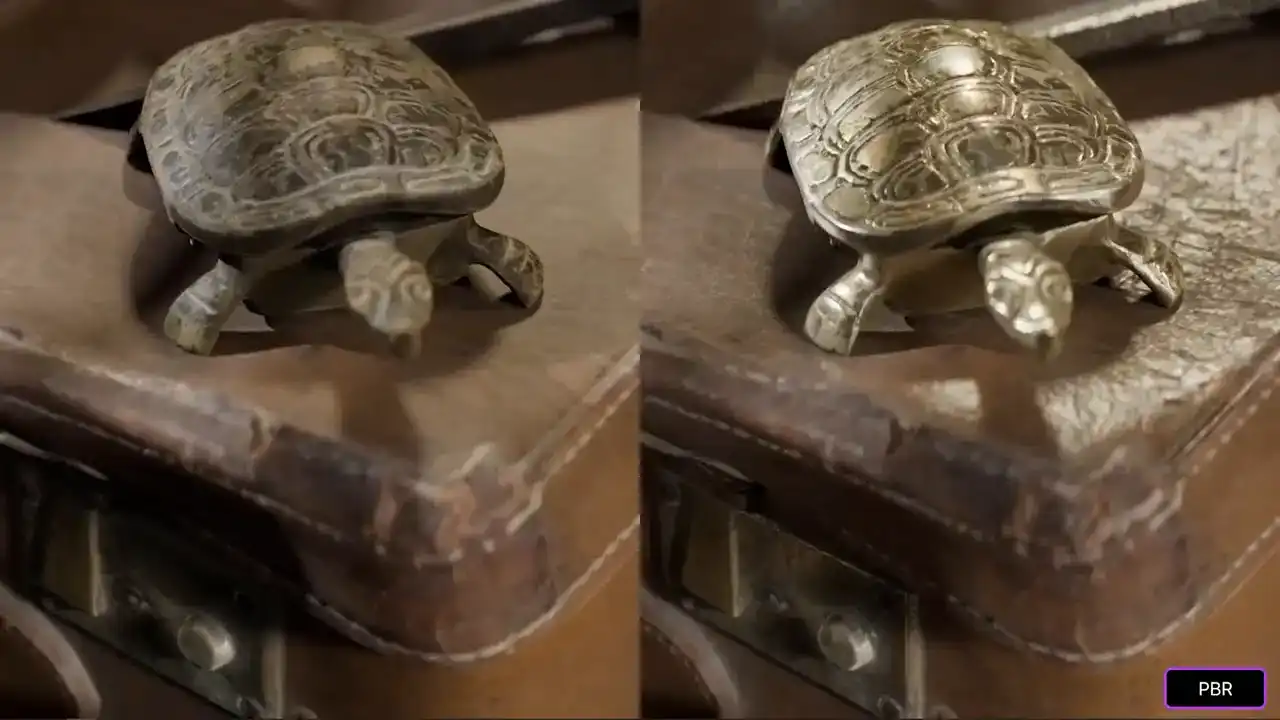
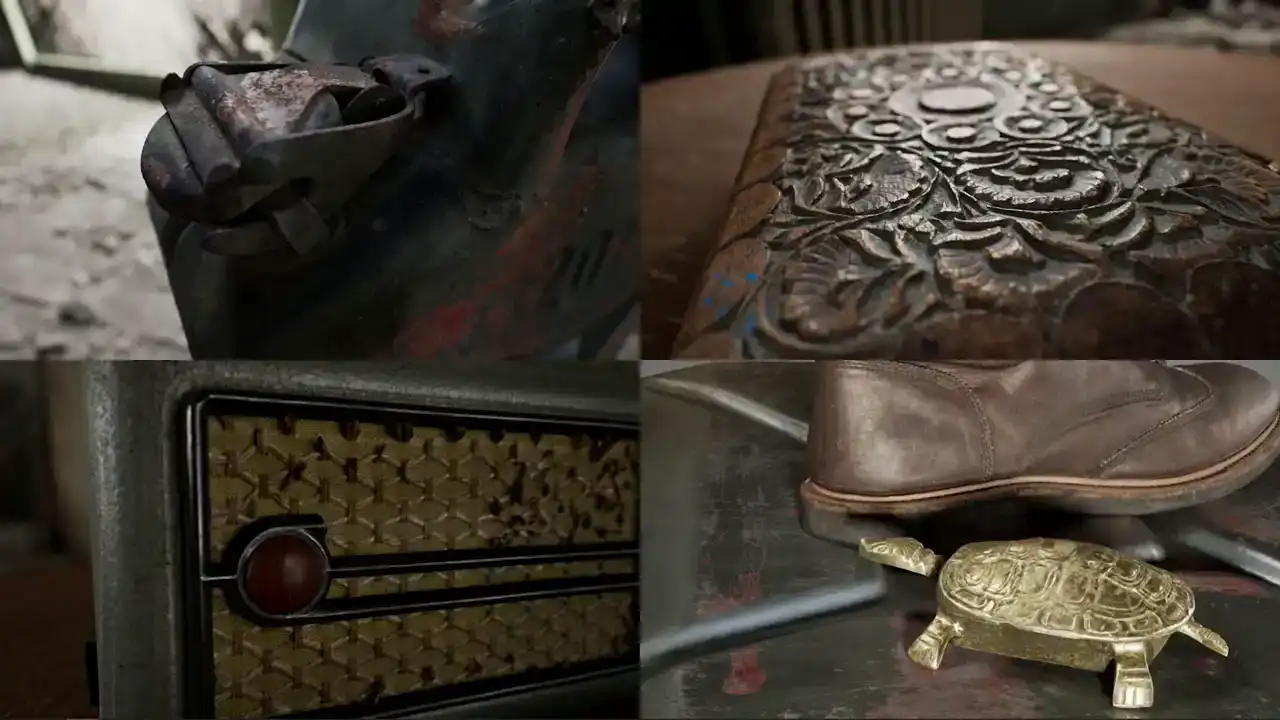
This is a scene that we put together. Lots of 3D scans. They are all real objects. At the moment, none of these have PBR properties. We have the shape. We have got lighting. We have got some simple shading.
But they all look very flat. They all look like they are made out of clay. you do not really get a sense of what each object is made from. As soon as we add the PBR properties into the mix, they start interacting with light. They start to look a lot more realistic, and things come to life.
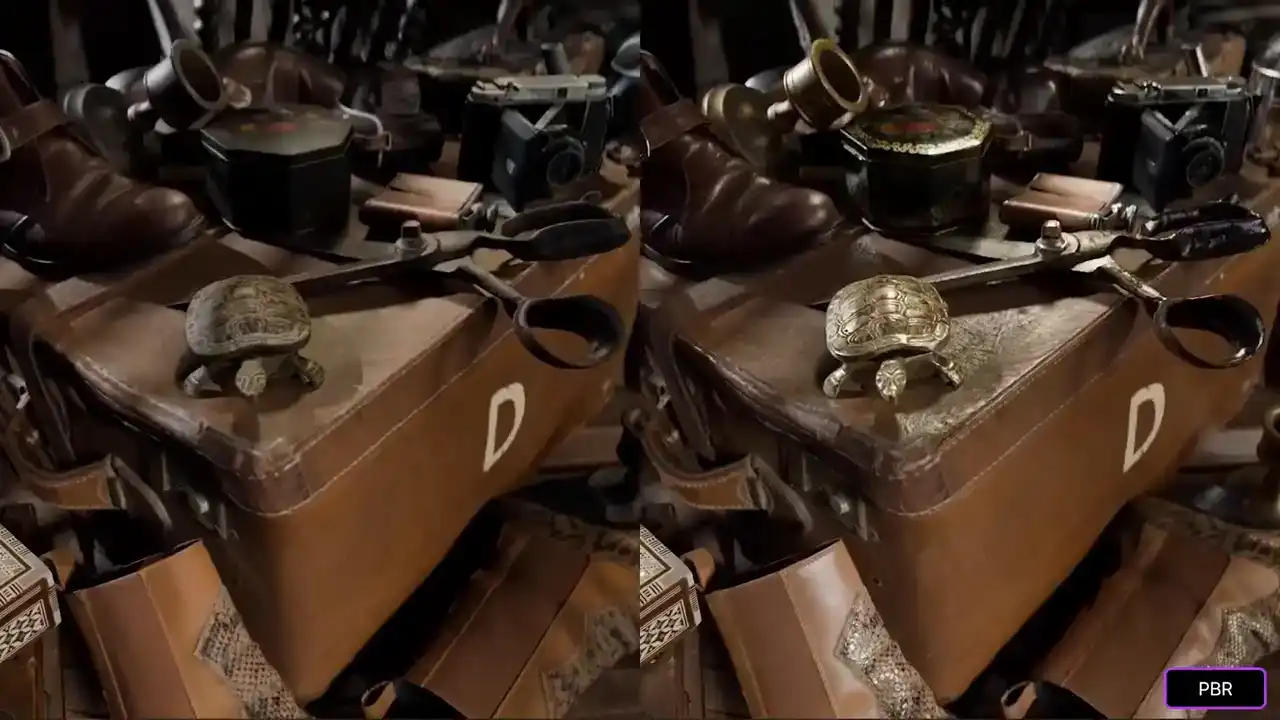
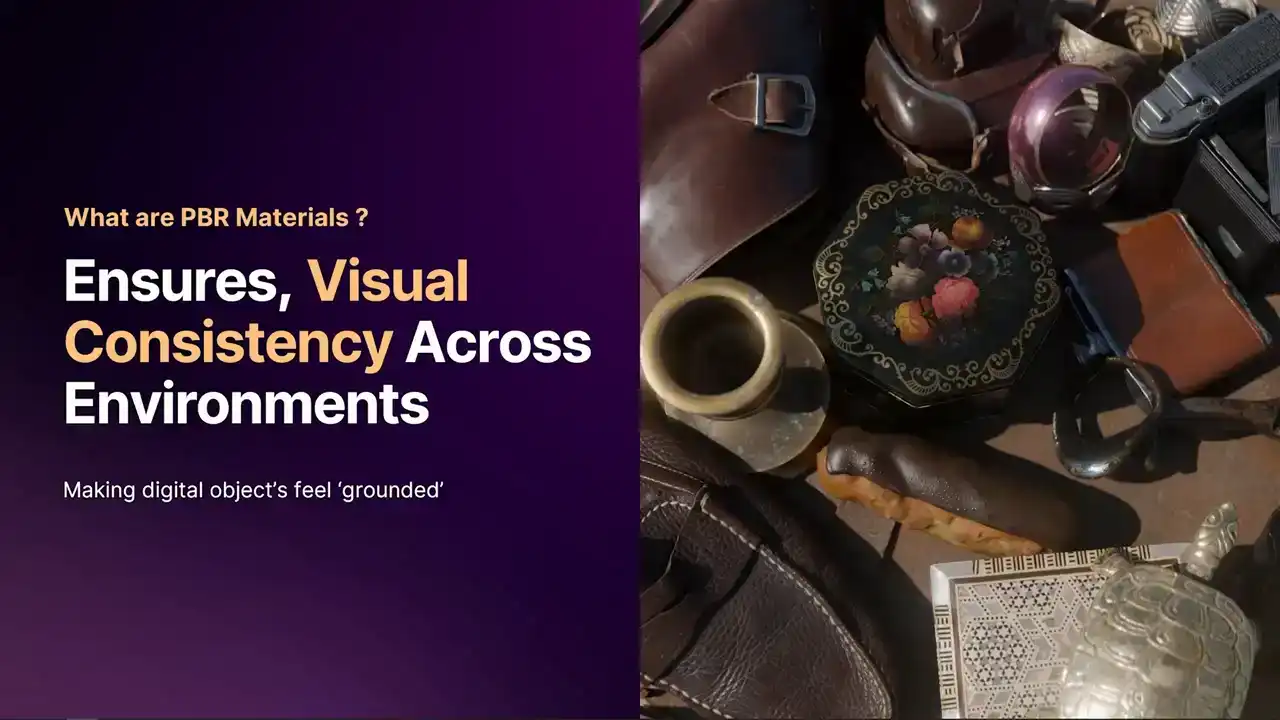
Comparing the two, we can see what things are made out of metal,
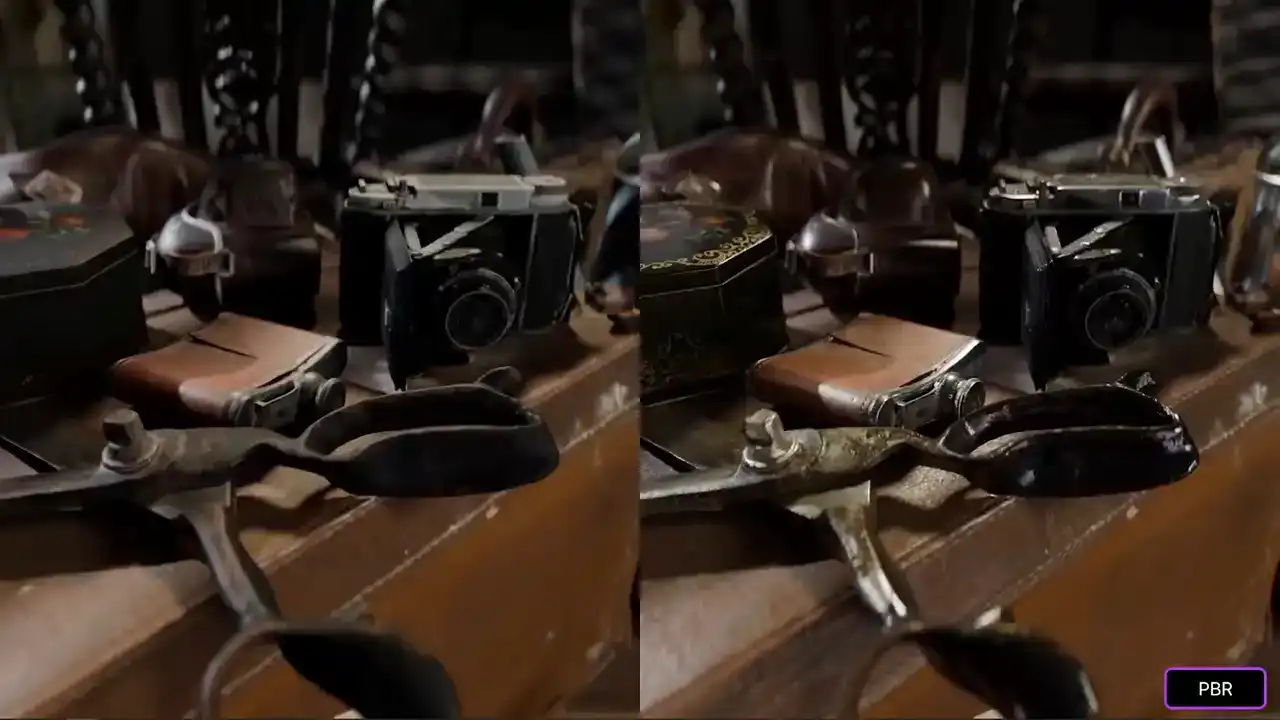
what things are leather.
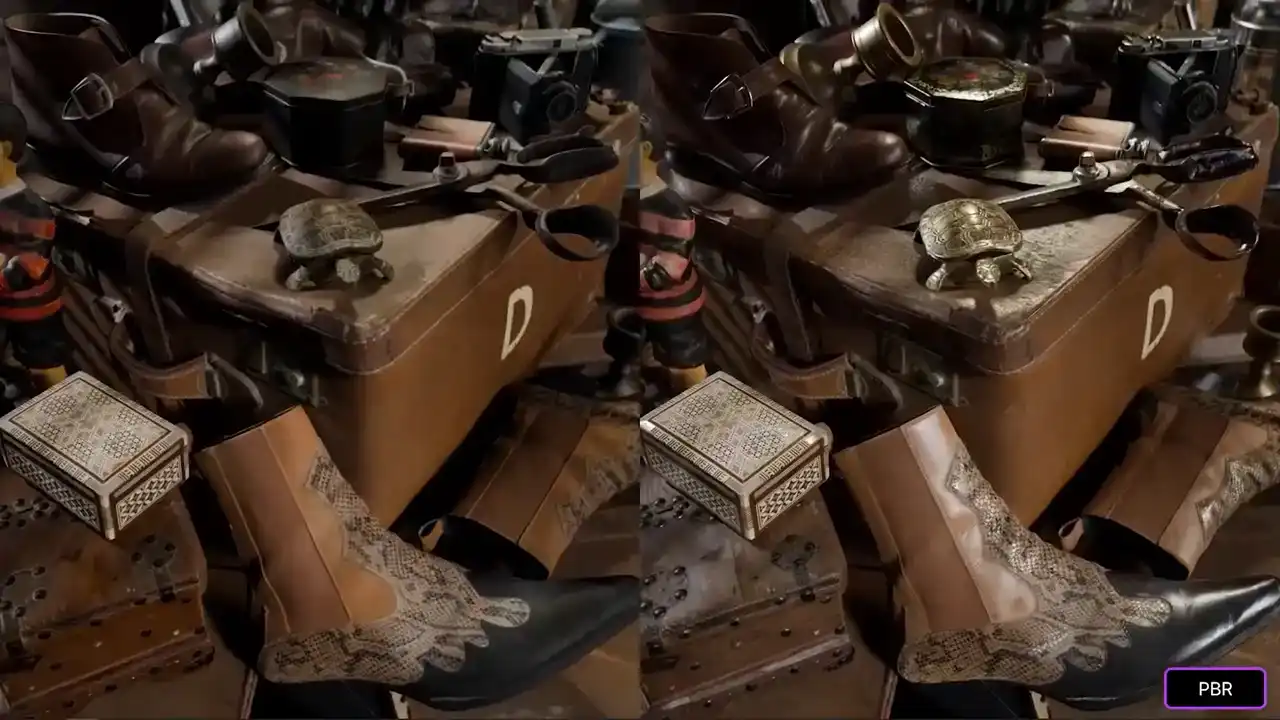
We can almost get a sense of a degree of tactility.
They give things a grounding within the scene.
Something that I find really cool about PBR is just how well you can almost feel the objects.
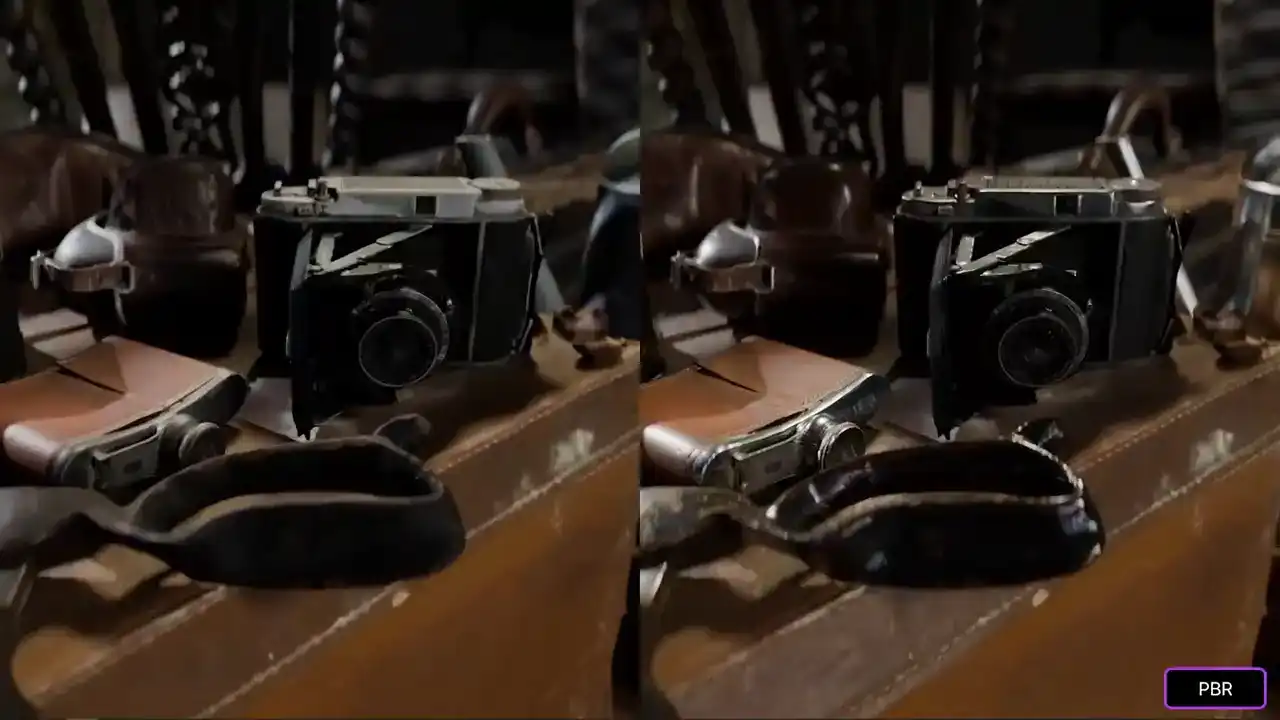
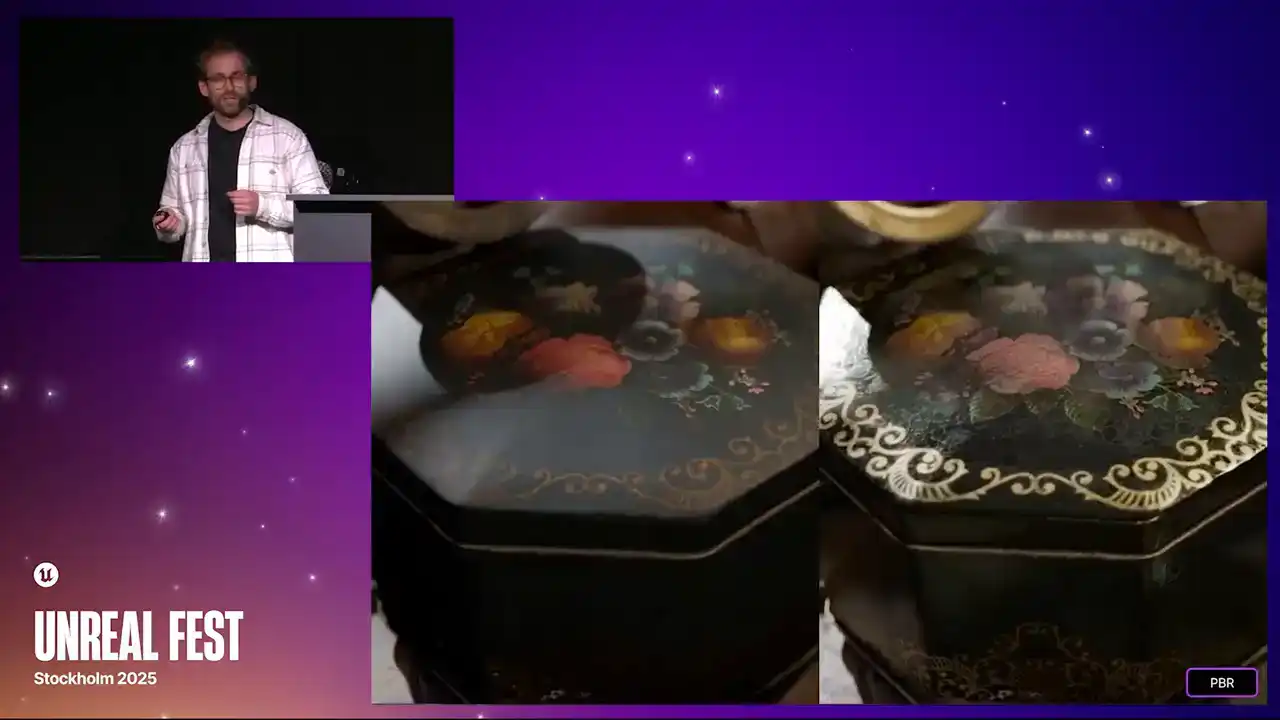
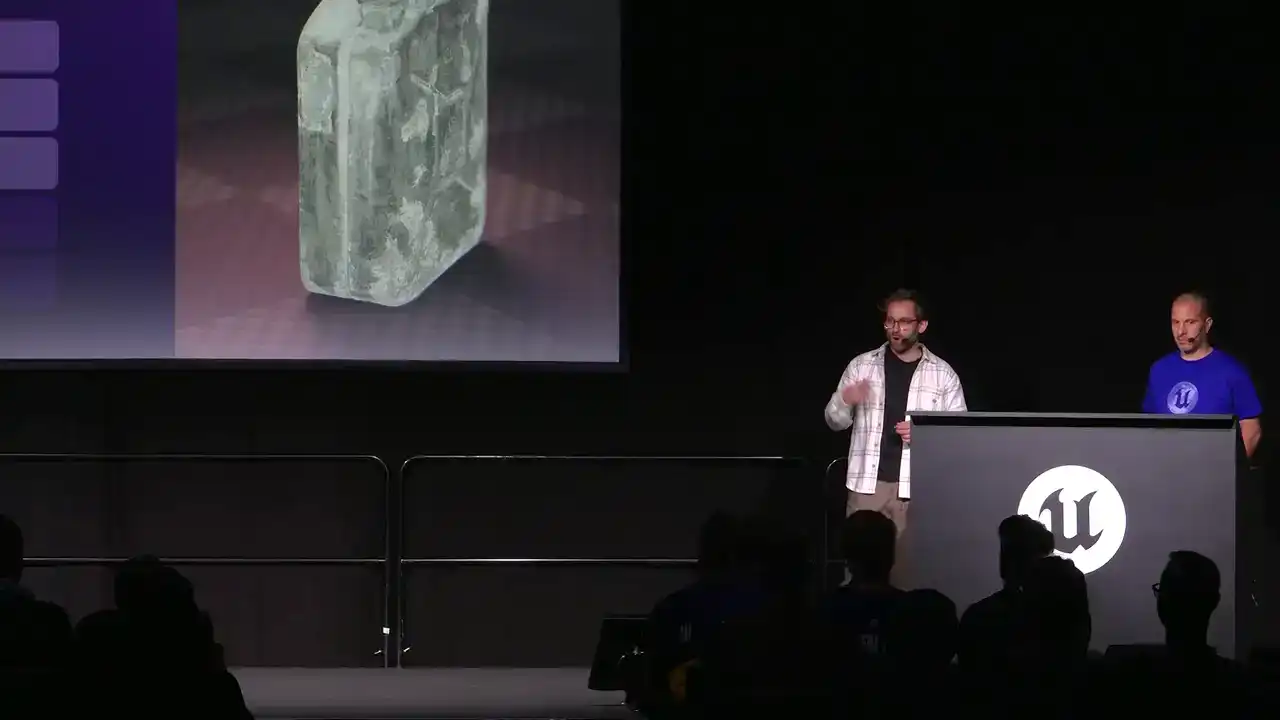
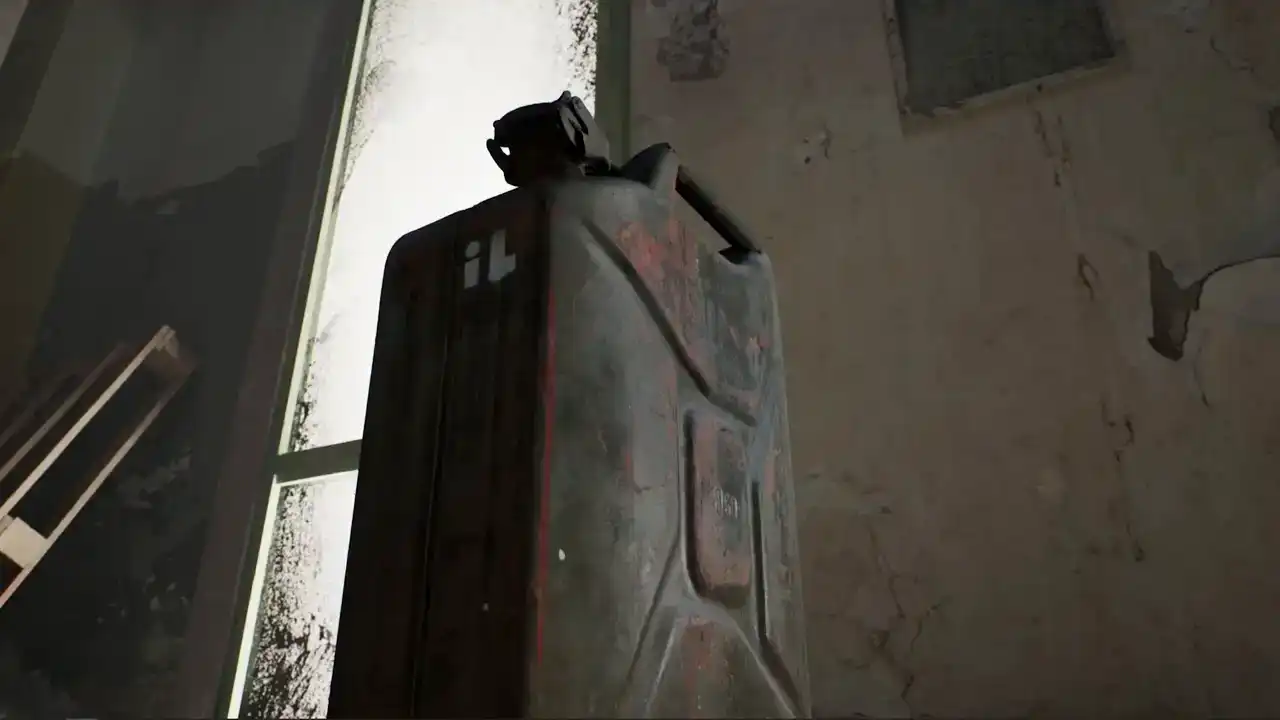
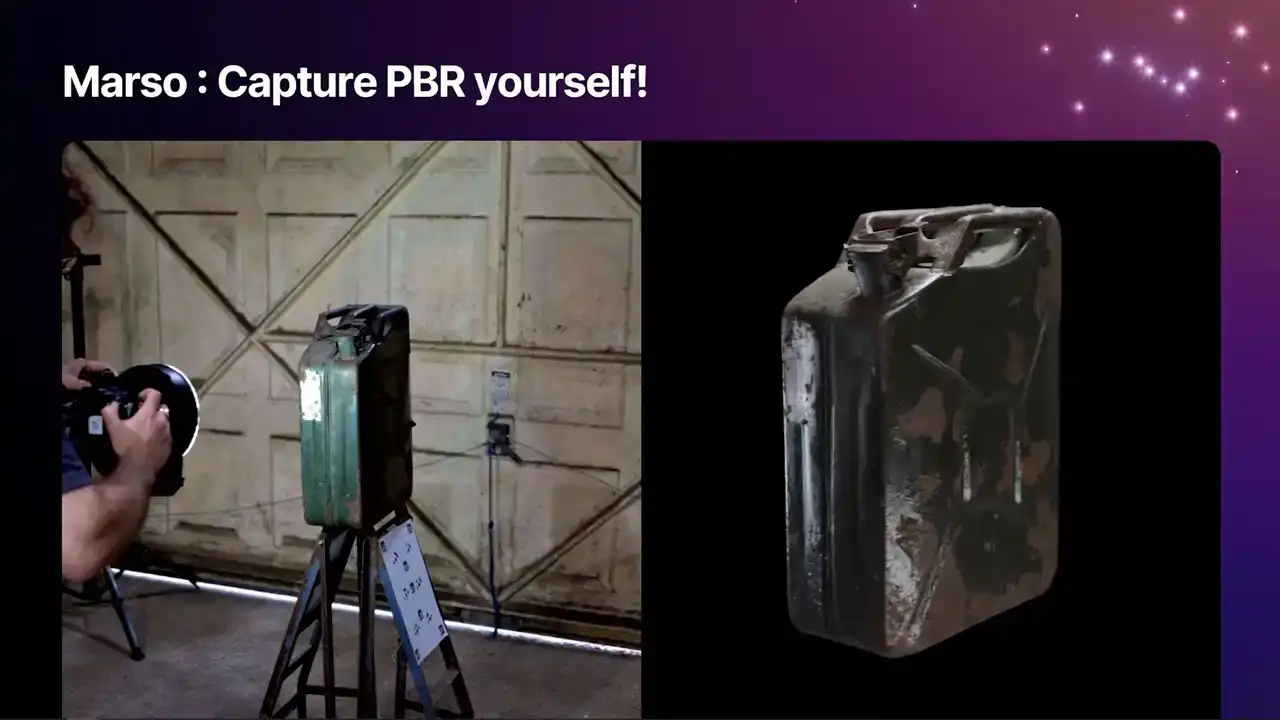
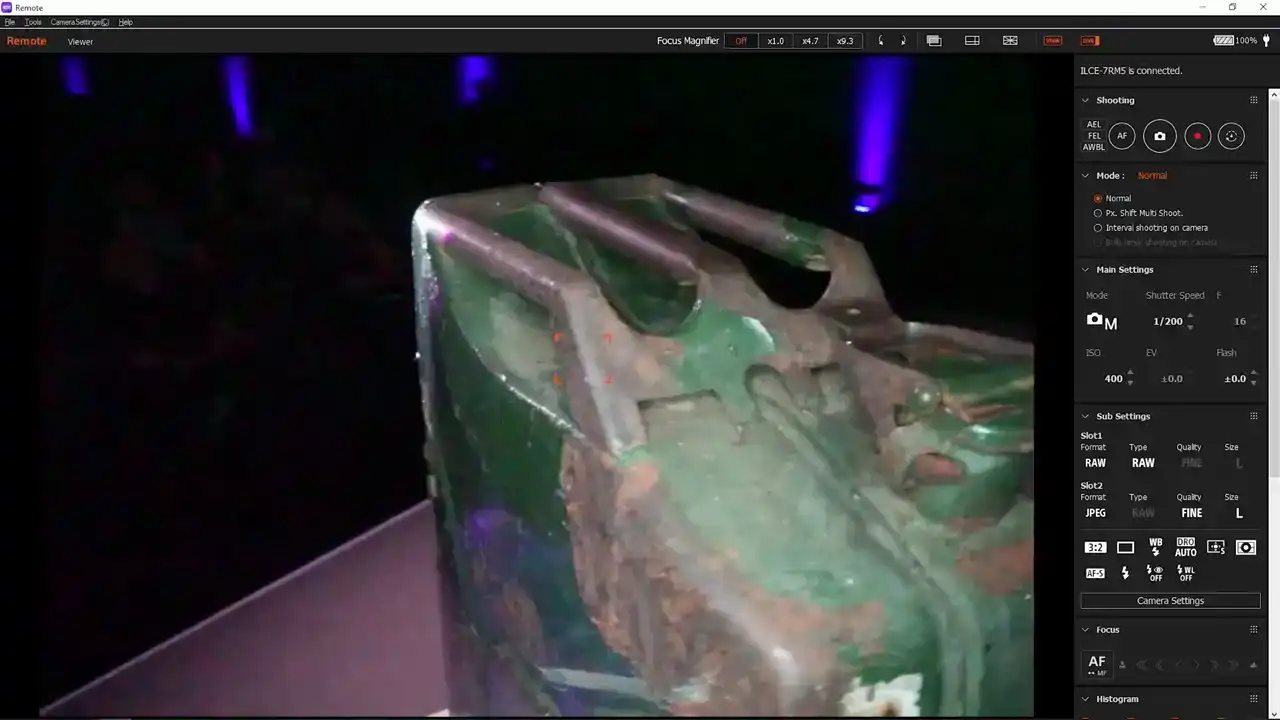
On one of these clips, we have this metal tin.
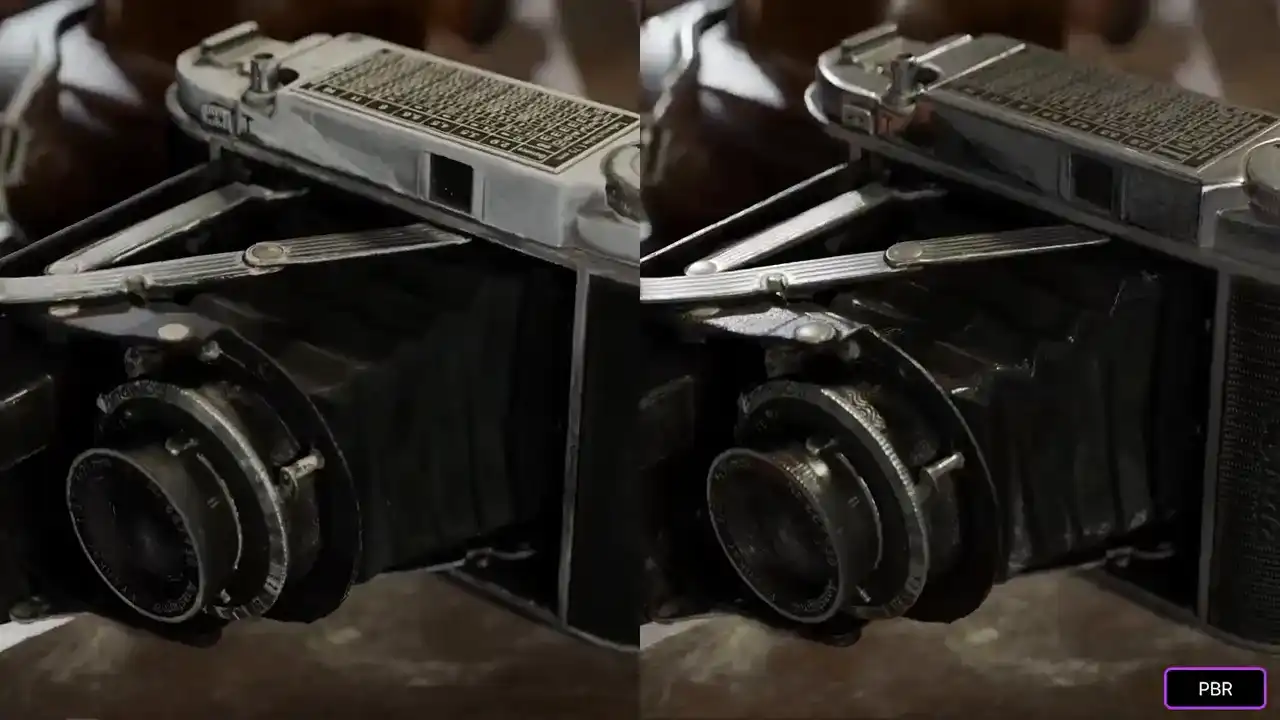
It is black.
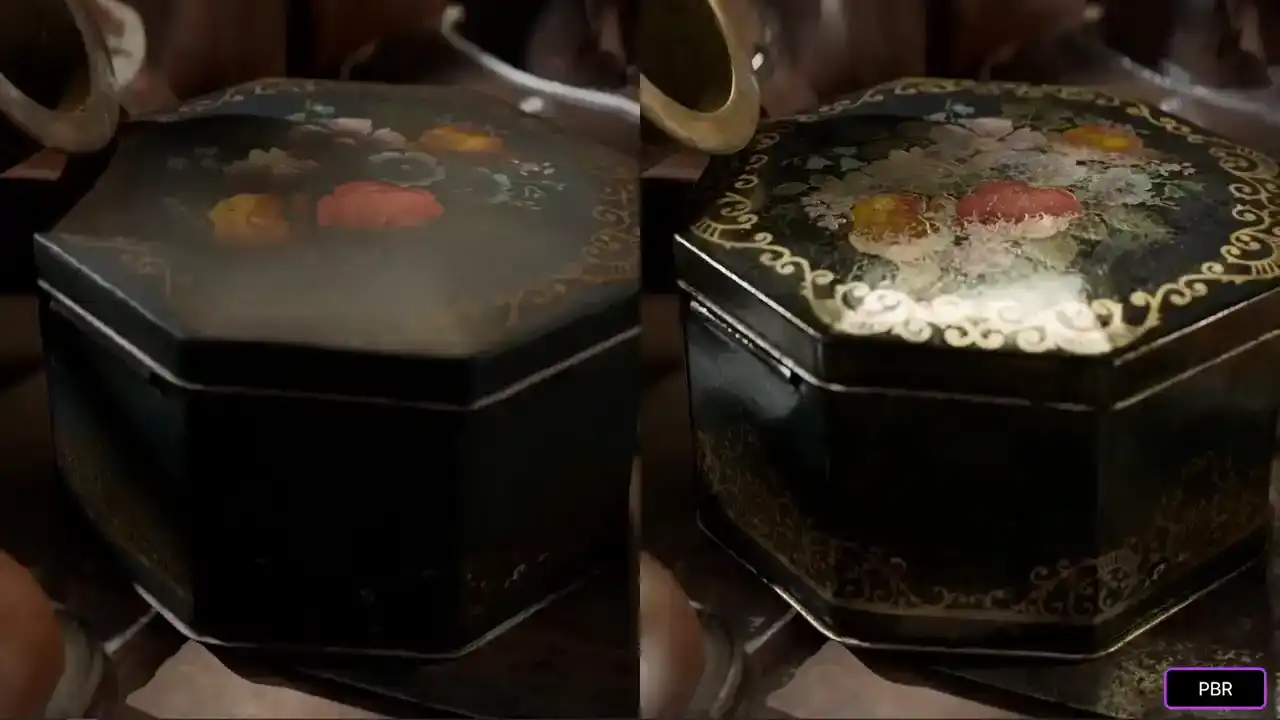
But in the PBR version, we can see this as a painted enamel.
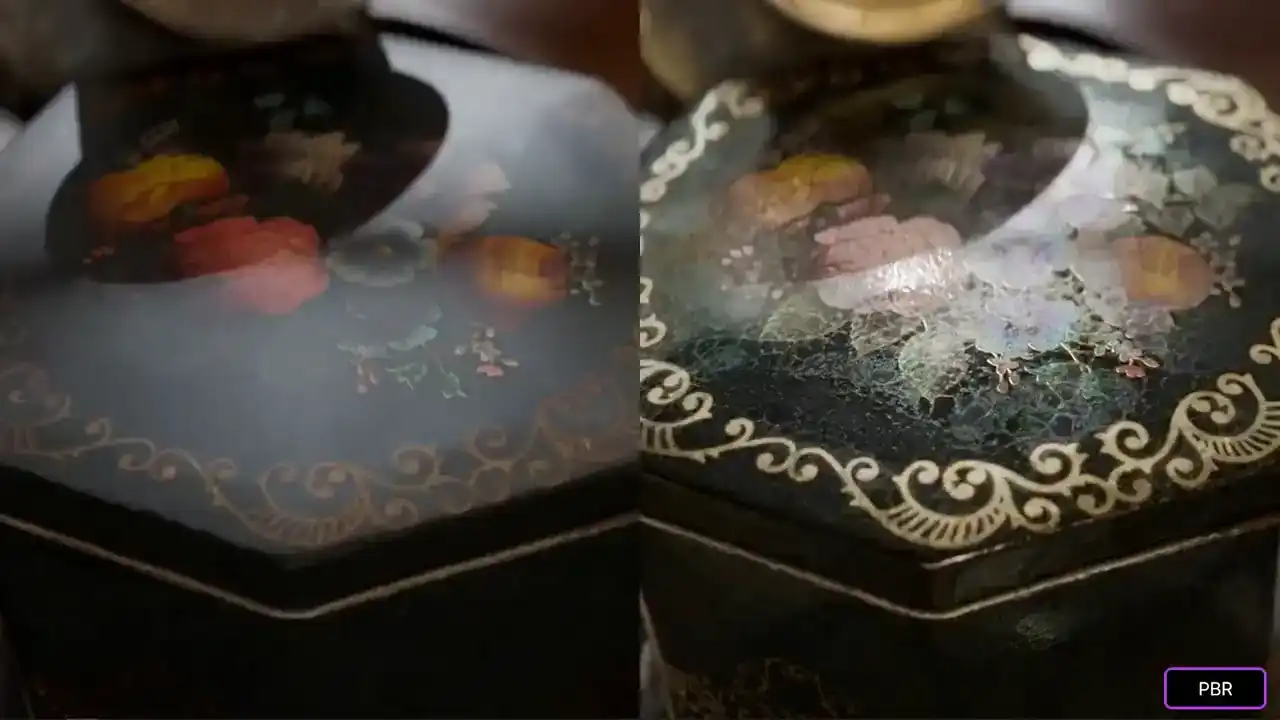
It is quite old. It is quite flaky.
You can almost imagine what it would feel like
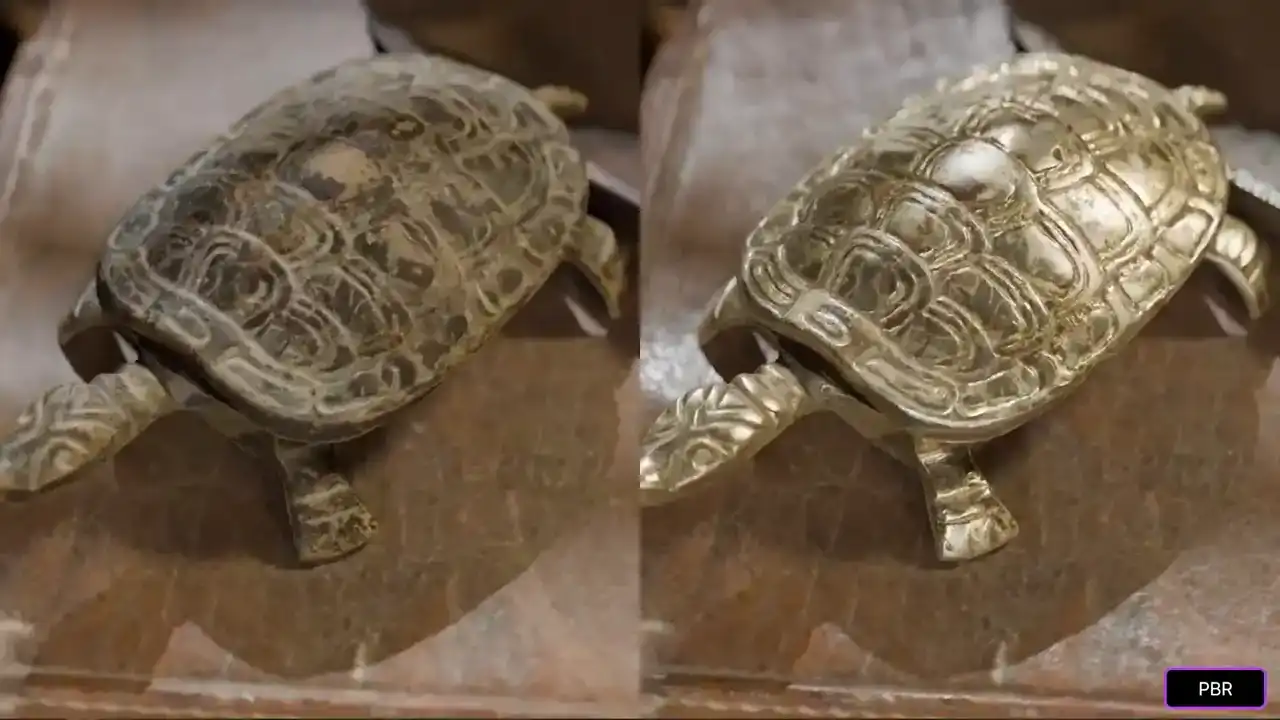
to run your hand across the surface.
The way that PBR does this, PBR stands for Physically Based Rendering, and it is simulating the rules of reality. It is simulating how real rays of light
interact with the surface of a 3D object and ensure a degree of energy conservation. So when you have a 3D object, and you place it into your scene,
and you have accurate lighting, the object will reflect that lighting correctly.
It won bounce more light off than the light that hits the object itself And if you mix this in with things like HDRIs which are lighting environments that have been captured from the real world then these objects look even more grounded
in a virtual environment,
and we can almost tell what they are made from and feel what they are made from as well.
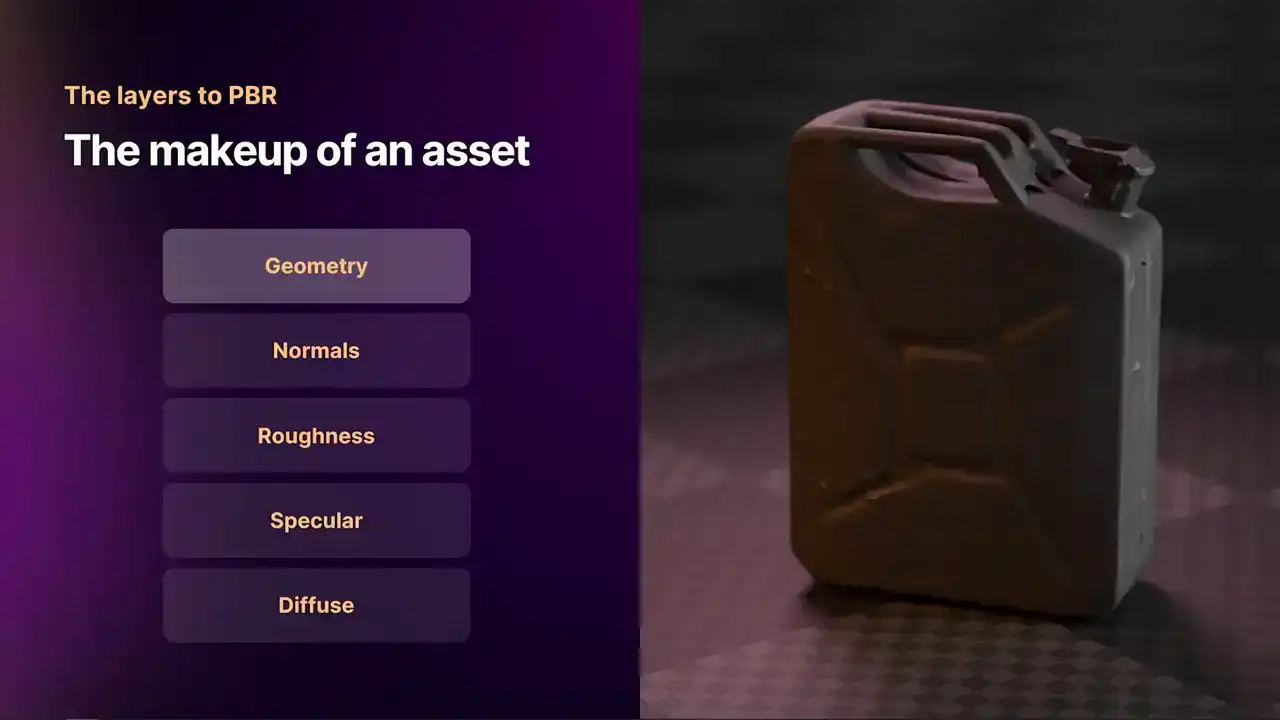
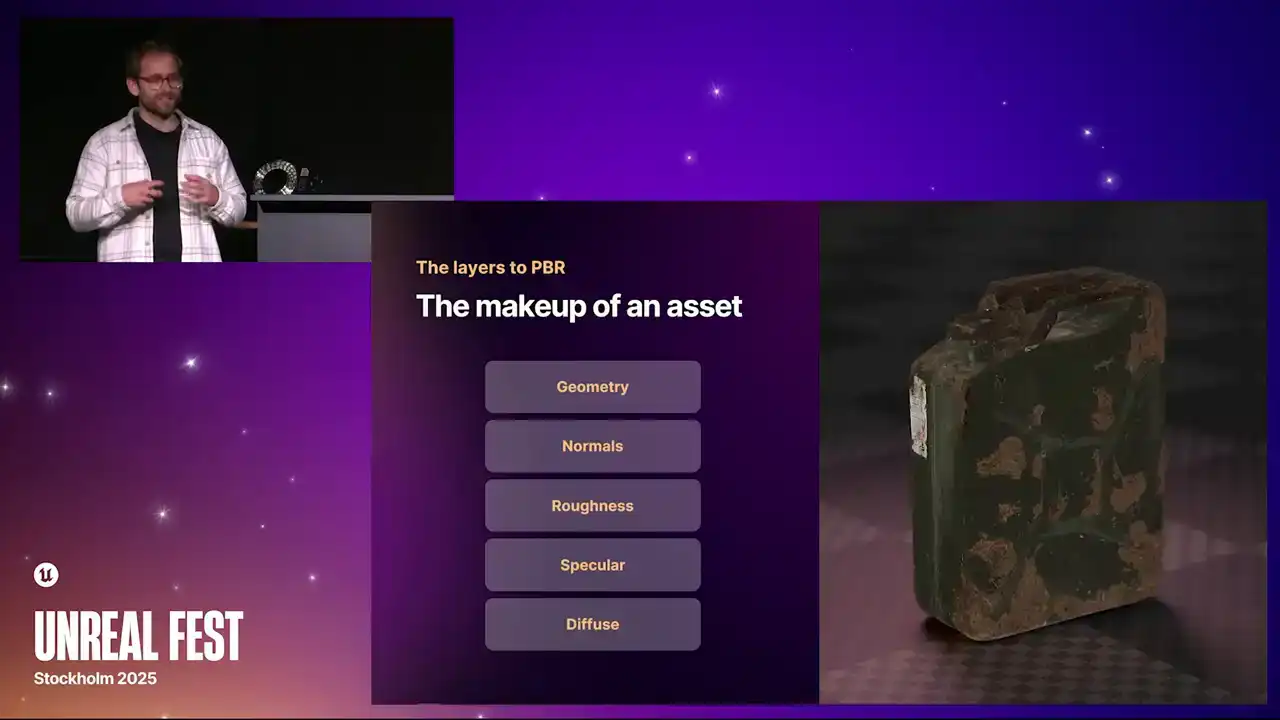
What makes up a PBR object? Well, there are two key shaders under the umbrella of PBR. You have a specular workflow, and you have a metallic workflow. You could argue that they are both doing the same thing, but optimized in different ways. Today, we are going to go through the Specular Workflow Shader.
The first thing that we have here is our base mesh. It is quite low poly, it is rather smooth, and it does not have any complex shading.
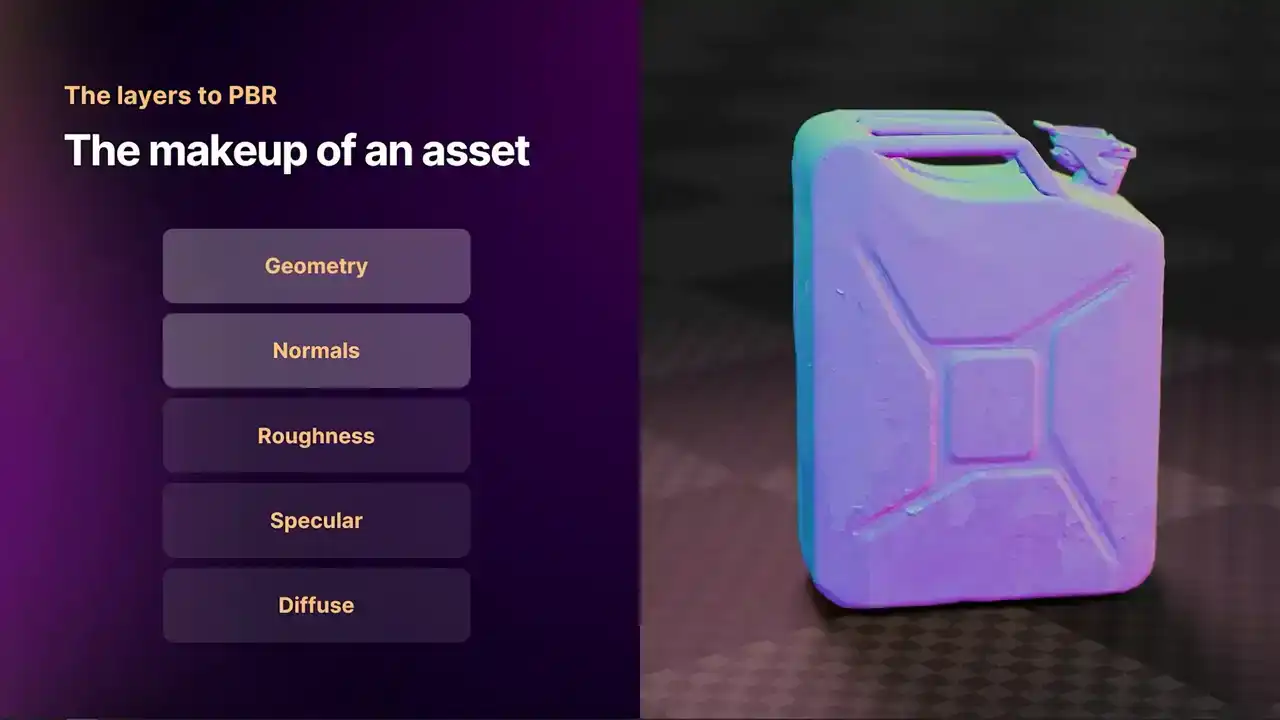
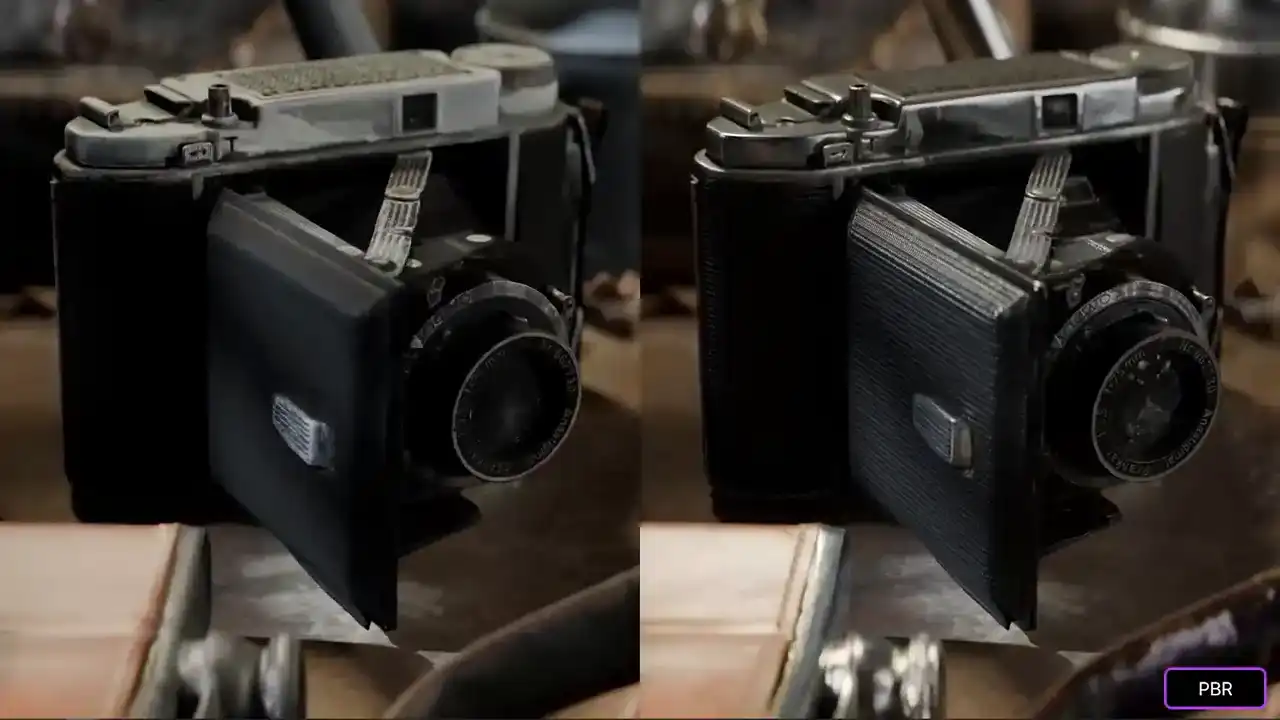
When we add normals into the mix, normals describe what is happening between the vertices. It adds a little bit of micro detail that we do not have to describe as a high poly mesh.
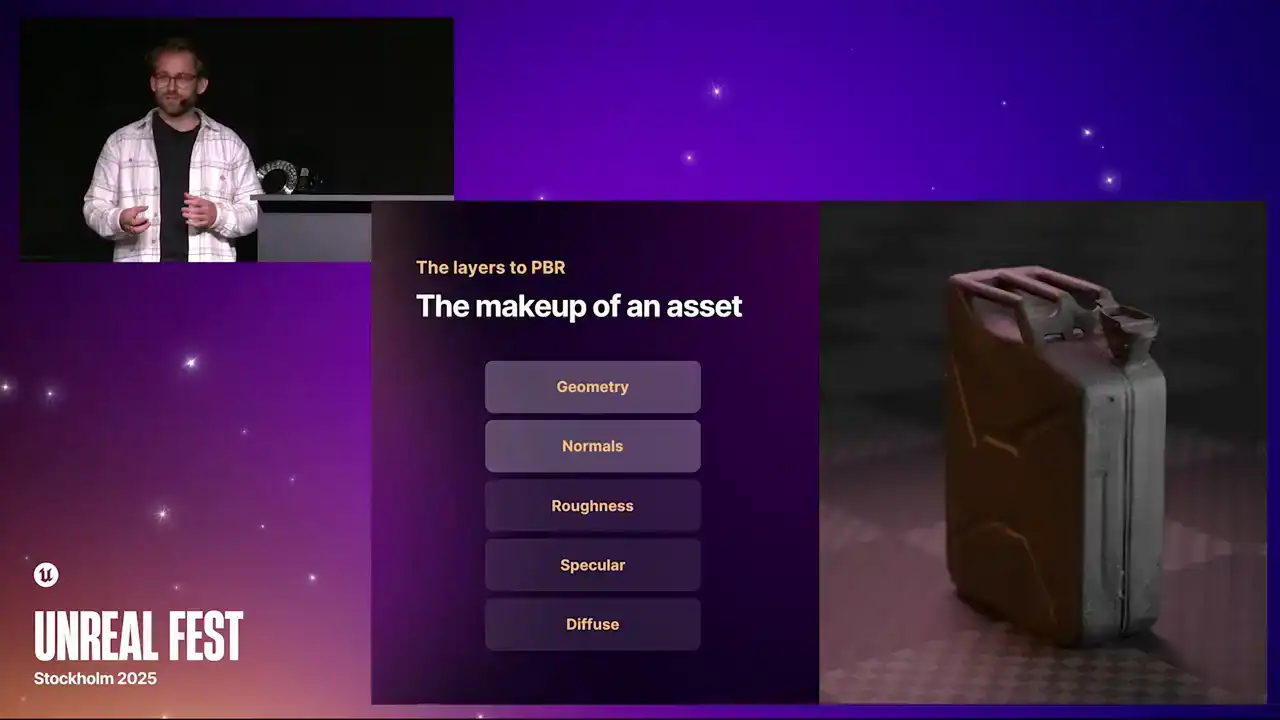
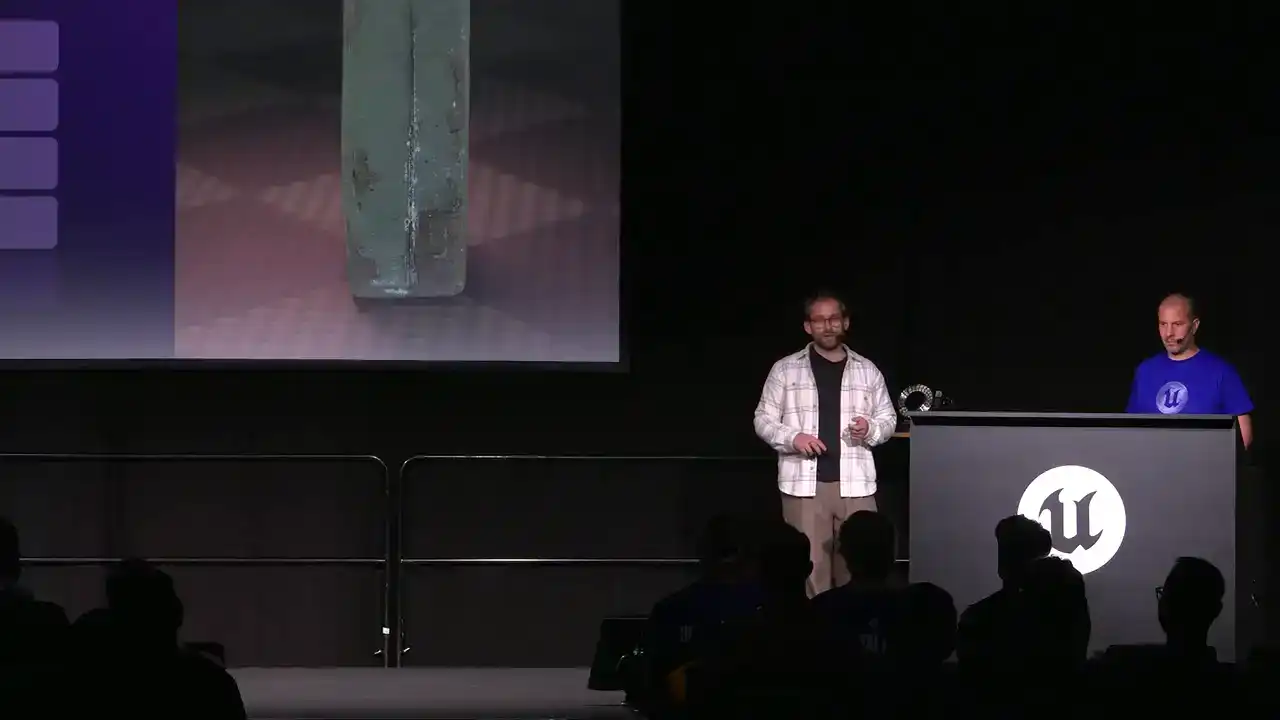
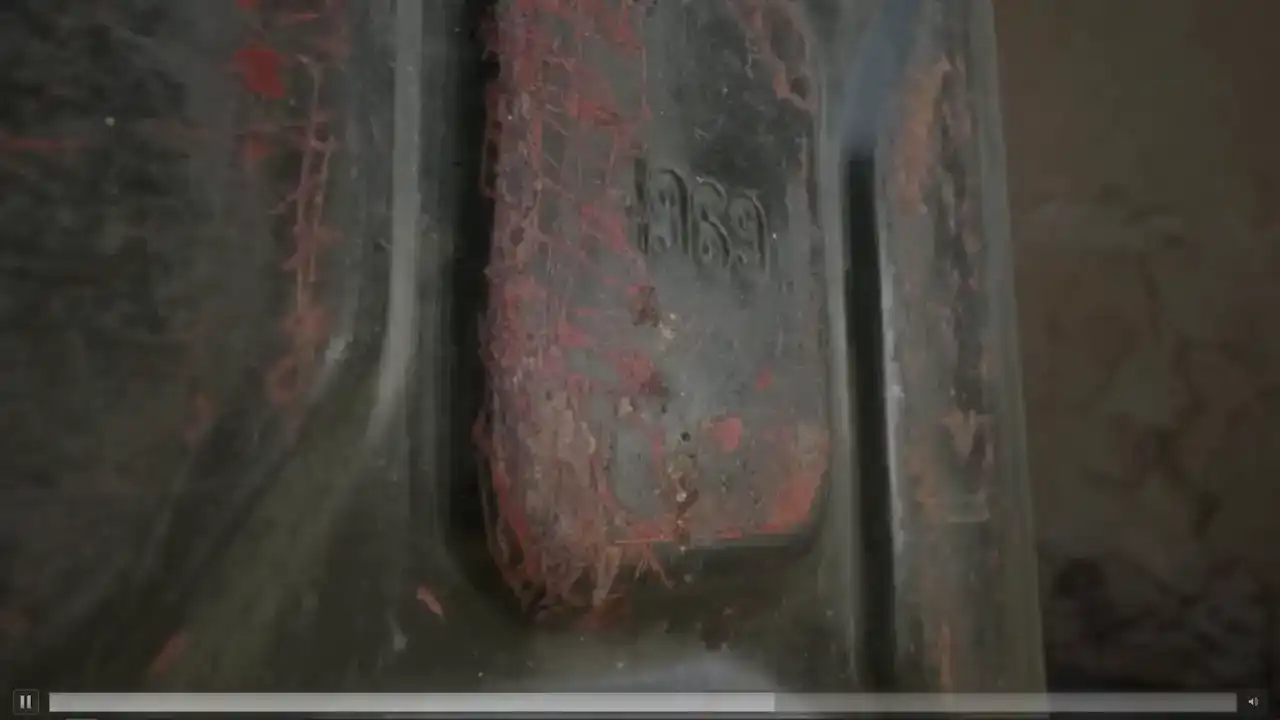
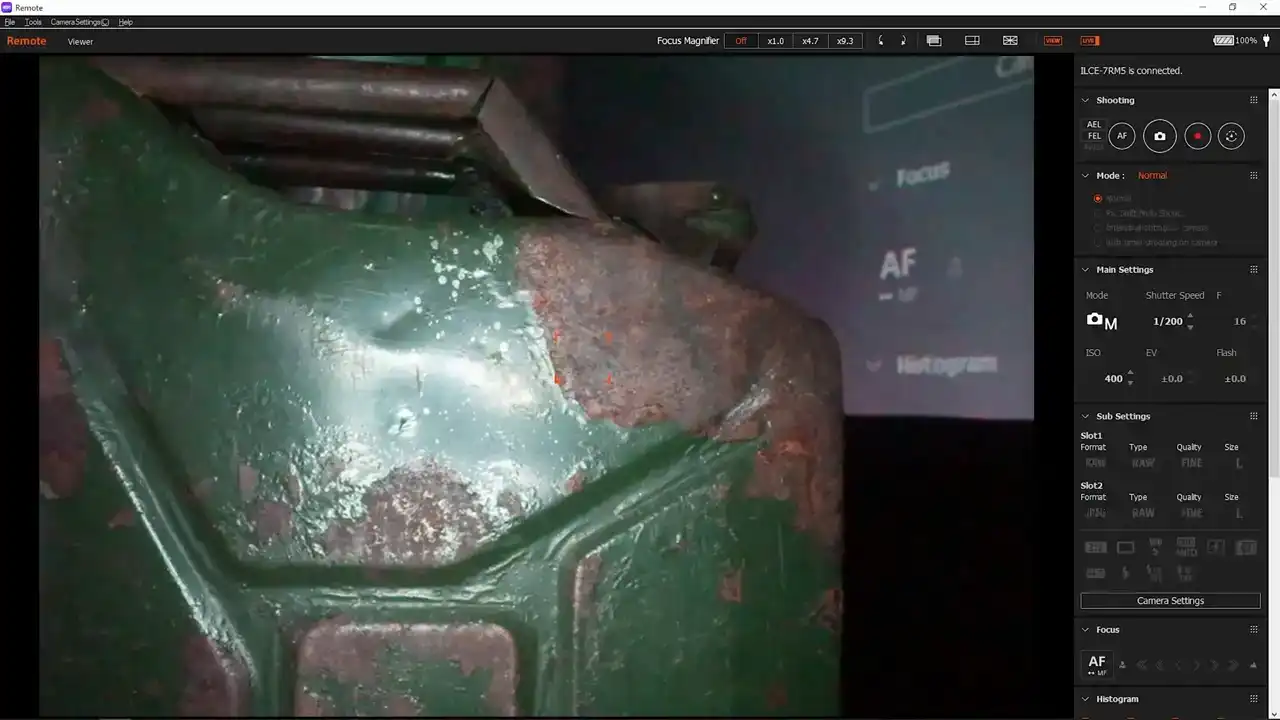
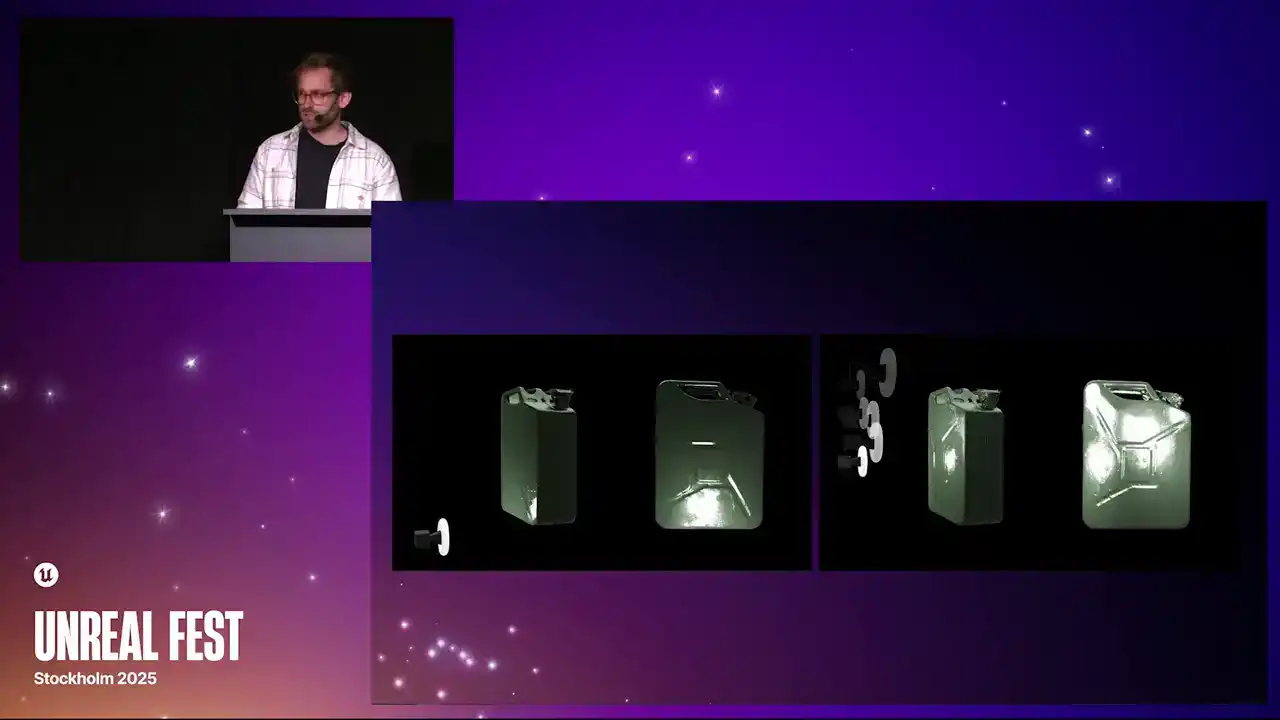
When we turn that on, we can start to see all the scuffs and scratches and the little flicks of paint coming off of this old petrol can.
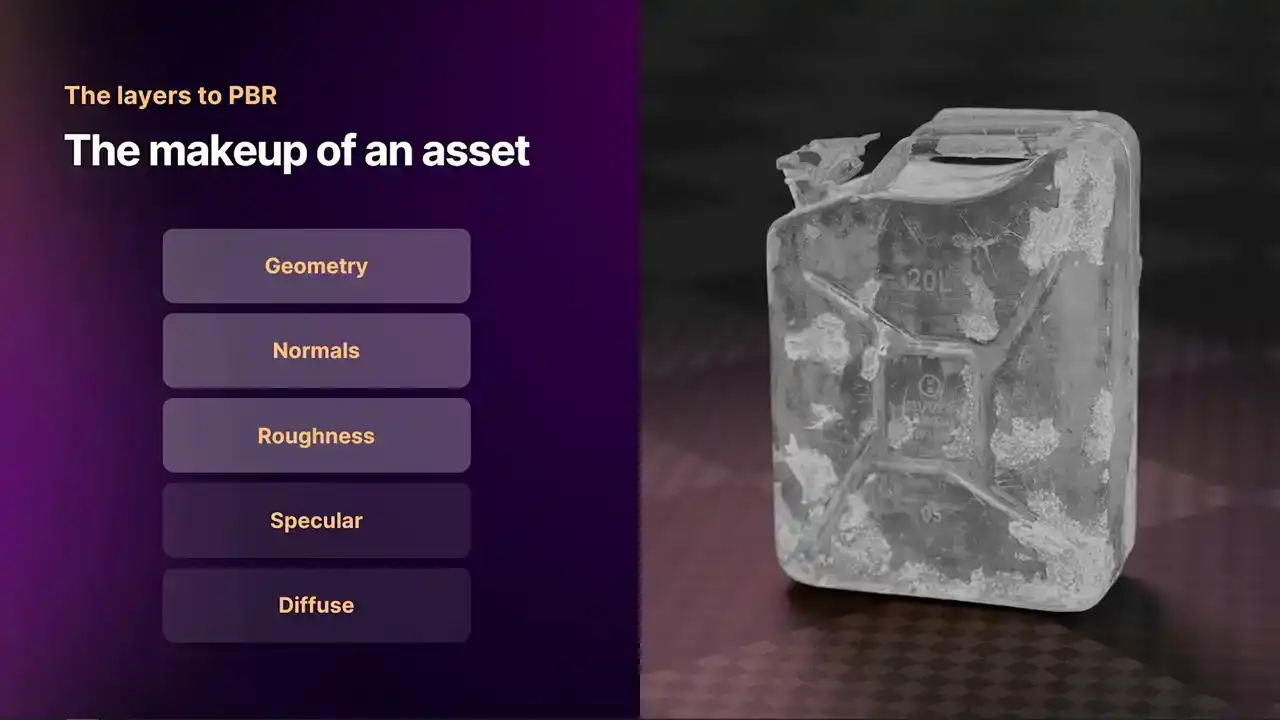
Our first true PBR property that we have is roughness. Roughness denotes when a ray of light hits the surface of an object,

does that ray of light scatter, or does that ray of light reflect in a smooth line? When it scatters, it is very rough.
We denote this with a white value, When it is smooth, we denote this with a black value. With this old, rusty petrol cam, we can see that the rusty areas are white,

and the painted areas that are quite smooth are more of a black.
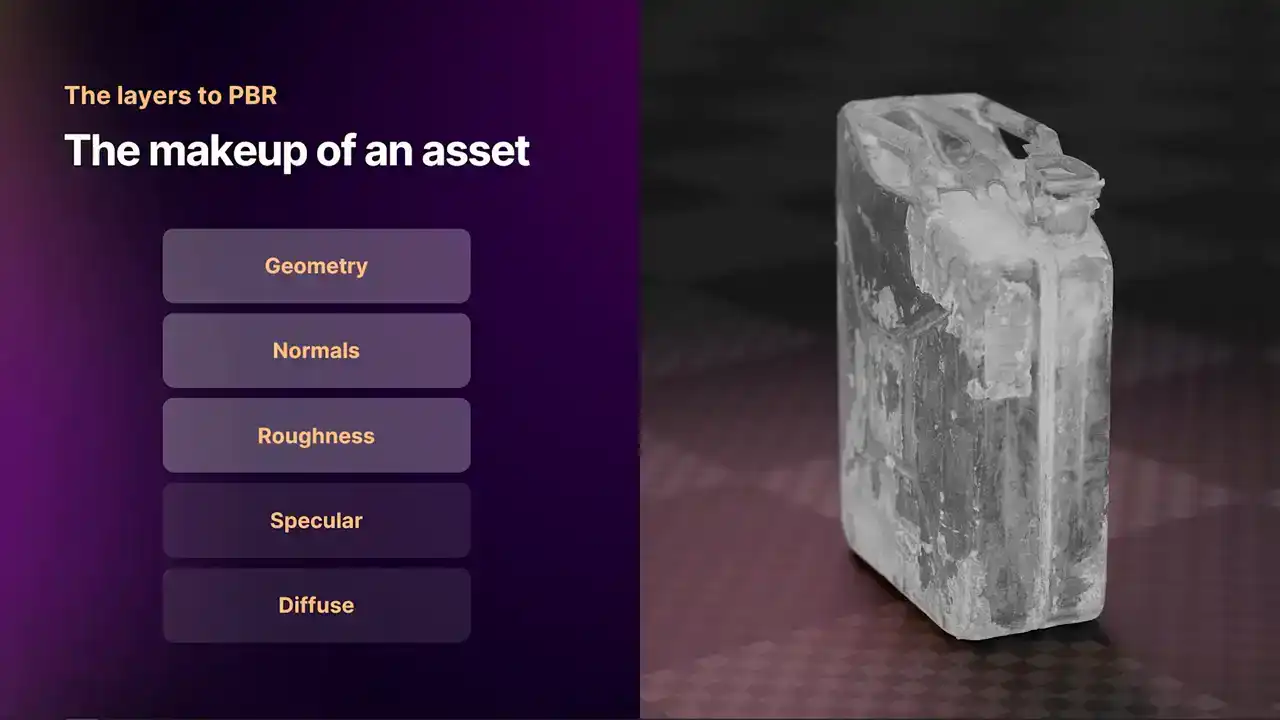
We can also see these thin white strips, which are all the scratches. Then when we apply that to the 3D object, we can see which areas are reflective and which areas are not. The other chop property we have is specular. Specular relates to the light that hits the object,
how much of that light is reflected, how much of that energy is actually absorbed. A lot of the specular reflection does tend to have a slight color to it.
You see this a lot with paints, metals like gold and brass, where the specular reflection is white, it might be more of an orange or a yellow.
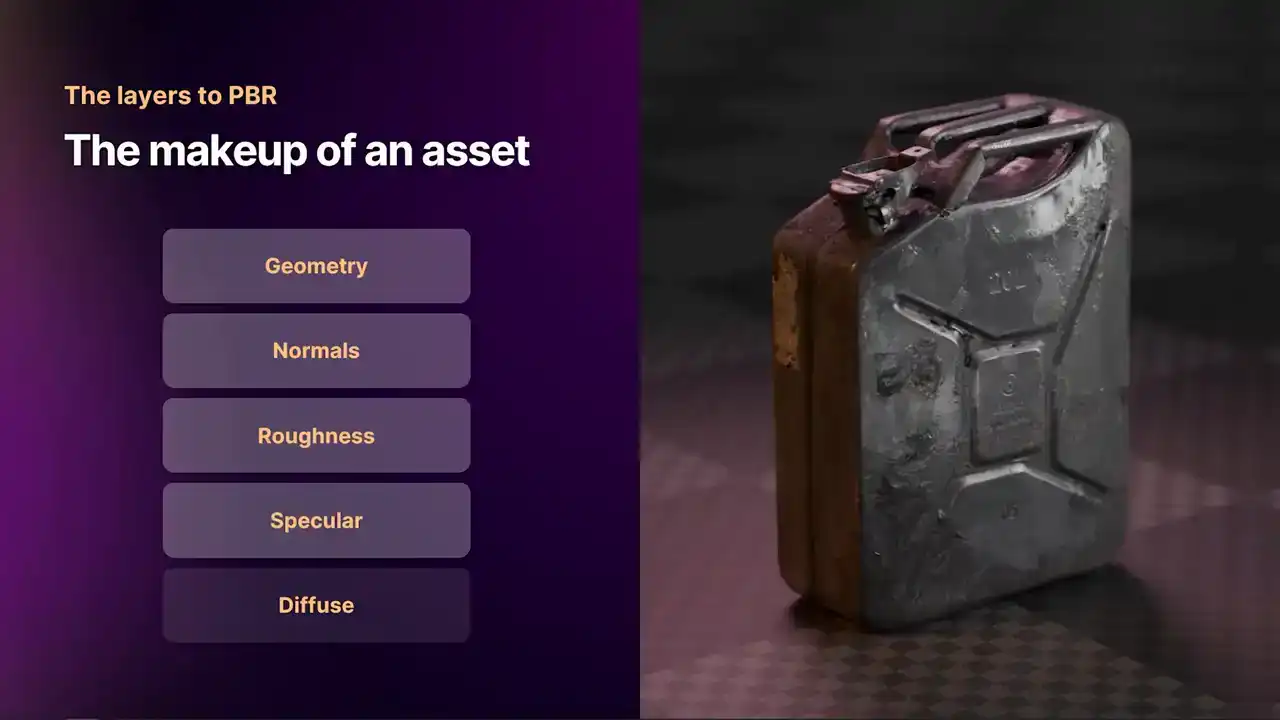
When you turn that on, you start to see the real difference between the highly reflective areas like the paint and the not-so-reflective areas like the Rust. Then finally, we have the Diffuse value. The Diffuse is our base color,
and this gives it the main appearance. You mix that in, and you have got your final 3D asset, and it looks pretty realistic.
Here is another video rendered in Unreal. In a Quixel scene, by the way.
That object was done in Marceau with RealityCapture. You can see with the normal map,
you get really fine details on the surface.
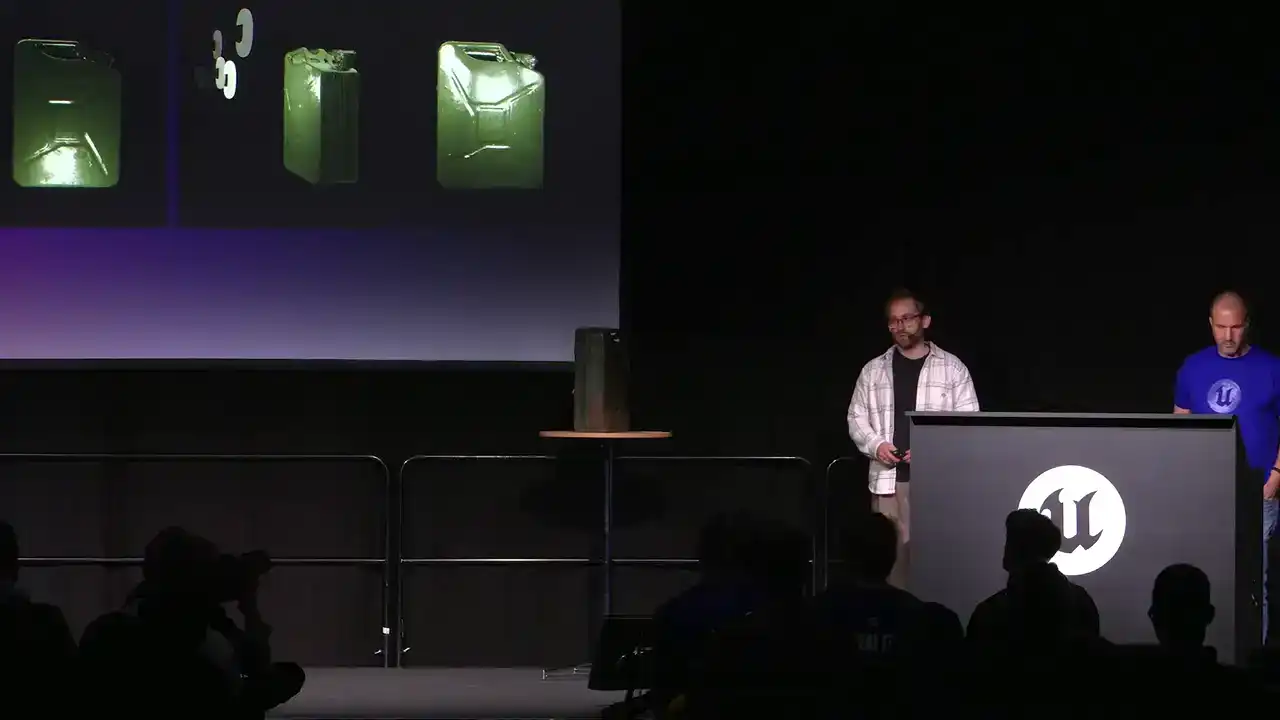
And that's a different petrol can to the one we're actually going to show you today, because me and Elliot have both got petrol cans that we scan in our garages.

So you might be wondering, why aren't PBR scans everywhere?

And the answer is that they're actually not particularly easy to make.
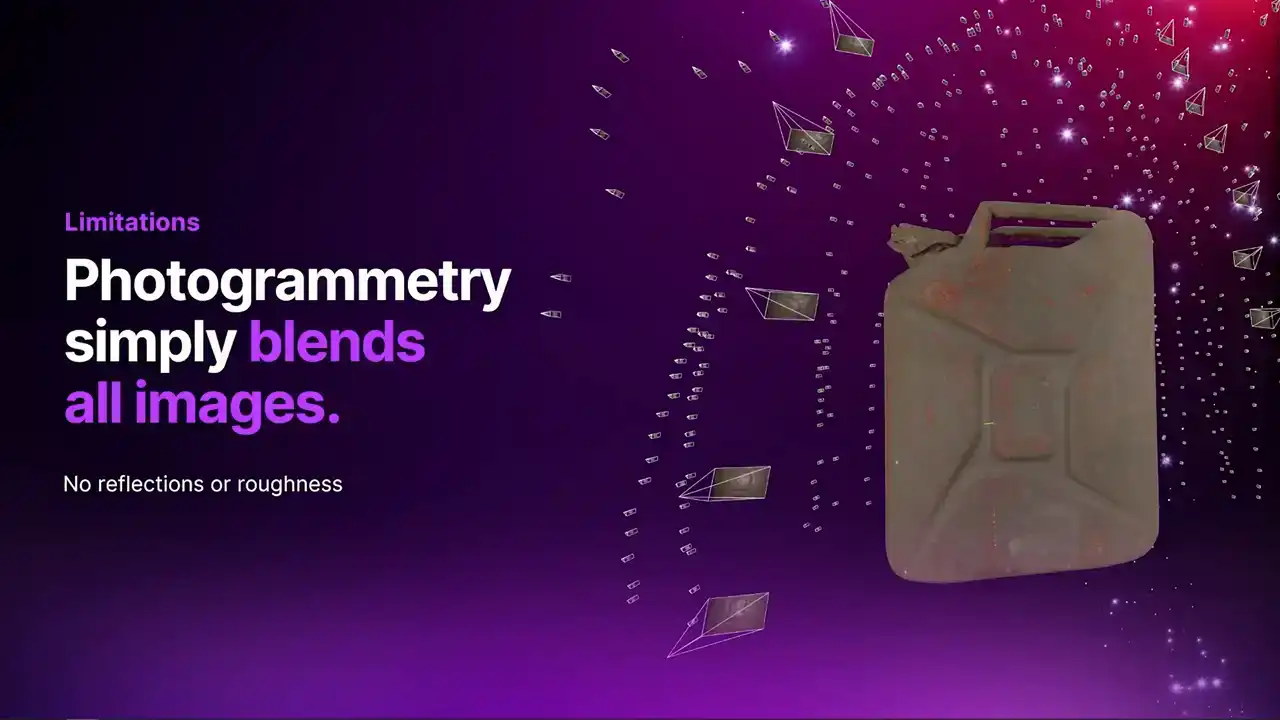
With normal photogrammetry, the way you get a texture is you just get a diffuse. It's a sort of attempt at an albedo texture. And essentially it made by just projecting and mixing every single camera onto the surface and blending them all together So you don get any of that material information about the reflections and roughness
So traditionally, here's two of the main ways
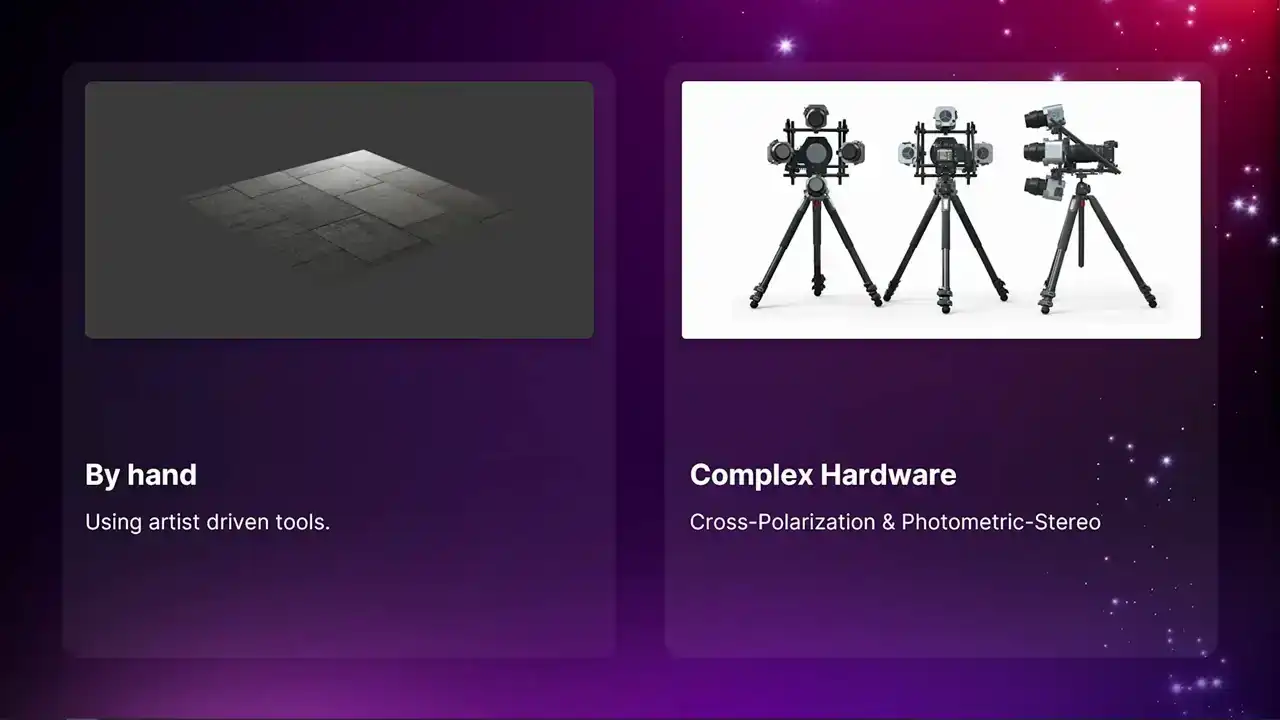
people might try and make a PBR material. There's a third one I'll go into later. By hand, which we'll go into in a sec, and also using very, very complicated hardware

with cross-polarization and photometric stereo. The manual way is kind of like an educated guess.
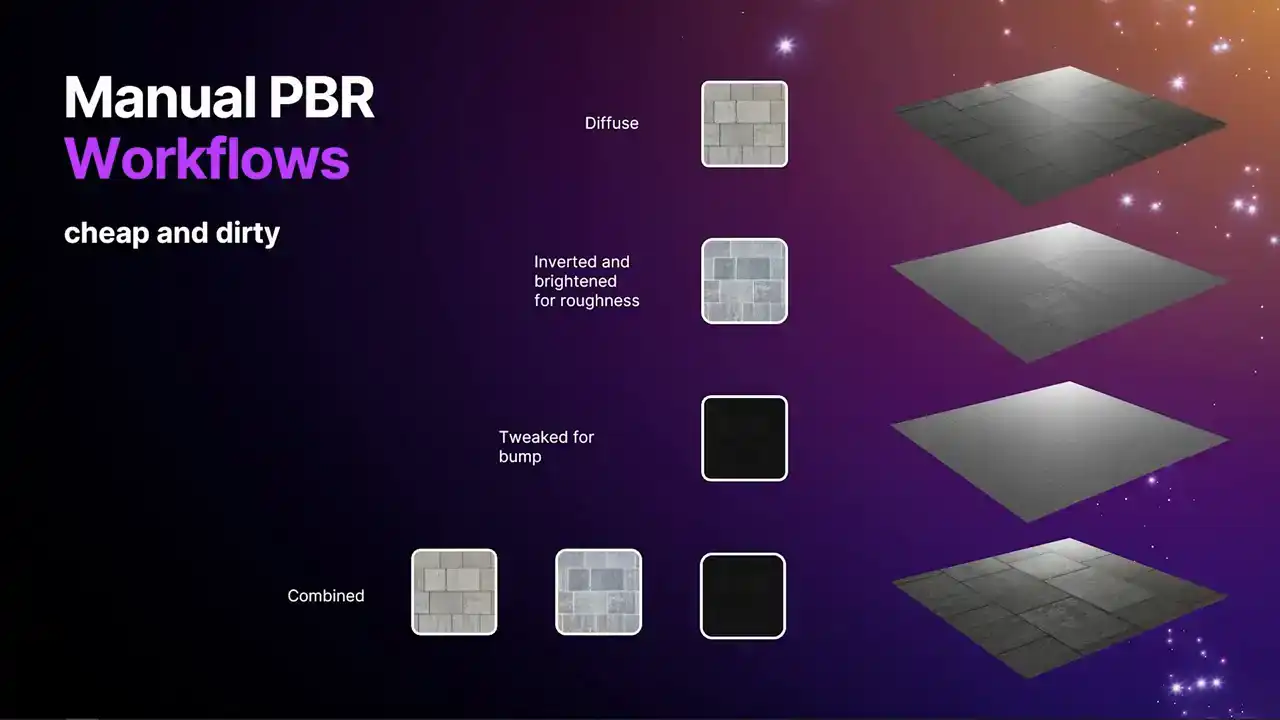
What people will do is they'll take the diffuse map. A lot of you might have had a go at this. Then when you have an understanding of what the roughness is going to be, so basically the darker parts are shinier
and the lighter parts are rougher. In this case, I made the decision
that I wanted the grooves in those tiles to be rougher. so I inverted it and then messed around with it a bit and got a sort of vague roughness map there. It's kind of arbitrary. The bump map, I think I've made a little bit dark there, but essentially, you know, the darker parts sink further away, so I've got the sort of grooves in the tiles there. Then you can combine it together, and it definitely looks a lot more realistic than not doing anything at all.

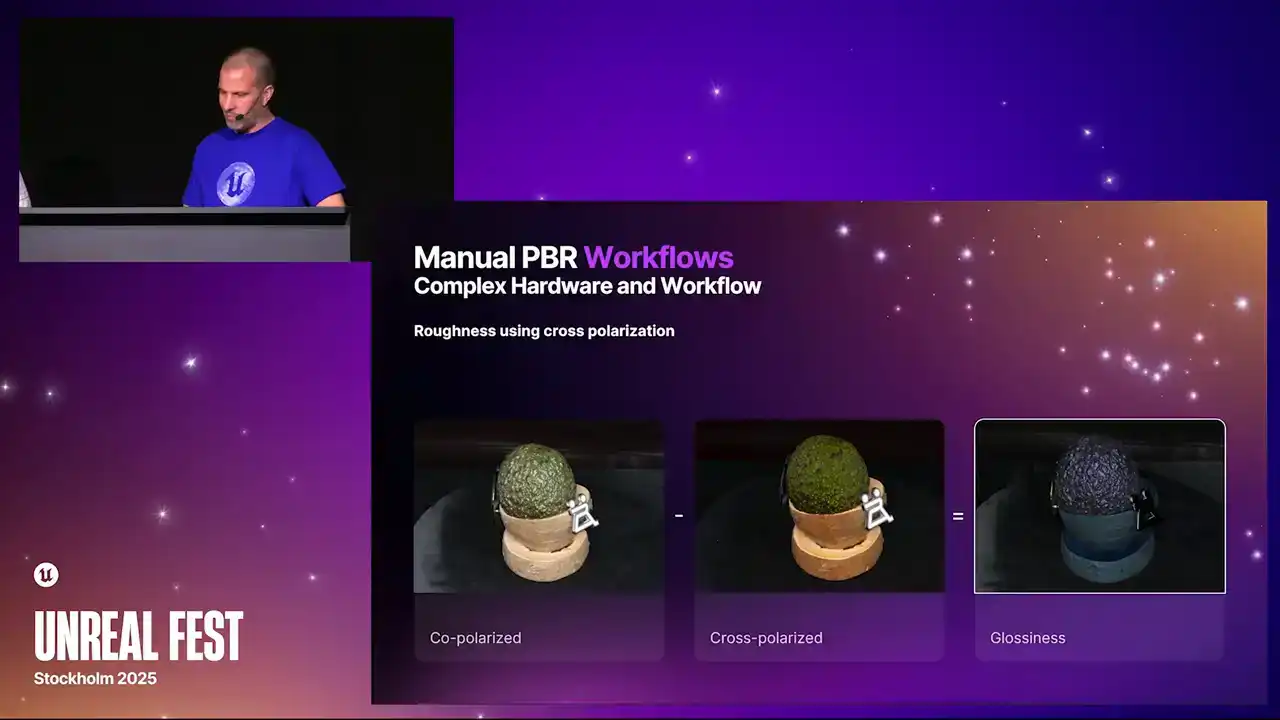
Now, here we get into the far more complicated ways. and one way you can have a go at making a roughness is using cross-polarization, where you use two polarized filters,
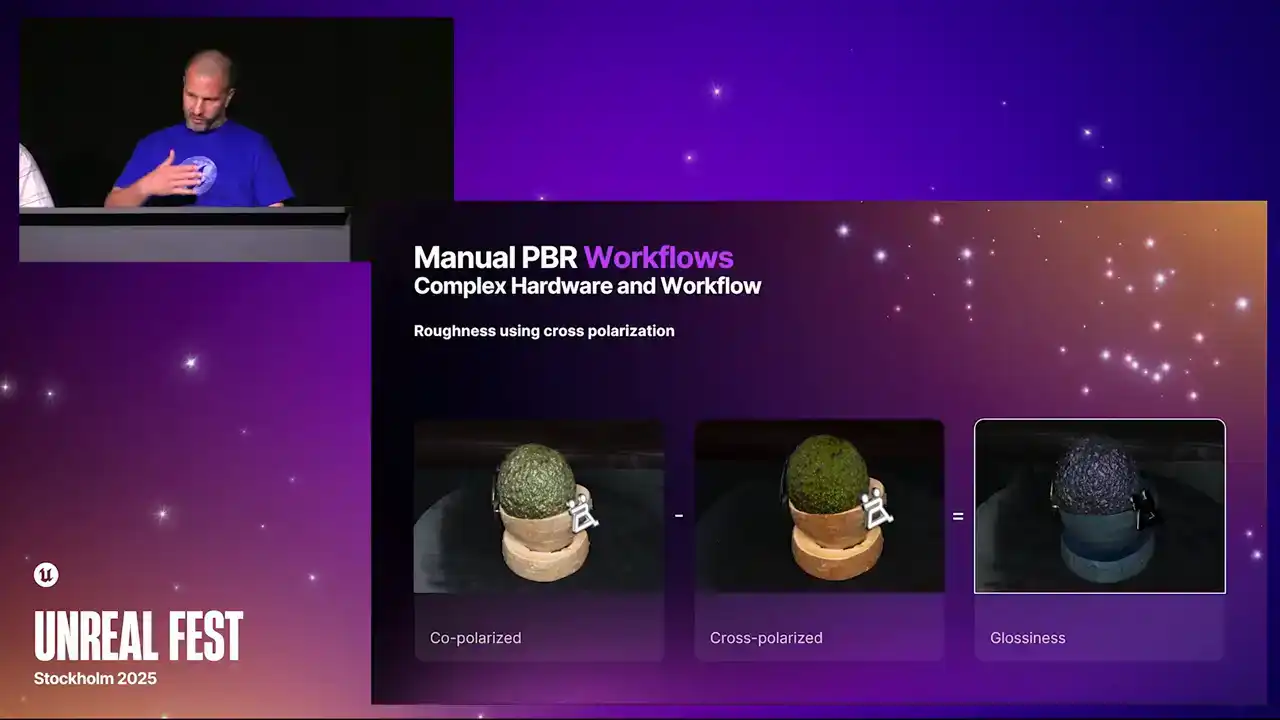
one in one orientation on the flash and one at 90 degrees to it on the lens, and what that does is it blocks out all the glare.
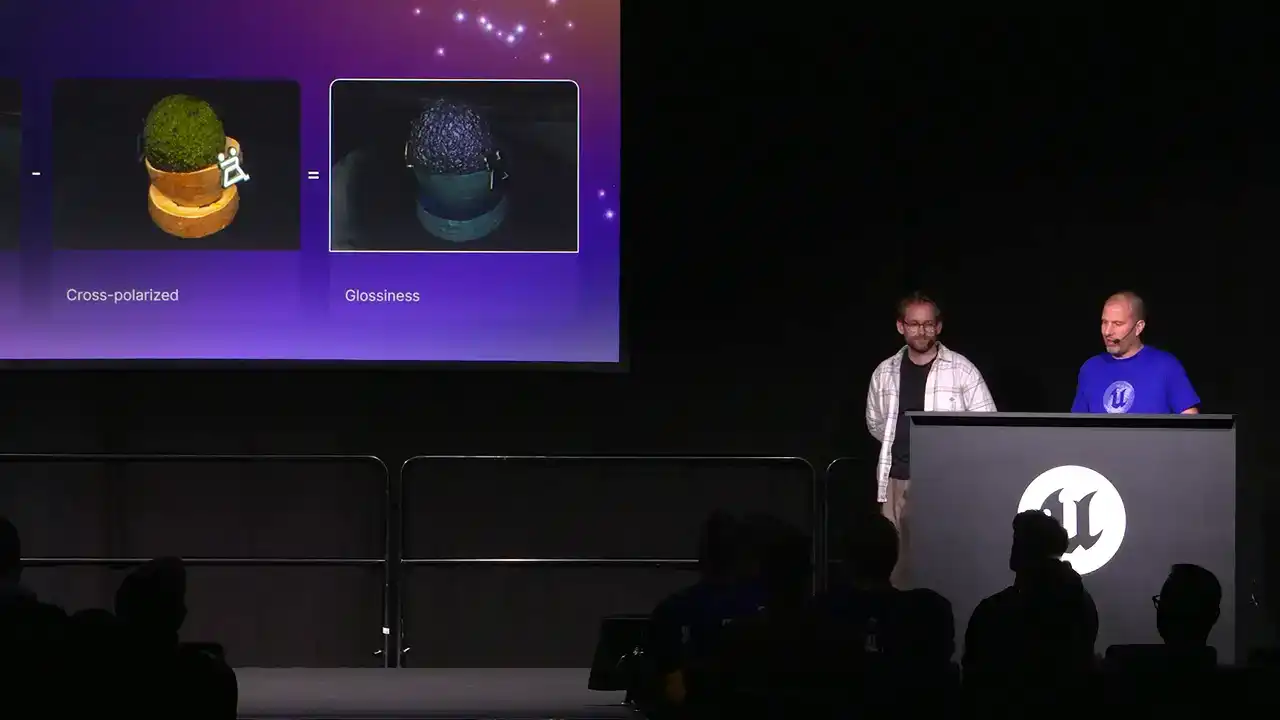
Now, imagine if you do that from every single camera position and you have a sort of glare map from every picture, then you can blend them all together
and you get a glossiness map, and then if you invert it, it's going to be akin to a roughness map.
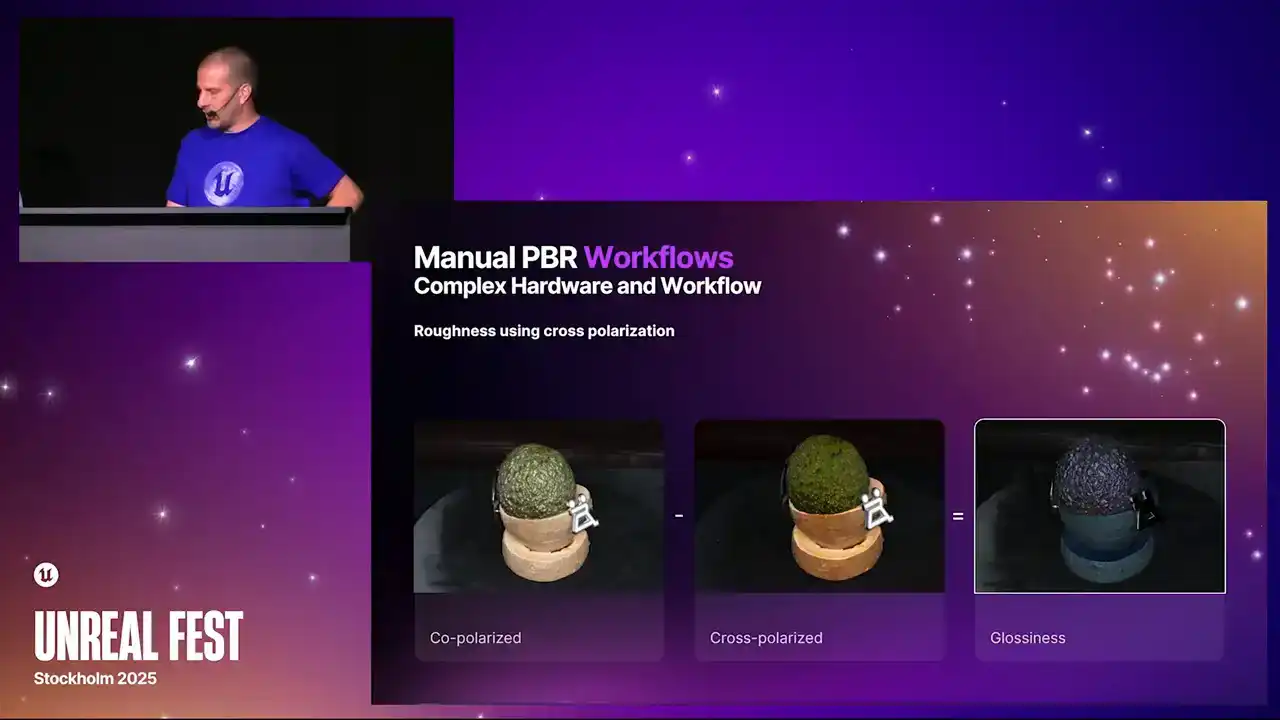
But you can see that it doesn't work perfectly every time. You can see I've got that white enamel badge on there,
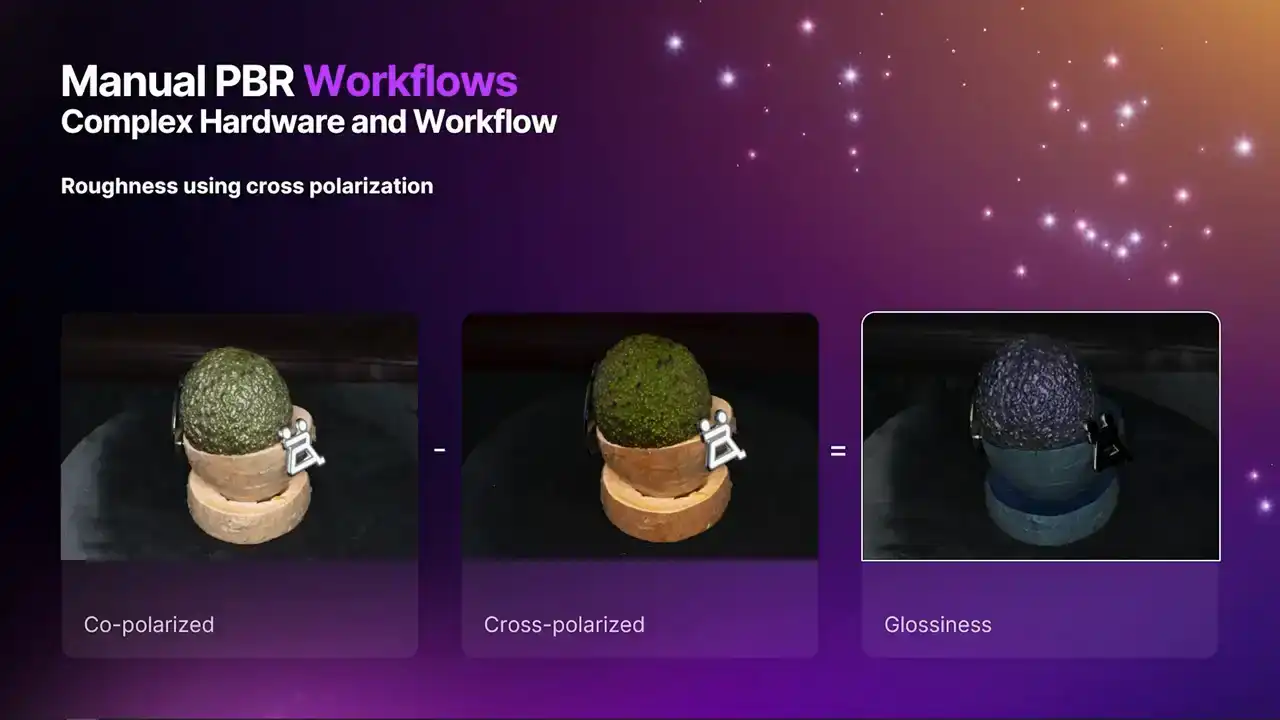
and you can see in the glossiness map, that kind of should be white because it should be glossy, but it's actually turned out black, so it's got that completely wrong. So yeah, it doesn't work all the time,
but you can get amazing results like this. And then if you want to get a normal map, there's an old technique called photometric stereo,
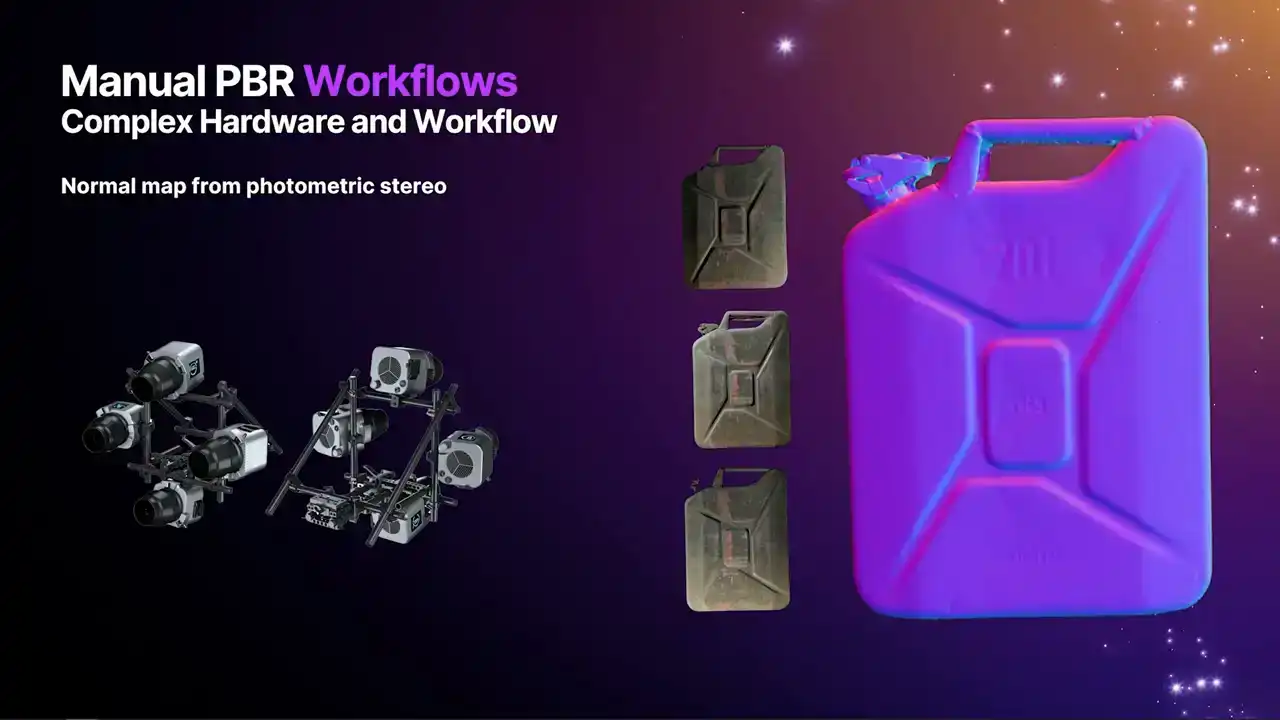
but it's an absolute pain in the ass to do. Oh, I've lost my mic. Because you need to take an image from the same camera position with several different lights, and then the math will figure out a normal map from that.
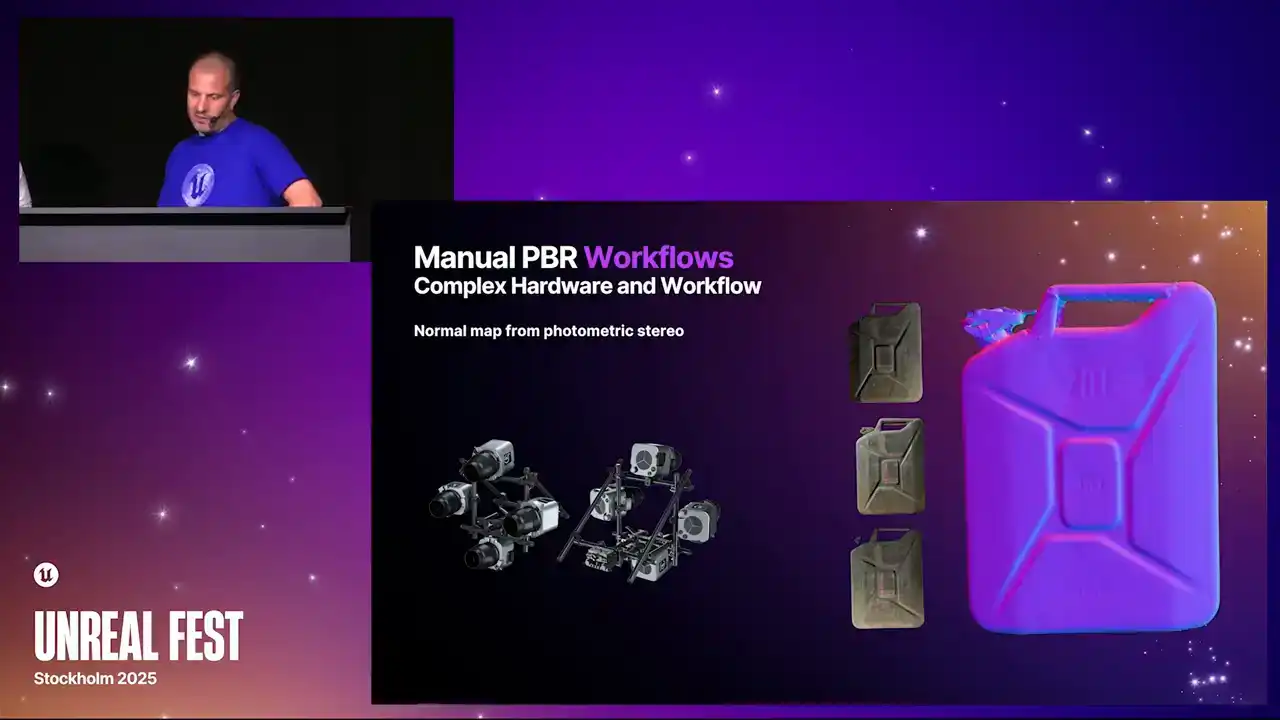
So you can imagine that when you're trying to make a PBR material like this, you end up with terabytes of data, and it's not actually that easy to process either.
This is a third one I was going to talk about. And basically, this is easy because you just take your diffuse and you just click give me my materials.
But it is kind of flawed and you are going to get really, really mixed results. And also it does not work on 3D.
These maps look nice, but actually when you put them together it did not actually look as good
as the one that I just messed around with the diffuse for.
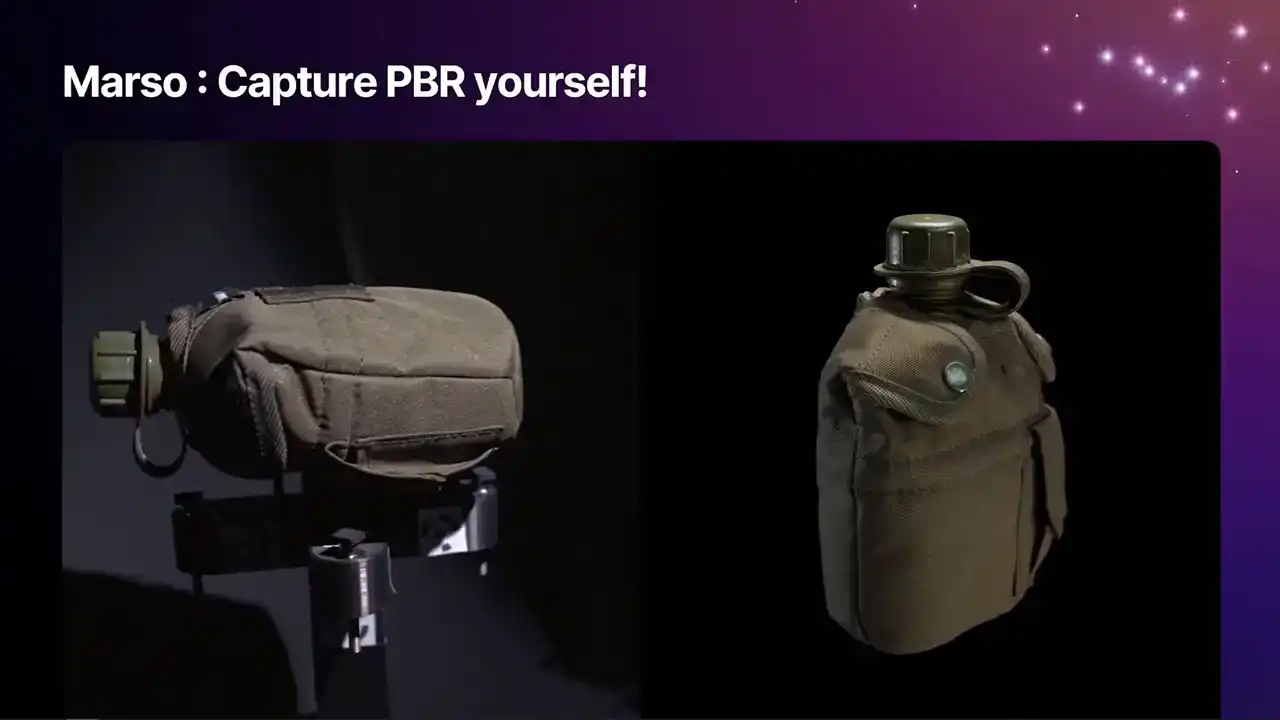
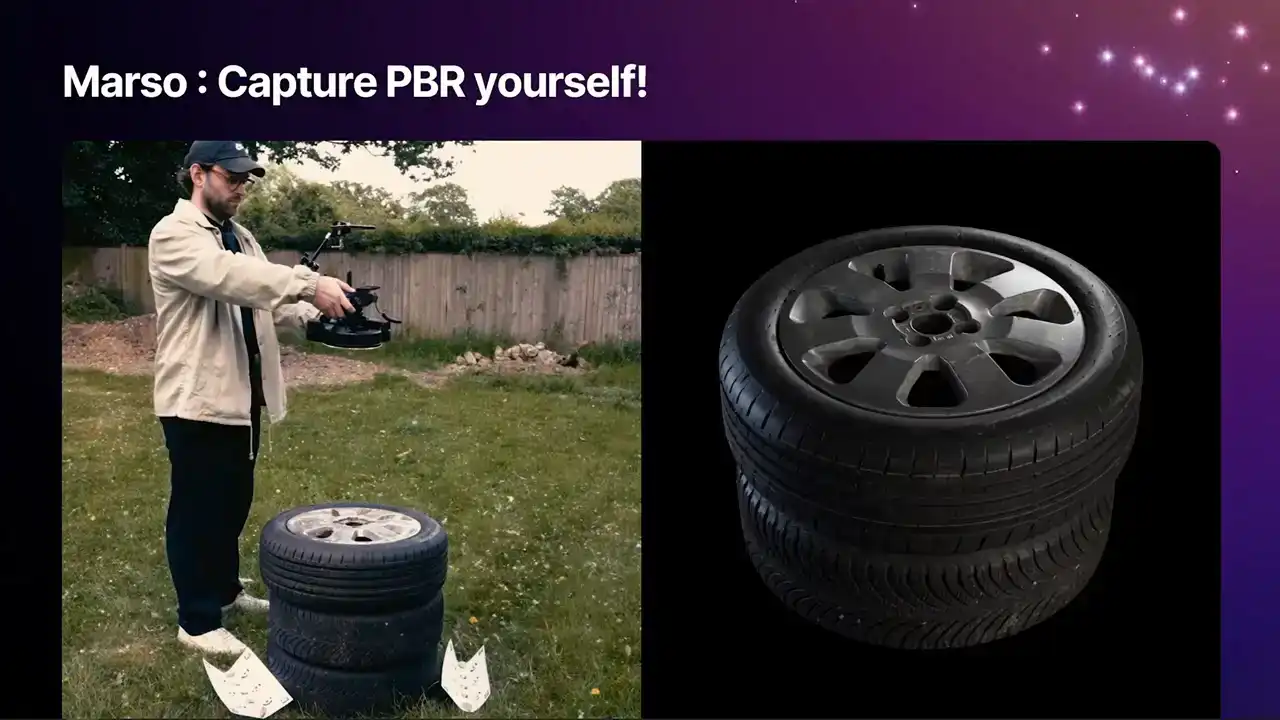
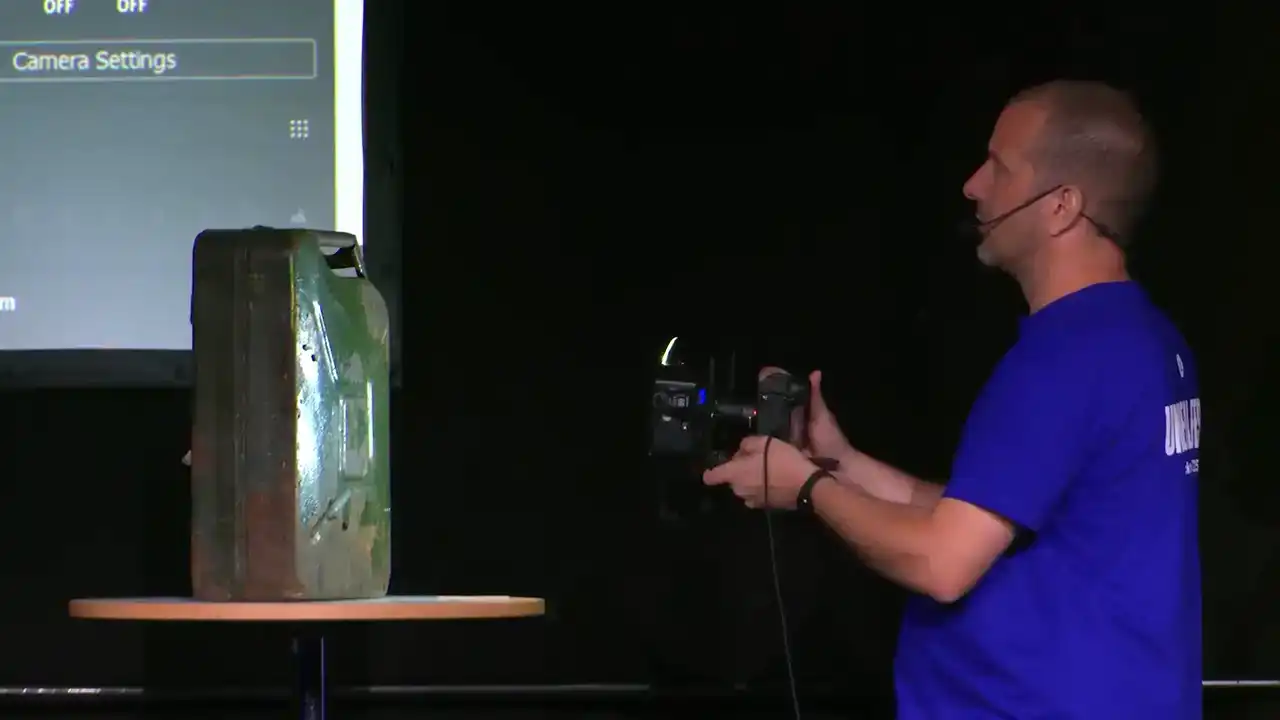
So we are going to show you how you can capture 3D PBR using Marso Measure and Reality Scan all by yourself
using available hardware. Before we do so, I am quite interested to get a show of hands
who has a camera and who also has a flash,
so like a point light or a ring flash. Okay, quite a few of you. So, using Marso, you will be able to do just this.
You will be able to capture full PBR objects.
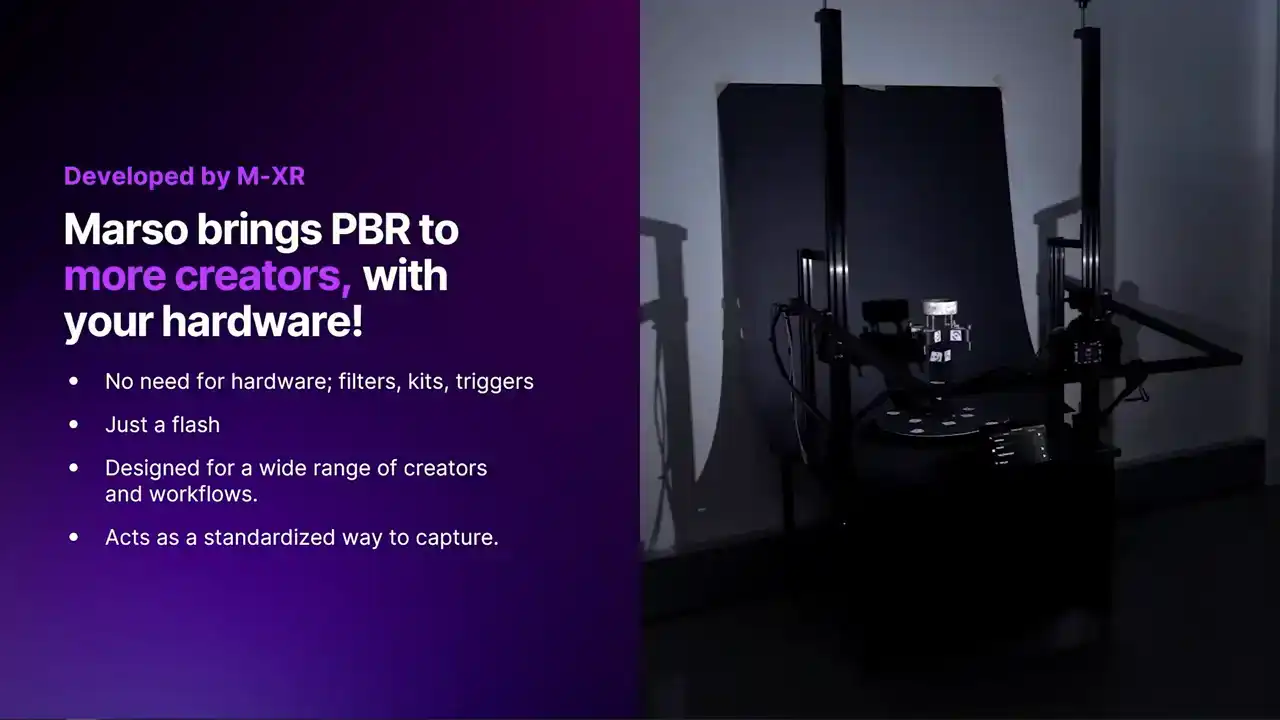
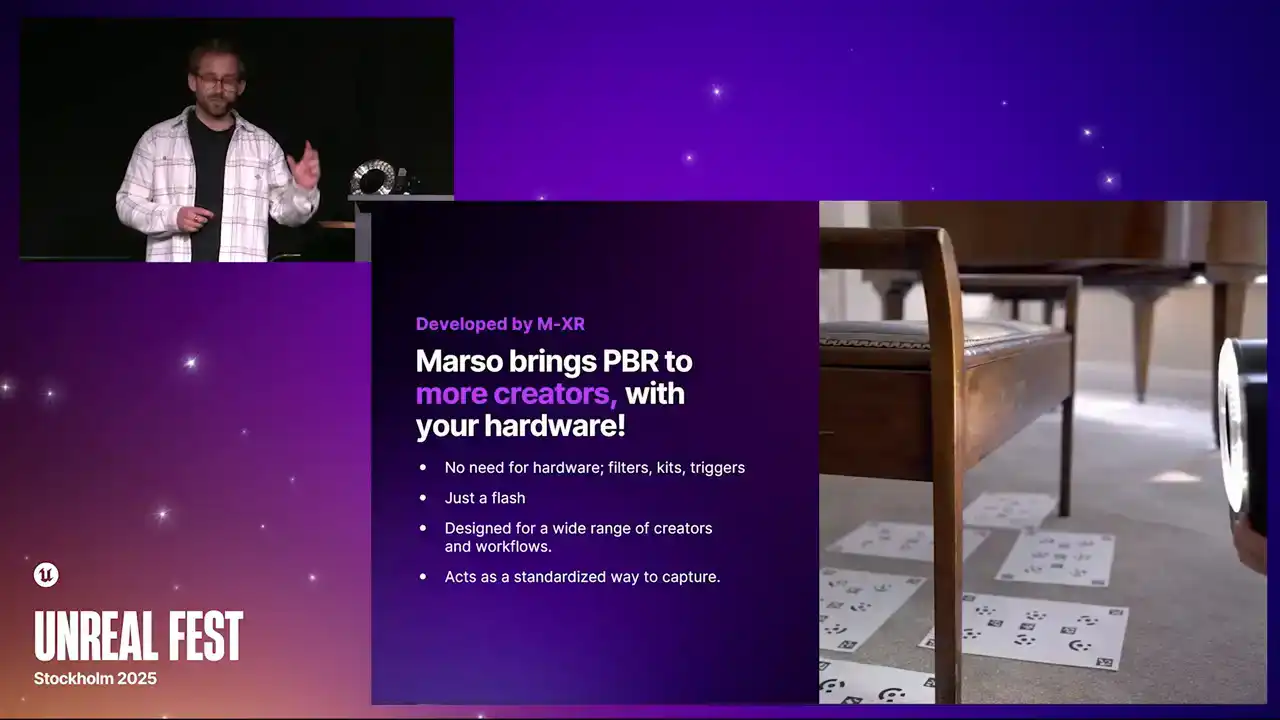
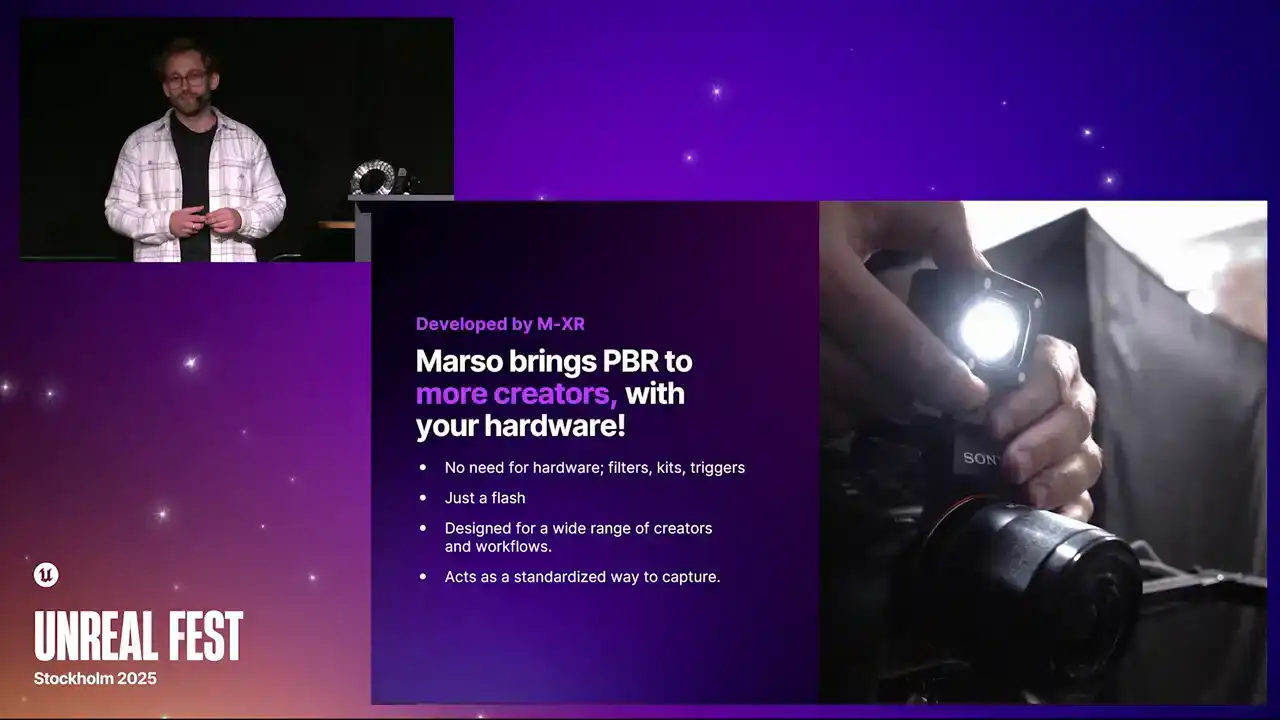
We built Marso really as a way to try and bring PBR to as many craters as possible Previously PBR capture has been incredibly tricky or using very expensive hardware has been limited

to large game and film studios.
We have come up with a method where you do not need any complex hardware, so no cross-polarization, no fancy rigs,
no filters and triggers. All you need is a camera and a point light.
This could come in many different variants.
It could be a DSLR with a little point light on top.
It could be a ring flash. It could even be your smartphone with the light within it.
This means that it could be a AAA game studio, an indie studio, hobbyist, student, or even just someone that likes doing 3D scans, and you can all capture PBR properties to the same level.
By simplifying this to just a camera and a flash, it also acts as a standard for capture.
If you are capturing assets from different locations,
three different vendors, you can bring all of these assets
into the same scene, and they will look identical.
We do this with flash photography,
and this is done by measuring how a 3D object interacts with light. We measure the PBR properties based off of this reflection.
By measuring how it bounces off, we can look at the specularity, we can look at the roughness,
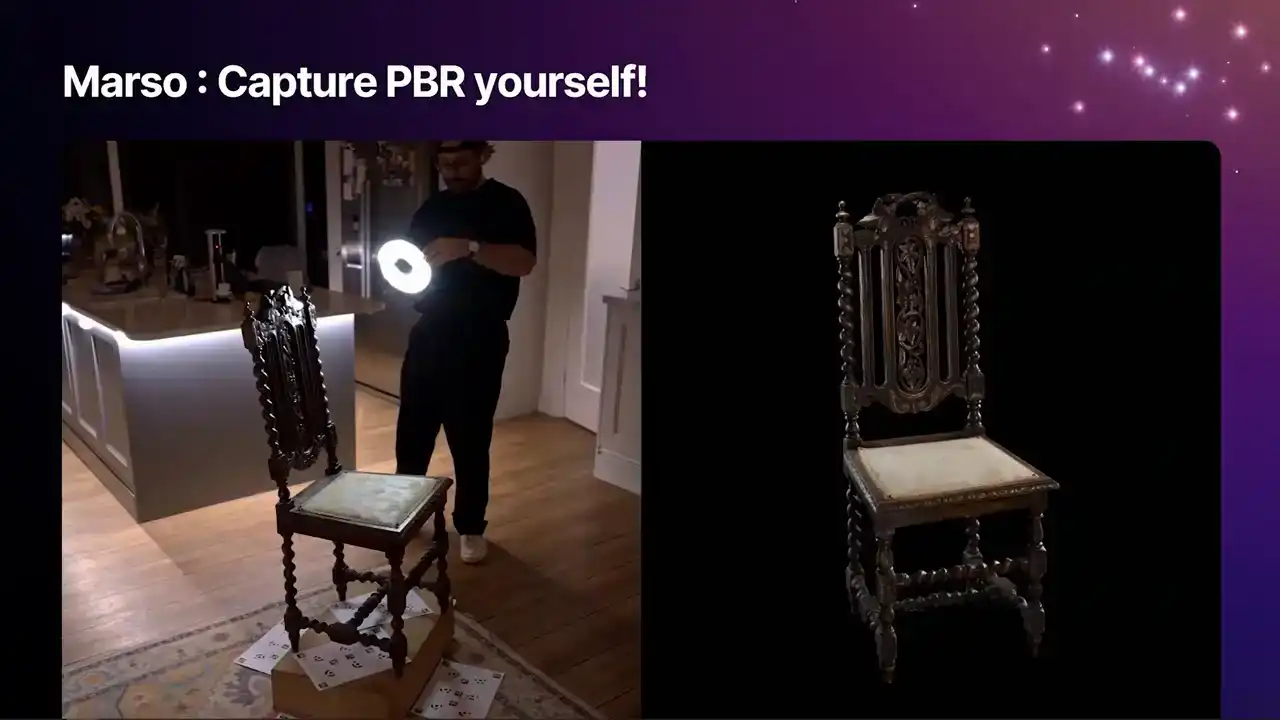
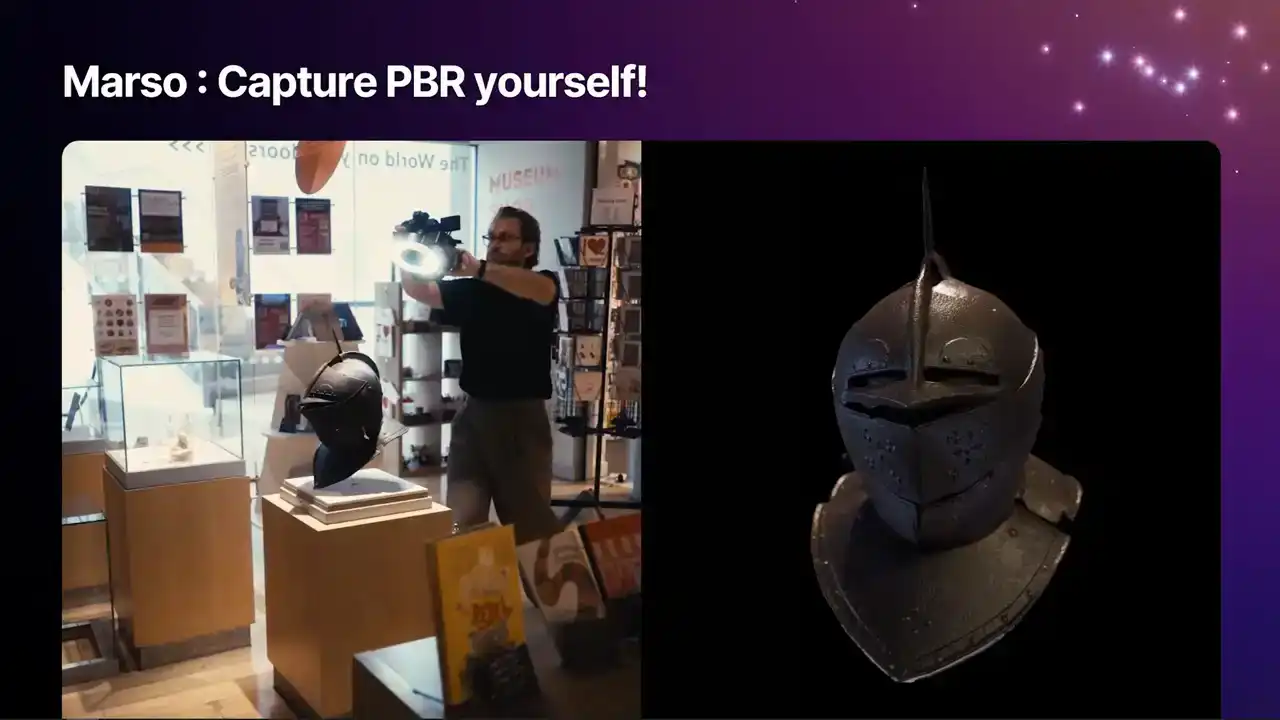
and we can also understand the base color. We designed Masso for capturing 3D objects that you want to put into your larger 3D scenes.
It is not really designed for capturing rooms, but anything that you can get around with a camera,
you can do a full PBR scan.
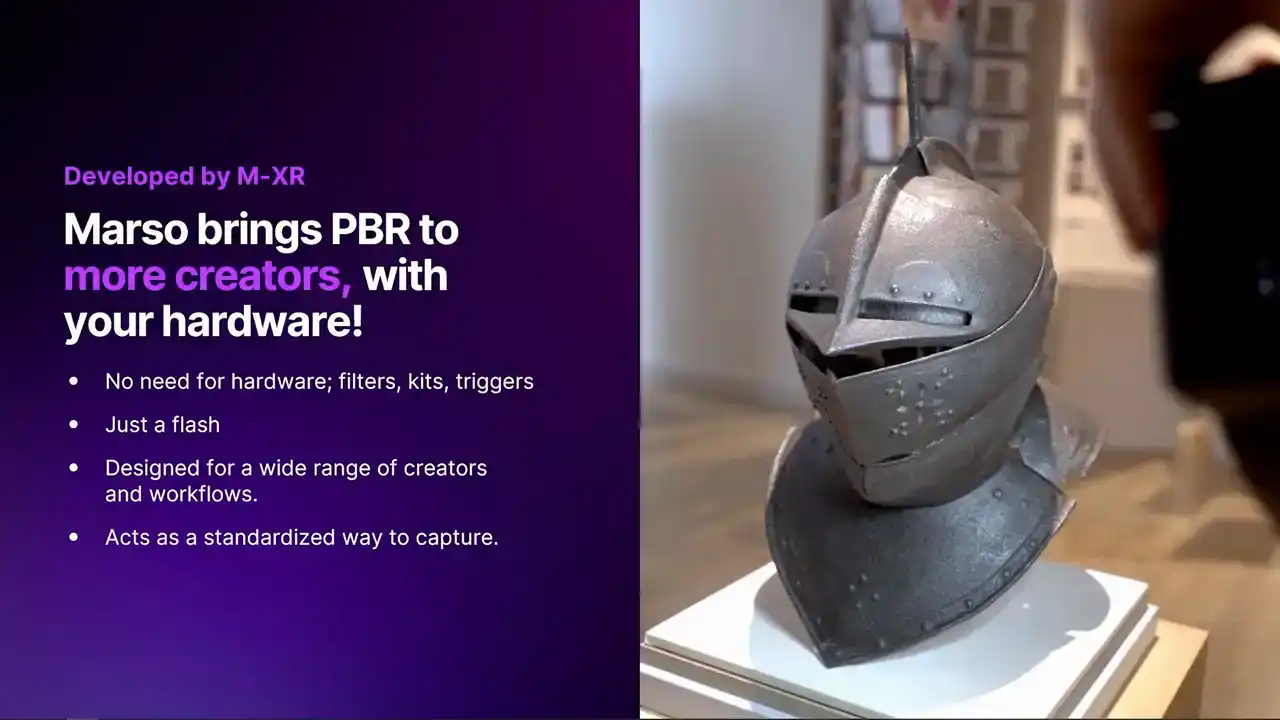
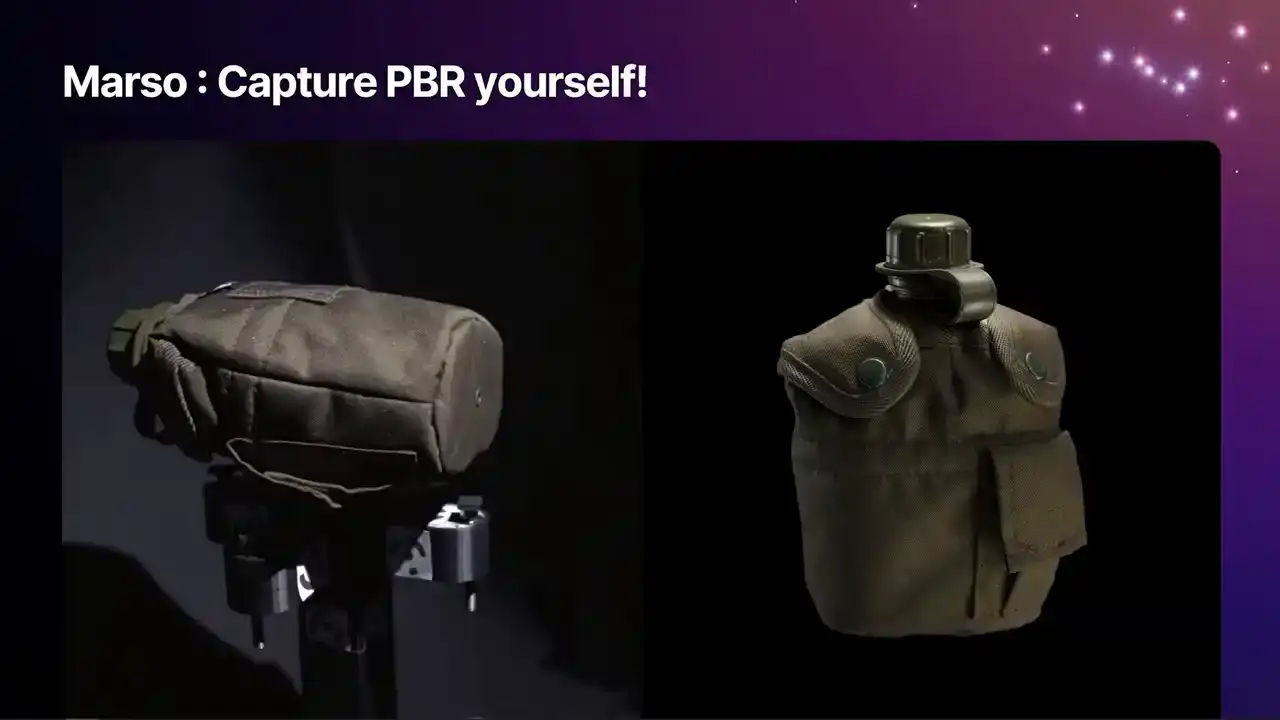
We have tried this with fashion apparel, so shoes and handbags, small to medium-sized objects for film and games,
so lots of props, even the odd cultural heritage piece, where you do not have to take the artifact out of a museum,

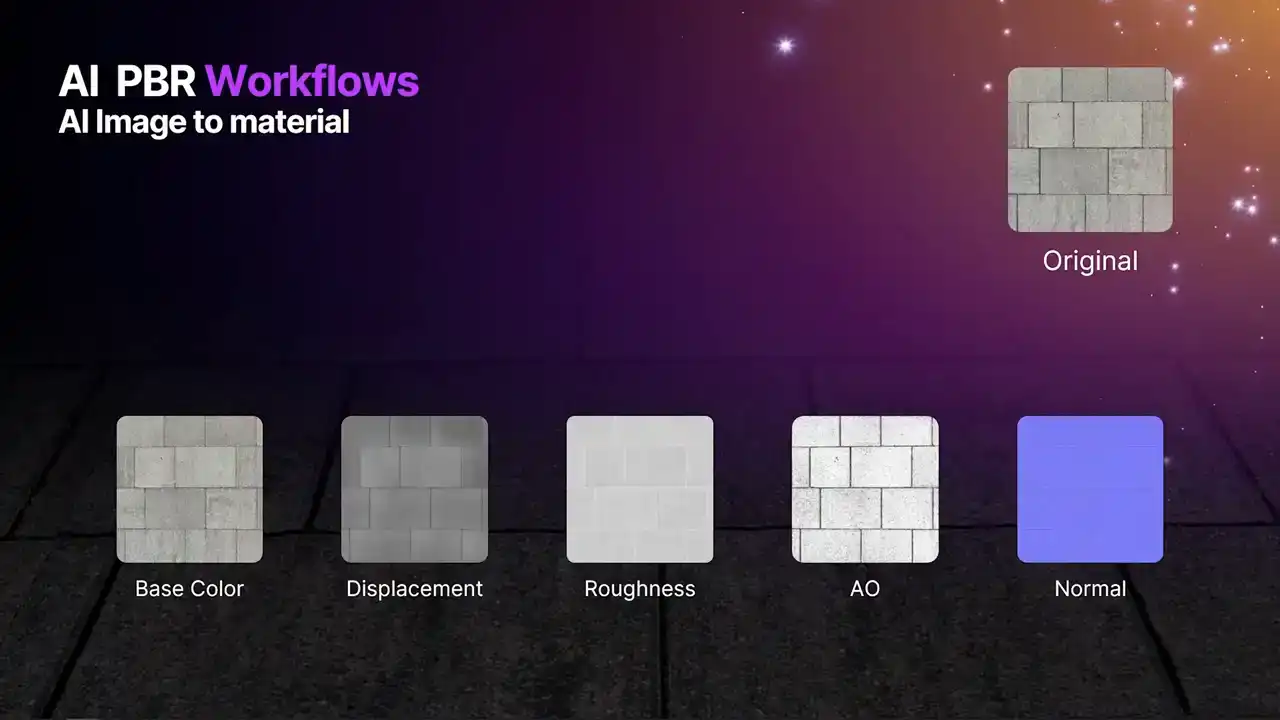
you simply take the glass cabinet off and take a few pictures. and we have even captured a few small to medium-sized pieces of furniture.
What can you expect for a mass-side measure? The software itself delivers the full array of PBR properties for both the metallic and the specular workflow. We give you diffuse, specular, albedo, metallic, roughness,
gloss, index refraction, and normals. These can be delivered all the way up from 512 pixels up to 16K, and these can be delivered as JPEGs,
PNGs, and even 32-bit EXR files. It works best probably with freehand.
A lot of the scans that we have done tend to be with the ring flash, but you can also use a rig if you put a small LED on the top and do your scan that way.

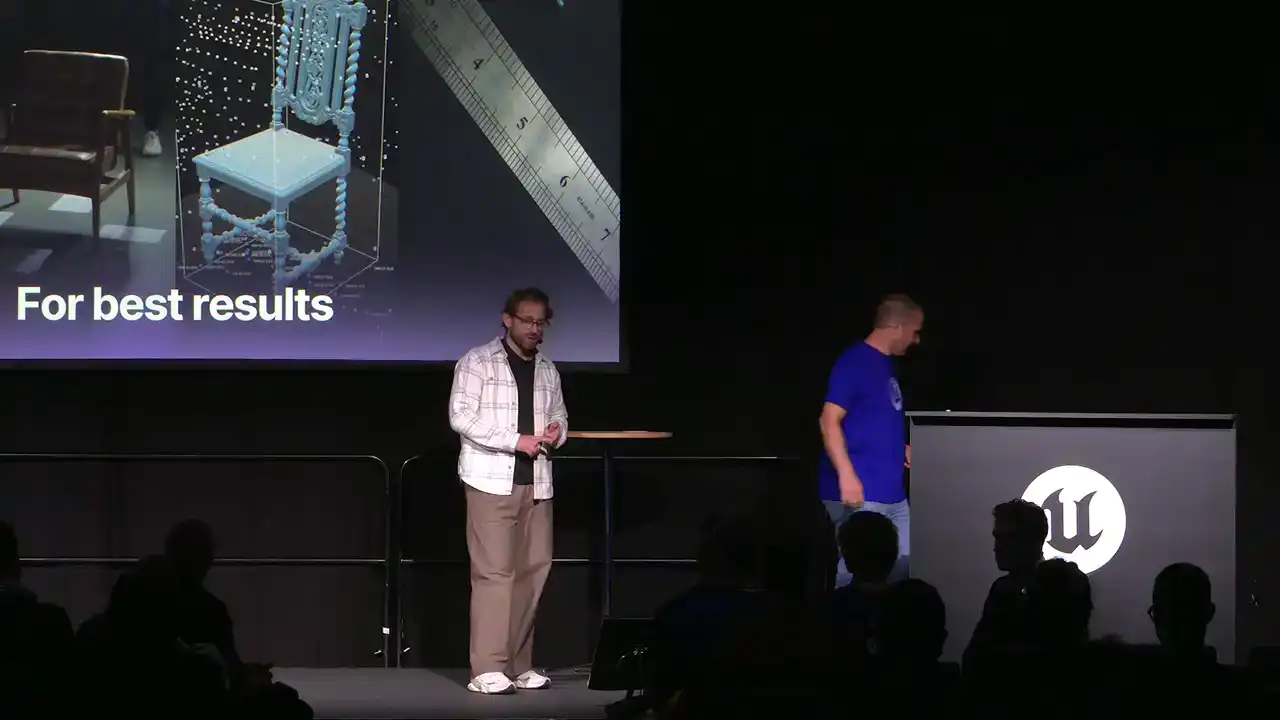
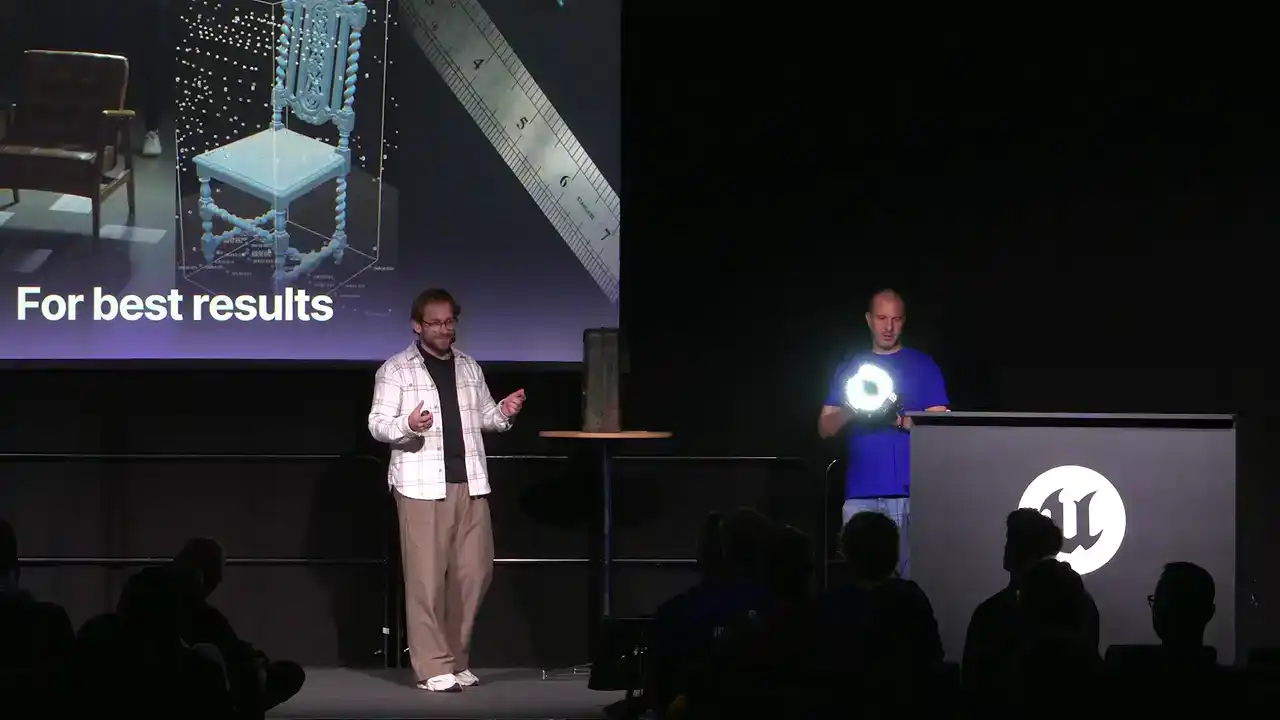
But to get the best results, you need to get good coverage, and you are going to hear me say this a lot. the better you can get around your 3D objects, the more likely you are to capture all of those reflections.

If any of you are photogrammetry veterans, this is something that you are probably not used to doing or doing it in a slightly different way.

But if you want to get a Marceau measured scan, just please follow along,
and you will get a good measured scan at the end.

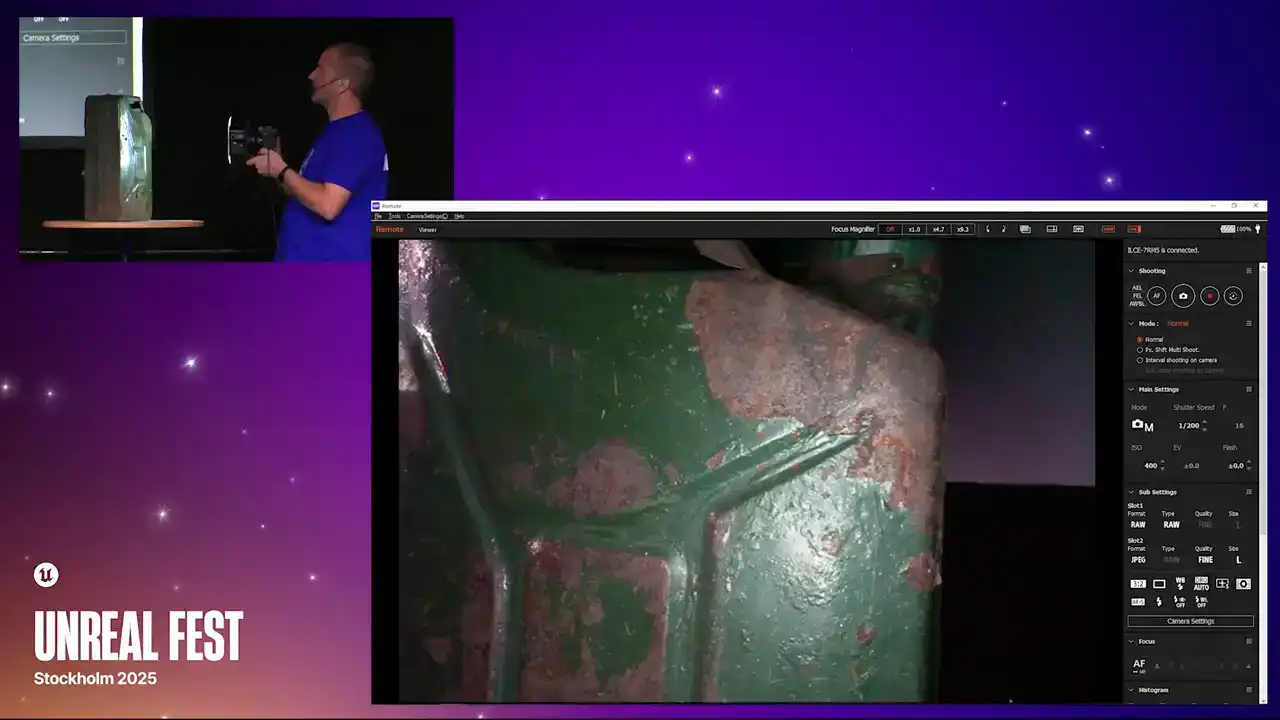
Wallace and I, over the next few slides, are going to show you actually how to do one of these.
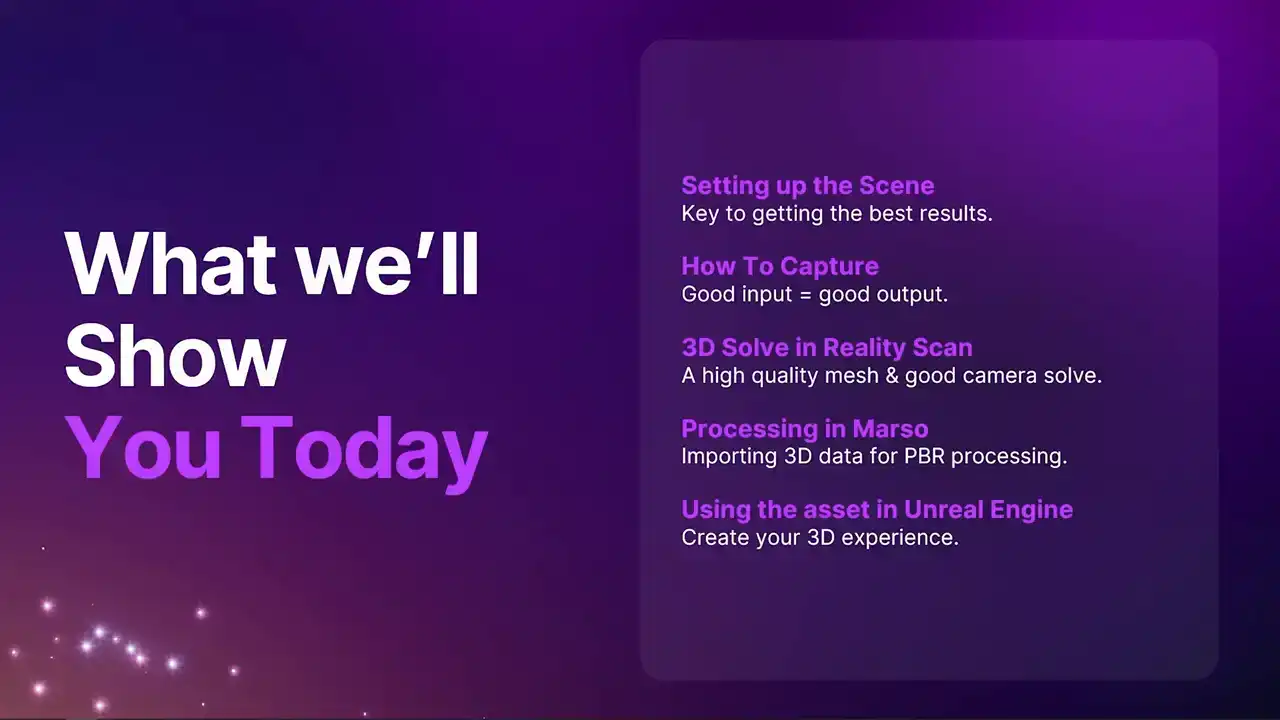
We are going to cover setting up your scene, how to actually capture. The better quality your 3D scan source photography is, the better the result will be out the other end. We are then going to show you how to process this through Reality Scan, how to process the PBR through Marceau, and then finally bringing it all together within Unreal Engine.
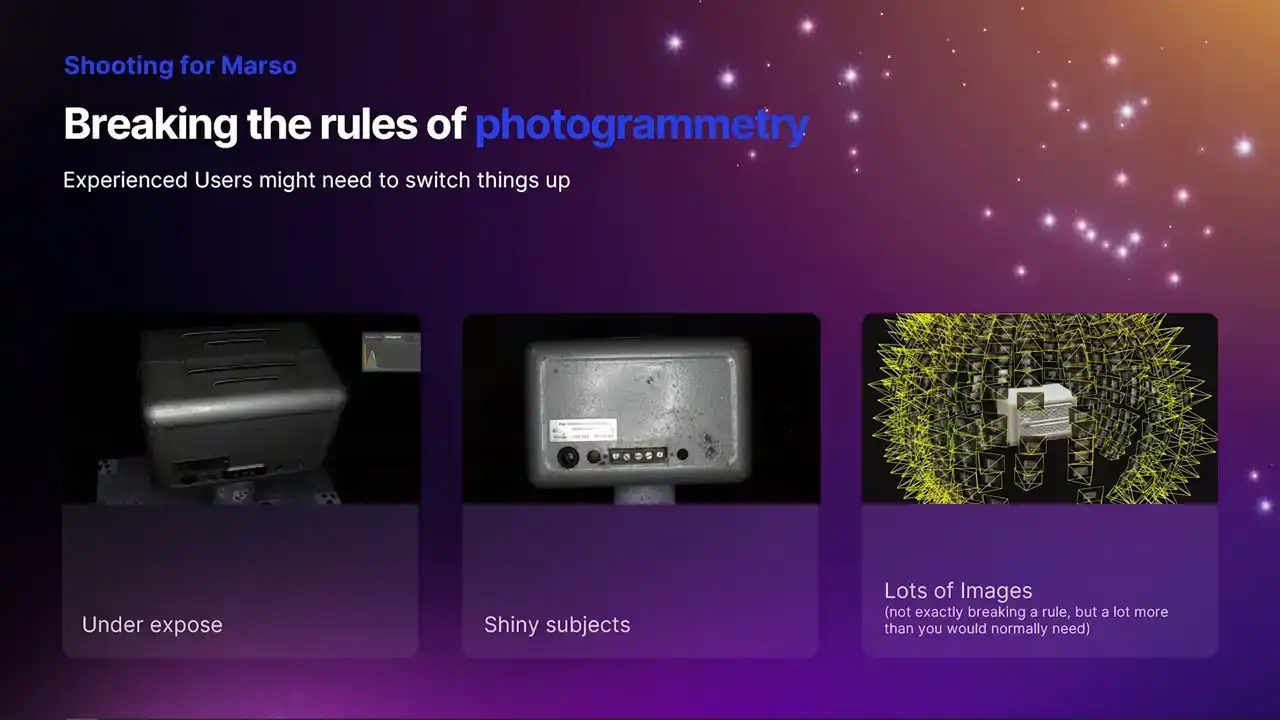
Those of you out there who are used to doing photogrammetry, you might find that this capture method is a bit different to normal. Now, for one, you're probably going to end up having to underexpose things. Now, the reason for that is Marceau needs

to be able to get values through the whole range of the brightness of the object. So those specular highlights, they can't blow out. They need to be below 1 in value, which
can obviously make the rest of the object pretty dark. But Marceau uses raws, and they've got big color depth,
so you can pull back a lot of that information. Now, the other thing we often tell people is don't bother using shiny objects.
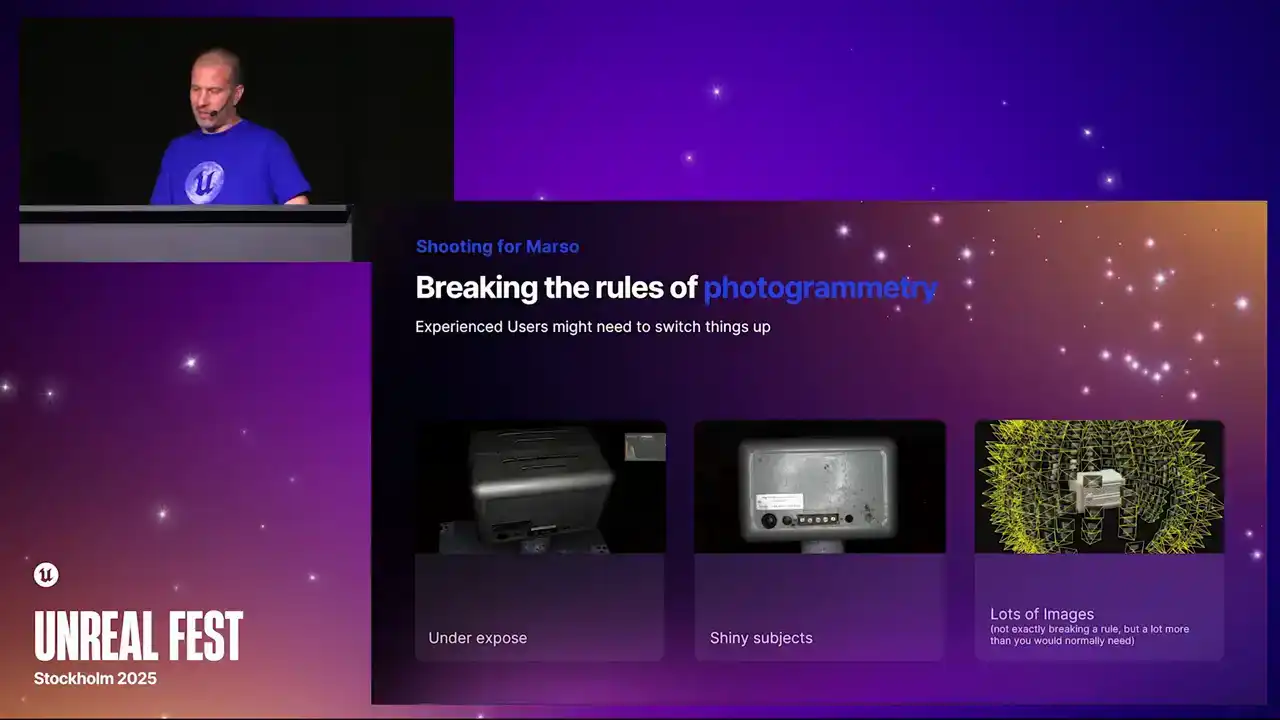
But that's kind of the point here. Often the most exciting PBR materials are going to be things with specular highlights and some reflections. Now, lots of images.

That's not breaking a rule because obviously we do encourage people to take as many photos as they possibly can because you can always not use them. But I think you're going to be surprised how many you need here.
It's a lot more than you would need to get a really nice photogrammetry scan.
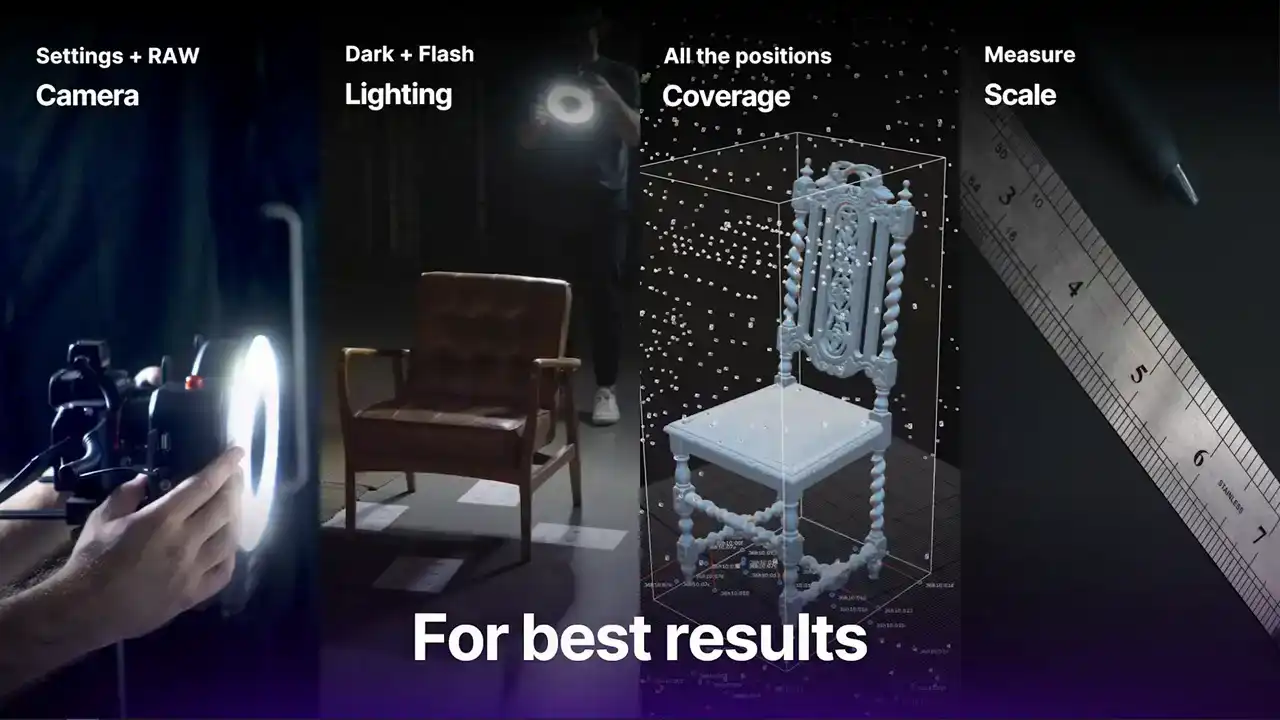
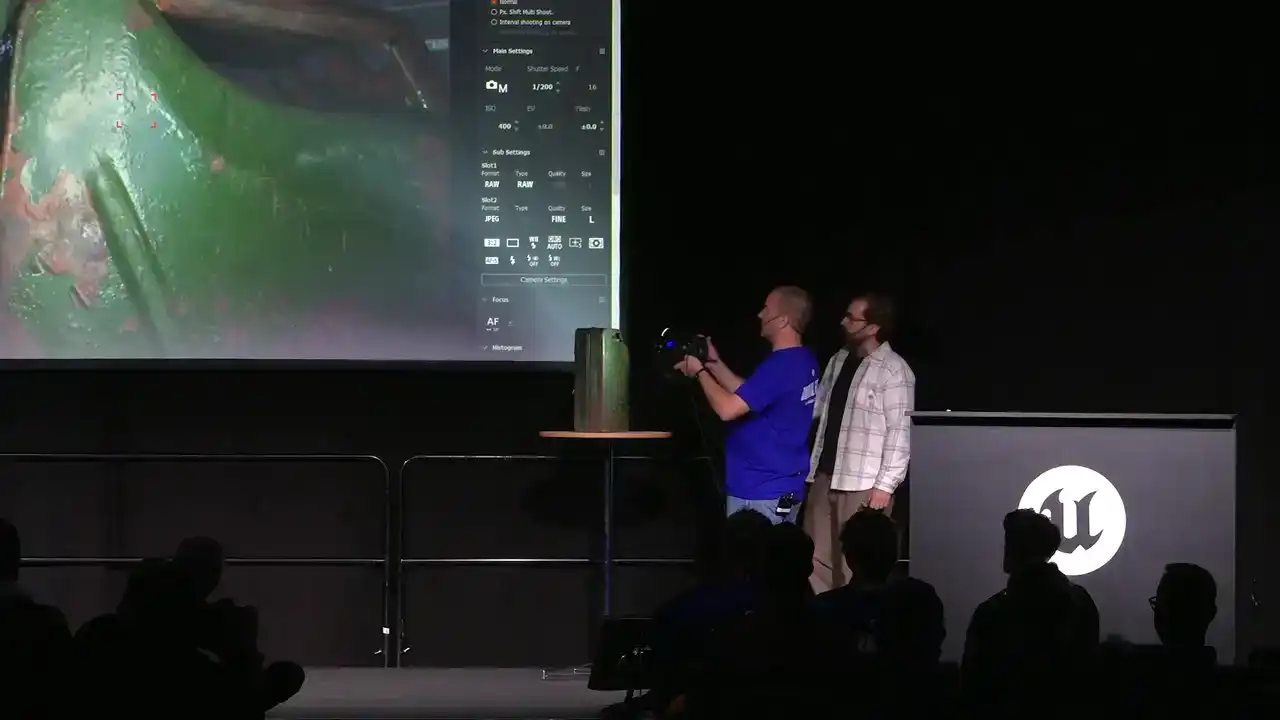
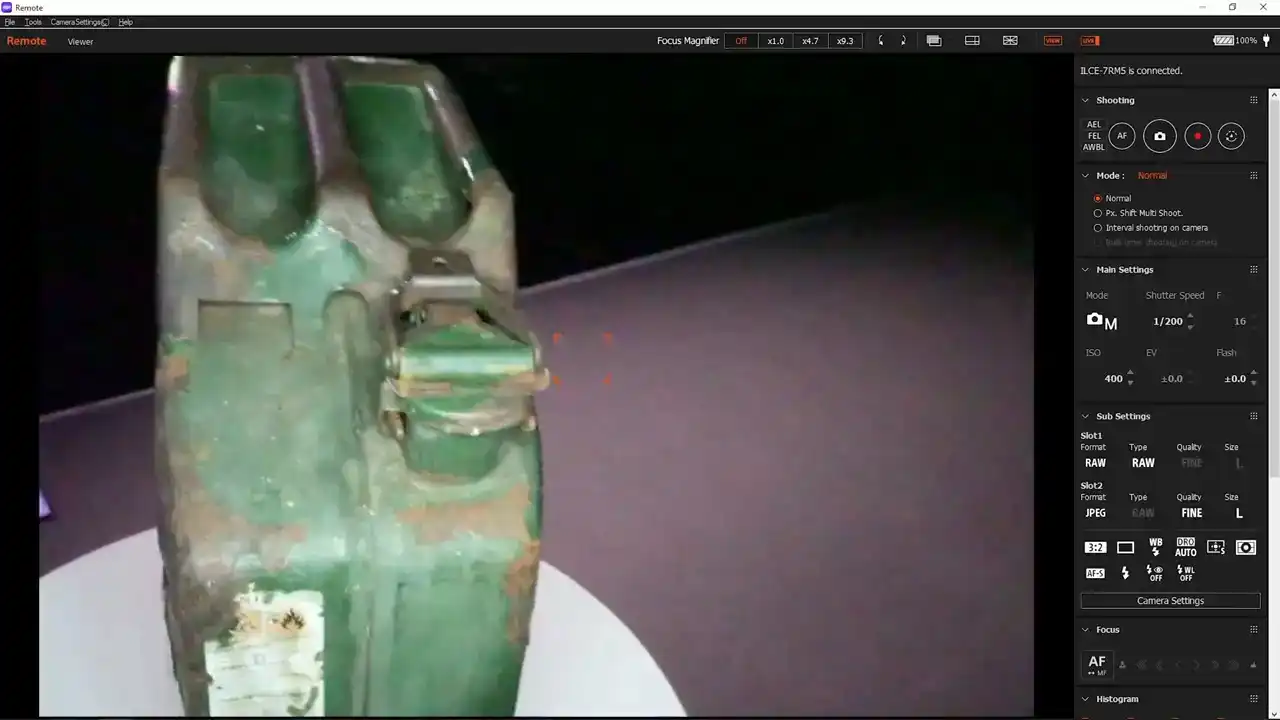
There are four things that you need to think about when you are doing a MASO measures scan. The first thing is the camera. When you are using the camera, it has to be a camera that can shoot RAW files. The reason for this is so that we can keep as much of that dynamic range as possible, so all of the highlights, all of the shadows, which will often get clipped if you are using a JPEG.
The other thing is the exposure. We want to slightly underexpose the image. The reason for this is to, again, maintain that highlight. If we expose normally, we are going to clip the highlights and we are going to expose for the majority of the 3D scene.
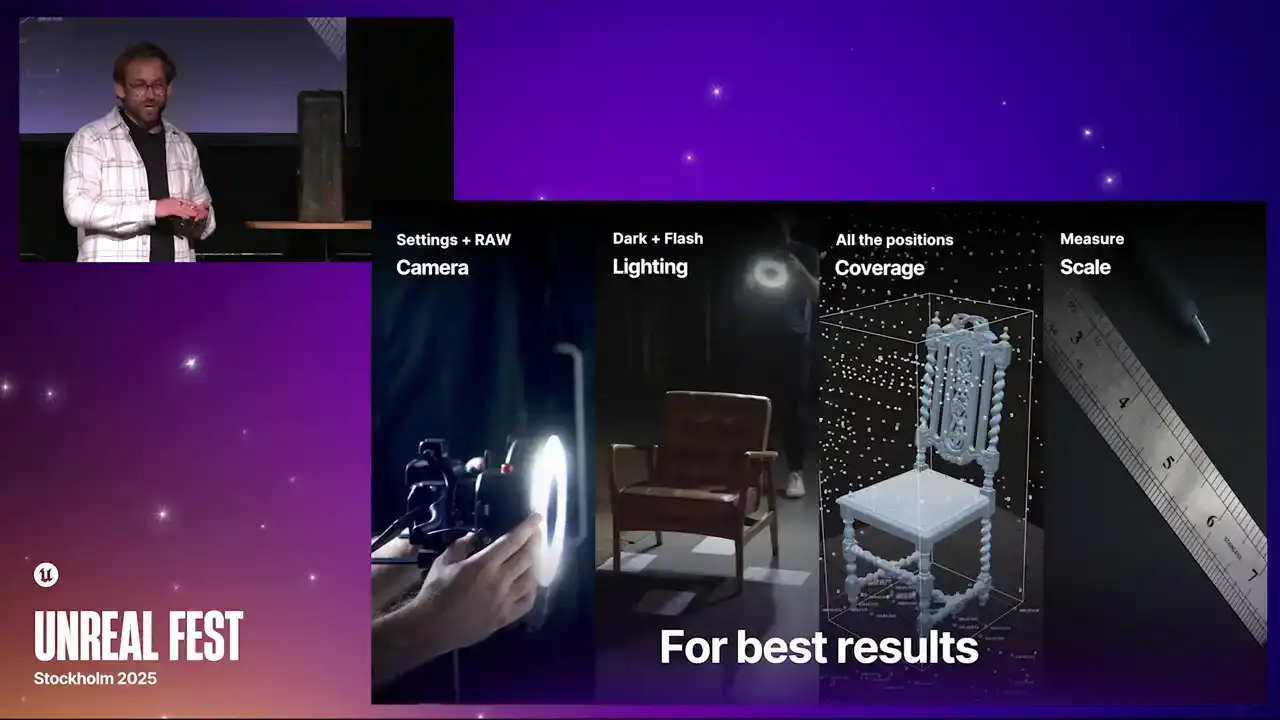
Also, locking off your exposure. A camera that can shoot in manual is really important. If you have the exposure changing throughout the scan, it is going to absolutely mess things up.
Find your exposure, lock it off, and then move forward with your scan. The other thing is lighting. Because we are doing a measured scan and we are measuring the response to light, the lighting is key.
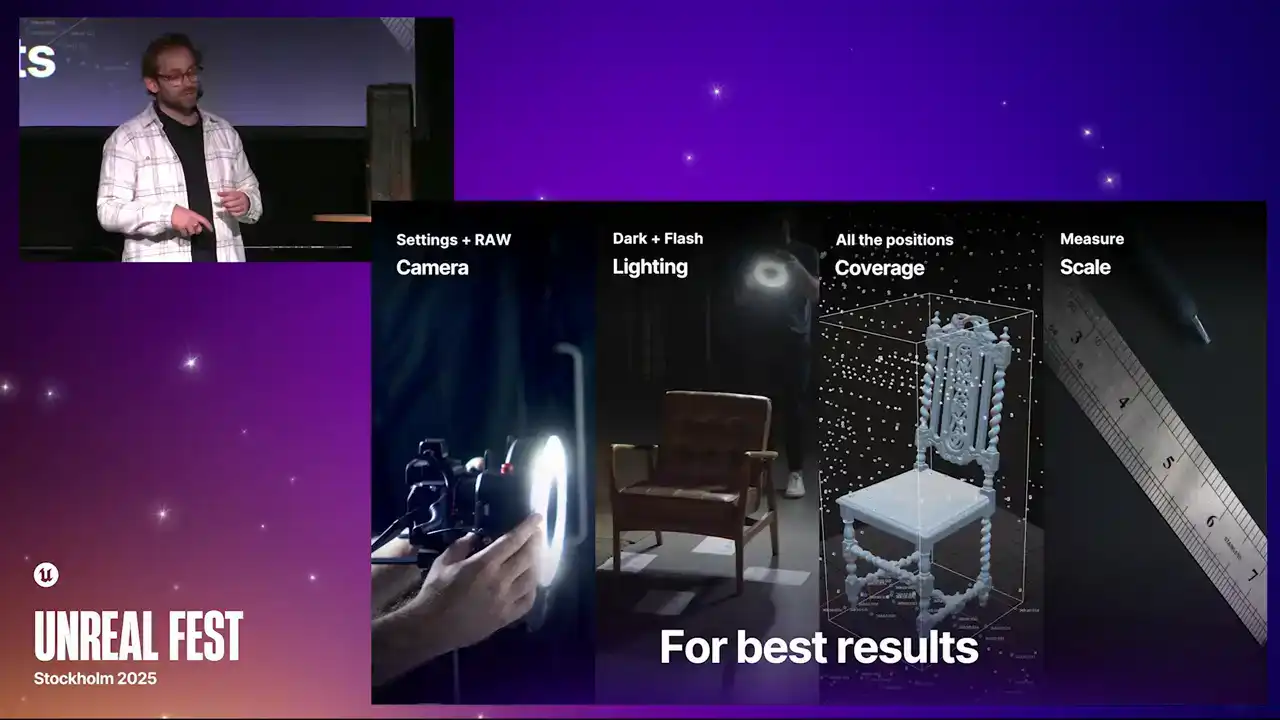
What we want to do is get an image where the ambient lighting has no effect on the image. It is entirely coming from the point of view of the flash. If you are using a point light source, like a continuous light,

it is best to capture this in a really dark room. If you are using a flash, like what Wallace has here, you can usually pump it up enough to overpower the ambient lighting in the room.
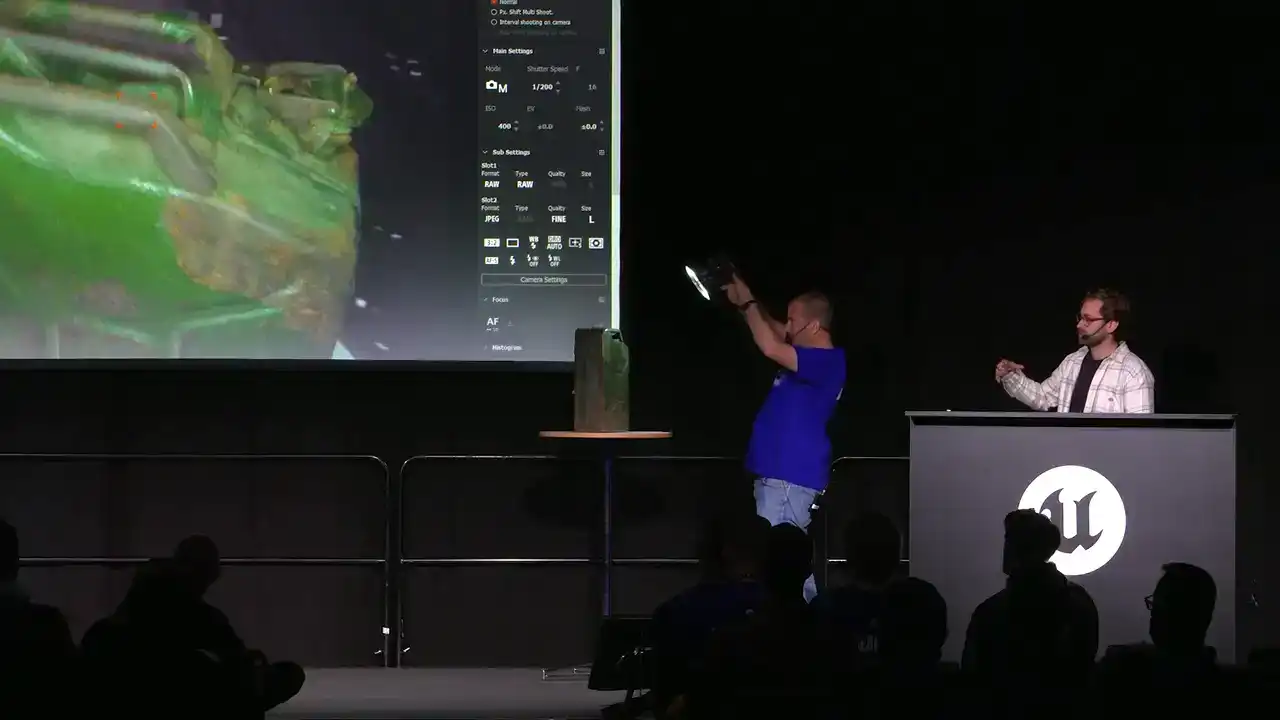
Coverage, keep going on about this, but you want to get enough views of the object.
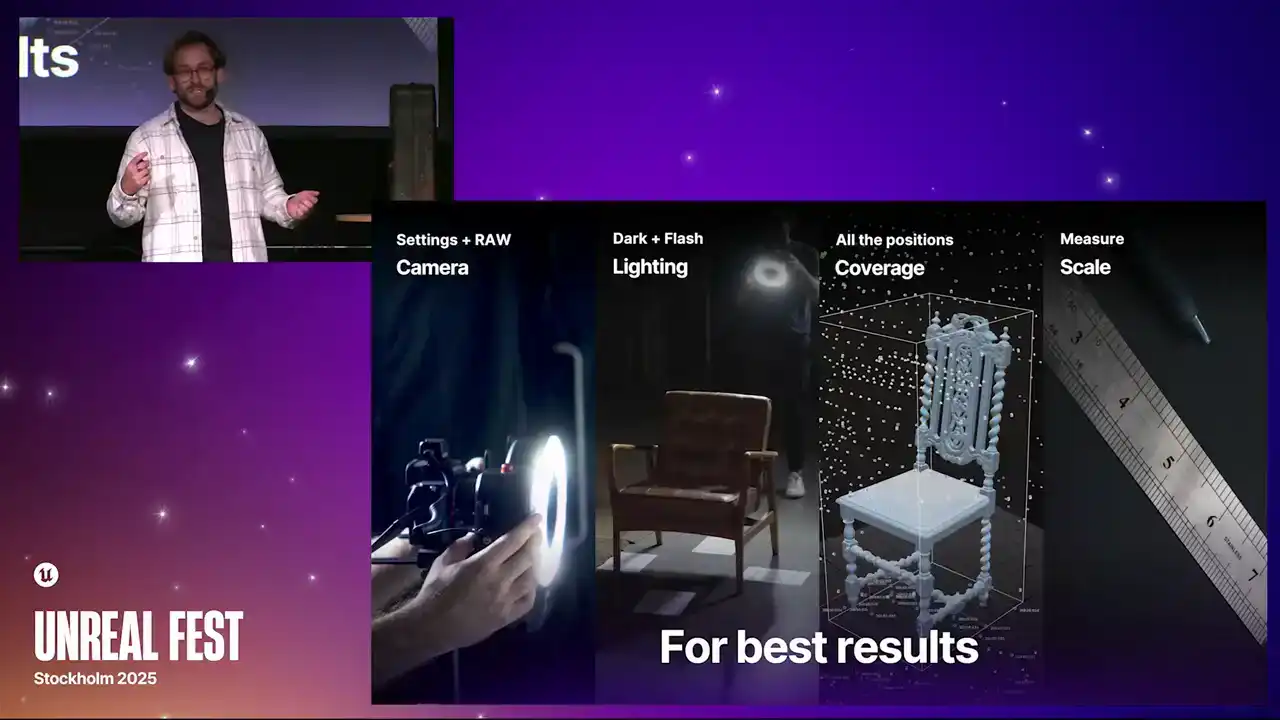
Usually, we will do a scan where you capture it from a few rings around the object, and then punch in and get a few of the details, and then finally scale.

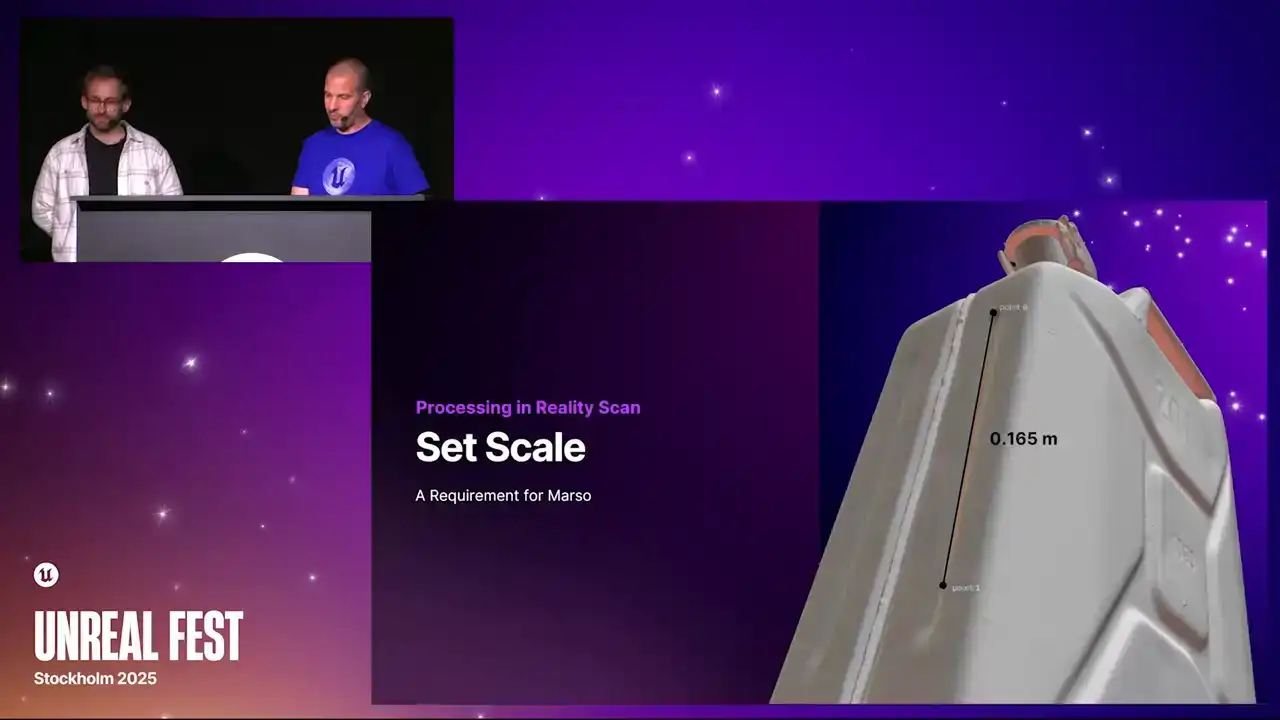
This is something that usually people do not have to worry about too much when you are doing a 3D scan, but for a MarsO scan, scale is key. The reason for this is when you are doing a picture
with the flash, the closer you are to the object, the quicker that object is going to burn out and it is going to look really bright.
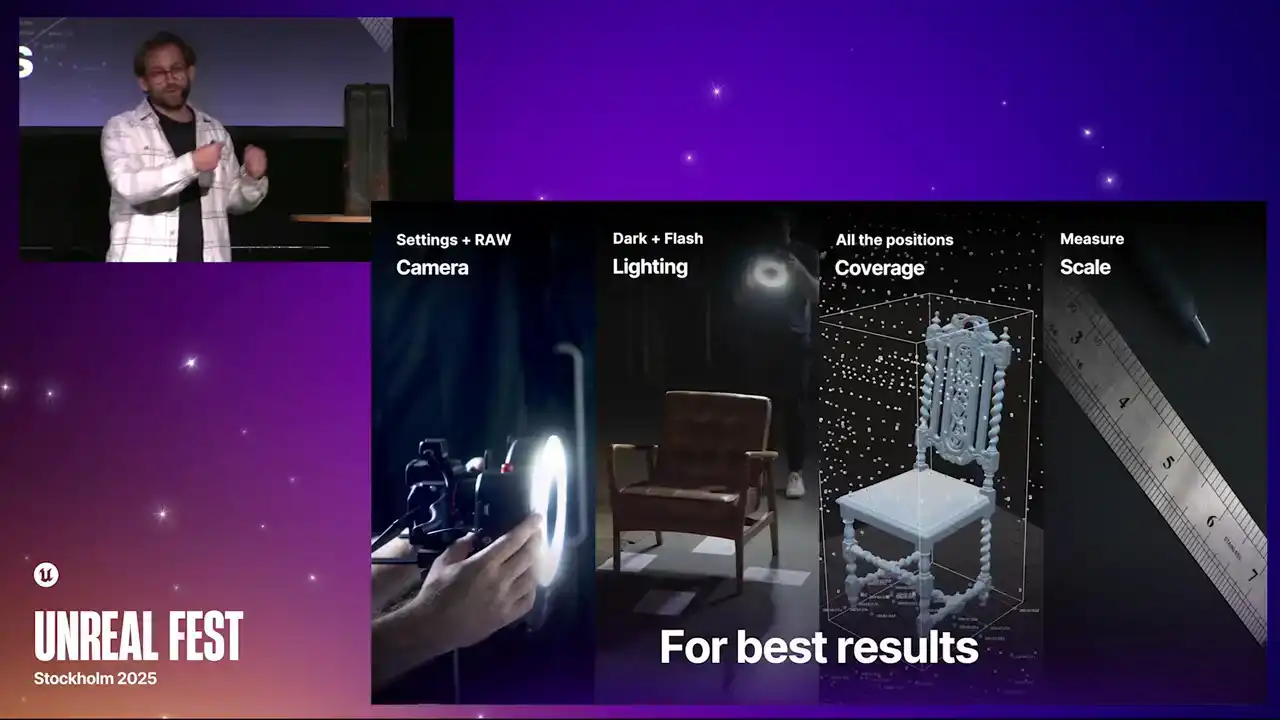
As you move further away, the lighting is going to fall off more quickly. There is going to be a difference in how bright some of the images are. If we can measure the scale of the scene,
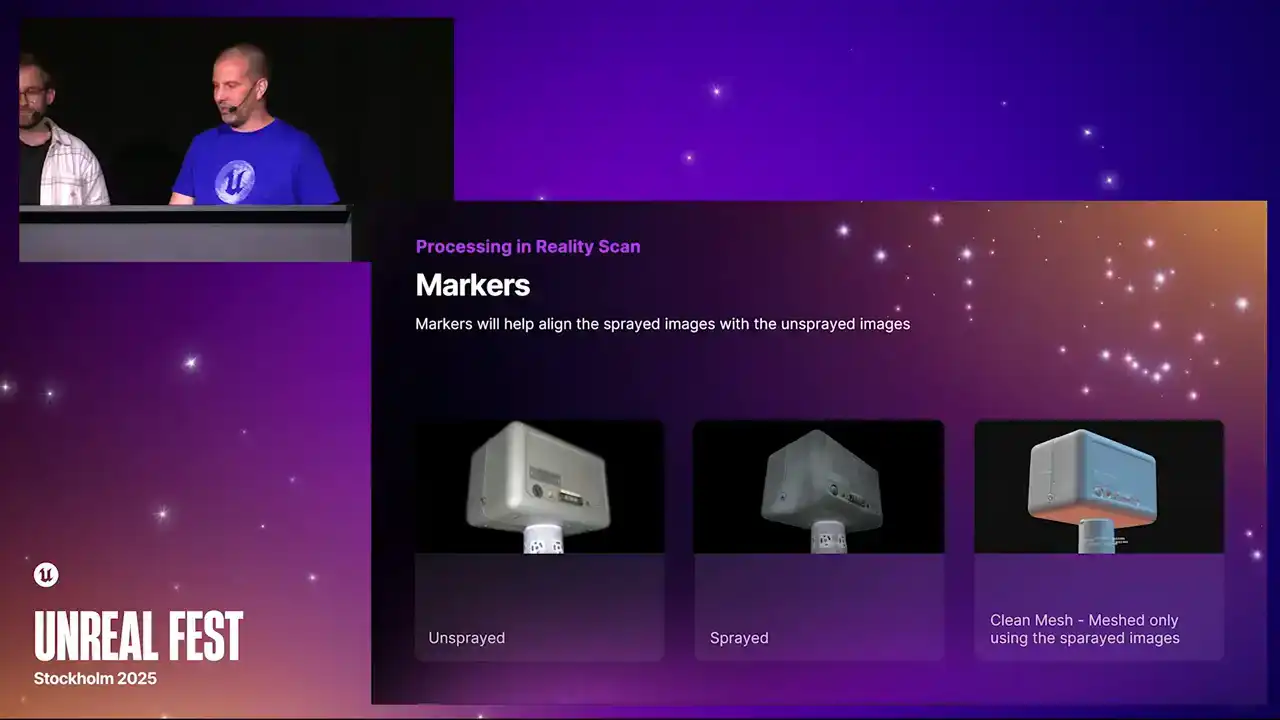
Marceau can actually account for that. A few ways that we can do this is either using some markers,
which I think we have here.
Markers that can be put into Reality Scan, where you know the distance between them.
If you have got markers, you can put a ruler in the scene. Alternatively, you can even just measure a part of the object and do it that way.
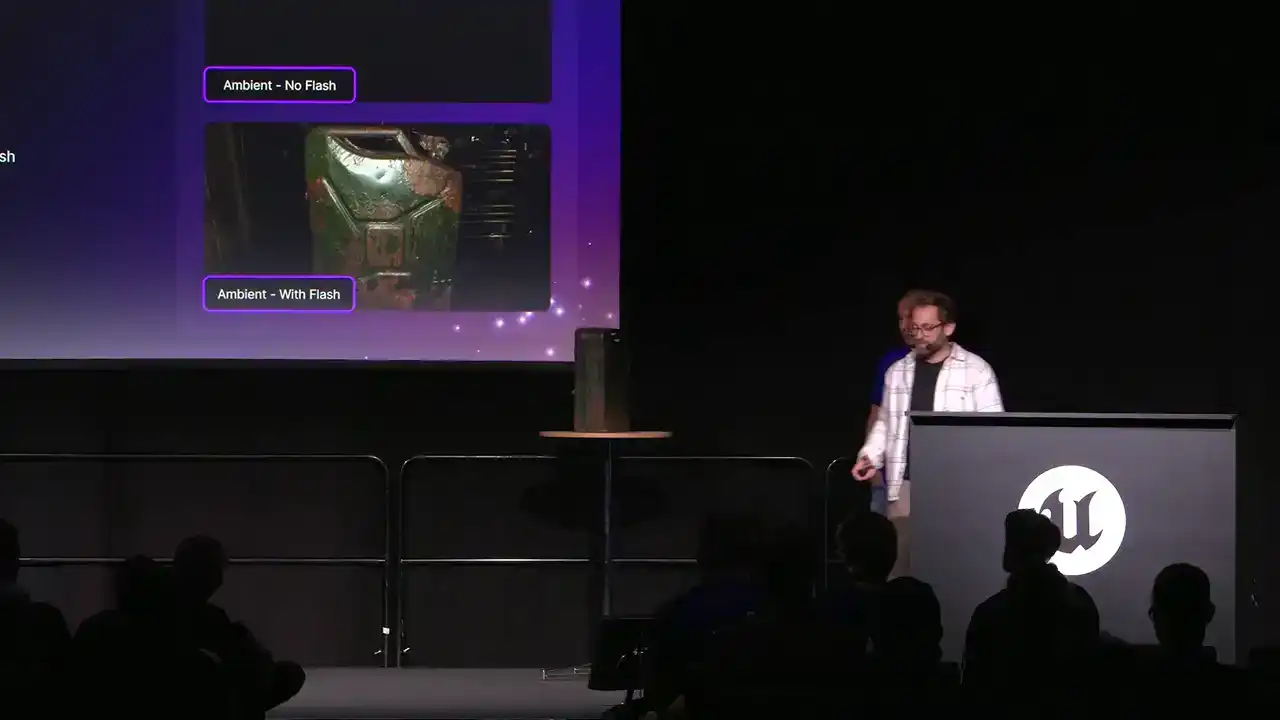
When you are getting your exposure, the easiest way to get this right is to actually take two pictures.
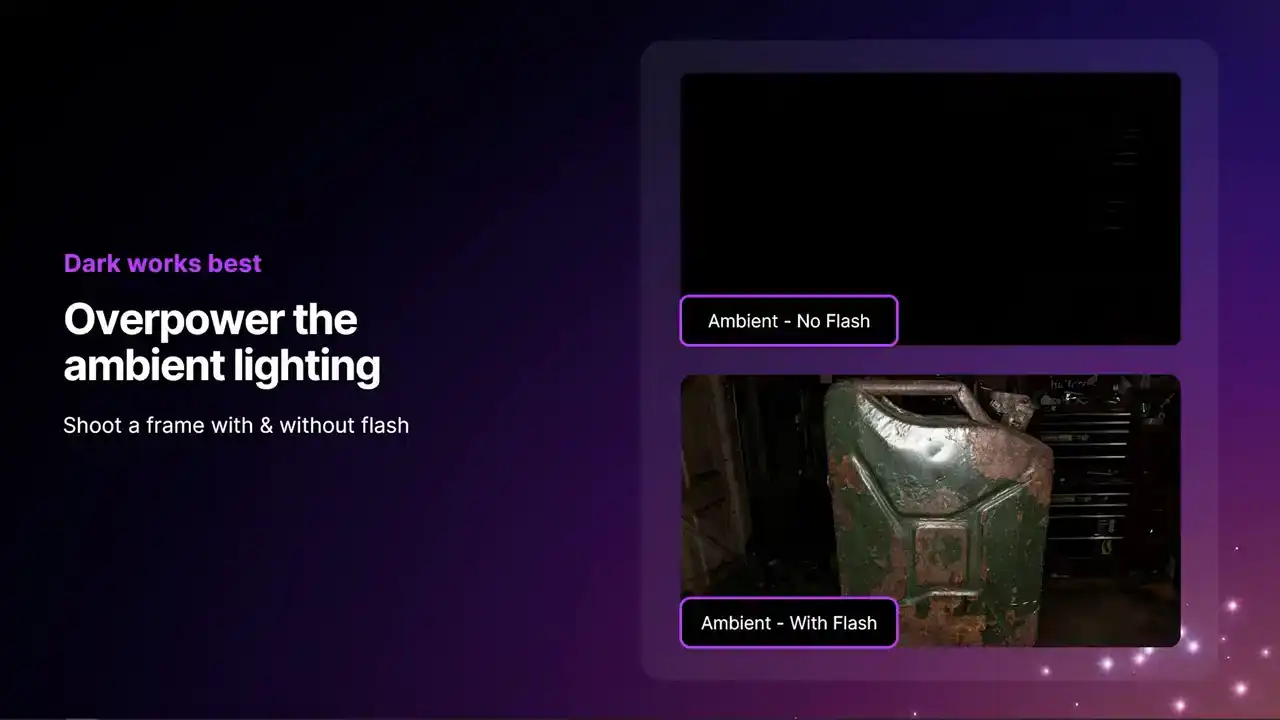
The first image you will take is with the flash turned off. Ideally this will be completely black If it is not you can tweak your exposure setting accordingly Then the second image take with the flash turned on If that second image looks nice and slightly underexposed
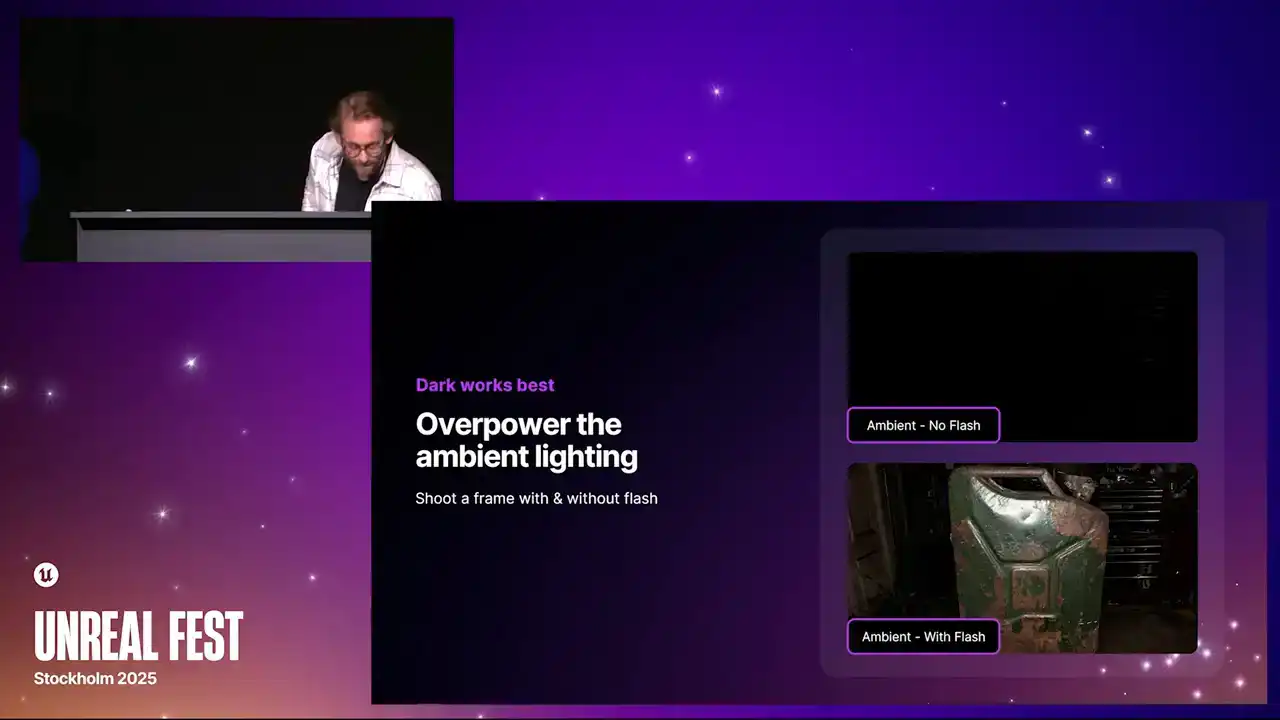
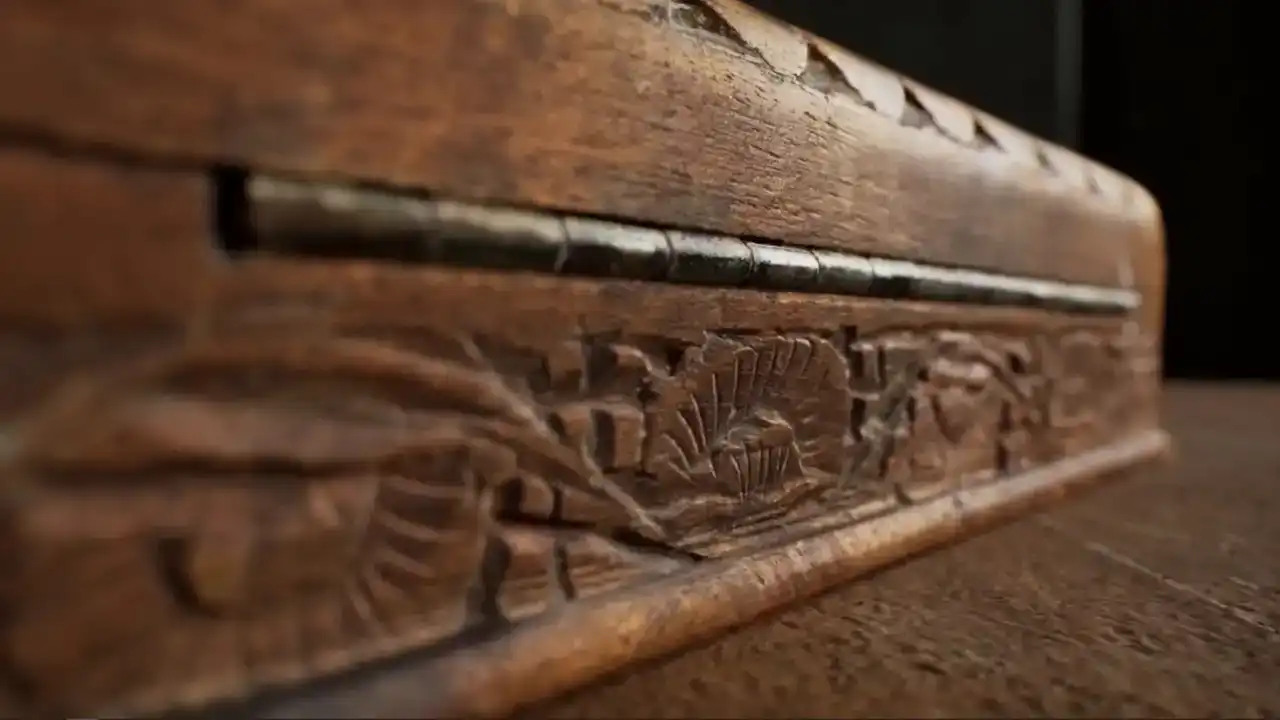
as you can see here, then you are good to go. What you can see from this point of view
is that reflected region. By capturing this reflection here, we can understand what the
PBR values are. We want to get enough images where we almost cover the whole object in that specular reflection.
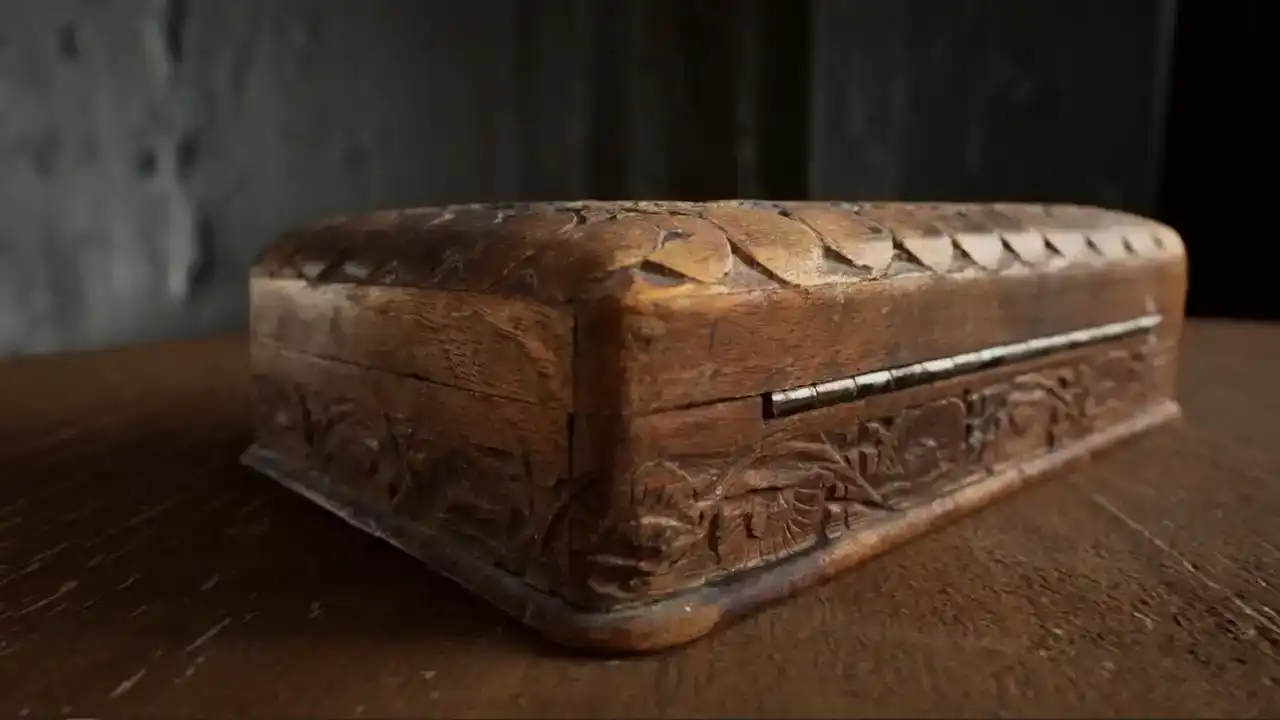
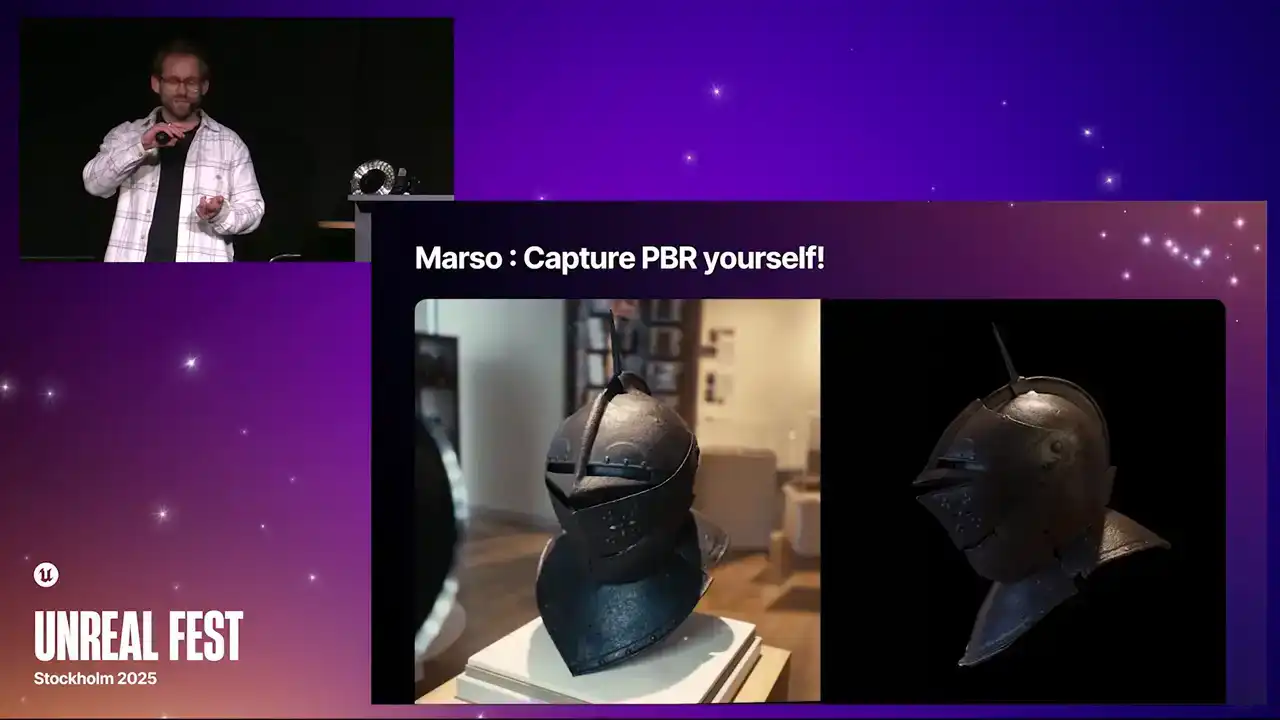
We pick this object because it has quite a few interesting material properties on it. Mindflip is quite hard for me to

get through airport security on my way here. When we are doing a scan, we will often do a few loops just
to make sure you have got the general shape.
but when you are capturing something quite planar like this,
it is usually good to scrub left and right, up and down,
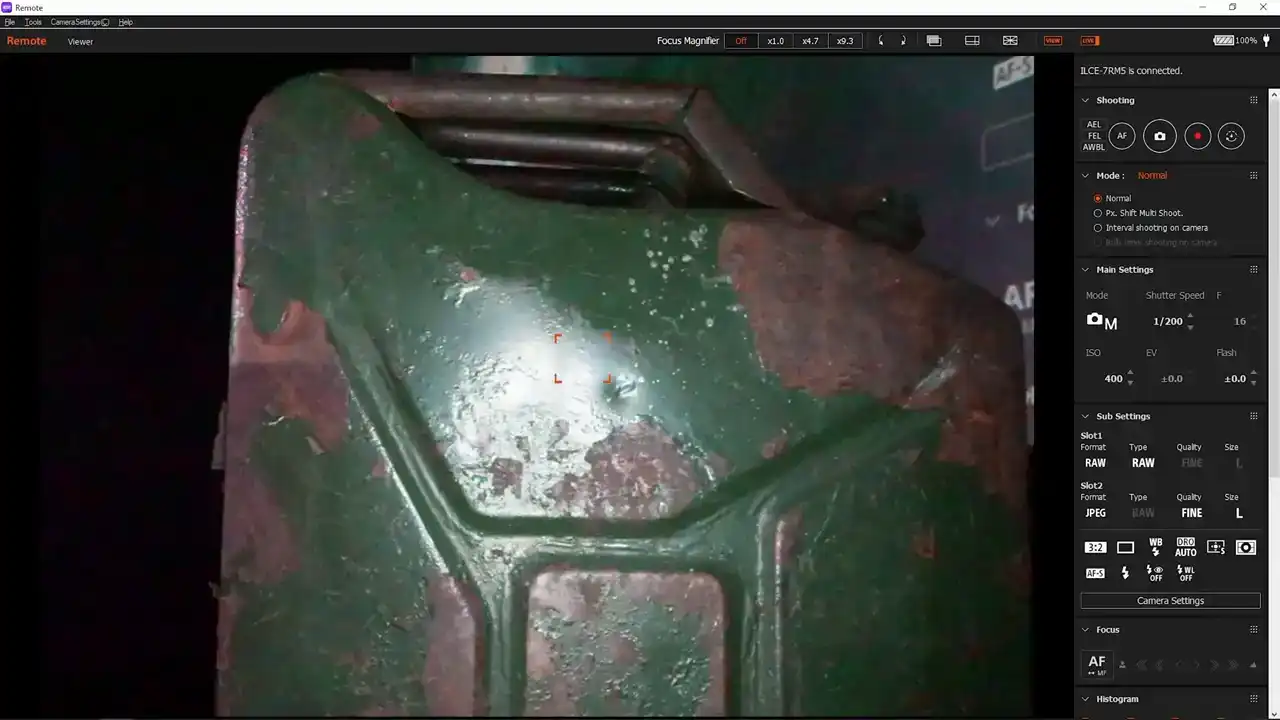
and that will just ensure that you have got
all of the reflective regions in your data set.

This is just an example of what that looks like. Scrubbing left and right, you can see if you were to almost add all those images together, It is like you are painting the object with light, so the whole thing becomes covered. If you do not take enough pictures, so this is a sparse scan, what you will end up with is regions
where you have got the PBR property and regions where you have not. Your Roughness Pass or your Specular will have peaks and troughs within it. The general rule of thumb is the shinier the object is,
the more images that you will want to take, and the more matte the object is, you can probably get away with a few less.
Just for example, all the scans that we have done of this

It is around, I think, about 600 to 700
for things like shoes that are quite matte, like leather. You can get away with about 300 images.
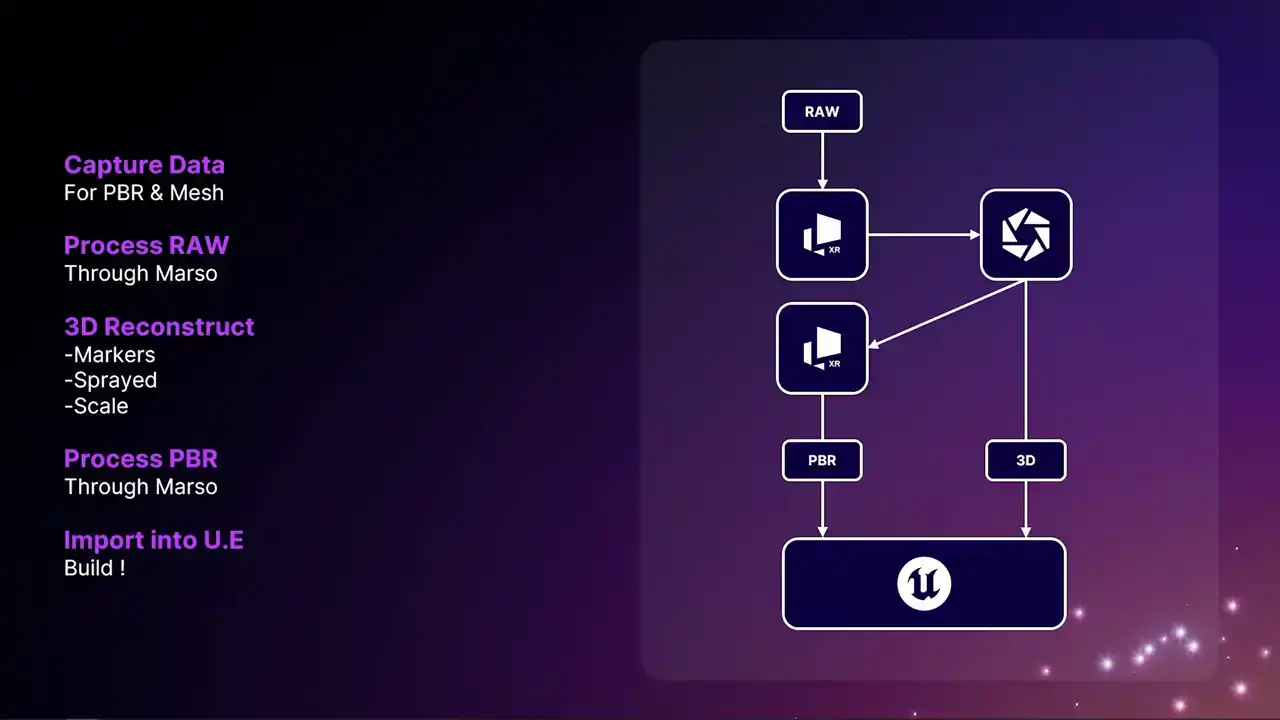
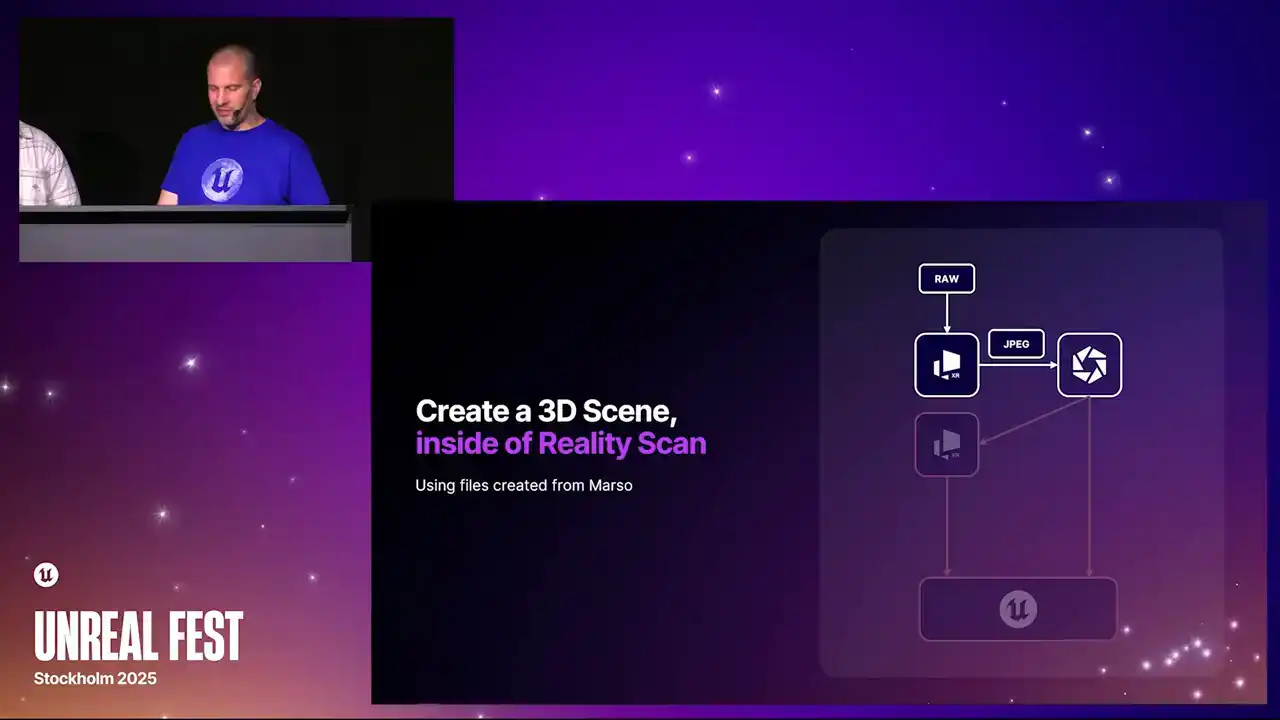
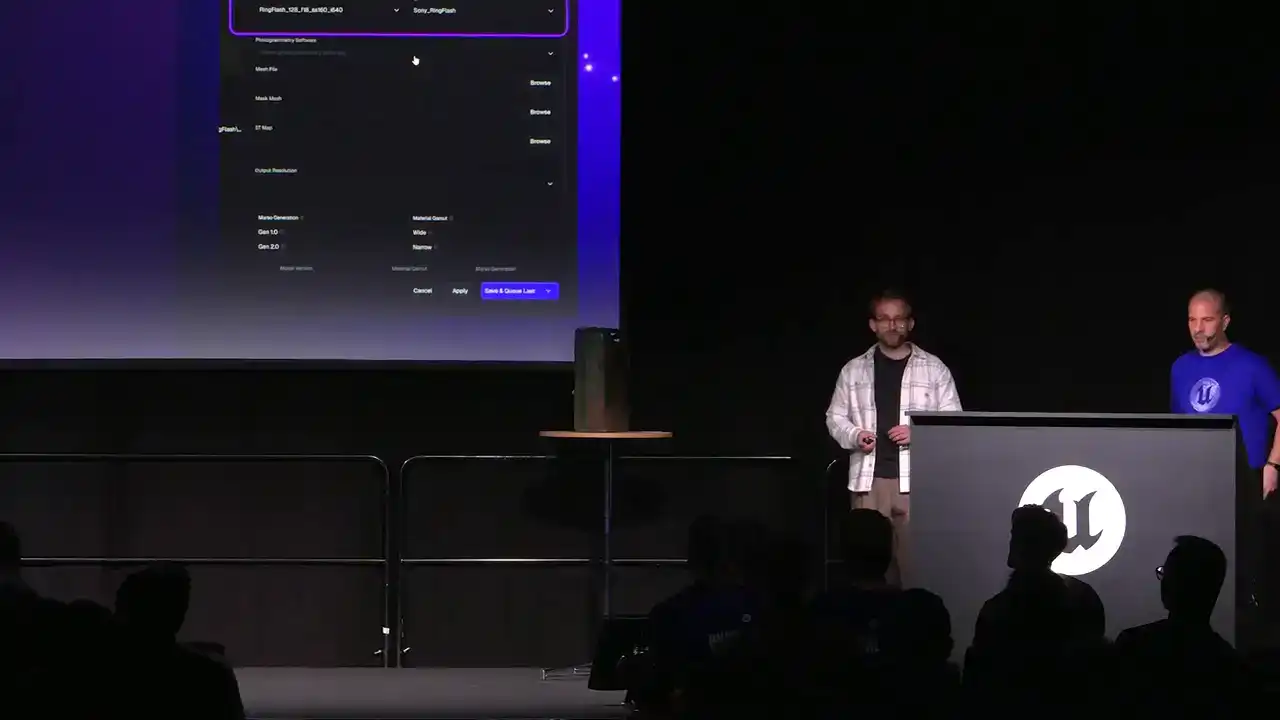
We have done the capture. Now we can go through the rest of the process. Just top level of the workflow, do your scan. You process the data initially through Marceau. You then hand that over to RealityCapture, RealityScan for the 3D.
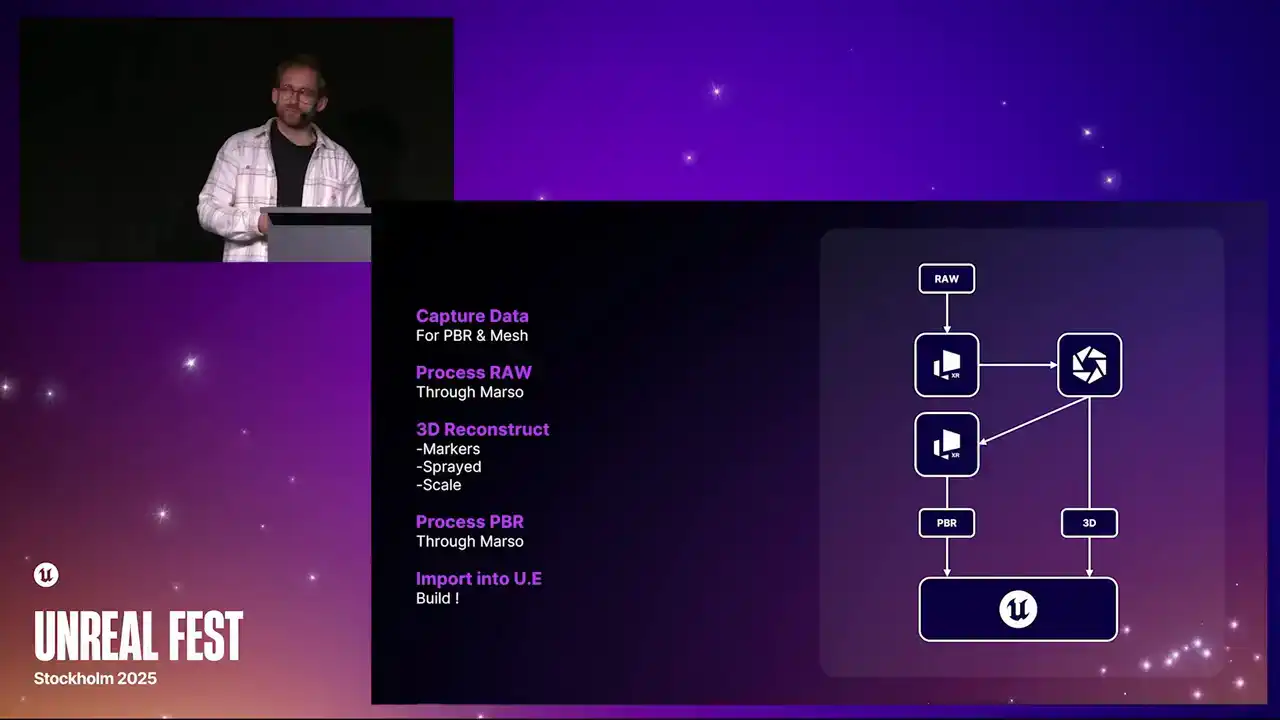
You then go back to Marceau, where you do the PBR predictions, and then you can take both of those elements and bring them into Unreal Engine.
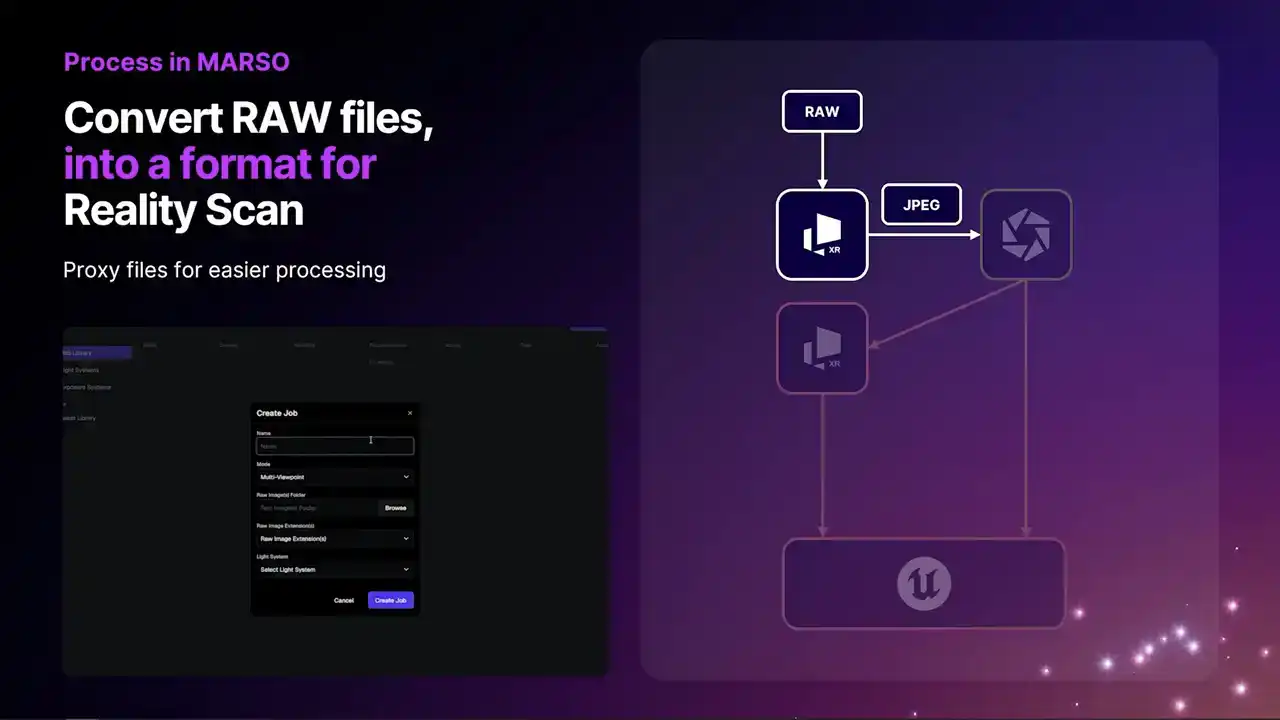
The first stage within Marceau is creating a job. A dialog will come up where you can input the name of your scan, and this allows you to come back to it many times. From there, we can also say where our raw photography is. When we first load in this raw photography, we can actually change the brightness of the image. This has absolutely no effect on the PBR predictions
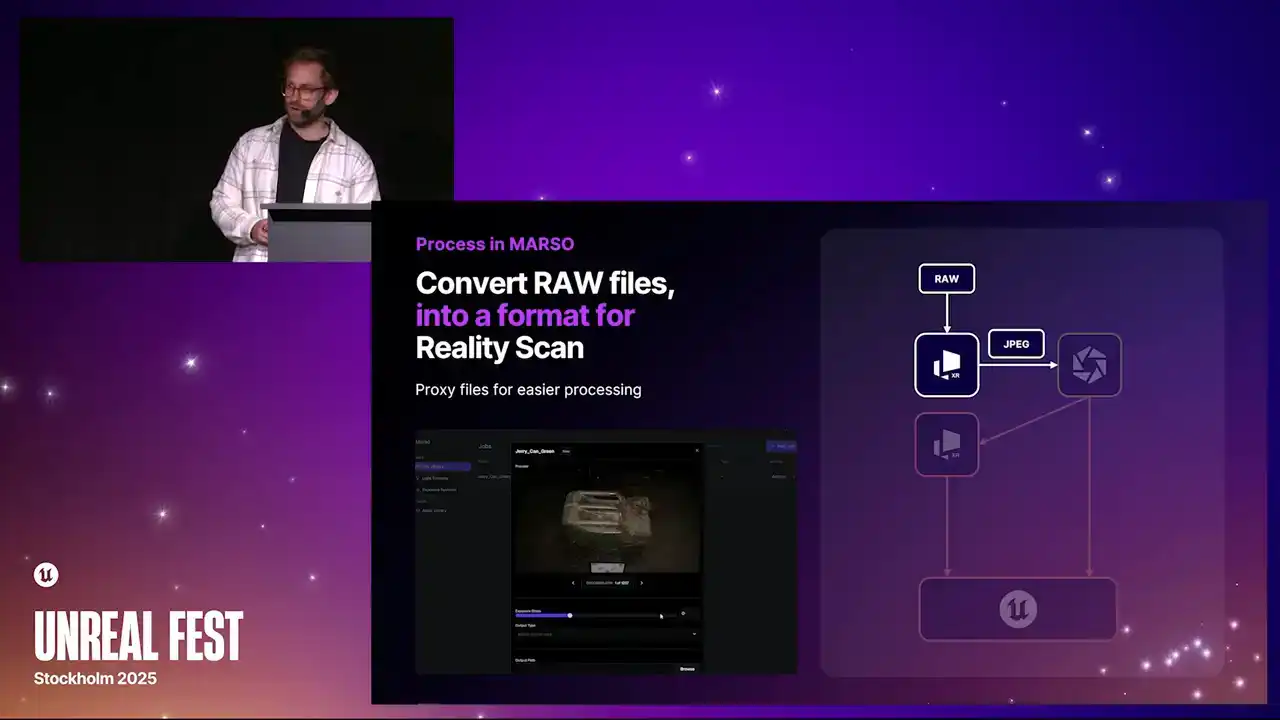
that you get out the other end. It just allows you to have a proxy file that you can run through Reality Scan. If it is too bright or if it is too dark, you can make a quick adjustment here
and then export them to either a JPEG or a EXR file.

When you send your JPEGs through or EXRs through to Reality Scan, you have an option to change the exposure.
As I showed earlier, you can just let those highlights blow out at this stage so we can actually get a better solve from all of the cameras.

I am going to go through processing in RealityScan and a slightly more advanced method that you won't actually need all the time. It is going to be very similar to normal processing

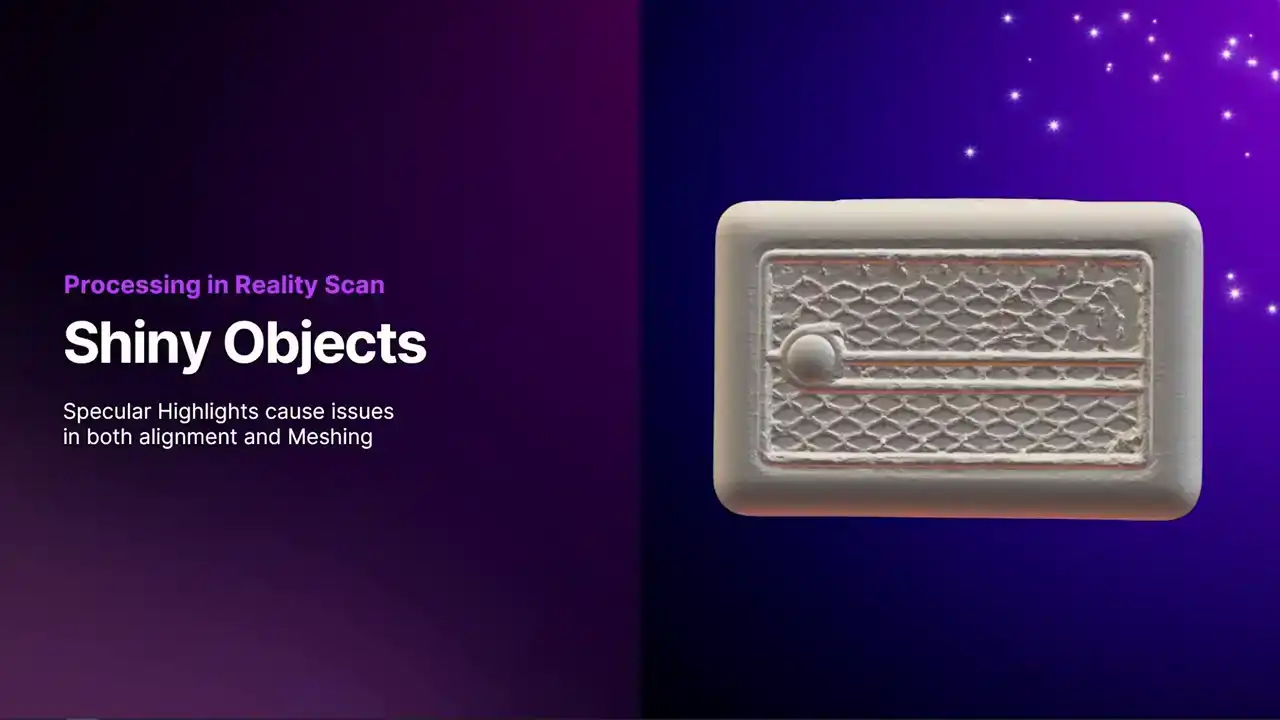
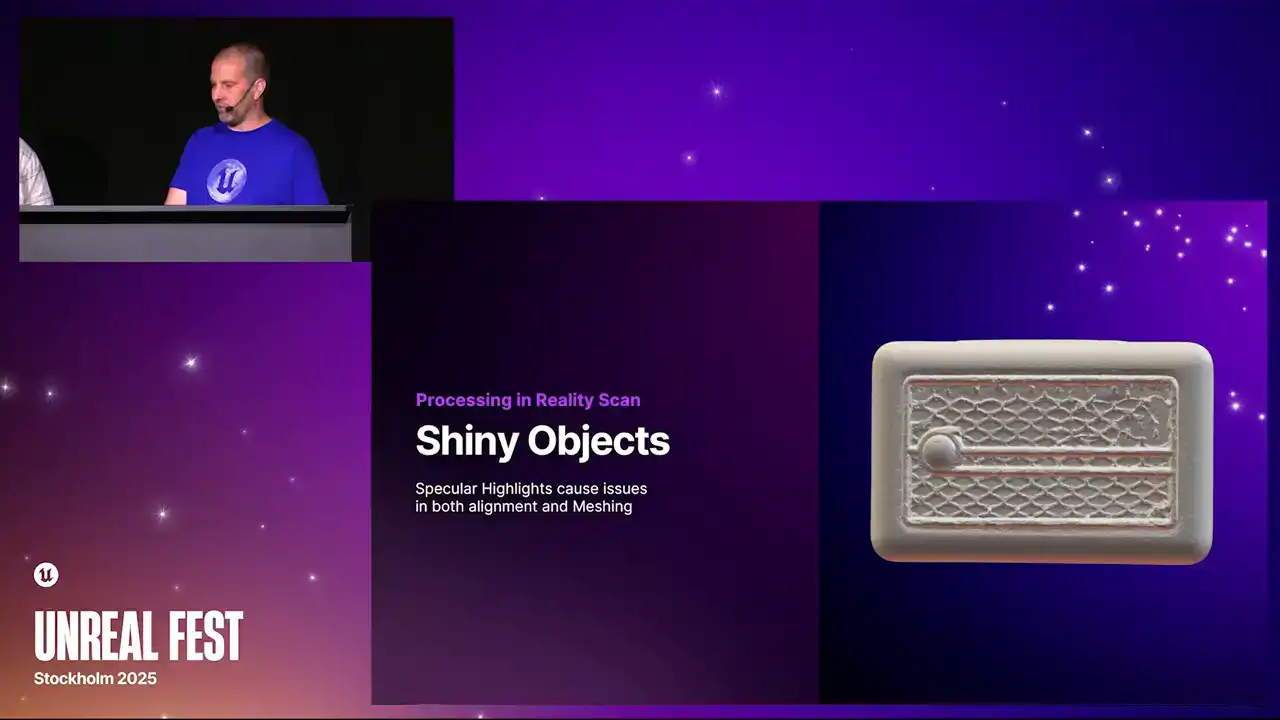
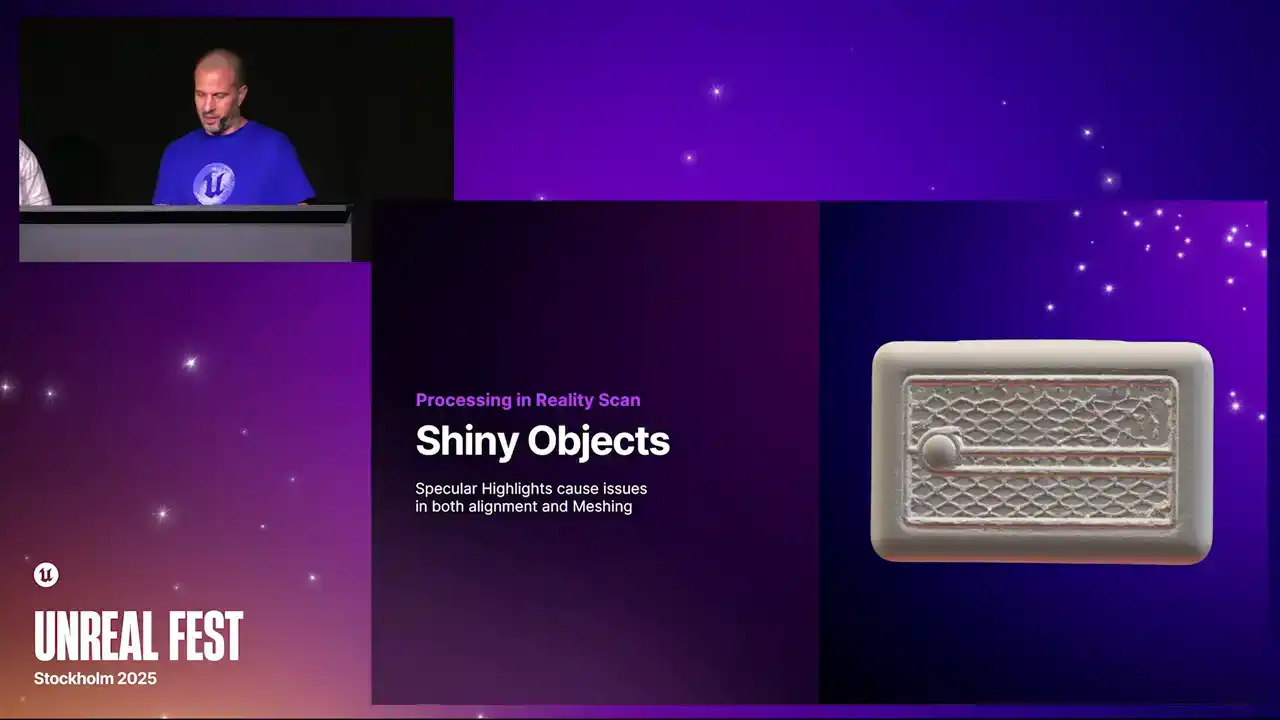
in RealityScan, aligning, meshing, scaling, simplifying, smoothing, unwrap is important, and then obviously exporting the files that Marceau is going to need to make those PBR materials You going to probably be using shiny objects
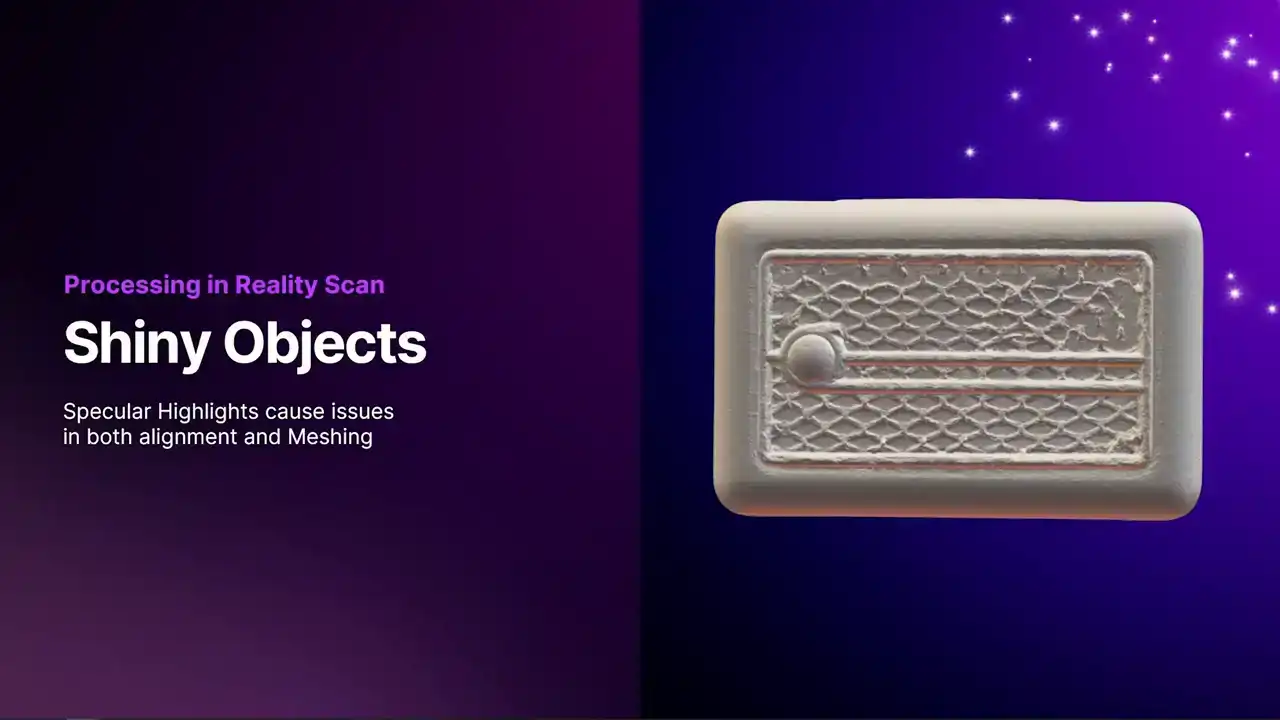
As I was saying earlier, they're not great for scanning.

Specular highlights cause issues in alignment and meshing. The reason for that is in alignment, the way alignment works is it finds common features on the surface of the object. Then using those, it can triangulate where the cameras are.
So in alignment, we figure out where all of the camera positions are. Now in meshing, we assume that we know where those cameras are,
and then we go in on a pixel-by-pixel basis, look for similar pixels in other images,
and then figure out a depth map. So we have a depth value for every single pixel on the object. And then when we have a depth for every camera,
we can make a nice mesh with millions and millions of triangles. But obviously, because we're looking for similar pixels,
if it goes to look for a similar pixel, and there's a big reflection there, that is going to create a mess in the meshing as well.
We have problems in both alignment and meshing. How do we help the alignment?
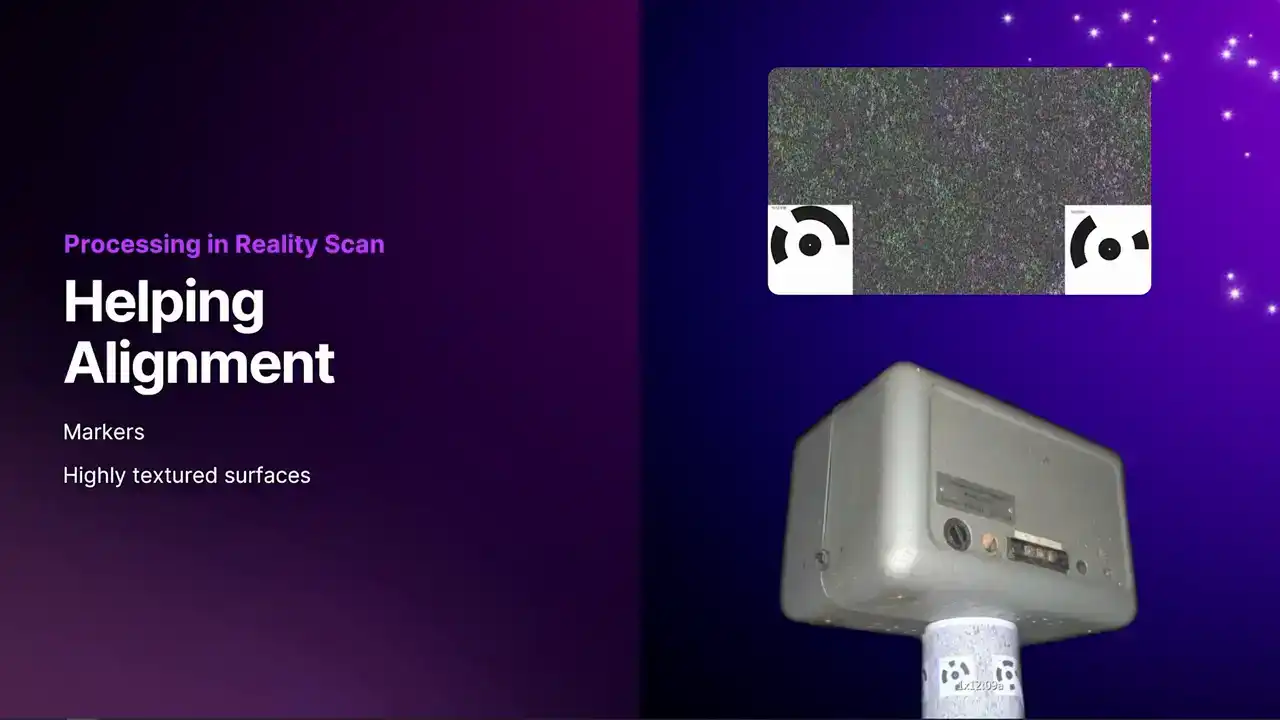
Markers are really helpful. I am not sure why I have used the circular ones here, because we actually have the option to generate April tags as well, which would be a better option. Imagine those are April tags and not the circular ones.
Circular ones are fine, but April tags tend to be a little bit better. The other thing we can do is you can put stuff in the background. You can see on the stand here,
I have put this highly textured material. Reality Scan is going to find loads of tie points in that,
which will help the alignment. It does not matter if the object itself is helping Reality Scan figure out where the cameras are. It can be anything in the scene. The markers are going to help,
and any highly textured surface you can put in and around your object will help with the alignment as well.
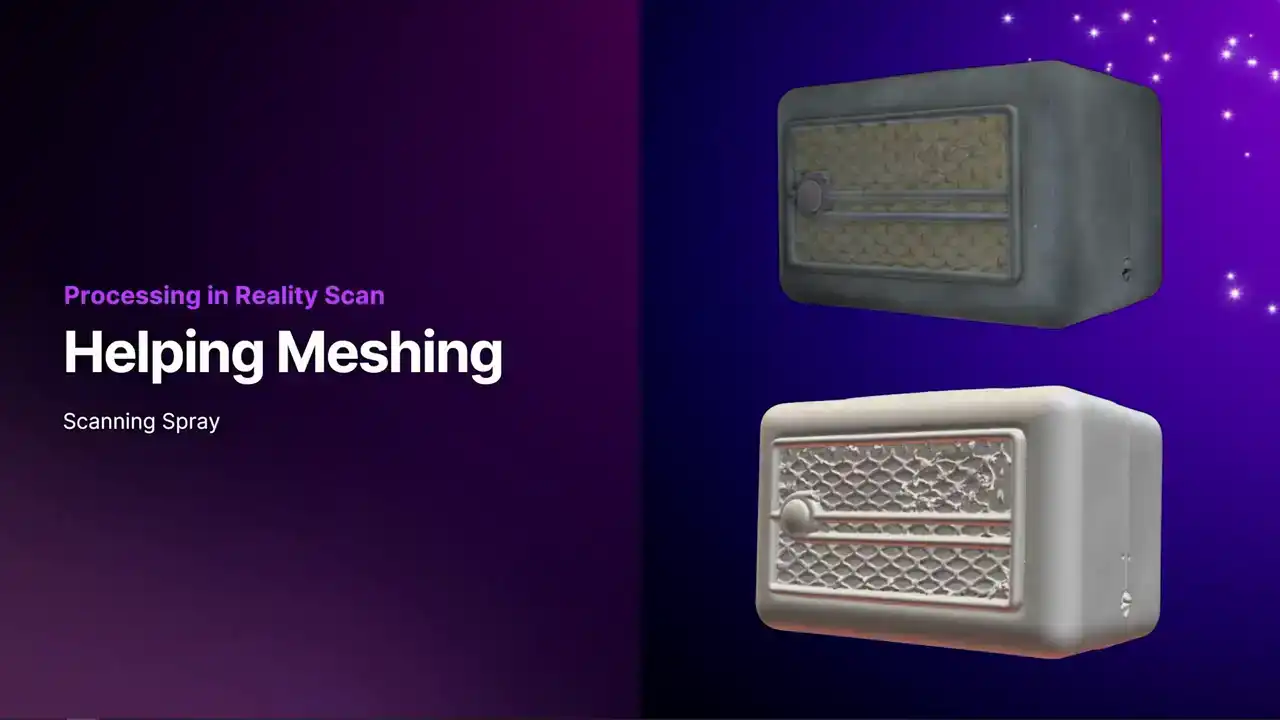
Now, helping in meshing. Now, actually, if we look, oh, no. Yes, I have not got the mesh there, but actually this mesh turned out fine If you'd simplified it and smoothed it, it would have been okay. But sometimes you'll get massive holes in your geometry, and obviously that's no good at all. So what you can do with meshing is you can actually get some scanning spray,

spray your object, and we'll align those images together with the ones from Marceau, like the shiny ones, and we can just use the sprayed images for our mesh.
So we get super nice geometry. Then obviously, we only send the images for Marceau back to Marceau.
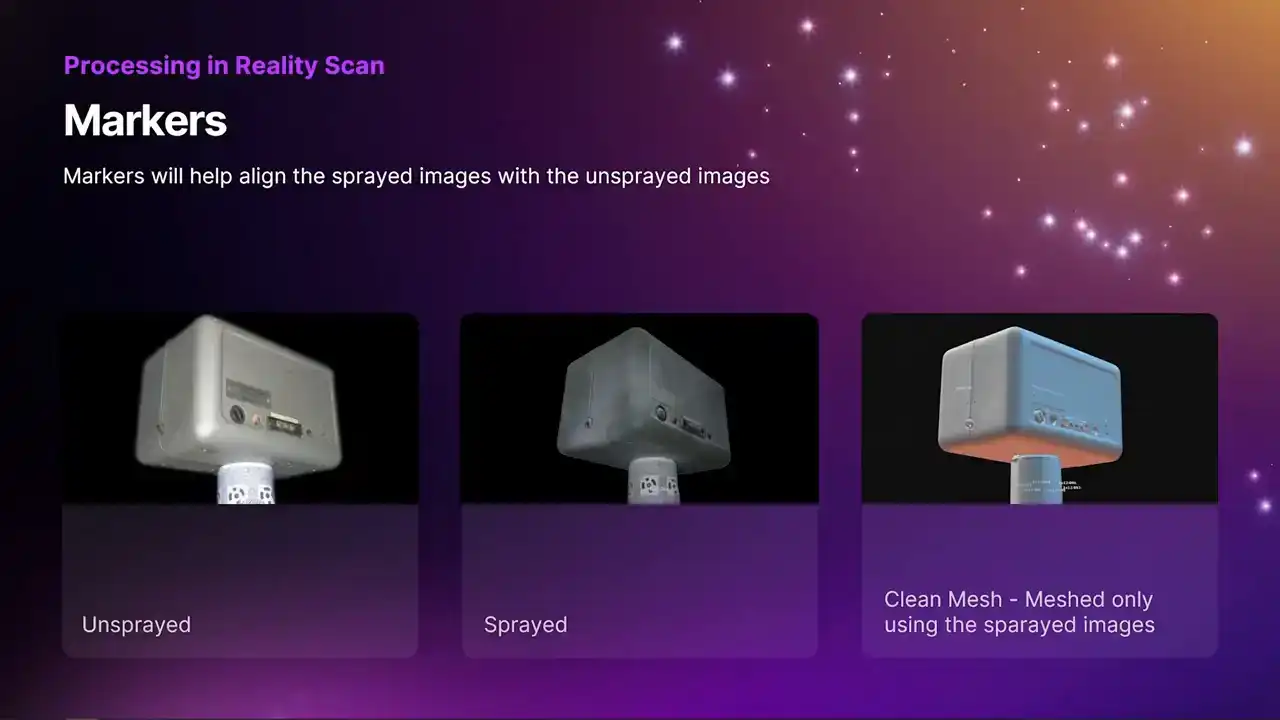
The markers are going to help in this situation if you want to use this sprayed workflow, because they are going to help. It is not going to see the same features on the surface, because one set is sprayed and one set is not. The markers are going to have to be the same
in both sets of images. Every time I have tried it, everything is all aligned together in one go. You can see my mesh there. That is meshed using only the sprayed images.
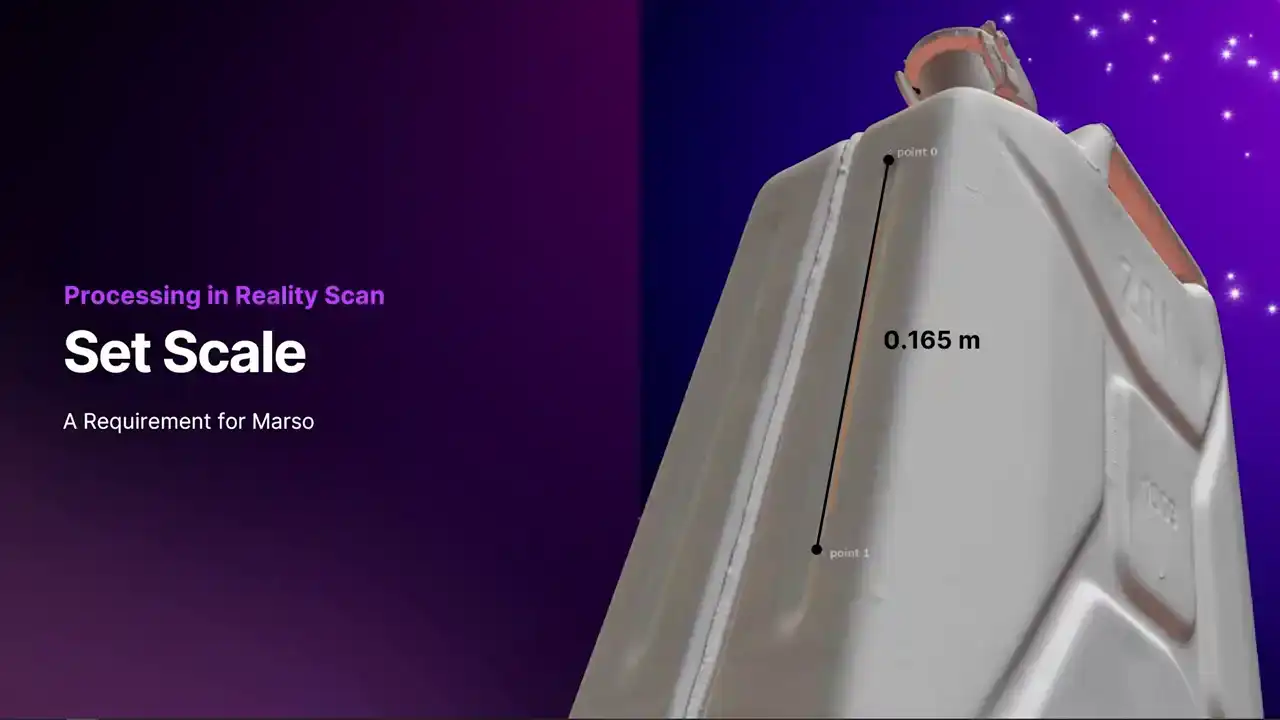
Okay, so scaling. As we said earlier, you can set a scale between the markers.
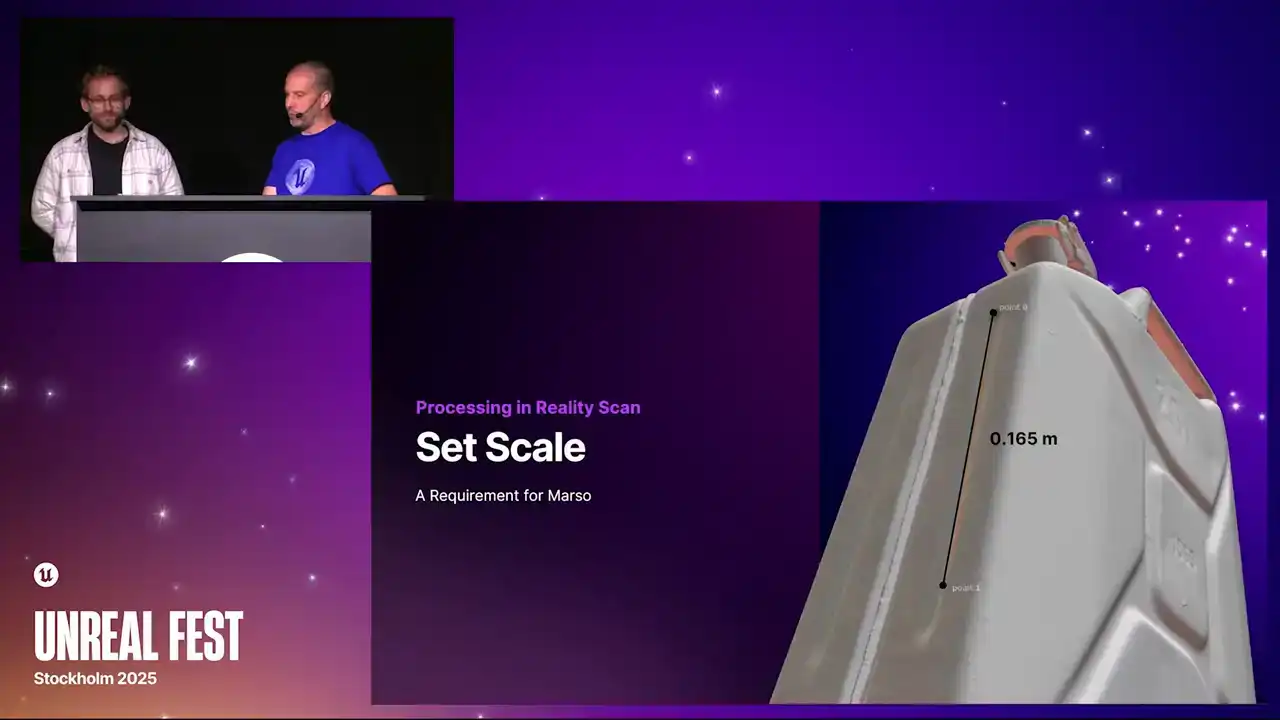
But yeah, Elliot also pointed out, if you know the distance between two points on the object, Reality Scan also has features to do that. That is really important for Marceau
to actually figure out how much light is involved, because it needs to know how far the light traveled from the flash to the object, bounce back, hit the sensor,
and it can't make any calculations without knowing that. Scaling is super important. You can't just have an arbitrary scale,
which is what you'll get in Reality Scan unless you actually scale it.
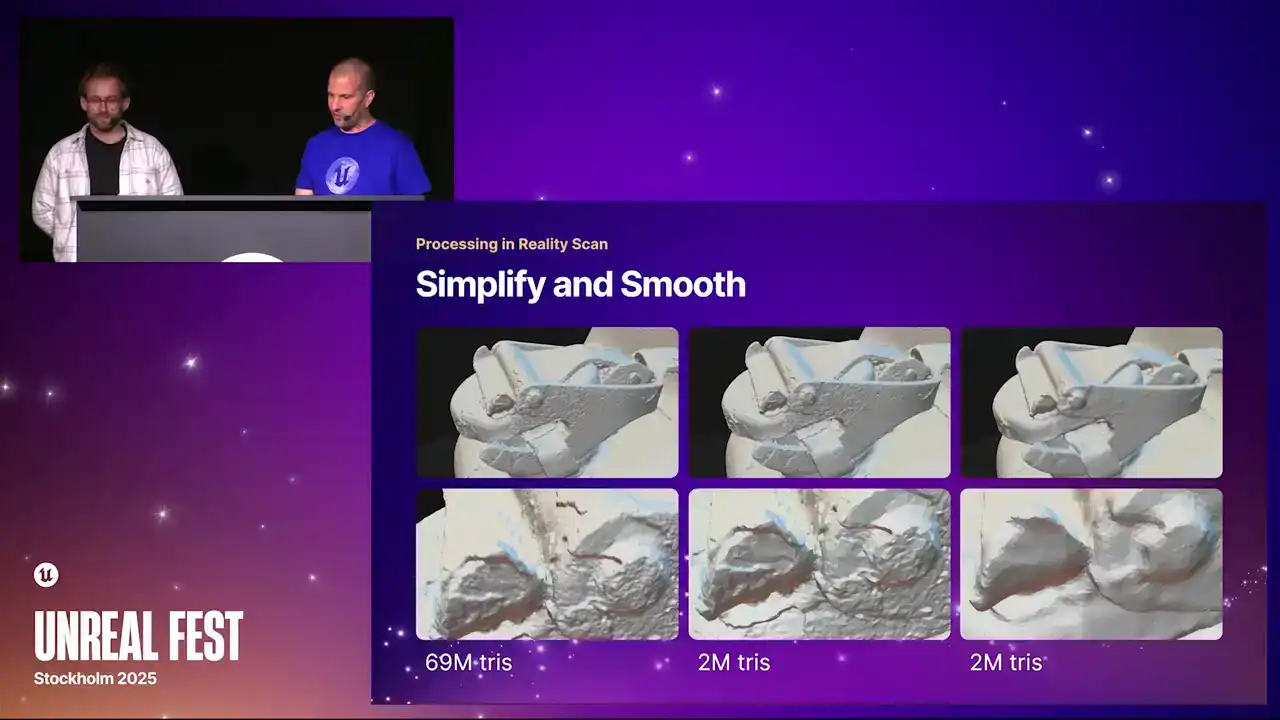
It's totally arbitrary. Simplifying and smoothing.
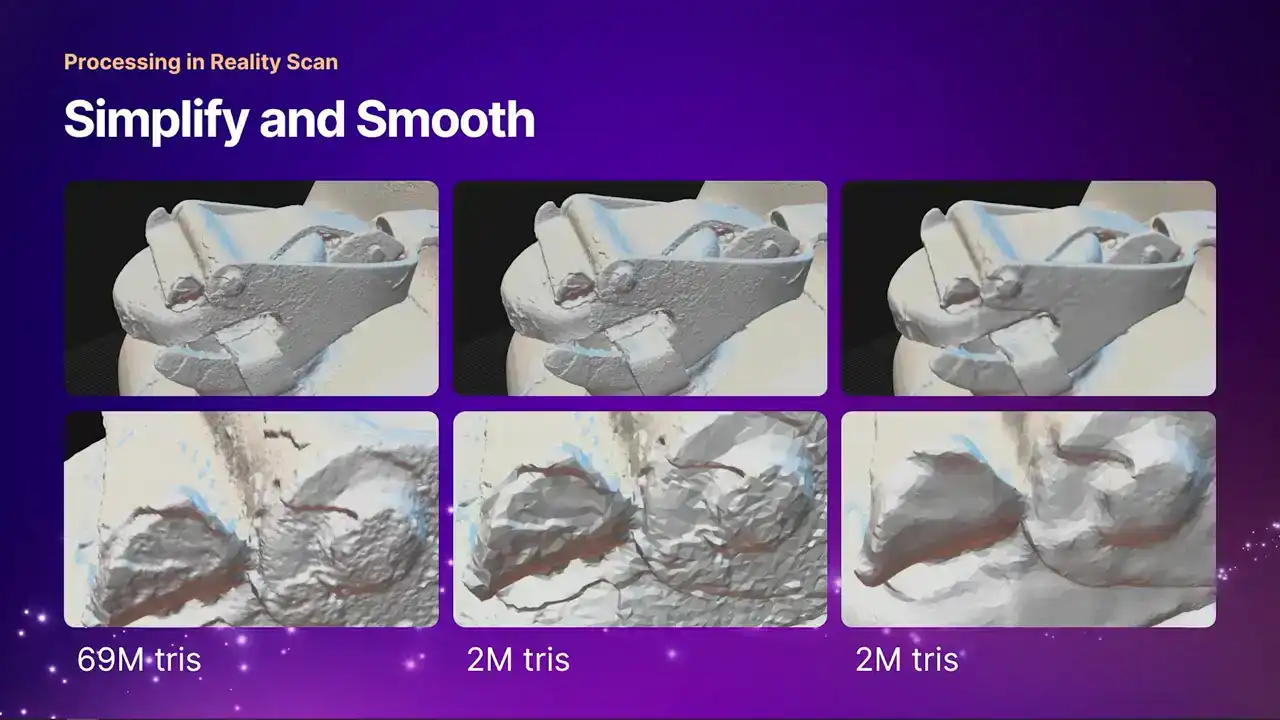
You can see my original mesh here with 69 million triangles. I smoothed to 2 million I think it probably overkill as well But Marceau makes a really nice normal map very similar to what you get with photometric stereo So your actual final mesh
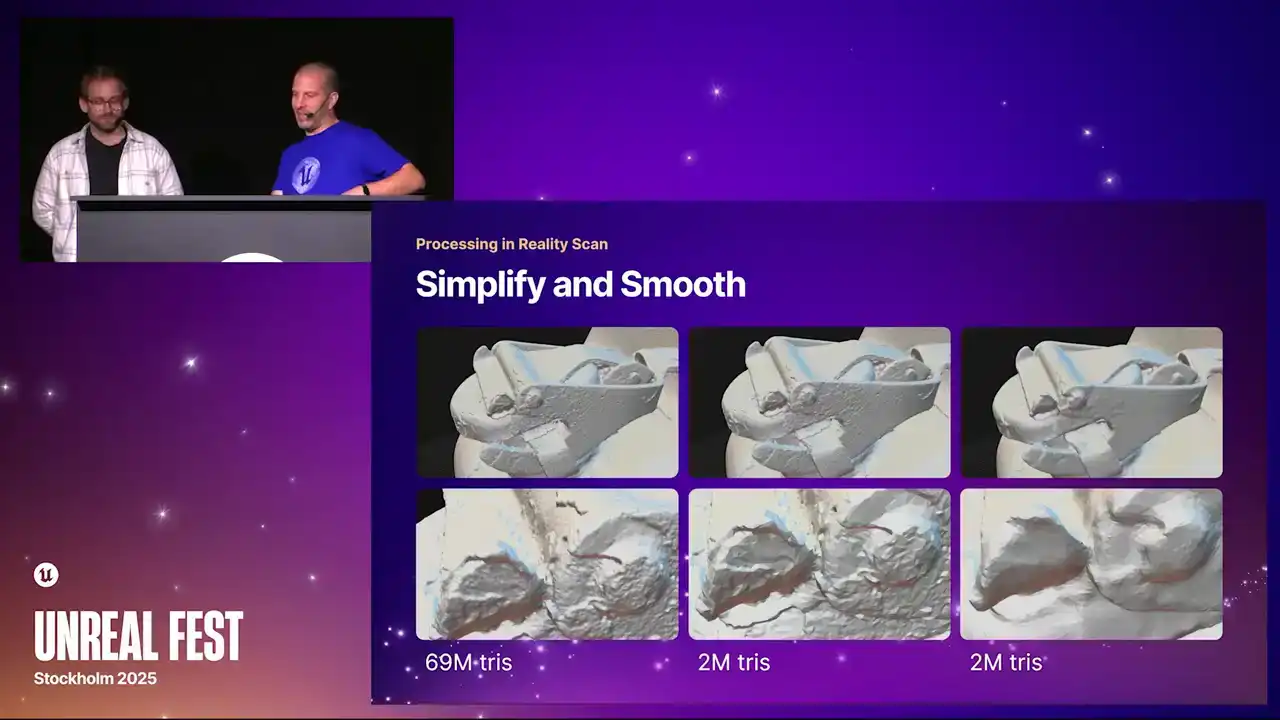
as long as it doesn't have massive holes in it and it's smooth and nice and not too many triangles, Marceau is going to do a nice job with it.
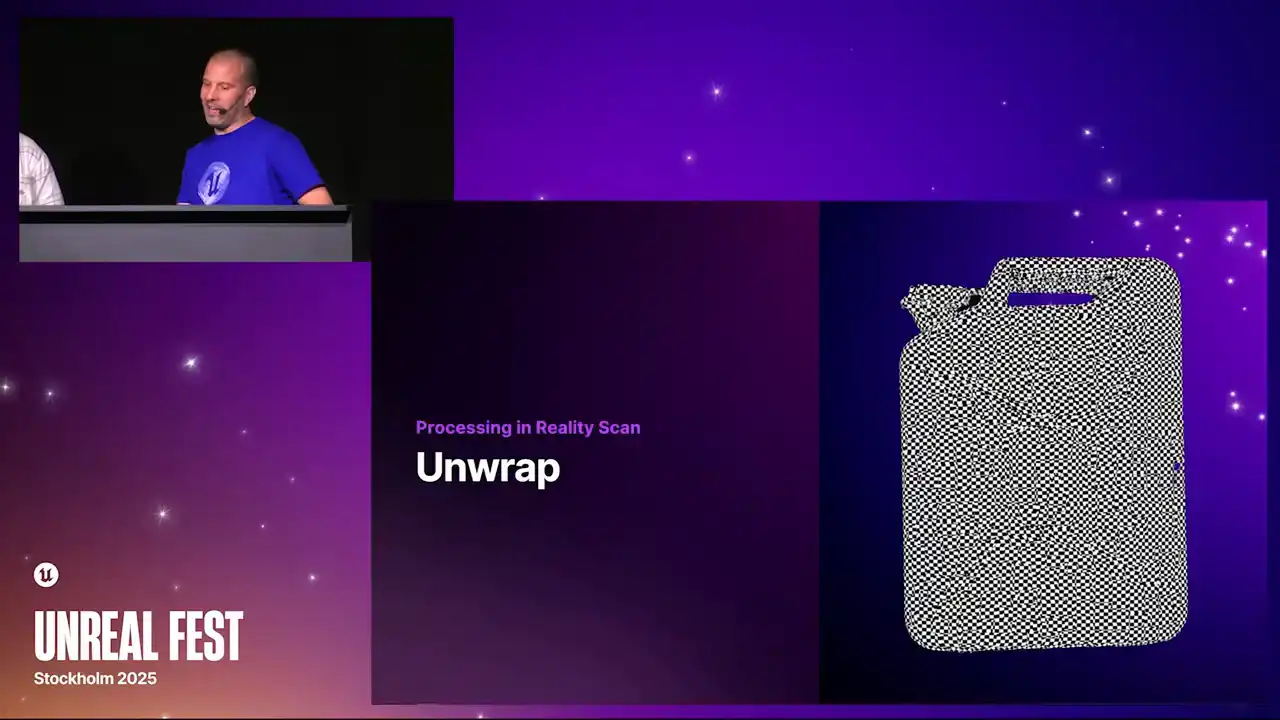
It has to be unwrapped.
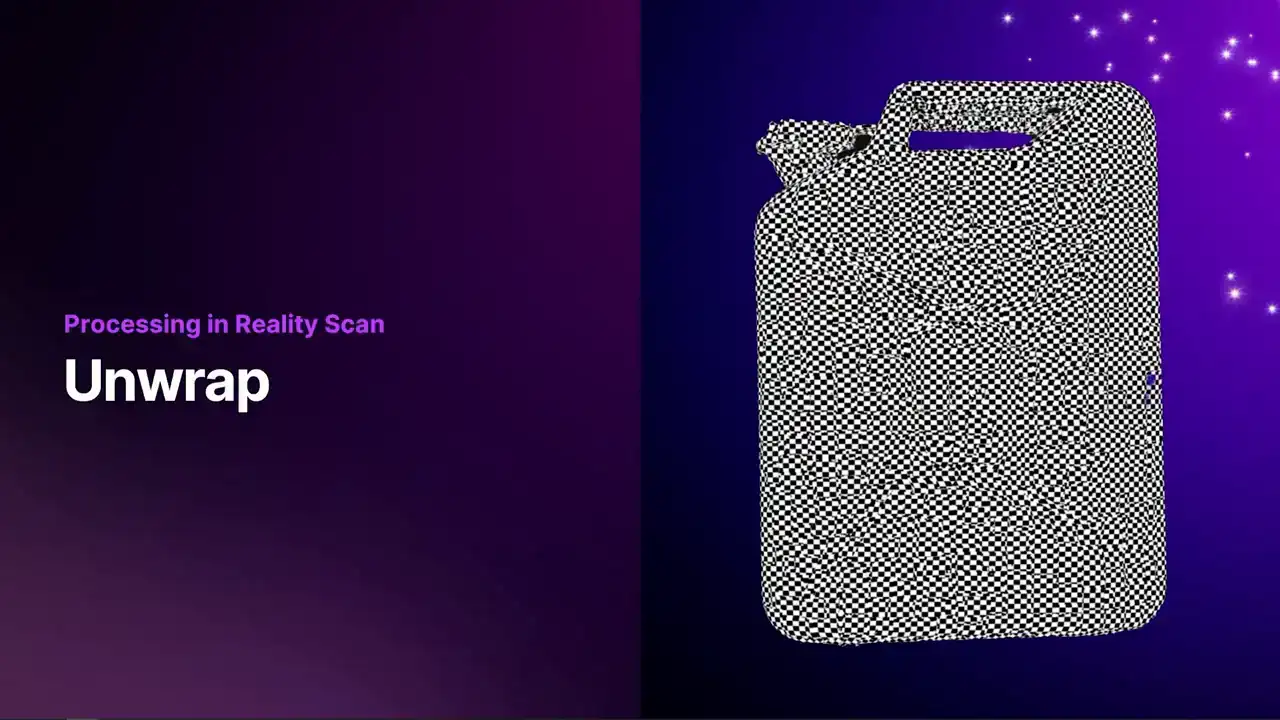
Yeah, because Marceau also needs to have an unwrap to work with. So unwrapped to a single texture, The default in Reality Scanner is a single 8K texture, but I don't think it actually matters what size it is.
It could be 2K, 4K, 8K, or 16K.
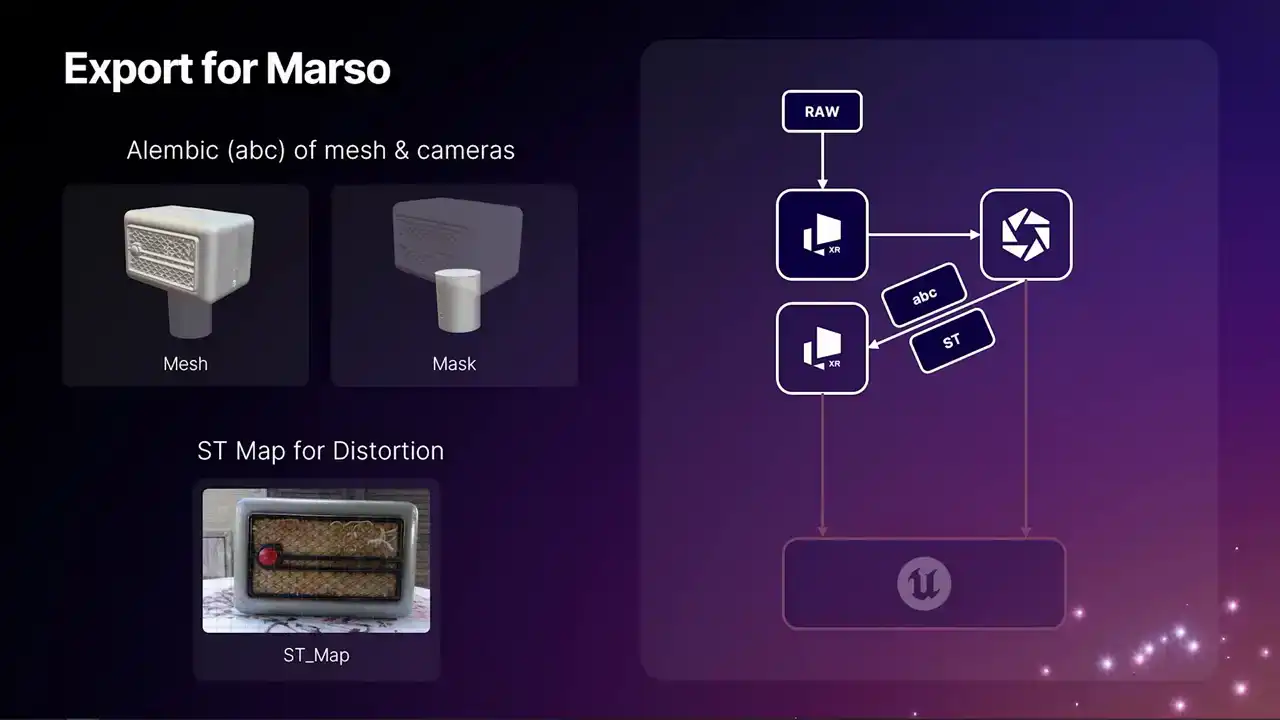
Then finally, we're going to export our files to Masso. The main thing, obviously, is a mesh, and it needs to obviously be unwrapped as well, like I said earlier. Masso also has an option for a mask mesh. In this situation, you definitely want one,
because the images underneath are going to be occluded. So when Masso tries to take measurements for anything near the bottom of that, if the table is in the way, it's going to get a completely wrong measurement because it's looking at a table and not the actual object.
So if you send the mask in, Masso knows what is the object and what isn't the object. We need ST maps as well, so it knows what to do with the distortions.
It has a perfect understanding of the distortion of the object. Something we can also do at this stage is if for whatever reason you want to UV unwrap your mesh slightly differently,
retapologize it, clean it up a little bit, you can do that to the Alambic file and send that also into Marceau, provided you maintain all of the cameras in the scale.
We have got our 3D data from Reality Scan. The first thing we are going to do before setting that up is actually putting in our exposure settings. One of the first things you do during a scan is actually take a picture of a gray card. You would pop a gray card up, take a picture, measure the distance, and then Marceau will understand what that light falloff is.
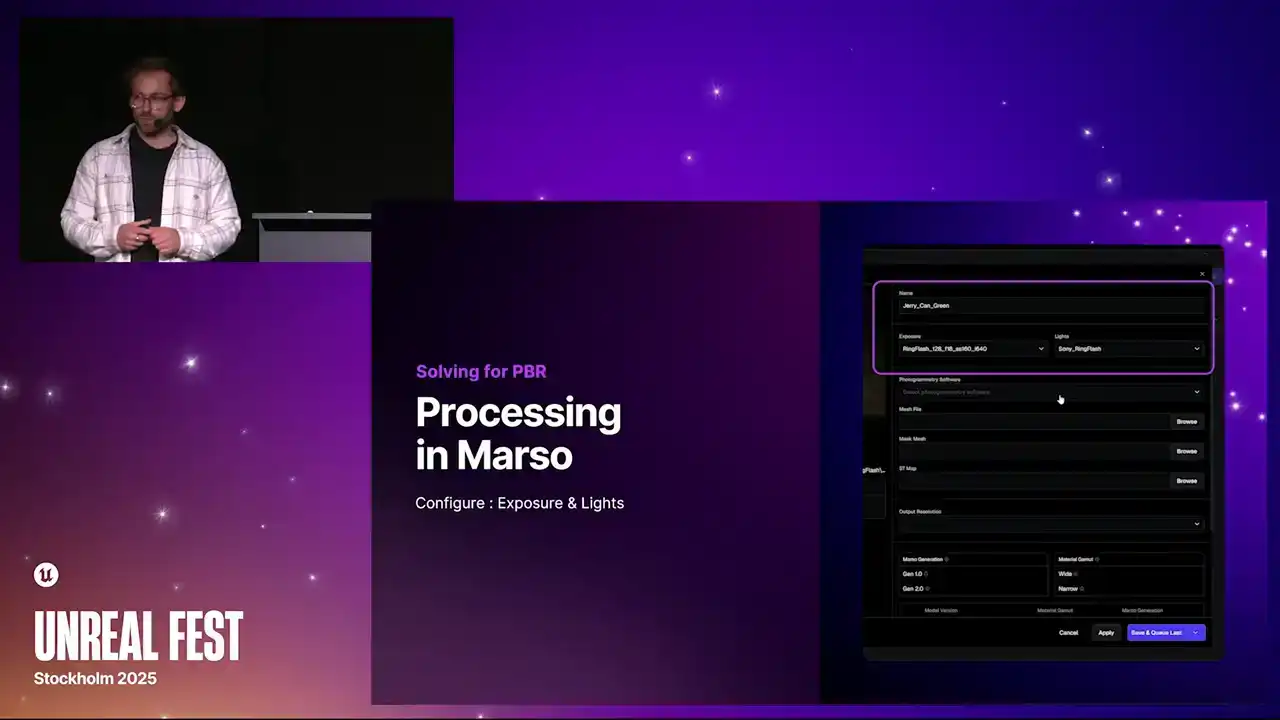
You only have to do this once. If you are using the same camera and light setup, do that once and then you can reuse it many times. You can have lots of these just in a list, so different pairings of exposure and light brightness, and you can pick those. Once you have picked that, you then state which version of photogrammetry application you are using. Here we are using Reality Scan. You then state where your mesh file is. You go to your Alambic. You can then optionally state where your mask is, if you want to use a mask, and then finally where your ST Map folder is. Once you have done that, you can then go over to your settings. This is deciding what resolution you would like. We go all the way up to 16K. You can also decide what version of master you want to run. We have got different versions of our models. that give slightly different results. Then you add this to a queue or process it immediately.

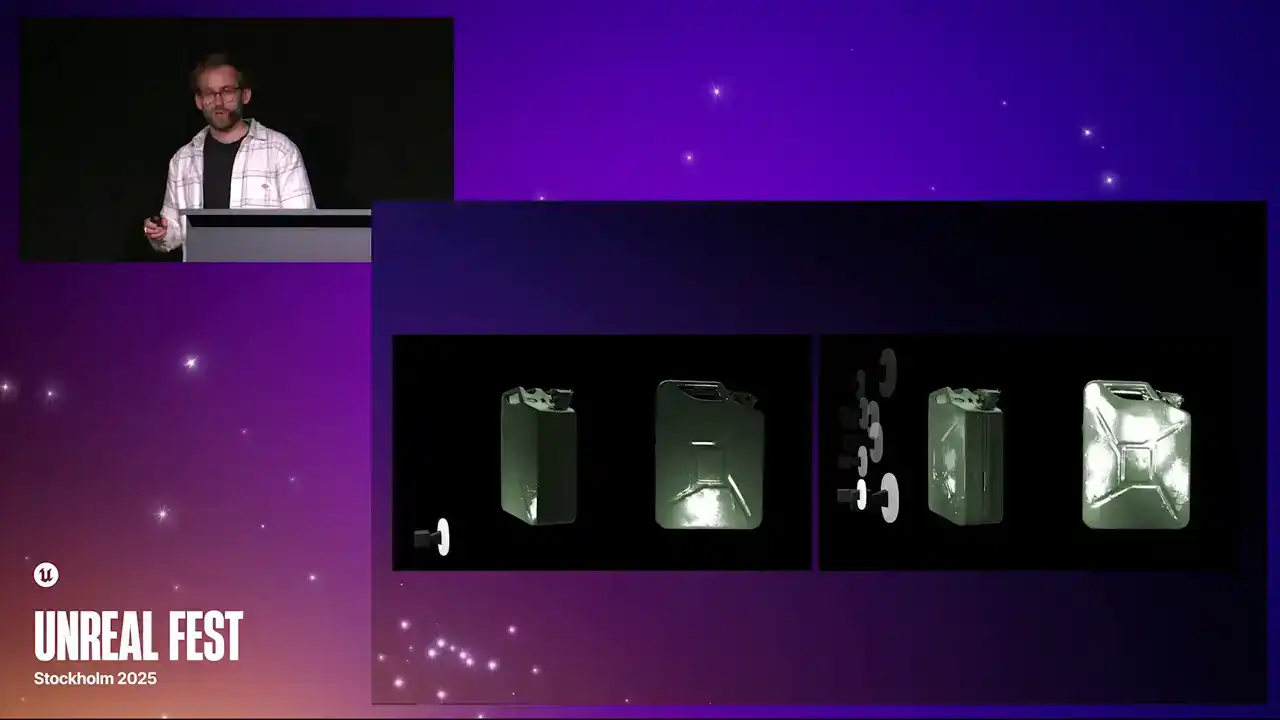
Out of that workflow, we have now got a lovely 3D mesh from Reality Scan, and we have got all of the PBR textures from Marceau.
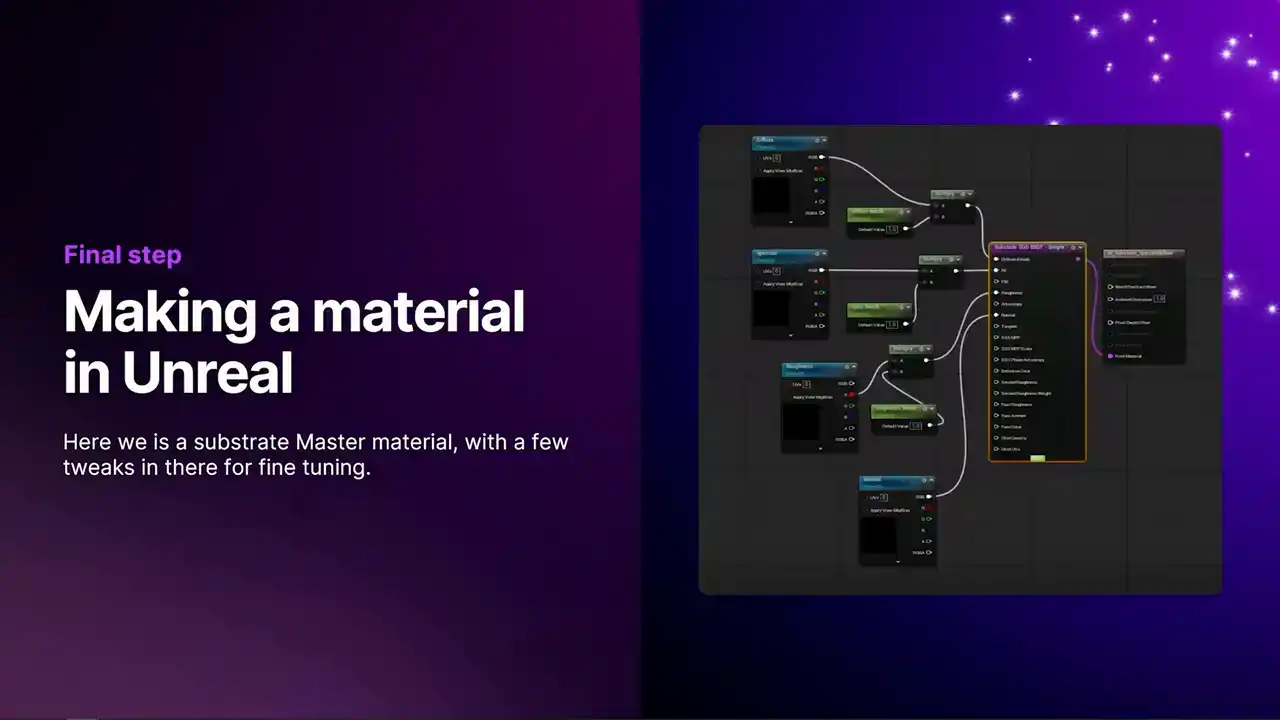
Finally, we got some help from Sebastian from Quixel with this substrate material. I am actually no expert here, but I threw this together, and it has just got a few little tweaks, so you can make some adjustments there, but it is very similar to just making any material in Unreal.
You just load your maps in there.
Finally, we just have a few Unreal renders there,
and that is it. Thank you.

Thank you for coming.