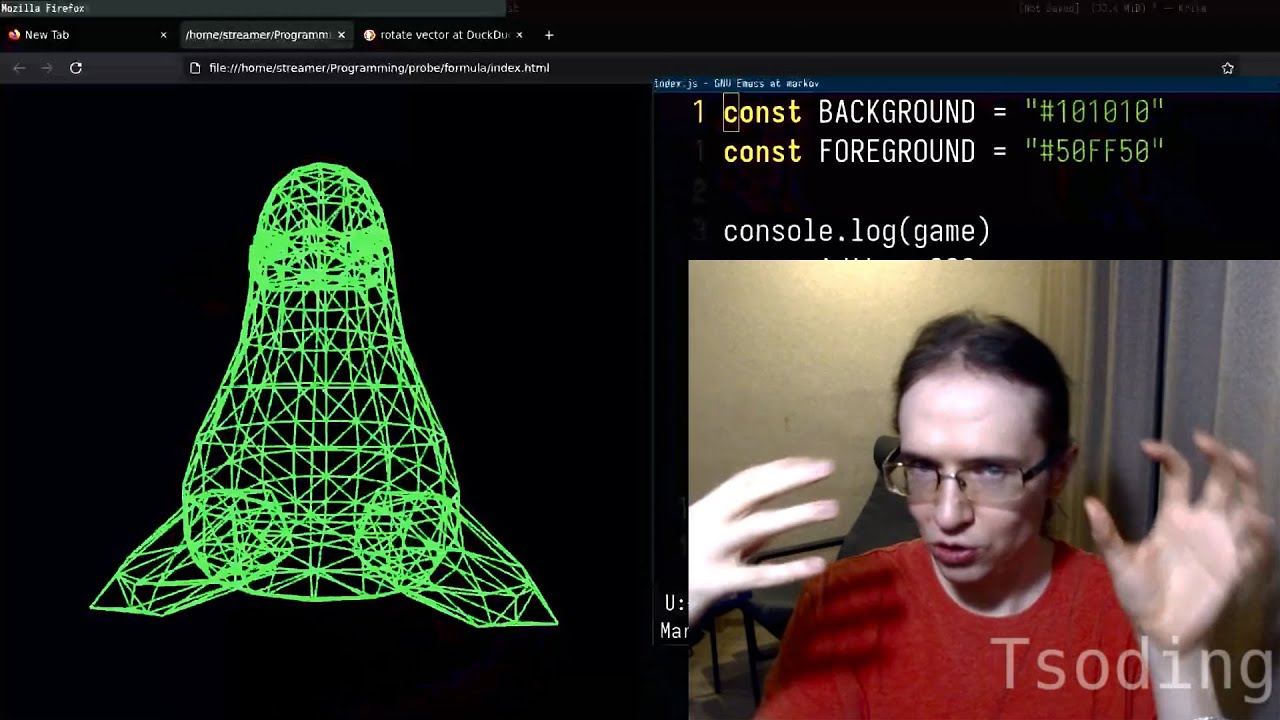
Back in school, I discovered a very simple mathematical formula that I keep thinking about to this day. It goes like this. Imagine that you have a 3D point in an imaginary 3D space behind your screen. And to project that 3D point onto your screen, what you have to do, you have to take its X divided by Z and its Y divided by Z. And what you will get is the point on your screen, projected. And if you just have a bunch of points behind your screen in that 3D space and you start animating them and rotating them and then use this formula to render all of these points on your screen, all of that will feel like a 3D scene, like a 3D object. Let's try this formula out. We're going to be using web technologies today. So let's create a very simple HTML page. I'm going to place a canvas with ID, let's say something like game. And also load a separate script index.js. Let's open index.js and let's go ahead and literally print this canvas like this. The thing about the IDs of HTML elements is that if they are valid JavaScript variable names, you can just directly use them. You don't have to do this document get element by ID voodoo. So let's open all of this stuff in a browser and let's open the dev tools. And here we go. Here is the canvas. Currently, as you can see, it's rather small. Let's extend it a little bit. let's actually say that the width is going to be 800 and the height is going to be also 800. So as of right now, it's a little bit bigger. The next thing we need to do, we need to take a 2D context, which will enable us to render on that canvas. Let's bring it into the console as well. And here it is. So let's see if we can actually place something on the screen. So let's actually do fill erect and let's place something at 0, 0 with the size 100 and 100. So as far as I know, it's not going to work. Well, yeah, it's a black rectangle. So let's actually set fill style to something like maybe green. It's rather dark, but this is probably because of the dark reader, which is fine. So let's actually try to set something a little bit brighter. Maybe something like this would be good enough. Yeah. And on top of that, I would like to see maybe the borders of the canvas. So I'm going to fill a grayish color through the entirety of the canvas. It's in the game width. And for this one, it's going to be height. There you go. So now I can clearly see the borders. So let's maybe factor out all of these colors into separate constants. This is going to be background. Let's place the background somewhere here. And this is going to be foreground. Let's place it in here. So let's factor out this particular code into a separate function. Let's call it something like clear. Every time I need to clean the screen, I'm going to be calling this specific function. And to be able to place points on the screen, let's create a convenient function to do so. Let's call it something like function point. It is going to accept x and y, and it's going to place a particular point, a particular mark at x and y. So here I'm going to do clear to clear the entirety of the screen. And then I'm going to say, okay, place a mark somewhere at 100, 100. And it placed it in here. But for a mark, for a point, it's kind of too big. So maybe let's actually factor out the size of this point into a separate variable called maybe something like s and let's say that is going to be like maybe around 20 yeah that's good enough right so that's basically the points that we're going to be animating on the screen the thing about this formula is that it assumes very specific coordinate system on the screen it assumes that given your screen that looks like this the zero zero coordinate is located at the center y axis goes like this x axis goes like this. x, y, 0. On the left side, you have x minus 1. On the right side, you have x1. On the top, you have y1. On the bottom, you have minus 1. But this is not how the coordinate system in HTML canvas works. In HTML canvas, 0 is located in here. x goes like this, and this particular point is actually the width of the screen. y, positive y, goes down, and this particular point is h. On this coordinate system, this simple formula won't work. So we need some sort of function that will take our point in this display coordinate and translate it into this screen coordinate. Let's call it something like screen. Let's actually accept a point as an object p, and that object is going to have two fields, x and y, and this is going to be our format of vectors. As of right now, our point x and y is a value starting from minus one to one, but we need to translated to a value from 0 to width or height. How can we do that? So let's take x and if we add 1 to this specific x, our range will be now from 0 to 2. If the range is from 0 to 2, it's very easy to normalize it by simply dividing it by 2 and you effectively end up with a range from 0 to 1. Then if you multiply that range by width or height in our case width you going to end up with a from zero to width You repeat the same thing for y and height and you get the point in a screen coordinates Let construct an object Here is x and here is y and simply return this entire thing. So for the sake of convenience, let's maybe transform this point function to also accept an object, right? So as you can see, I'm accepting an object with the fields x and y, and I'm instantly destructurizing it so I can then use it inside of this function. So and in here, let's construct a final object in here. Let's create a point with a coordinate 0, 0. Let's project it onto the screen and let's render it. Let's put it onto the screen and it is located at 0, 0. So now if I place the point at half, x half, it is halfway through. If it is one, it is outside of the screen, which is not particularly correct. I should be able to see at least half of that point. And this is probably because I want to kind of offset x and y of this point by half of its size like so. So when I'm placing it at x and y I'm placing a rectangle with the center at x and y and now I can see like half of this entire point. So let's place x at zero and let's take a look at the positive y and that is not correct. The positive y has to be at the top so we must flip the y coordinate. Let's actually take the y coordinate when it is in normalized form essentially when it's going from 0 to 1. And let's basically subtract 1 from that specific form. So that will essentially flip it around. Now it's at the top. And if I take the negative value for y, it is in here. Very well, then. So let's go ahead and now implement this formula. Let's create a function which is called project. It is going to accept p. And let's also destructurize it. So it's a three-dimensional point and let's construct a new two-dimensional one where x is equal to x divided by z and y is equal to y divided by z. So now let's take a point at 0, 0, 0, project it on 2D display and then project that to a screen and you can't see anything and it kind of makes sense actually because z is equal to 0 which means you have a division by 0. This formula assumes that your i, here's your i, is located at zero. The z-axis goes like this. You're looking at the screen. This is the screen. This is z-axis. And this is either x or y, depending on how you look at the 3D scene. z equals zero means that the object, the point, is exactly in your eye. So there's nowhere to project. So it has to be slightly at the distance from you, preferably behind the screen. So because of that we have to set z equal for example to one. Let's set it to one and now we can see. And what's interesting is that if I modify the z to two nothing is going to change because the point is looking straight at us. So we have to put a point a little bit to the side for example in x and it still doesn't really tell us the full picture. So to actually see a bigger picture we have to animate that point. Let's make it move away from us in a z-axis. So let's wrap this entire thing into frame function and let's schedule it with setTimeout. Let's actually animate it at around 60 FPS. I'm going to take 1000 milliseconds divided by the FPS and then in here as I render a single frame I'm also going to reschedule that frame. Let's introduce the variable that keeps track of the offset of Z for the point. The point is going to be located at one plus that specific offset. And on each frame, we're going to be incrementing that offset, let's say by one. But also, it would be nice to synchronize it with the timing. So let's actually multiply it by delta time. Delta time is equal to one over FPS. One is a single second. So we divide it by the amount of frames per second. And that's basically the delta time between the frames. So now if I try to run it, and as you can see it goes from right to left and that actually kind of makes sense. If you look at the real world and you look at the moving objects, when they are moving away from you, they are moving towards a center, towards so-called banishing point and this is exactly what we see in here. But with a single point, again, we can't really see the full picture. What if we introduce another point in here which is offset from the center to the left? Now you can see that they're approaching the center from both of the sides. If we move them a little bit higher like this they're approaching them from the bottom. Let's create another pair of points which approaching this thing from all of the sides and you can think about these four points as a plane that is moving away from you and that's exactly what's going on in here. Let's take all of these points and maybe save them in some sort of array, let's call them VS for vertices, because we're going to be adding more and more points in the future So let use a little bit of Emacs magic like so here this and boom Let actually remove this plus Z part and let apply it as we render it So essentially let iterate each individual V of VS And in here instead of rendering this entire thing this entire thing, we're going to be rendering V, but we need to offset that V by Z. Let's introduce a function translateZ. It is going to accept XYZ, right? So the point essentially, and then construct a new point where x is the same, y is the same, but z is updated by delta z, like so. We have an array of points. Let's move it a little bit closer to the frame. We're iterating on each frame array of points. We're going to be translating their z by the variable that we are animating. Then we're projecting that 3D point to 2D display. Then we take that 2D display and projecting it on our screen and then we're placing it on the screen so that's essentially what is going on in here so let's actually refresh seems to be working and now i would like to maybe place it at half the same as x and y so let's create another plane in here which is actually behind us you can think of it as we're standing in the center of that cube and let's animate our dz starting from, let's say, 1. So we can see the entirety of the cube. As you can see, this is the entirety of the cube. It is moving away from us. It is still not particularly convincing that it is a cube. Let's actually do something more interesting with that cube. Let's try to rotate it instead of translating it. Let's introduce a function called rotate. And I want to rotate around y-axis. So that means I'm going to be rotating it in XZ plane. I'm accepting the XYZ and I'm going to be accepting the angle. So how do you rotate a vector? Rotate vector. So that's basically the formula. That's entirety of the formula. And it's kind of convoluted, but this is because it's one of these formulas that you kind of have to memorize and don't try to understand. You can prove that if you do this kind of thing, your point, your 2D point, which looks like this, will be rotated like this by theta. You can easily prove that. But even if you prove that, it will still not explain to you why do you have to even do it like that. It's one of these things where you have to just shut up and calculate. If you want to watch a quick five minutes proof of this formula, I really recommend this video. I'm going to put it in the references. But for now, let's shut up and calculate. I'm going to grab cosine, turn it into that. Boom, boom. Then I'm going to grab sine, math sine, boom, boom. Let's get rid of the end. Let's grab theta and replace it by angle. In fact, there is a little bit of a duplication in here. I might as well maybe factor this thing into something like C and this thing into something like S. And now I have a point rotated. I can go ahead and return this like so. And this is not going to be correct because it is rotating in the plane x, y. We need to be rotating in the plane x, z because I want to be rotating around the y axis. So to achieve that, I just have to use z instead of y. And y itself is going to be basically the same. So now let's first rotate the point by some sort of an angle. Let's allocate a variable to keep track of the angle. Originally, it's going to be zero and animate this angle. Let's take a full circle, which is 2 pi. And let's multiply it by dt. So it's going to do one revolution per second. And it is rotating and moving away from us. So let's actually not translate this entire thing. So it is just rotating, but it's a little bit too close towards us and it's rather big. So let's actually make it, I don't know, half as small. I'm going to replace half with quarter. And now it does in fact look like a rotating cube. Maybe it is too fast. So let's actually cut the speed in half. Now it is a little bit slower, but it's still not entirely convincing. What we probably want to do, we want to actually connect all of these vertices with some sort of lines. Let's introduce a function that is going to draw a line for us. So let's call it line, and it's going to accept p1 and p2, the ends of the line, essentially. So what we need to do in here, so the way you draw lines using HTML5 converse is that you have to start a path, right? So you begin in the path. So it's sort of like a turtle graphic. Then you move your turtle to P1X, P1Y, and then you line from that point to P2. And then that is not enough. You have to stroke this entire thing. You're sort of describing the path of the turtle, and then you perform strokes essentially. Now we need to define how exactly we going to be connecting these vertices Let introduce another array which we going to call faces It going to be fs and each individual face is going to be another array which is an array of indices to connect as a polygon In here for example I know this is a back face of the cube so I want to connect all of the vertices from 0 to 3 and this is the front face of the cube so I want to connect all of these things from 4, 5, 6 to 7. So the way we're going to be rendering all of that stuff, we're going to be iterating all of the faces. And for each face, 0, 1, 2, 3, we're looking at the current index. I want to connect the current vertex and the next one. Then I do one step, I'm connecting 1 and 2. Another step, I'm connecting 2 and 3. And I also want to wrap it around. So if I'm standing in here, I'm going to wrap around and connect 3 and 0. So it's going to be sort of like a closed loop. Let's iterate starting from 0 up until f length plus plus i. Let's take the vertex by fi and that is our first vertex. And let's take the vertex by fi plus 1 and this is our second vertex. But we have to be careful. If we're looking at the last vertex we're going to have a buffer overrun. So what we have to do we have to wrap it around using modular arithmetics. If the index is the last one is going to wrap around and point at zero again. So in here we have to perform all of that stuff for A and all of that stuff for B and draw a line between these things. And we can't really see anything and this is because the stroke is actually black. So let's set ctx stroke style and let's set it to foreground color. Now we can see some things. The lines are a little bit too thin. So I'd like to maybe make it a little bit thicker. Let's say it's going to be 3. That looks a little bit better, but that doesn't look correct. They are not actually connected in the right order. This is the positive x, then it goes to the negative x, and I suppose the next thing has to be a negative x in here, like so, and it is connected more or less nicely now. So now we need to connect each individual vertex of two planes to turn it into a cube. So essentially we have to connect pairs of these vertices. So let's connect 0 and 4. It's this one. Then 1 and 5, 2 and 6, 3 and 7. And we got a cube. We can make it even cooler if we abandon rendering the vertices at all. And there we go. We got a wireframe over cube. Pretty cool formula, isn't it? But the question is, why does this formula even work? Let's take a look at the scene that this formula is trying to model. Your eye is located at 0 and your screen is located at 1. What you're trying to do, you're trying to take the point P and you shoot an array from that point into your eye and what you need to find is the point P' on the screen. If you look closer, you will notice that you have two triangles. The first triangle is this bigger triangle and another triangle is this smaller triangle. And as you can see, they have the same angles, which means they are similar triangles. Let's define P as X, Y, and Z, and P' as X' and Y'. And since these triangles are similar, that means that the ratio between this value, aka 1, and this value, aka the Z value of P, is equal to this value, aka X' or Y' depending on what you're trying to currently find, and this value, x or y of the 3D point. So let's take this expression and try to reshuffle things. For example, we can move this x to the left side right here. Since we're multiplying by one, we don't really need that one anymore. Let's remove this bar. Let's maybe move this x' to the left side. Ta-da! We got the magical formula! And you do the same thing for Y. Take that, remove the Xs, replace them with Ys. What's interesting is that we've got a very simple 3D engine in here, and it's capable of rendering arbitrarily complex model. You just need to find appropriate vertices and appropriate faces. So here I prepared a bigger model that consists of roughly 326 vertices and roughly 626 faces. If we copy-paste this entire model instead of our cube, we get something like this. And please notice that we're not using OpenGL, webgl web gpu or anything like that the only thing we use is 2d html context and a very simple formula that i keep thinking about to this day so yeah have fun with this formula