Hi everyone, my name is Ivan Cerevko. I'm a principal character artist at Hangar 13 and I worked on the hair and heads creation pipeline for Mafia the Old Country.

I'm truly honored to be here today and I would like to share with you some aspects of our metahuman journey.
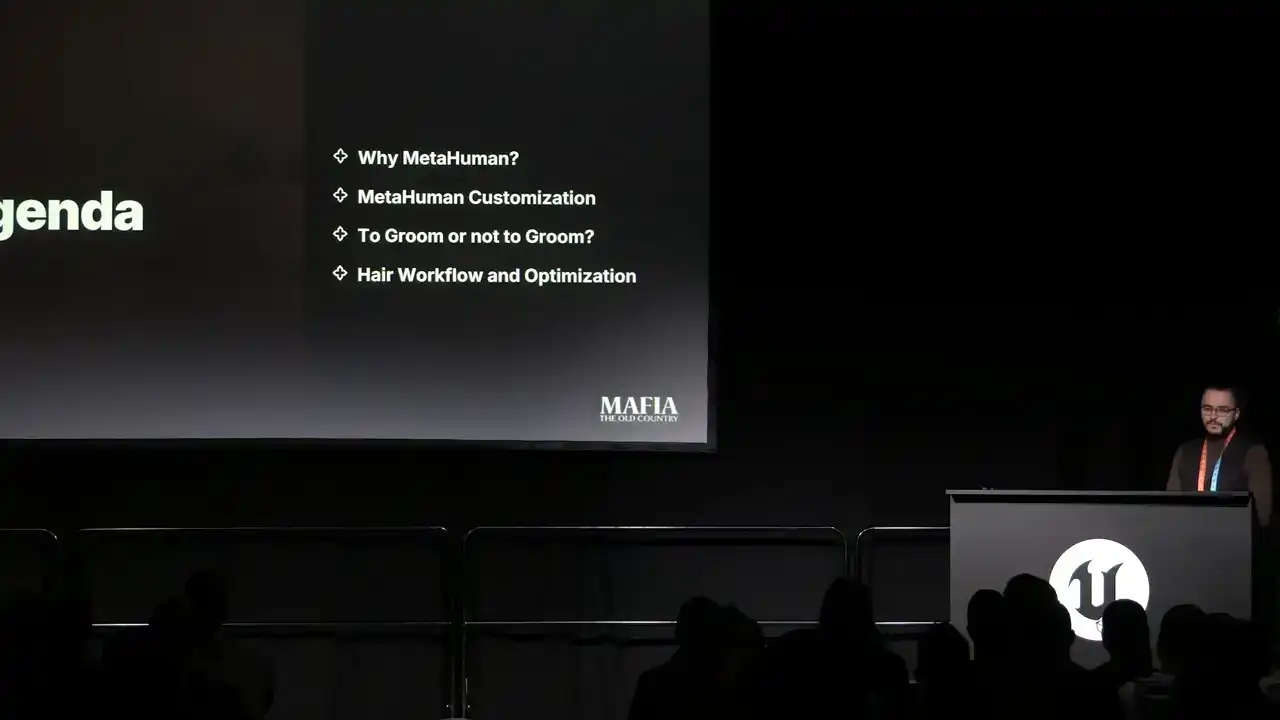
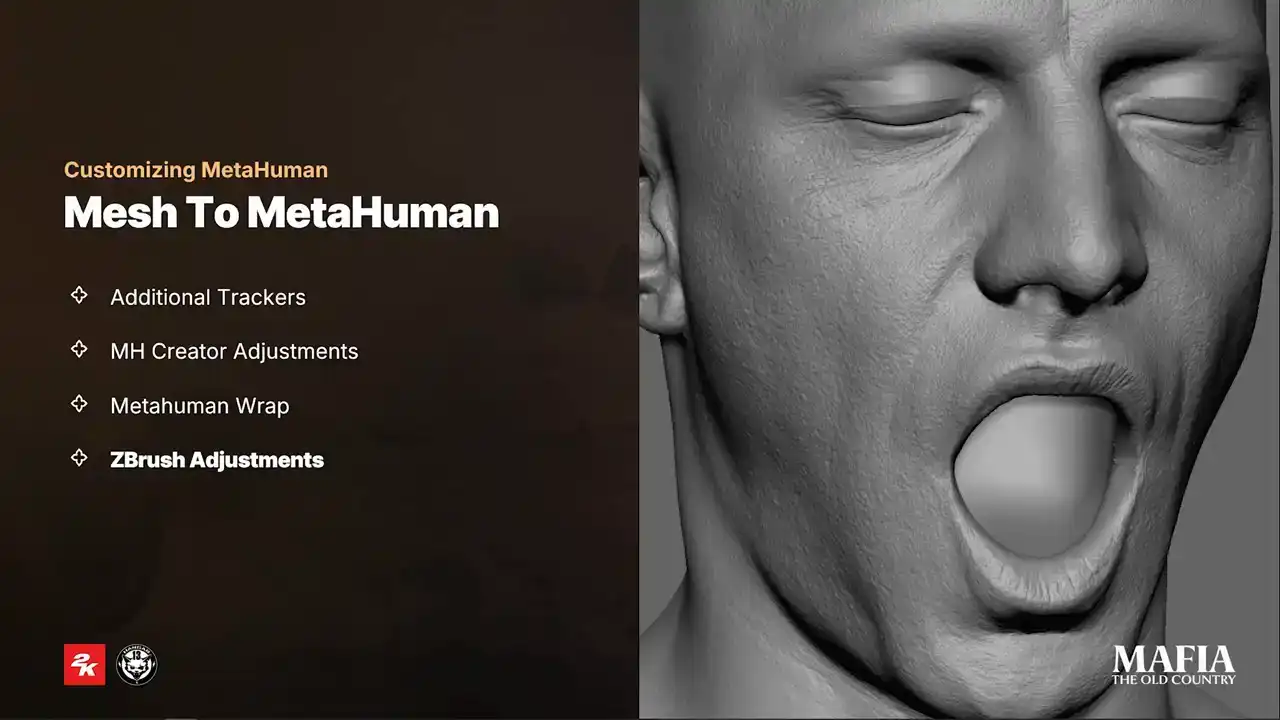
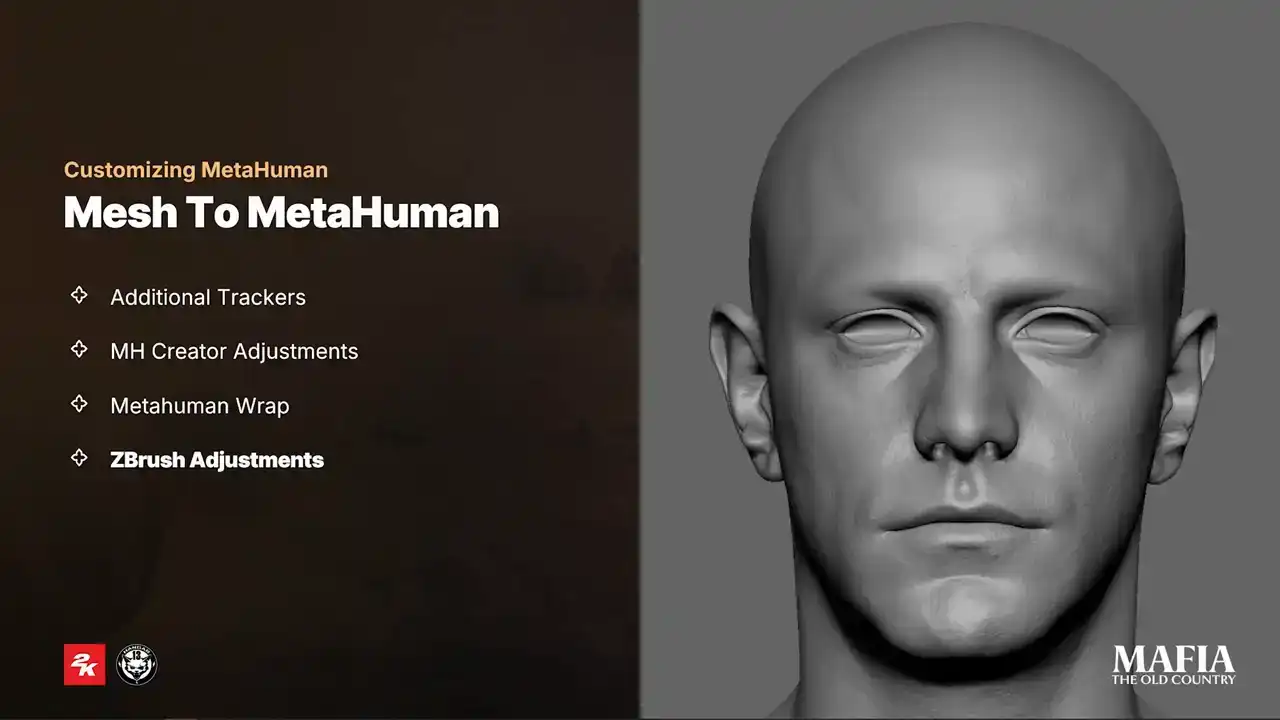
What I'm going to cover today. First I will explain why metahuman and how it fits into our project vision. Then I will show you an example of MetaHuman customization and how we achieved production flexibility. Next, to groom or not to groom. In this part I will compare haircuts and strands and share the work that worked the best for our project. And finally, I will walk you through some aspects of our hair creation workflow, including how tools for high poly groom can also be used for in-game assets creation.
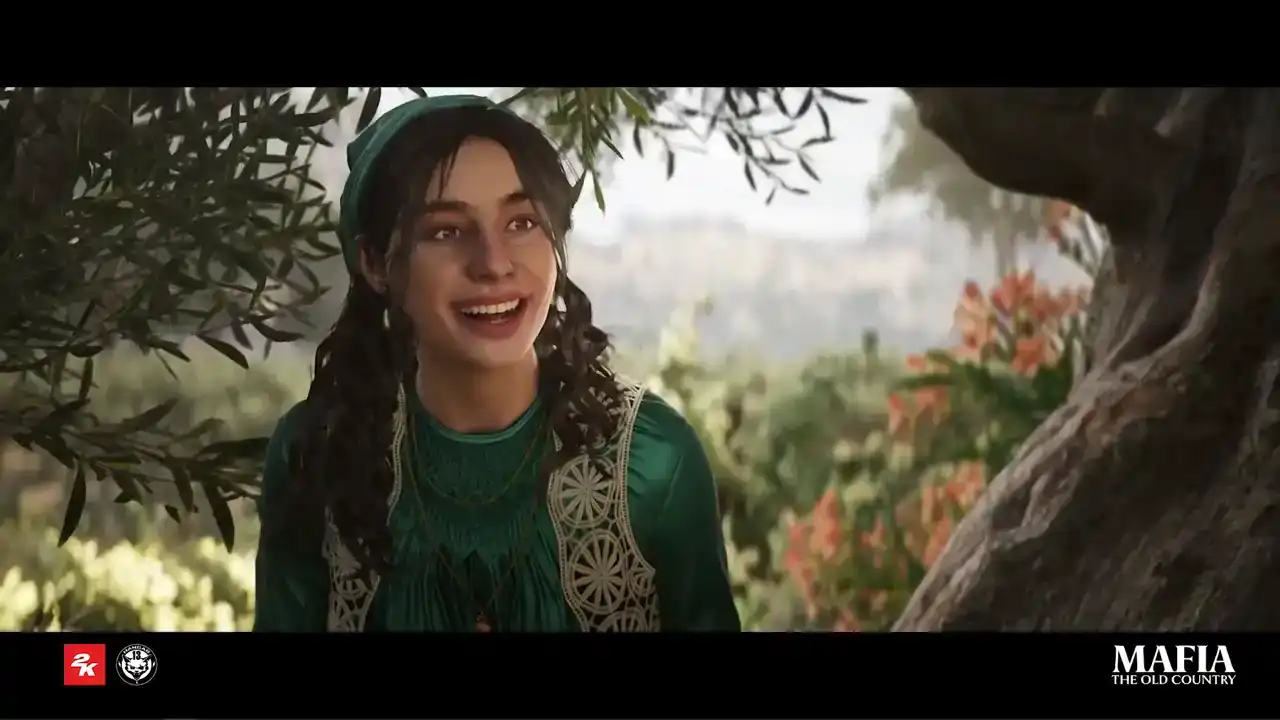
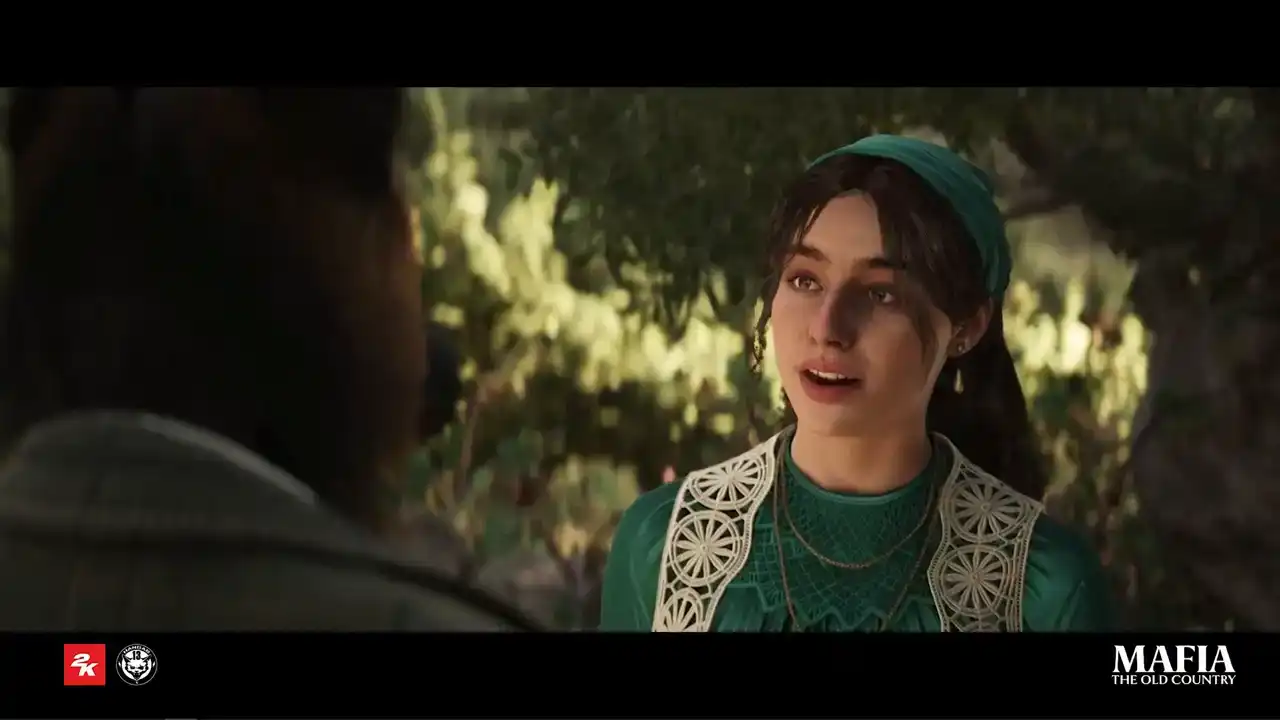
But before we dive in, I would like to start with a short cut scene from our game. All of the men in this room are bound by blood. This is a family. And in this family we follow a code of honor. As a way of life. In Brotherhood? You are here because of your deeds and the assertions of those who stand after your side. This life is one of secrecy. If you make a friend, meet a woman, they must not know about our thing. It is binding. It is not forgiving. To betray one is to betray all. Do you wish to commit yourself, your life, to this family? Yes, I do. Alright. Thank you.
So, why we decided to use MetaHuman?
The first reason is high-quality realism. Mafia the Old Country is a story-driven game with realism-oriented art direction, and it was important for us to push the quality of the story characters to the next level. MetaHuman Rig helped us to achieve high quality animations which can express even subtle emotions. The second reason is efficiency of the workflow. Because of our time and budget limits, scanning of NPC assets just wasn't an option for us. Thanks to MetaHuman, within roughly three months we were able to produce more than 100 NPC assets with a quality very close to main characters.
For asset processing, we used DNA Calibrator together with our custom tool, which gave us flexibility to update or regenerate a full rig setup in just a couple of minutes.

And lastly, flexibility and Unreal 5 integration. One of the strongest aspects of metahuman technology is that you can still iterate on the assets, even in late production phase without the risk to break rig or animations. In effect, it was quite common for us to create animations on the base heads and then later apply those animations to specific assets when assets were ready.
Development of Mafia the Old Country started on Unreal 5.1 and we were really lucky that just a few months later
DNA Calibrator tool was released that gave us much more flexibility over the asset scalability. On one side fidelity of the main characters
was crucial and on the other side optimization for NPC characters was
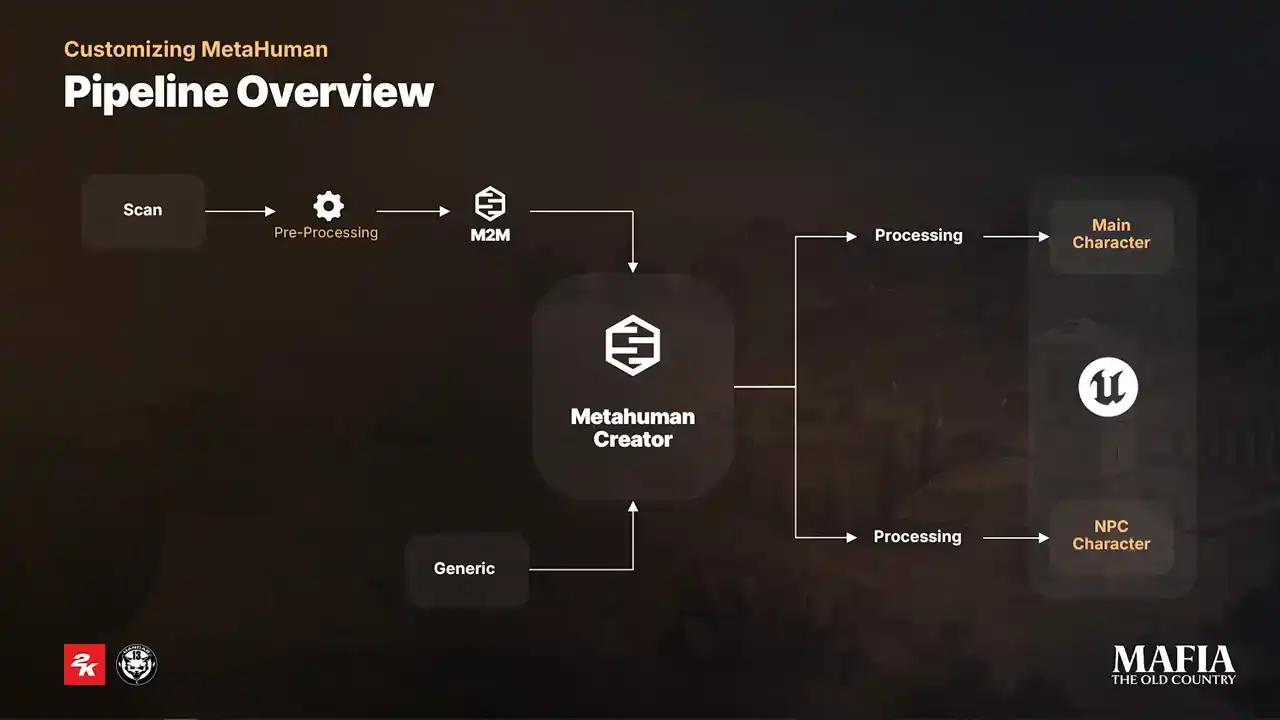
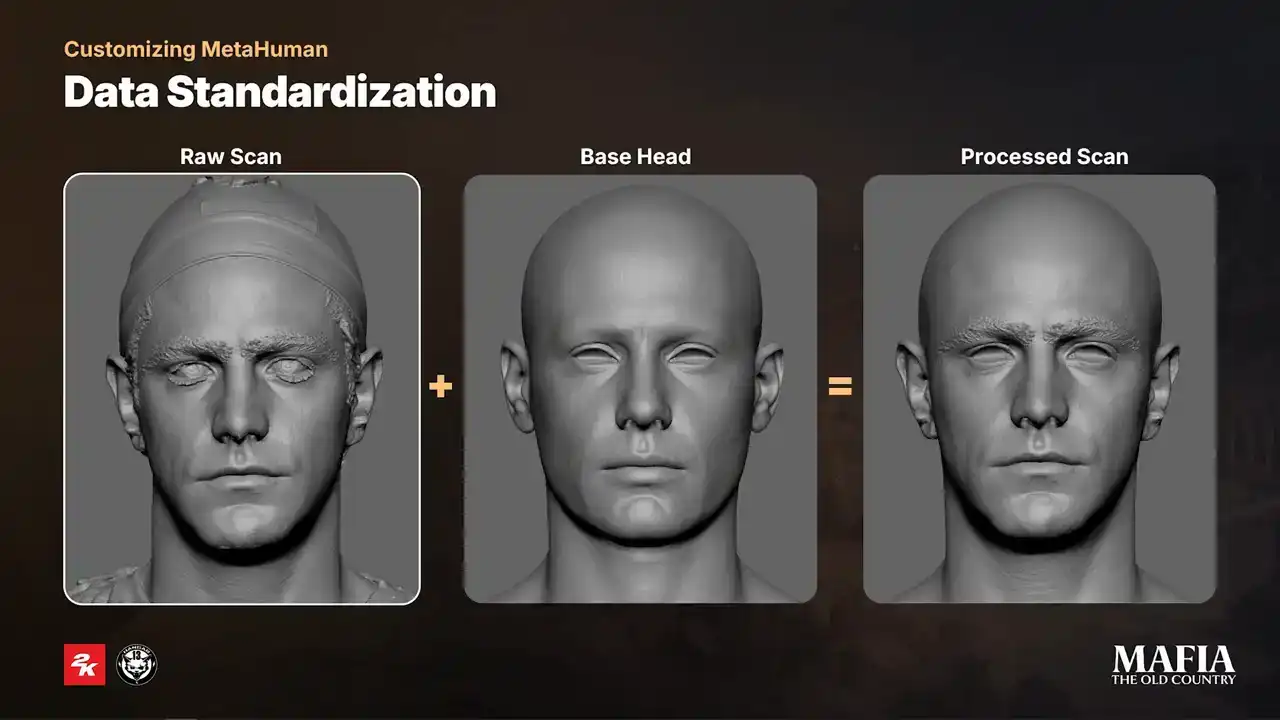
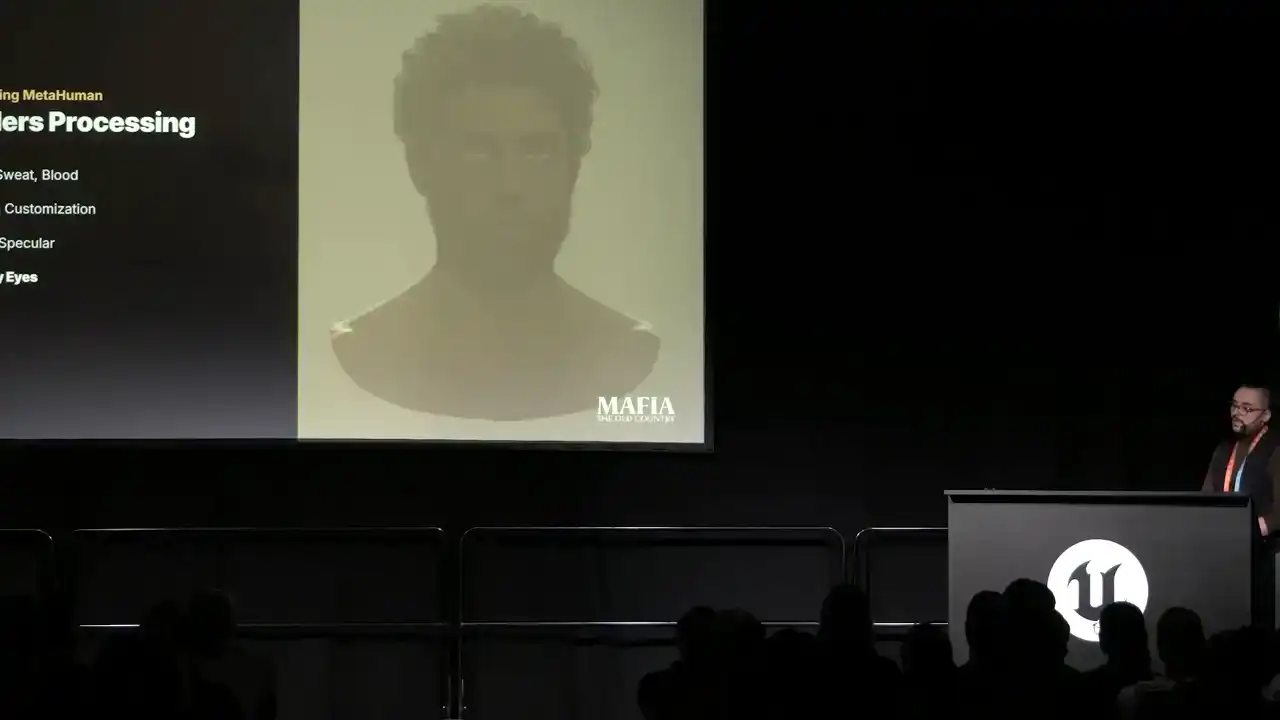
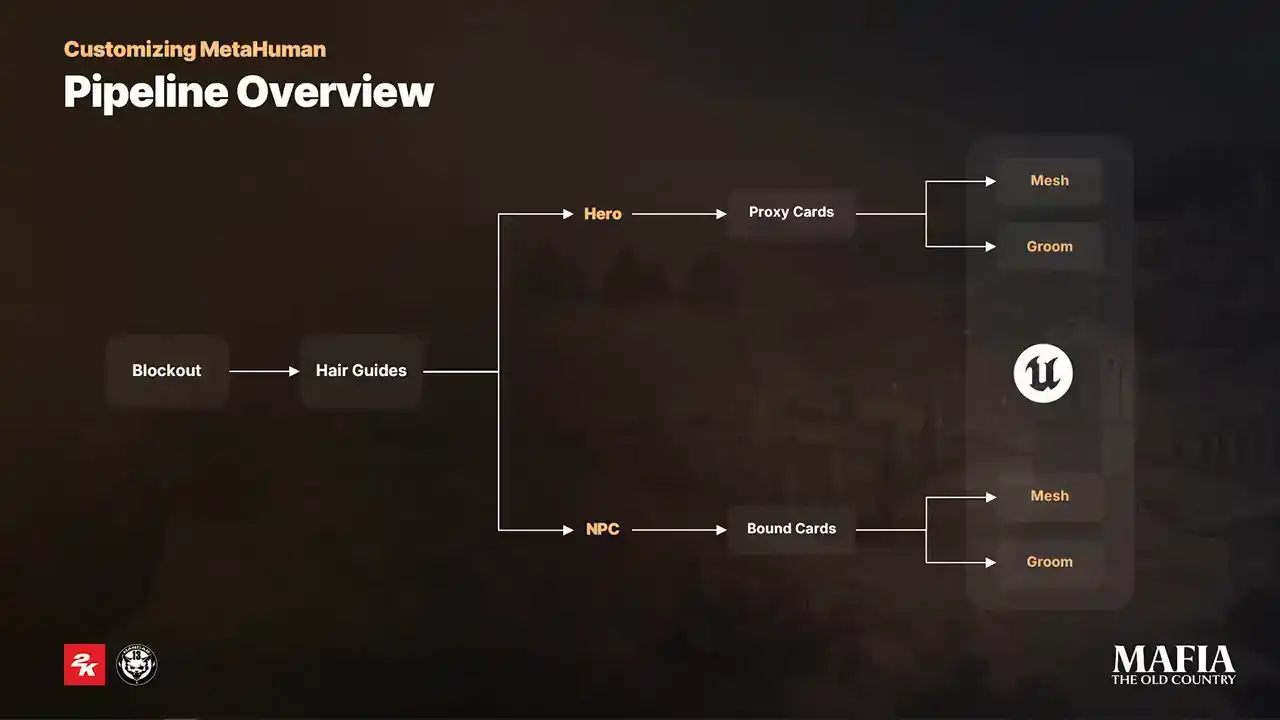
absolutely essential. And here is a small diagram of our workflow. For most of the main characters we used scans together with Mesh2MetaHuman plugin but before Before sending scans into Mesh to MetaHuman, we always did a first cleanup path just to make sure that input is matching MetaHuman measurements more closely. Because of our project time constraints we only processed neutral expressions that means all of the main characters sharing general MetaHuman expressions pool For NPC characters, the approach was different. They were created directly in MetaHuman Creator based on their story or concept. Unreal Engine implementation also differs between two categories. NPCs received an extra round of optimization to keep them performance friendly in crowd scenes.
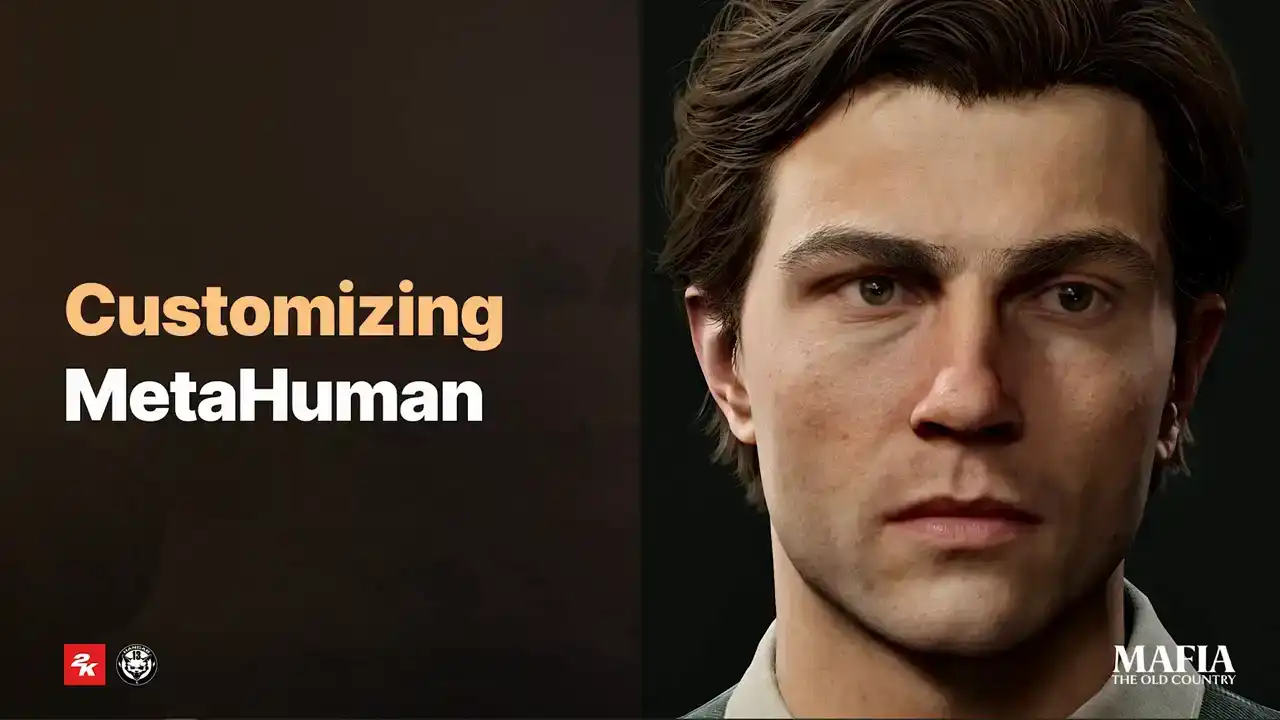
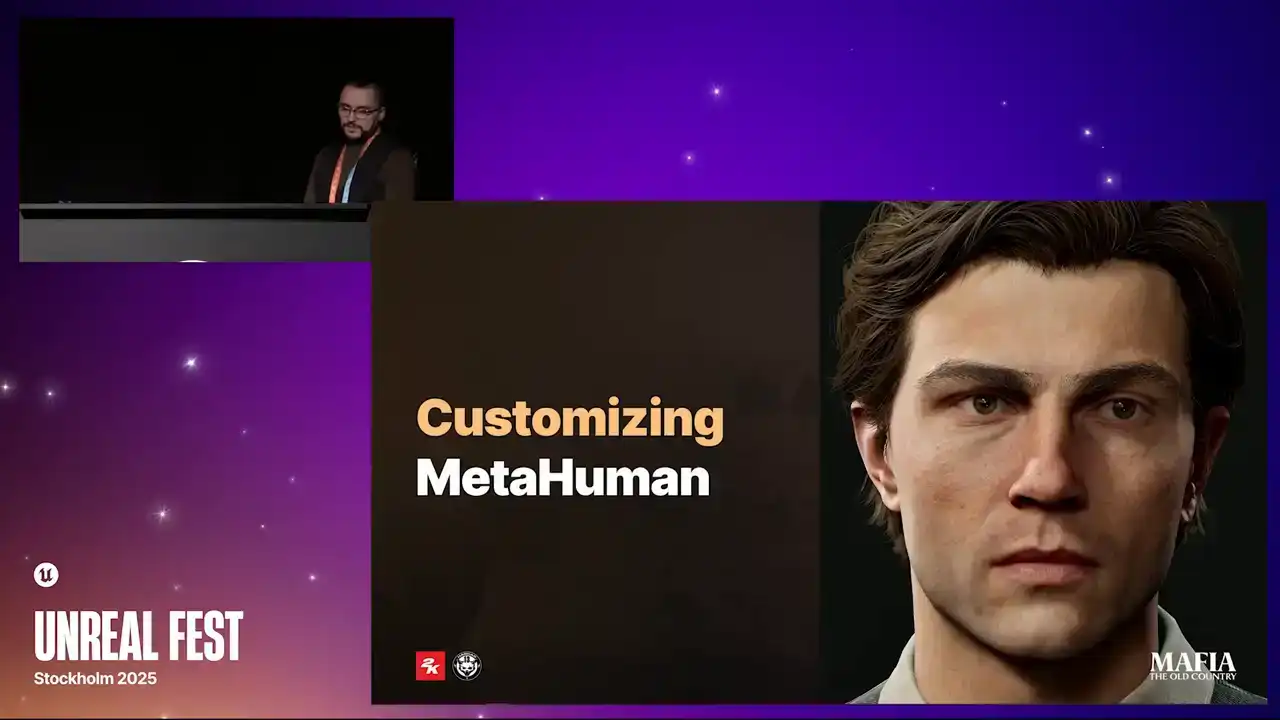
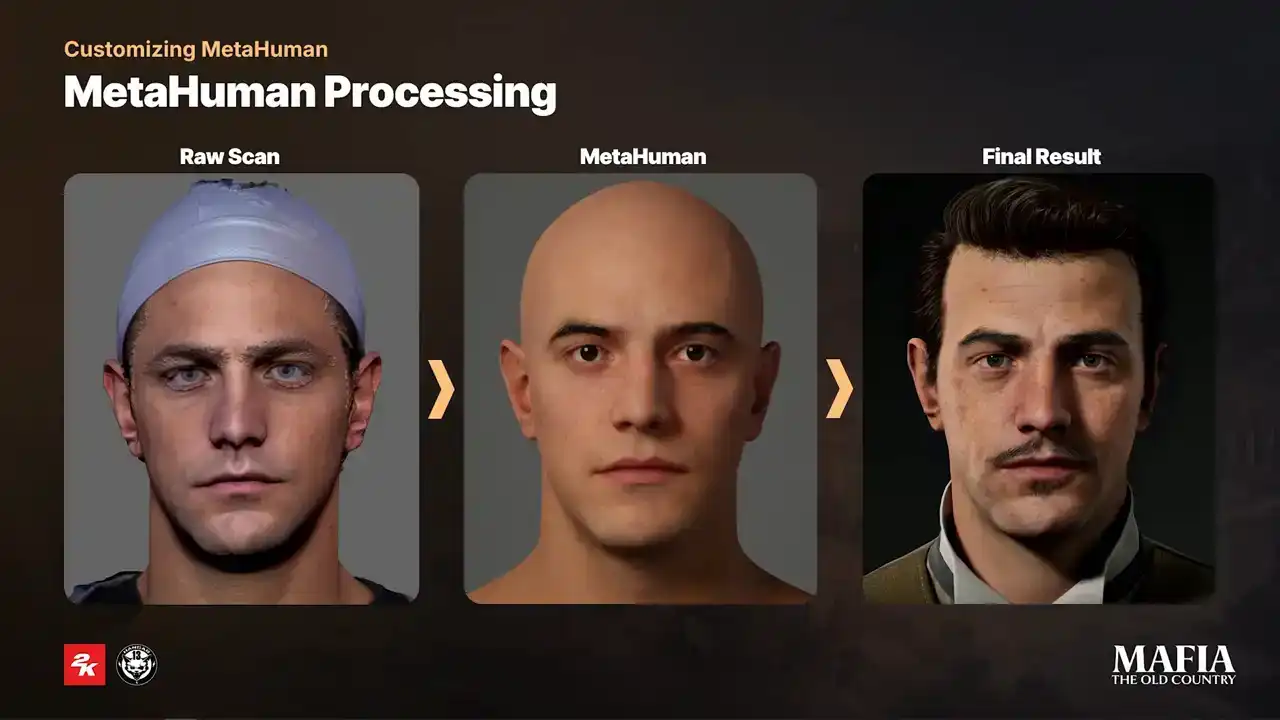
Now I would like to share an example of workflow on one of the main characters. It's a pretty common situation that during scanning session actor is tilting or leaning to the side.
From our experience, it's always better to fix those issues before putting scan into MetaHuman Creator. If at some point you need to blend facial features from MetaHuman results with your scan, you have to make sure both inputs are aligned properly. In our case, we always did 100% blend for the mouth cavity. That helped us to maintain a nice clean sliding deformation of the lips over the teeth.
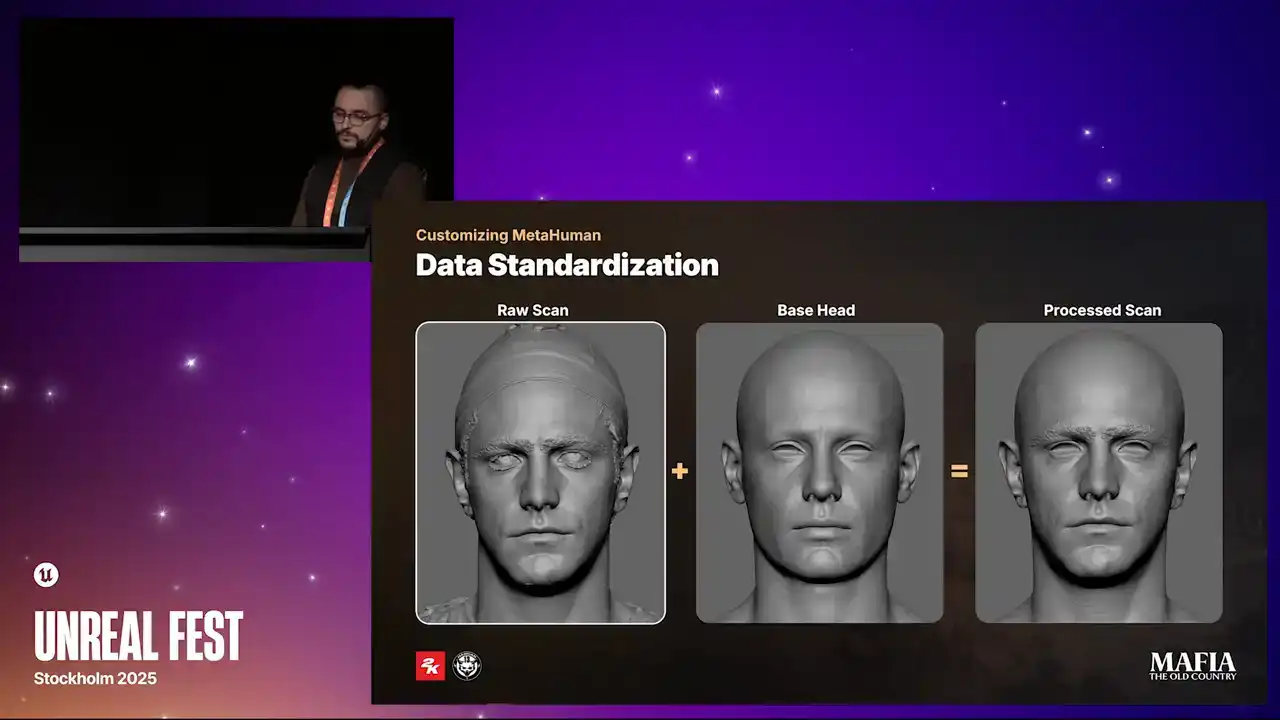
Additionally, for some characters, we used about 40% blend in the eyelids area. if there were some mesh penetration issues.
To fit each scan into MetaHuman measurements, we used base head as the main alignment point.
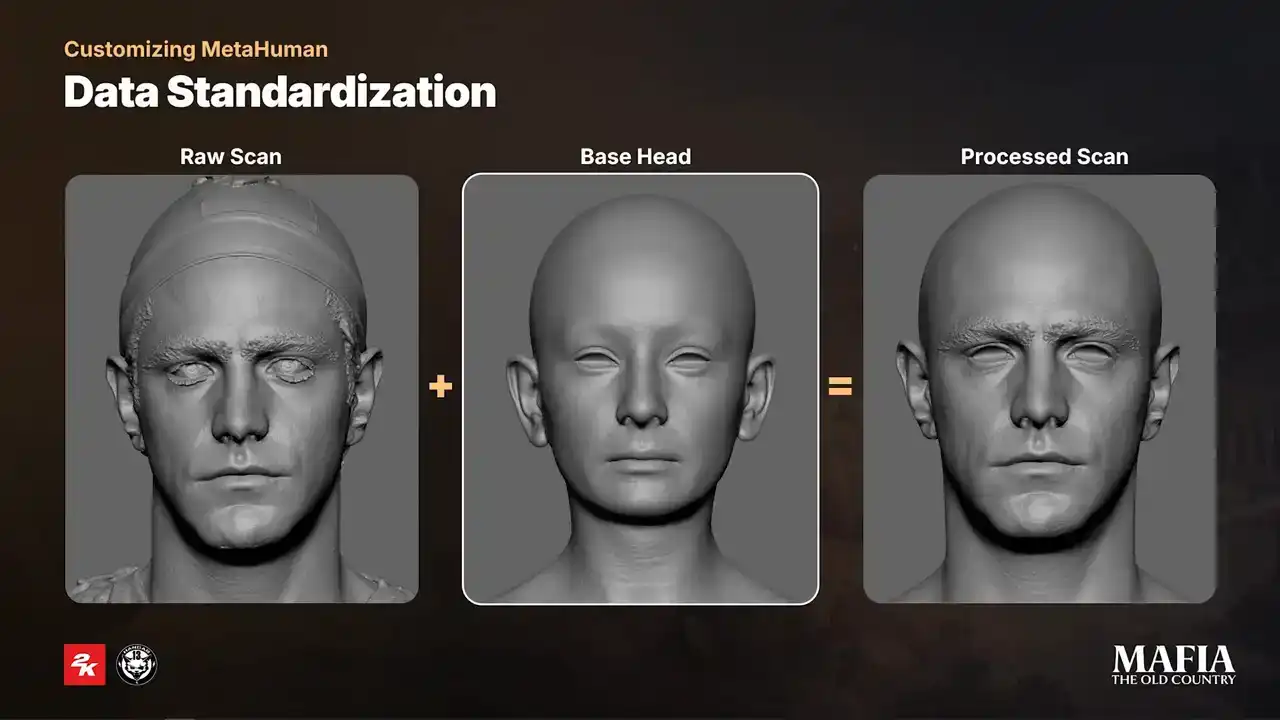
We had four types of base heads, male, female, brood and child. All of these heads were created in MetaHuman Creator with scale adjustments to match our body proportions. On the base heads, we kept face area completely unchanged
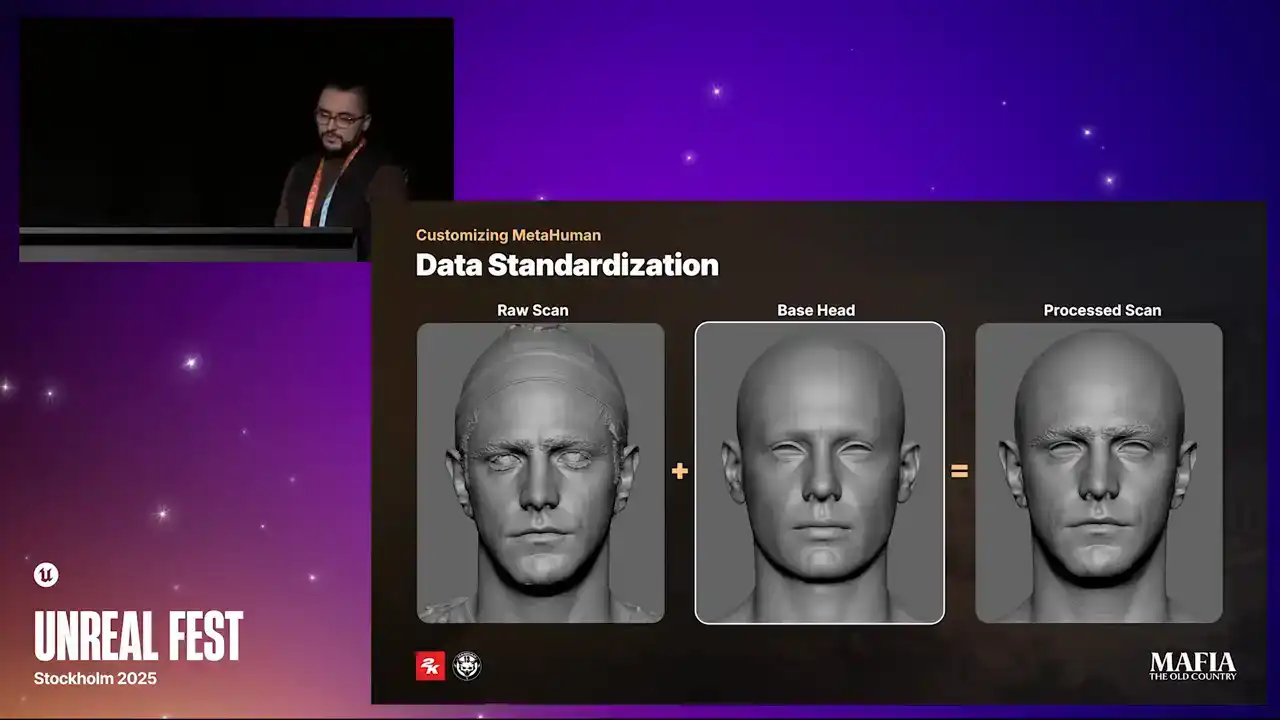
changed exactly as it comes from MetaHuman Creator, the rest of the features were adjusted according to the project needs. Once mesh were aligned, we wrapped base head topology over the scan and as part of the first cleanup pass we also
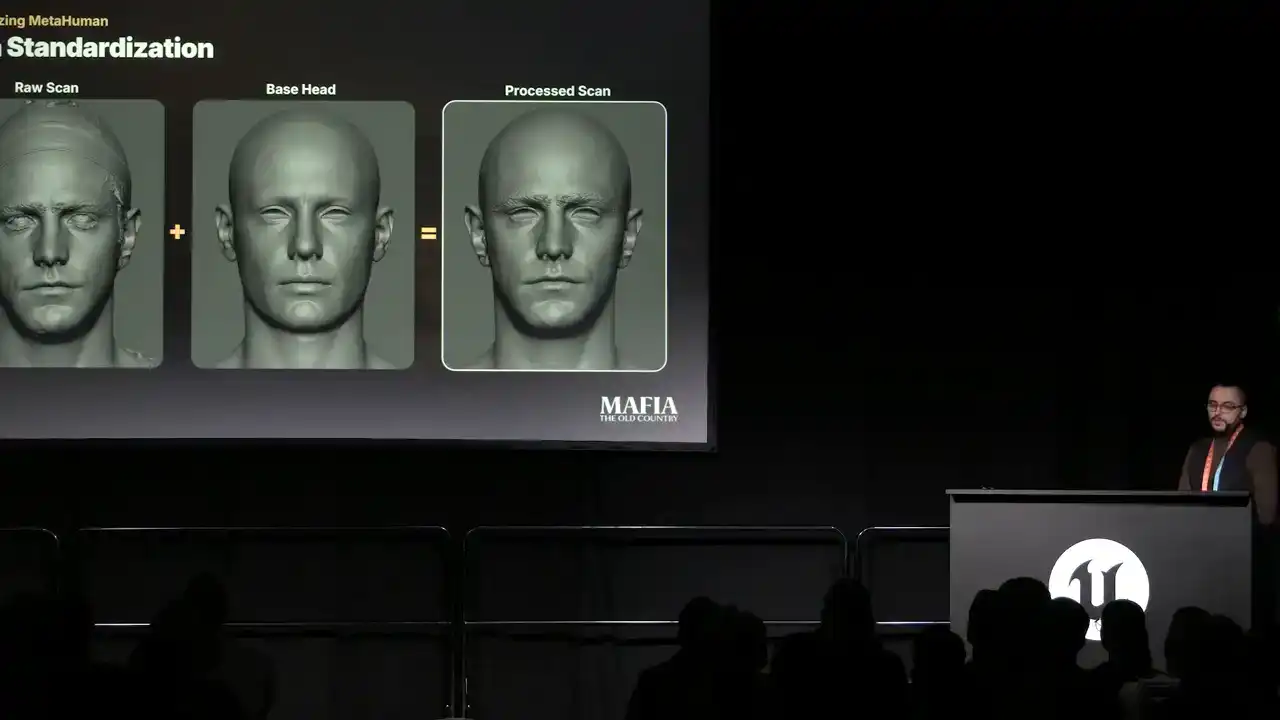
blended skull and neck area from the base head. As a result of this
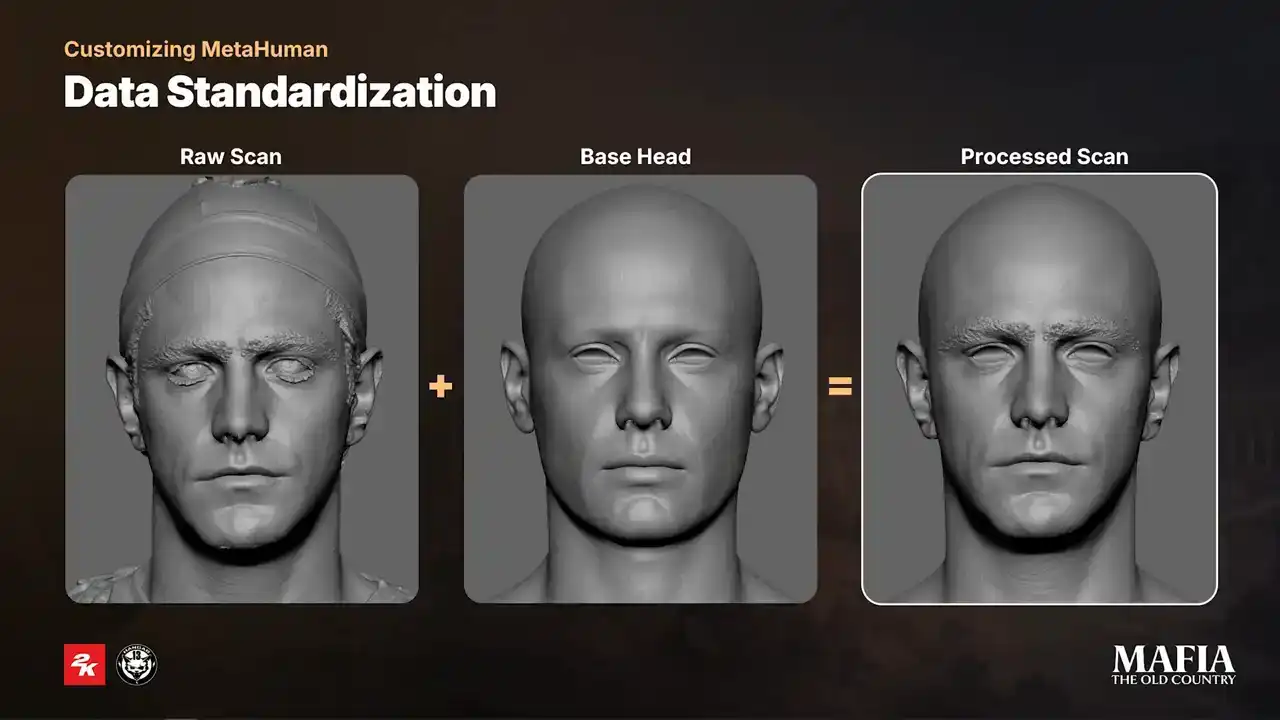
pre-processing stage we ended up with a scan with minimum artifacts that fits into MetaHuman Matrix and ready to go for Mesh2MetaHuman. So as I mentioned
earlier we started production on Unreal 5.1 and the game was eventually released on Unreal 5.4.4. Because of that we were working with legacy versions of
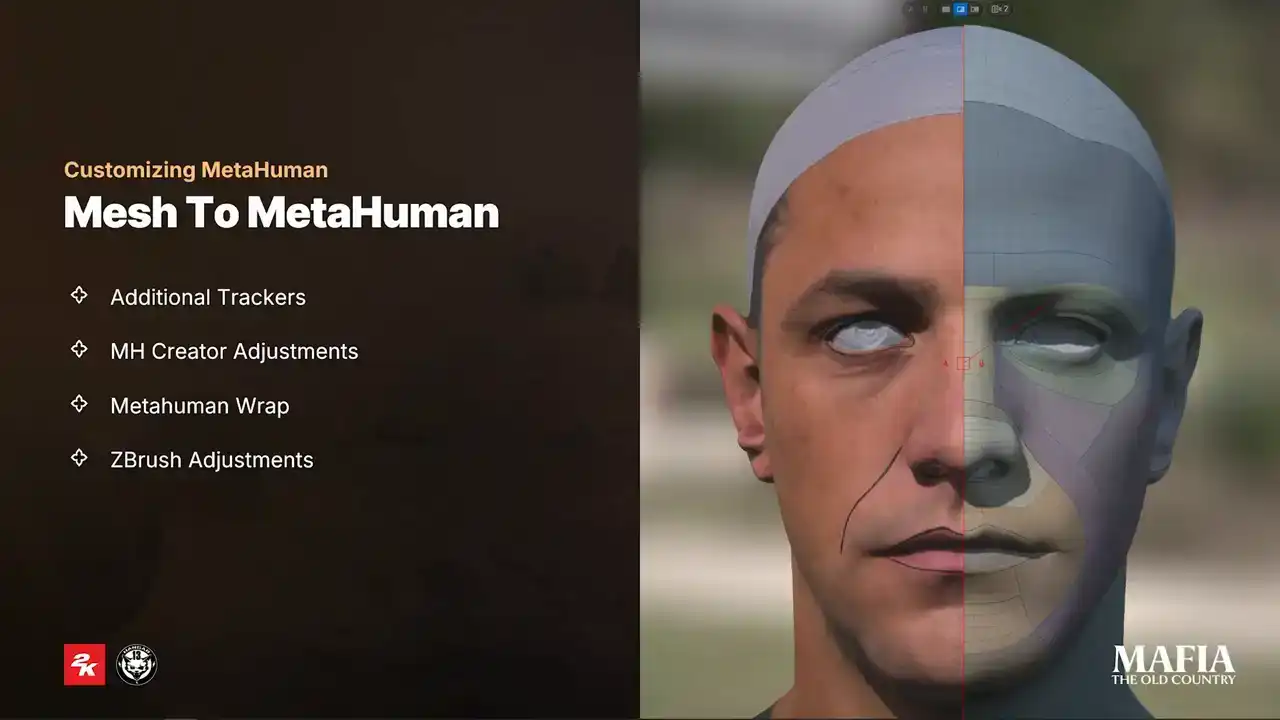
Mesh2MetaHuman plugin and MetaHuman Creator. For Mesh2MetaHuman tracking our
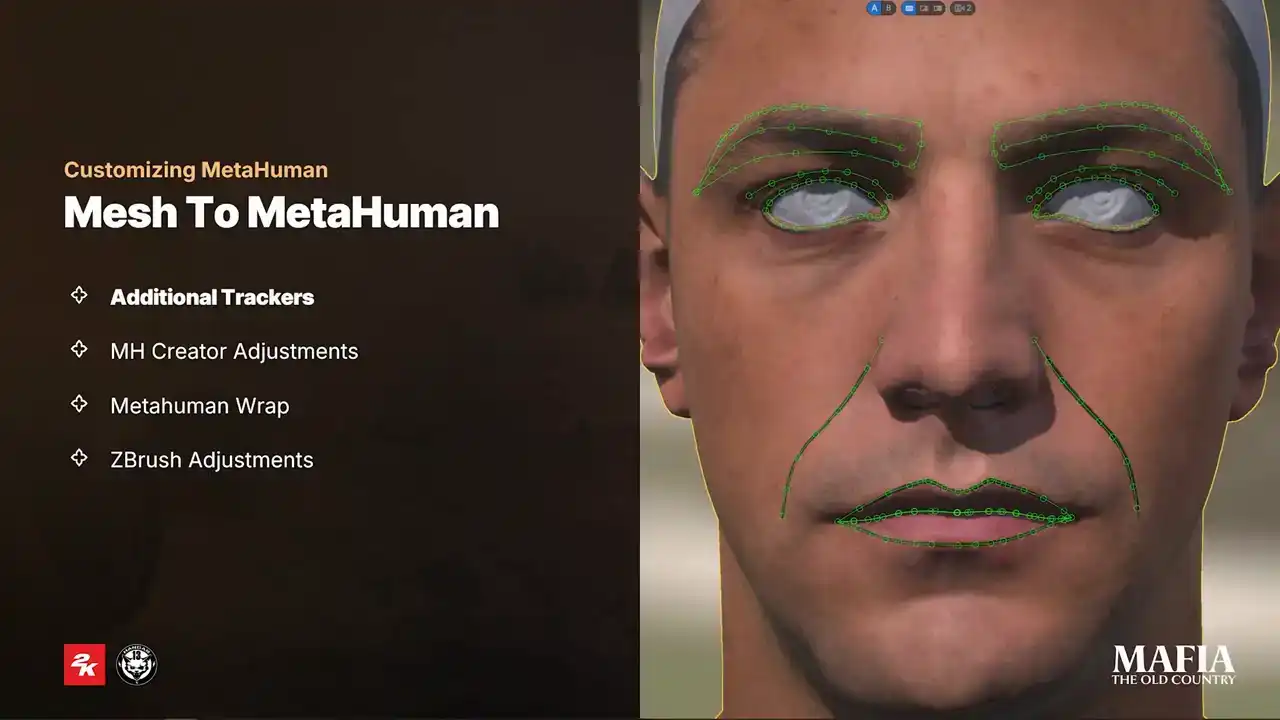
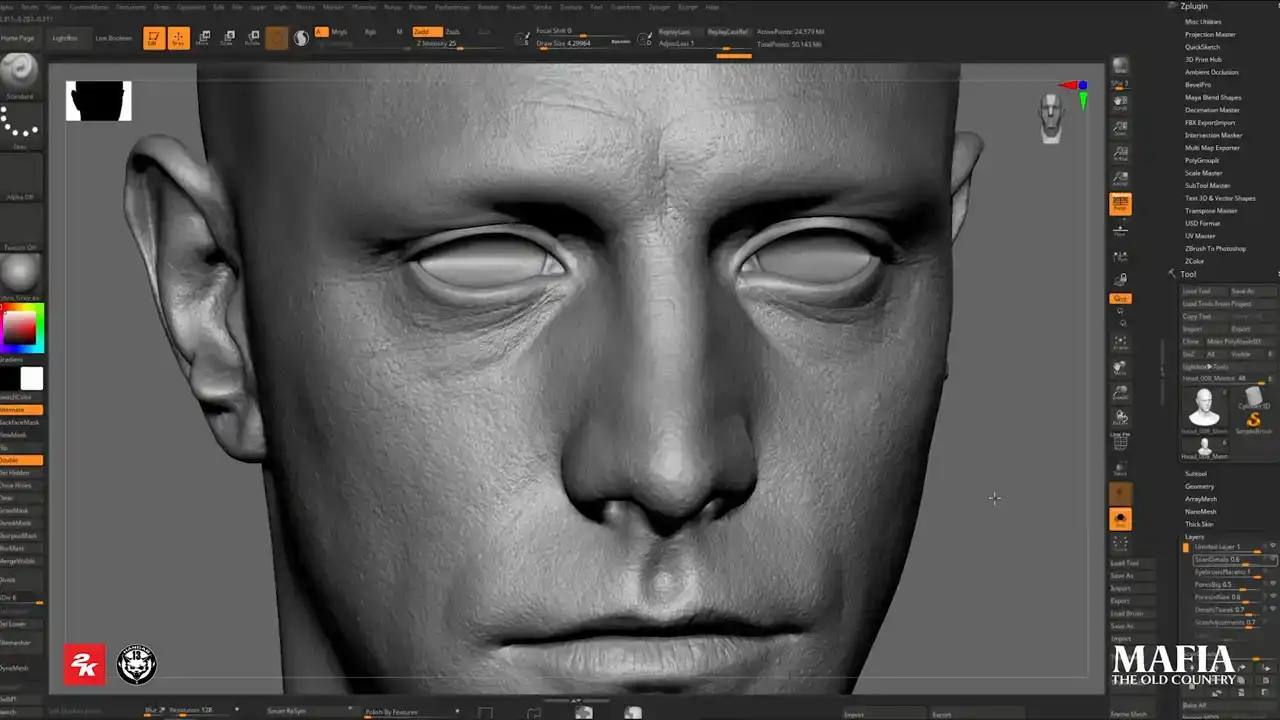
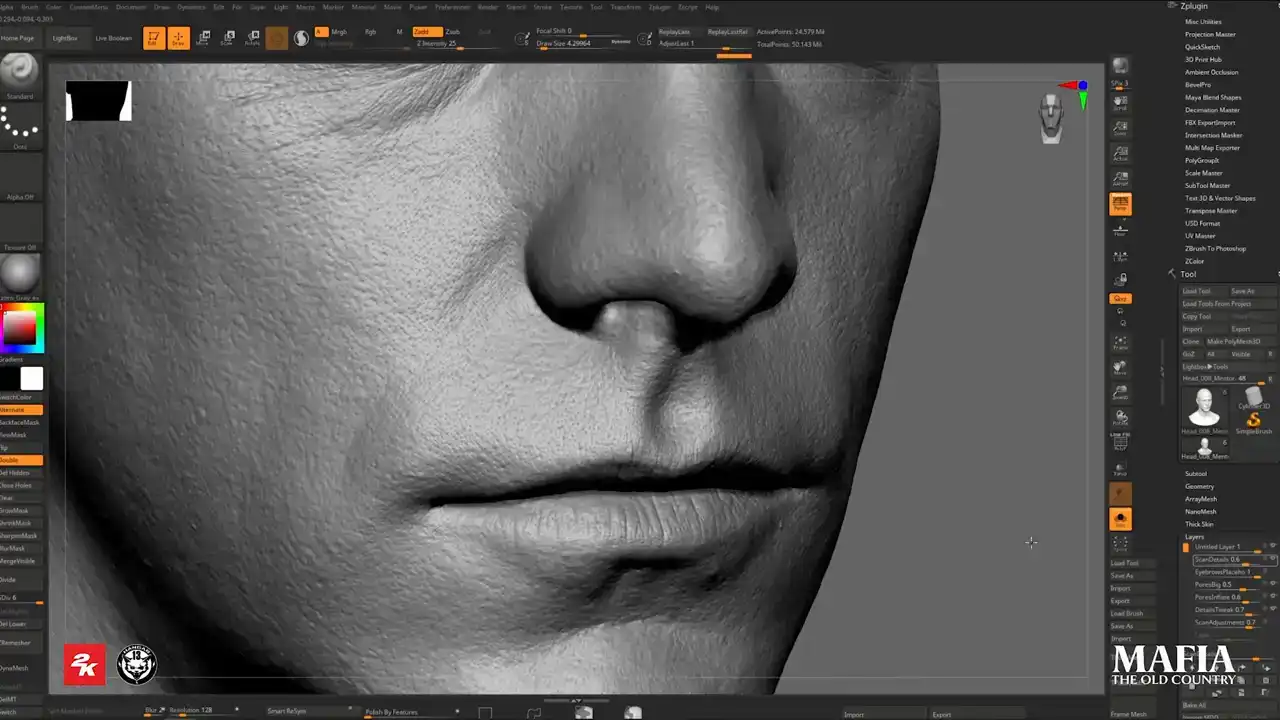
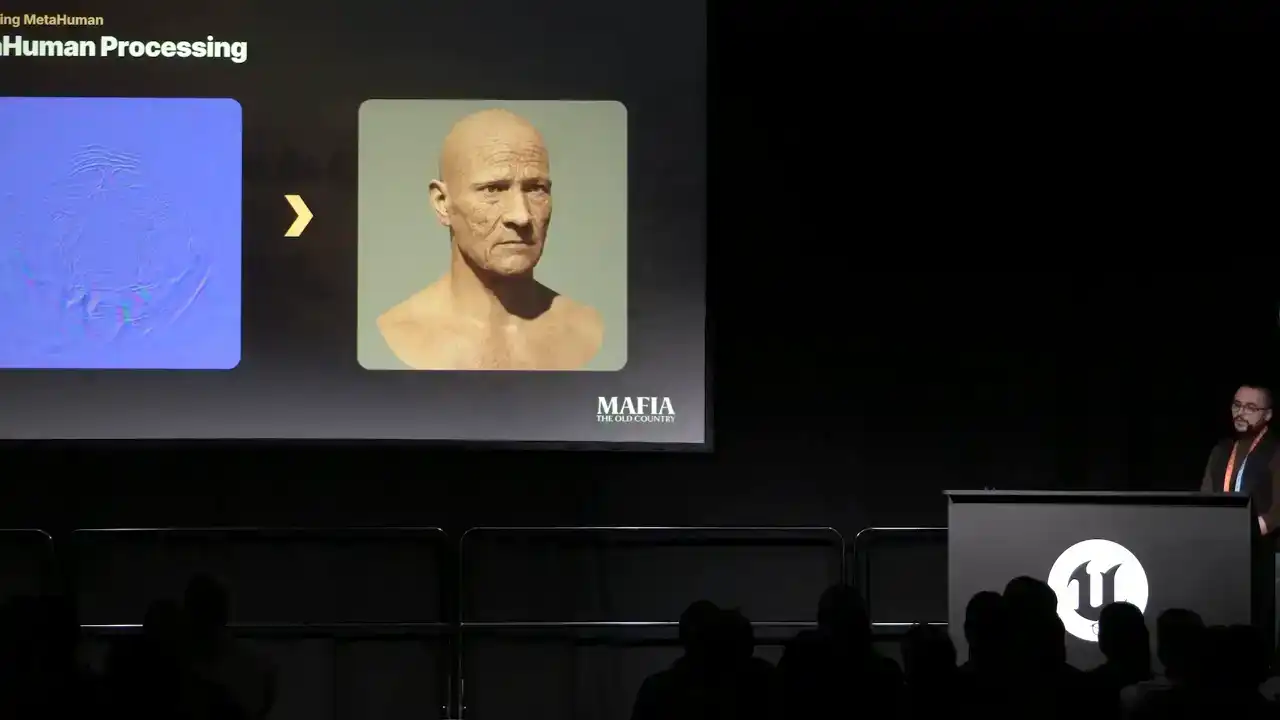
standard setup was to use two or three camera positions. In some cases we added extra trackers for example on the edges of the eyelids. This was one of these areas where it was necessary to push precision a bit further. As you can see
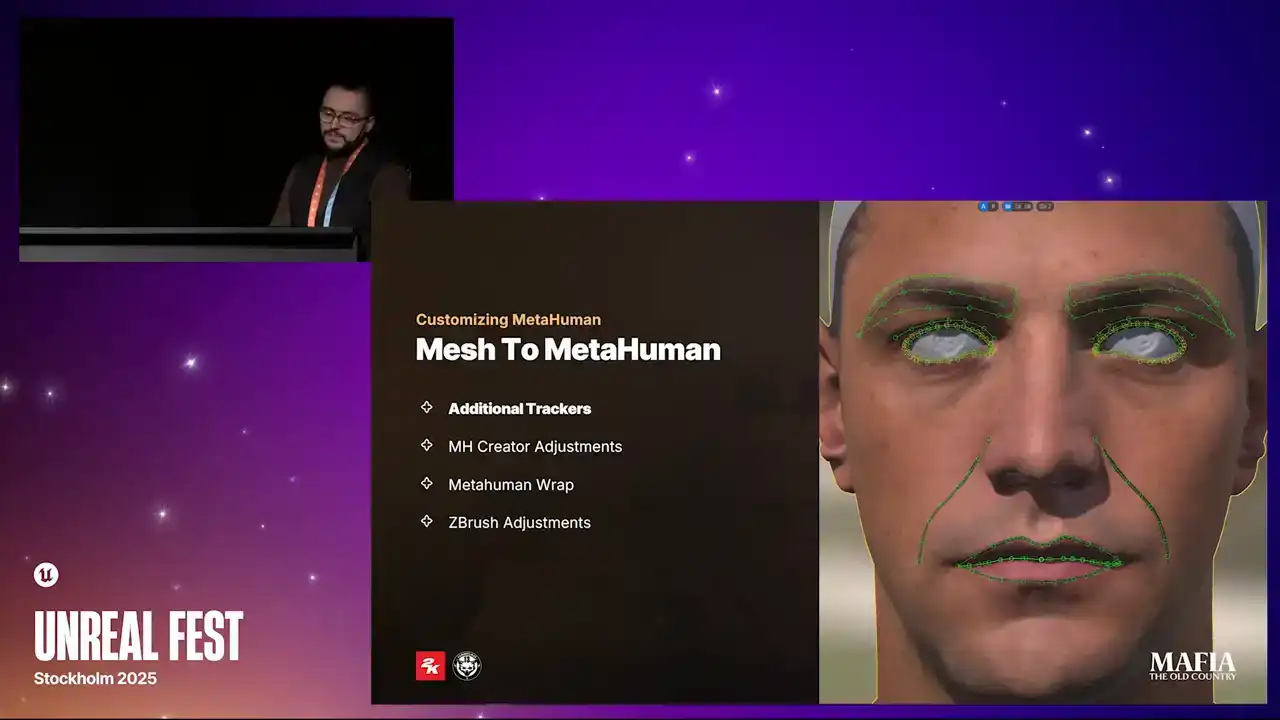
on the image we also painted additional landmarks over the facial features. The reason for that was mainly because of the smoothness of the

features on the younger phase, so it can be difficult to see exactly where trackers need to be adjusted. Almost every Mesh to MetaHuman result required
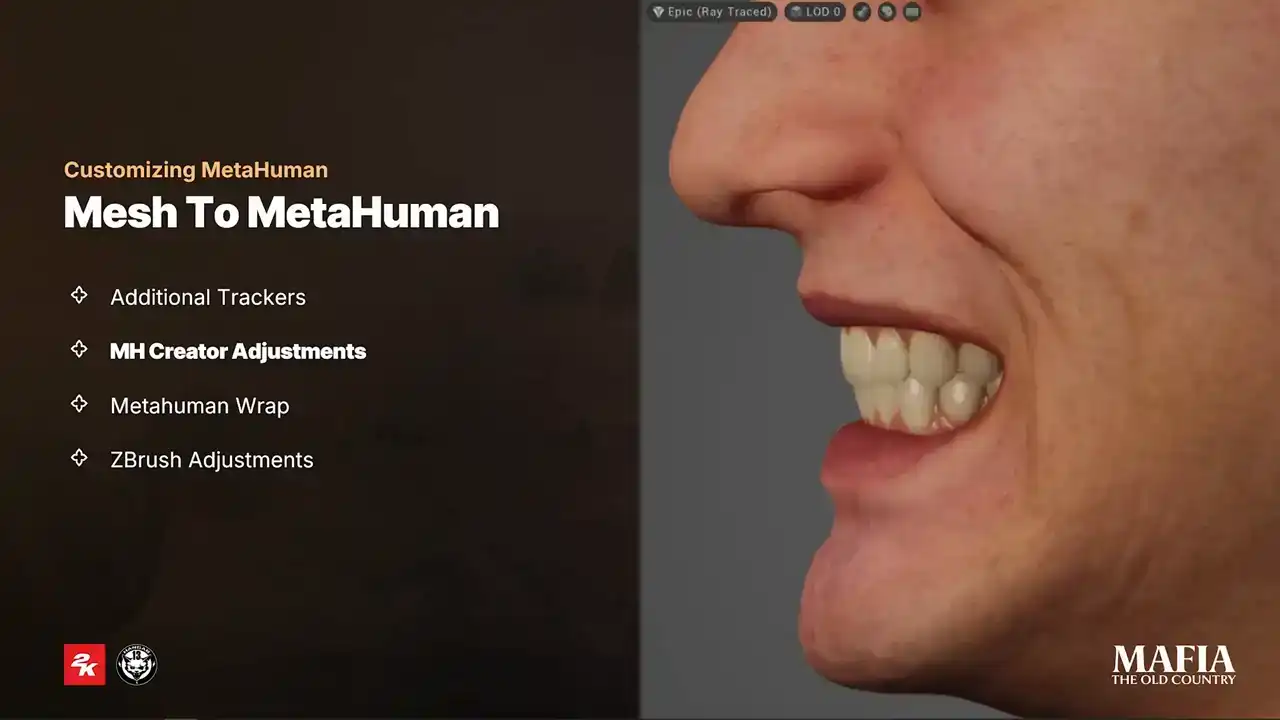
some adjustments in MetaHuman Creator. Most of the time these modifications were around mouth area. In many cases the default this position caused a strong overbite or sometimes these were placed too deep in the mouse cavity. In many
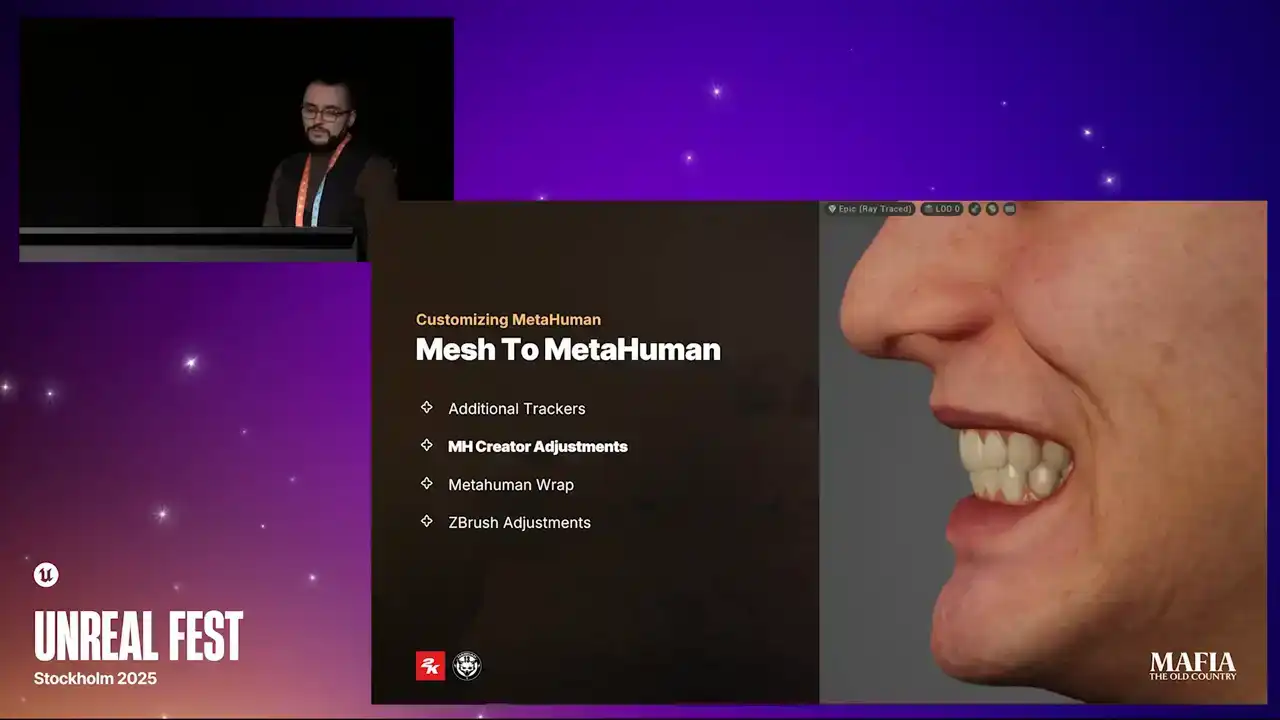
cases this was causing unpredictable animation results. For hero assets we went a step further. We also tried to match the teeth shape to actors reference photos as close as possible and we made those changes in MetaHuman Creator because it's not only about teeth themselves, the contact point
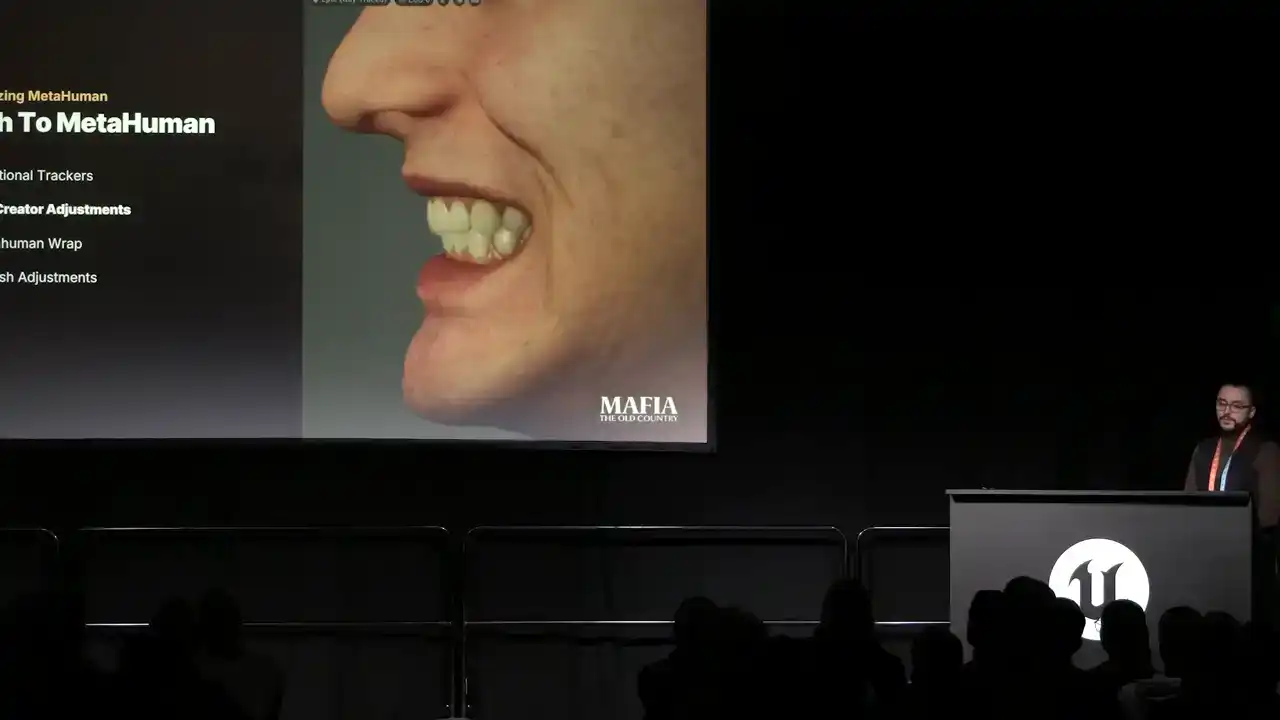
between the lips and teeth also shifts when you're making those changes.
Mesh to MetaHuman usually gave us a pretty solid result and for non-story important characters we could often use output as it came. And thanks to all earlier preparation, MetaHuman result already fit very well with our data both in scale and position. But for the main characters likeness was critical.

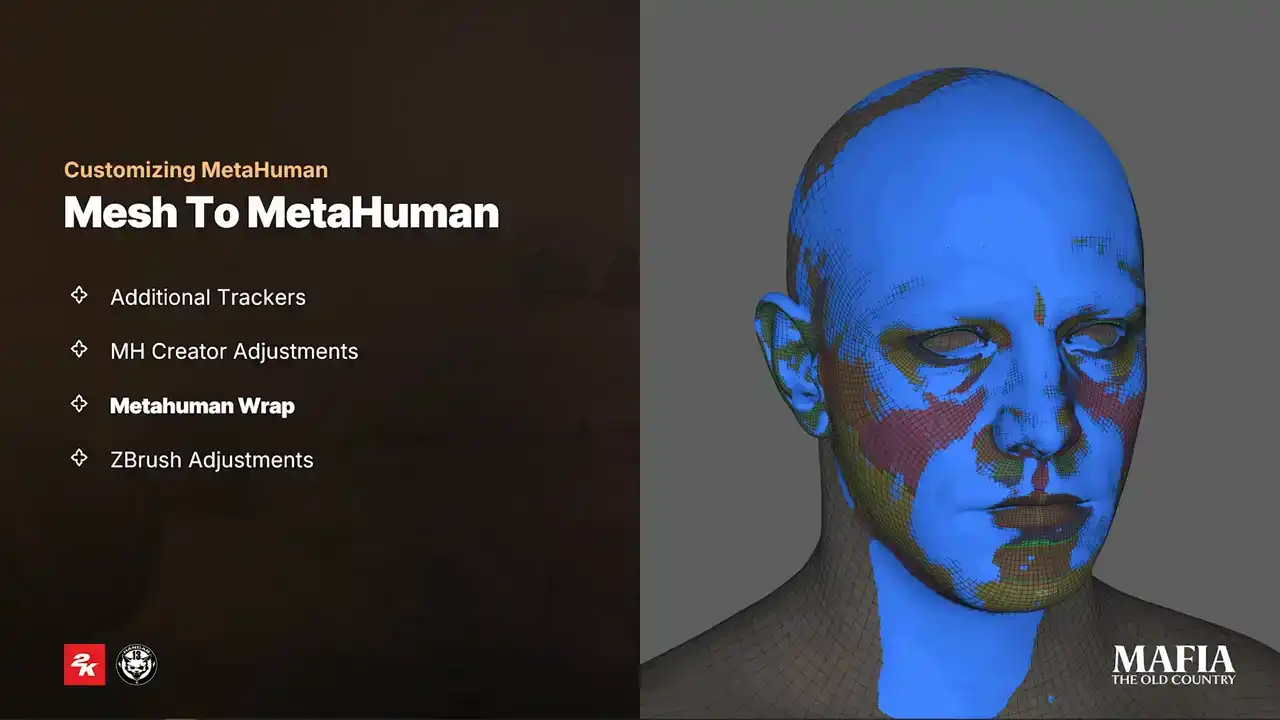
That's why we added an extra step of wrapping the MetaHuman output over the scan. At this stage, it was important that all mesh loops are wrapped on the corresponding features, otherwise the distortion would carry over into the facial expressions. So after wrapping and before moving to the final adjustments in ZBrush,
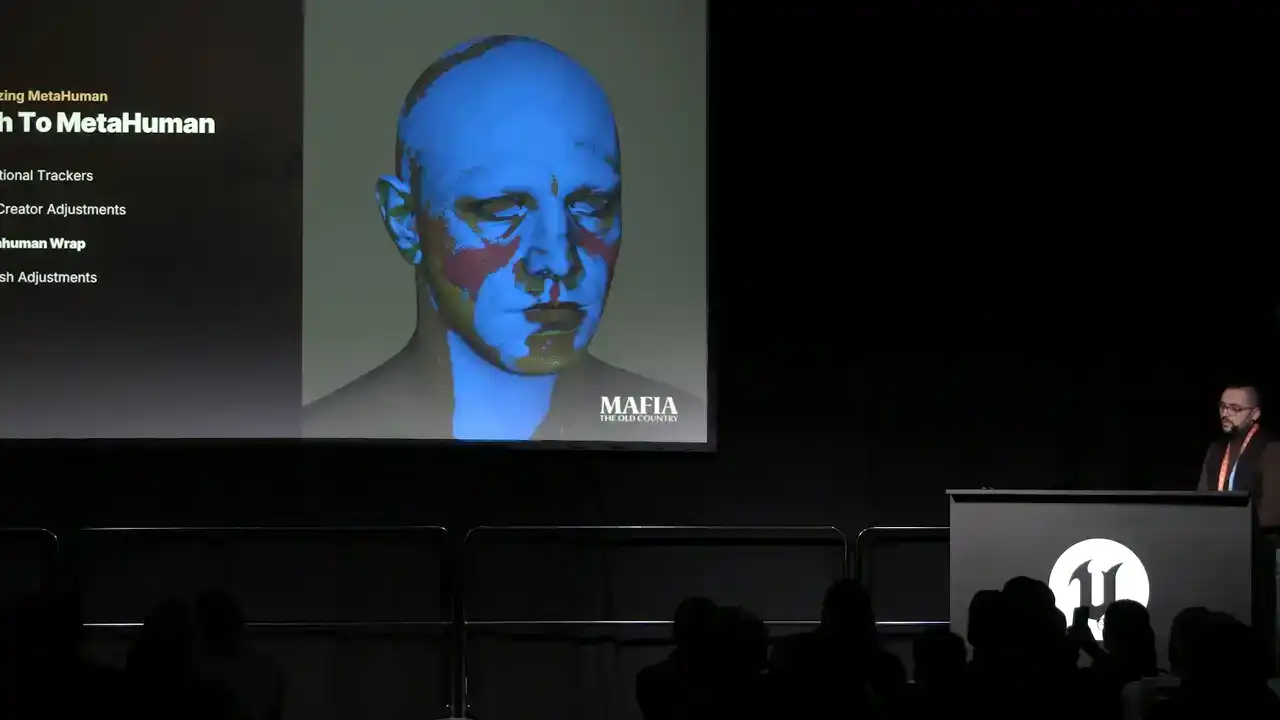
we usually run a few tests to check if the wrapping was successful
and if the expressions work without issues.
During the ZBrush pass, we reprojected details from the scan on the final topology and added extra artistic adjustments on the top where it was required Since we weren using custom expressions it was necessary to compensate some breaking expressions by adjusting features on the neutral pose
It was common situation that we did an extra puff on the mouth corners to avoid sharp dimples which were propagated from neutral pose.
As the very last tweaks, we applied small modifications to head features based on the feedback from the art director or the animation team. And usually this meant emphasizing certain features or increasing intensity of the pores and wrinkles to compensate limitations of in-game lighting scenarios.
For the additional tertiary details we used high quality data from texture XYZ in combination with
displacement maps extracted from our diffuse textures. This gave us an extra layer of realism beyond what we could get directly from our scan geometry.
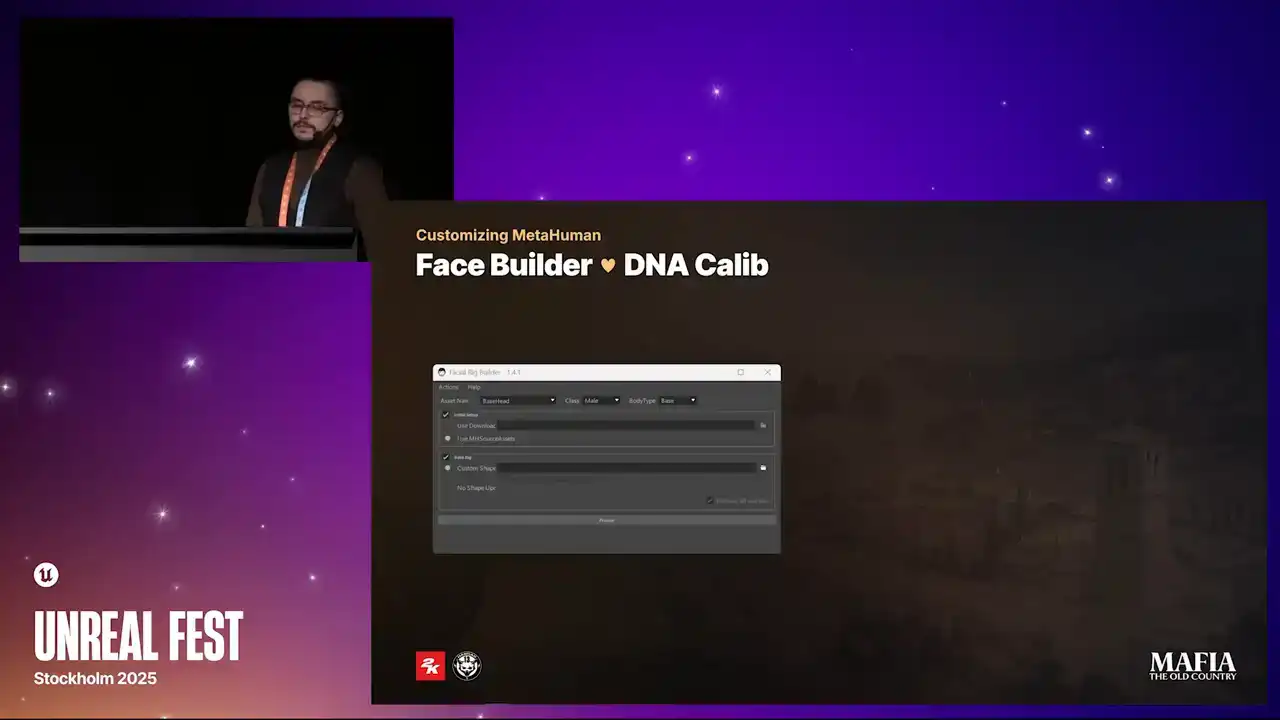
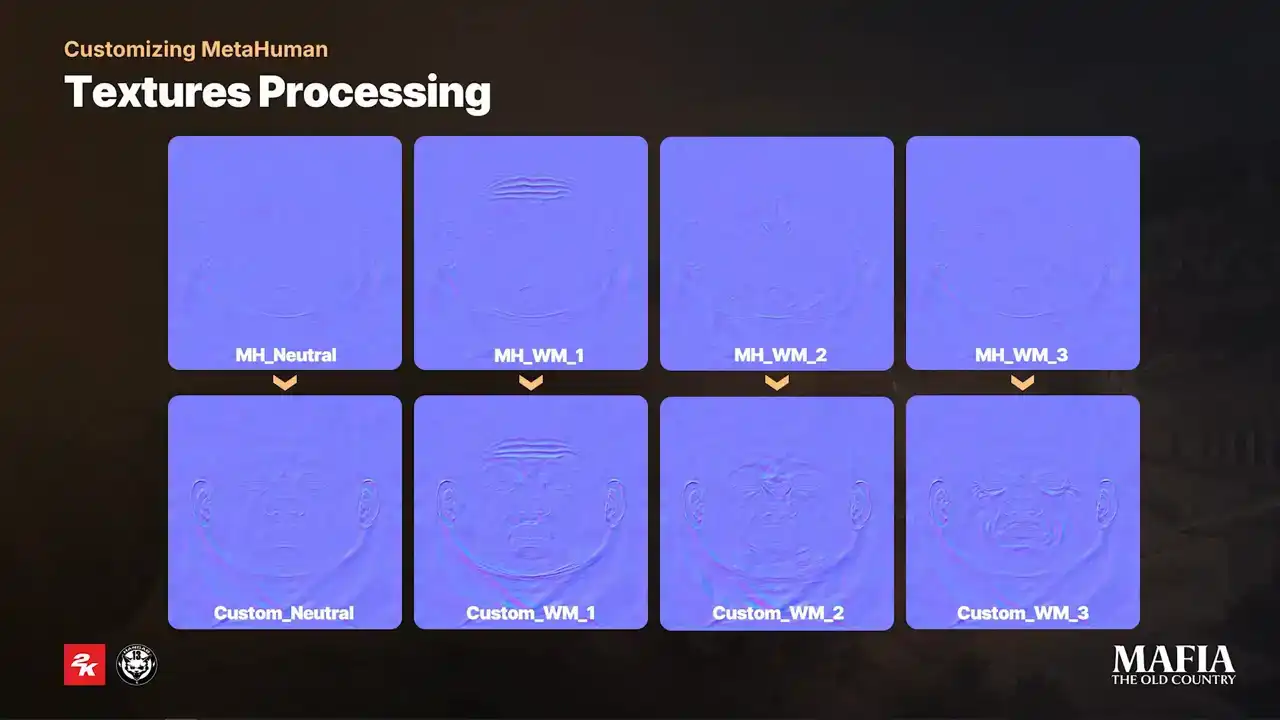
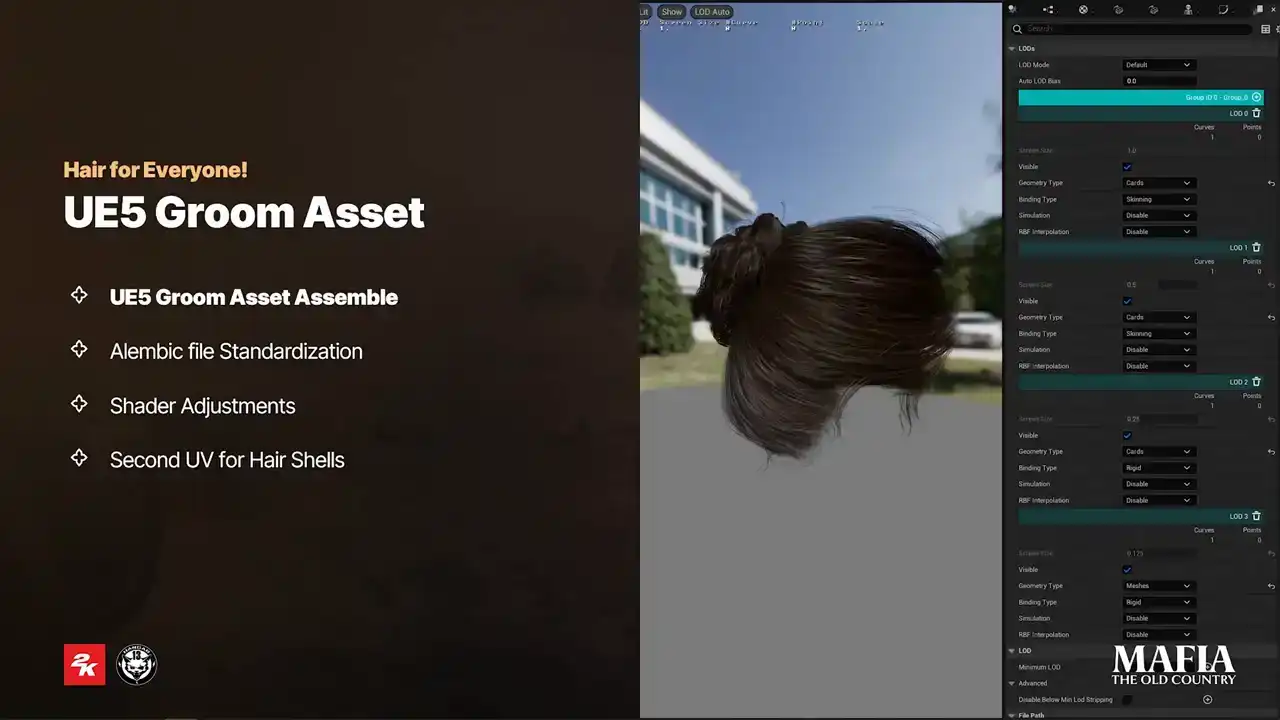
To propagate our custom changes over the MetaHuman result, we developed a small in-house tool built on the top of the DNA Calibrator. With this tool, we could reposition joints and vertices according to our head, teeth, eyes and other meshes. As a part of the initial processing of MetaHuman sources, we also reassembled the LODs to fit our project needs. In the table you can see that we used only four LODs instead of original seven. For the head geometry we completely removed MetaHuman LOD0 and all morphs, even for the main characters.
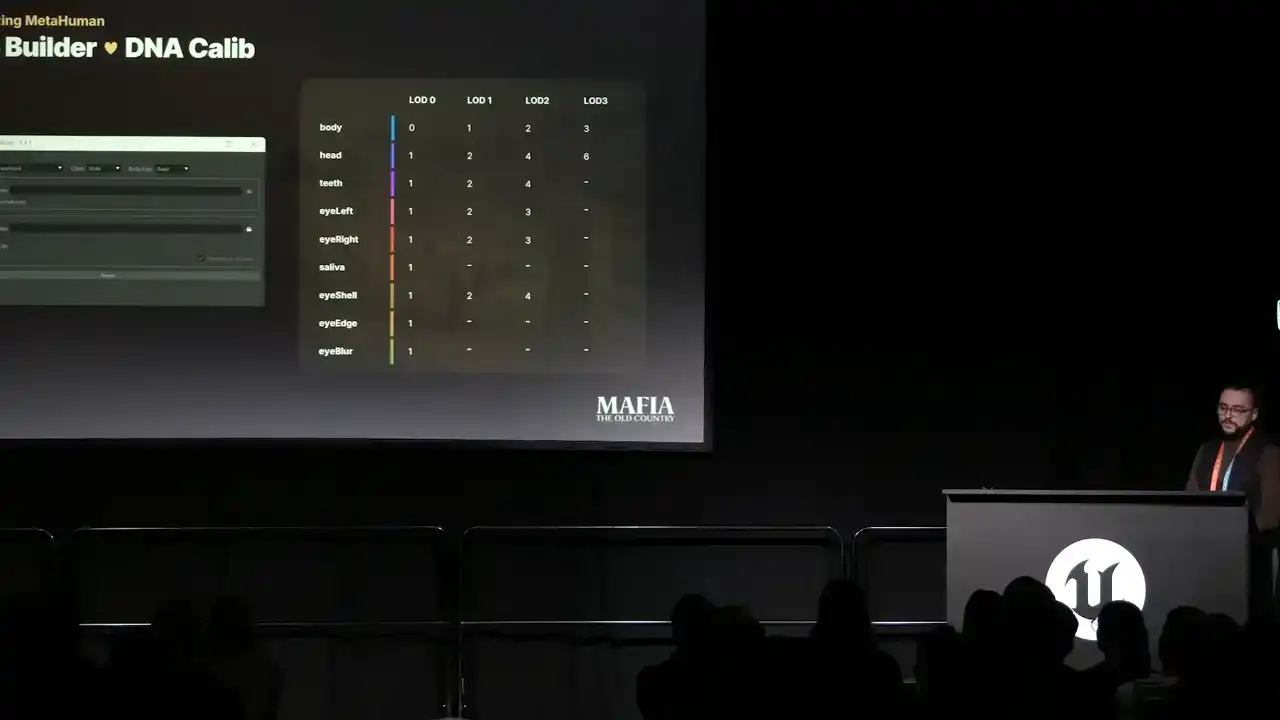
LOD1, which is our LOD0, was kept for cinematics where high quality mattered. LOD2 was for close-up in-game scenarios where we reduced the number of the mesh elements, which were only important for cinematics.
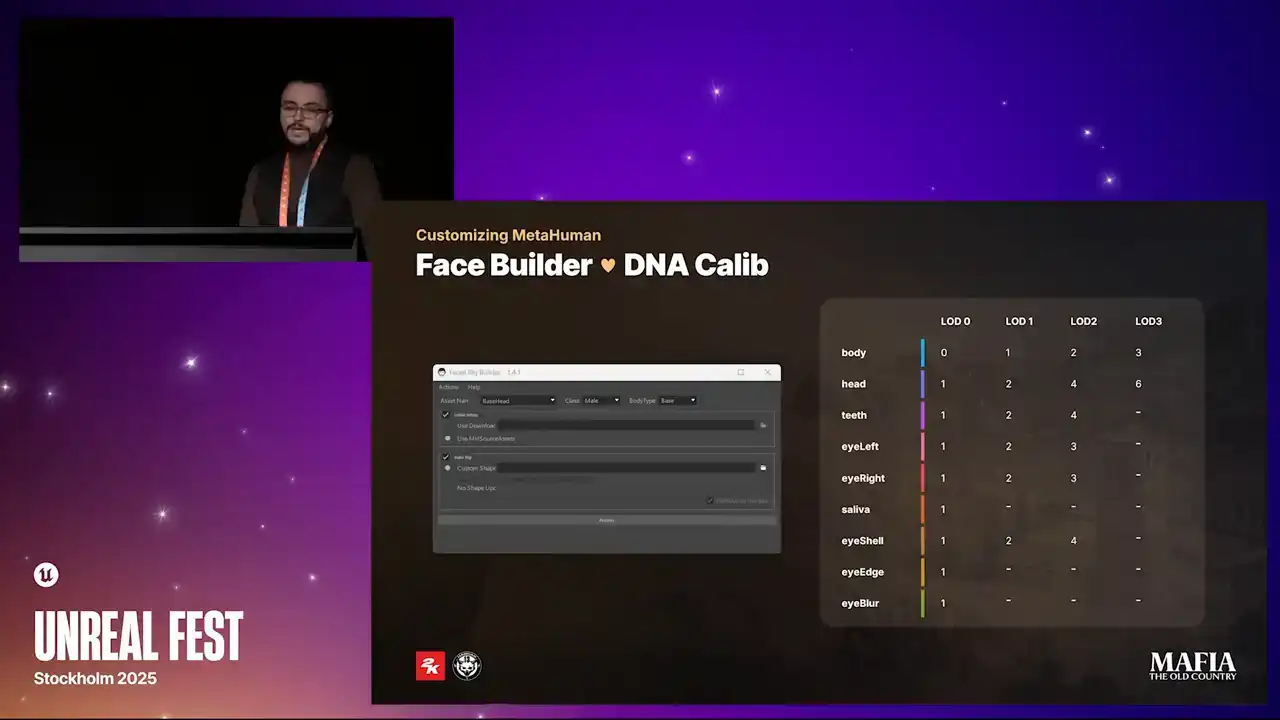
You may notice that for LOD 0 we had an extra mesh called eyeblur, which isn't part of MetaHuman by default. I will explain it in a few slides. And for the last LODs we applied really aggressive optimization because this was all about performance for characters in a distance.
For body meshes we used all four MetaHuman LODs.
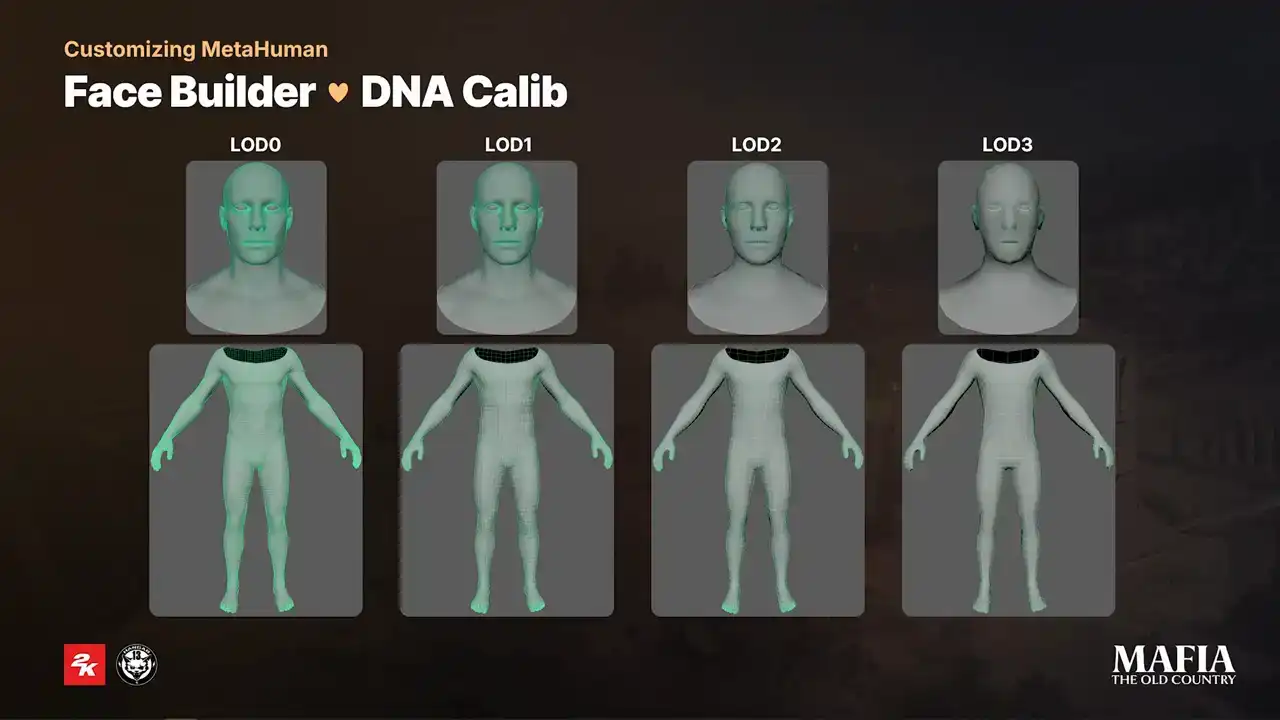
human LODs. The only change on the topology that we did was around the feed area for LOD 0 where we did the blend between LOD 0 and LOD 1. Because we completely skipped LOD 0 it also meant that we skipped all of the corrective blend shapes. In this example you can see that for some expressions quality loss is noticeable. For NPC assets this wasn't such a big deal and it was perfectly fine for in-game situations but for main characters in cutscenes faces start to get more unnatural almost rubber feeling
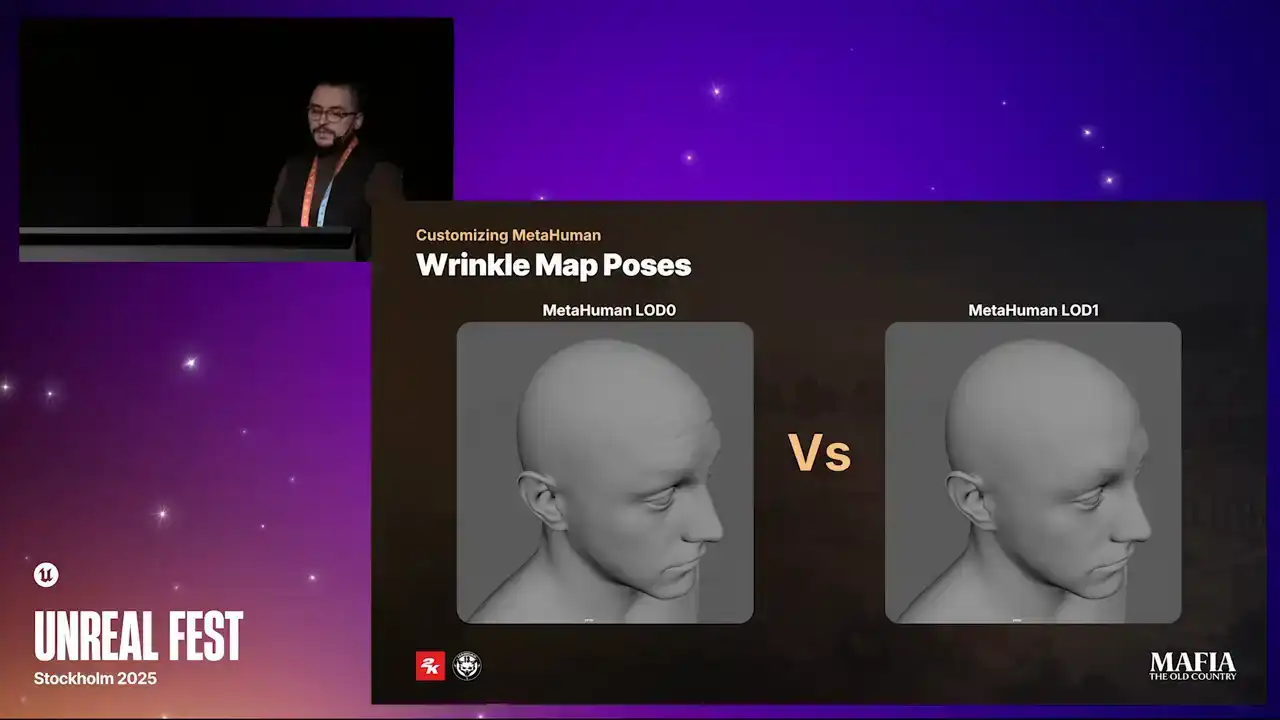
animations. To partially compensate quality loss in expressions we decided to rebake mesh differences between LOD0 and LOD1 into our custom wrinkle maps. If the wrinkle maps required extra sculpting paths, we did bake from high poly mesh.

That was slower but quality oriented option. The second faster option was to use Substance Designer. There we could isolate topology differences between LOD 0 and 1
and then combine the difference with existing wrinkle map. Substance Designer was an important part of our pipeline. We used it for baking and also processing of metahuman sources.
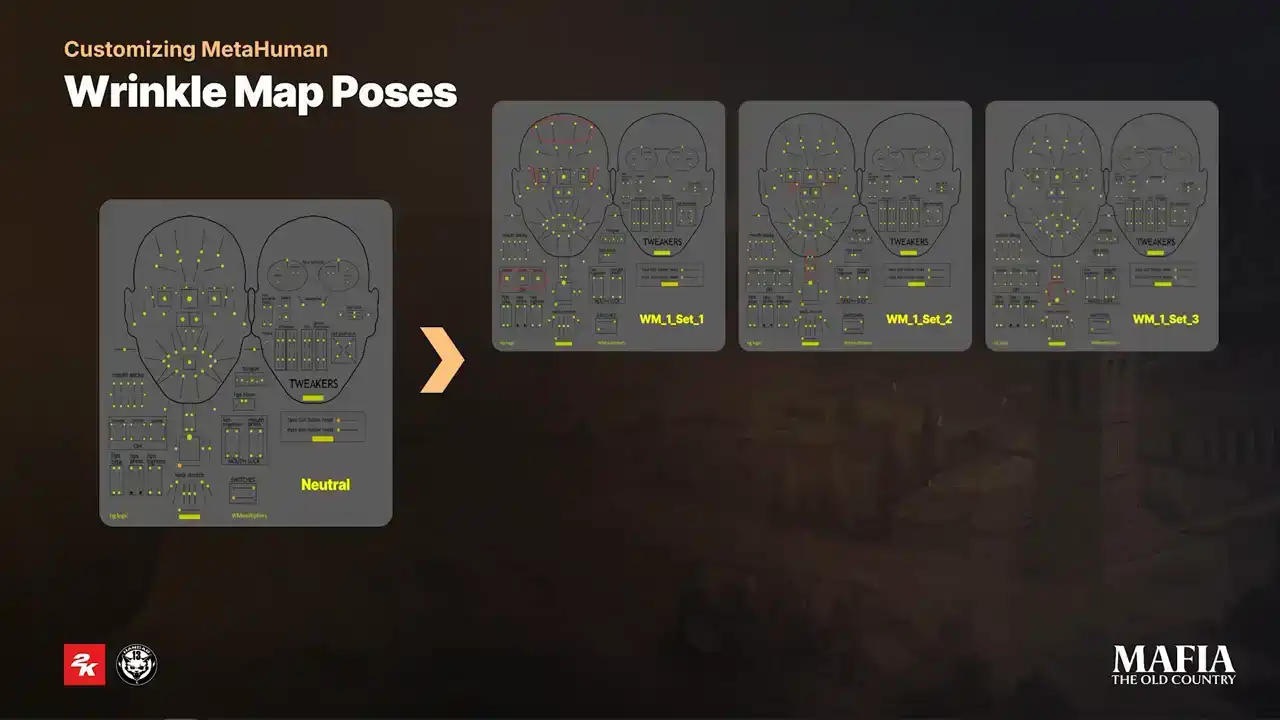
For WrinkleMap1, since its combination of multiple overlapping expressions, it was necessary to bake three separated sets. Those bake results were then automatically combined into a single texture inside Substance Designer. For WrinkleMap2 and 3, the process was straightforward.
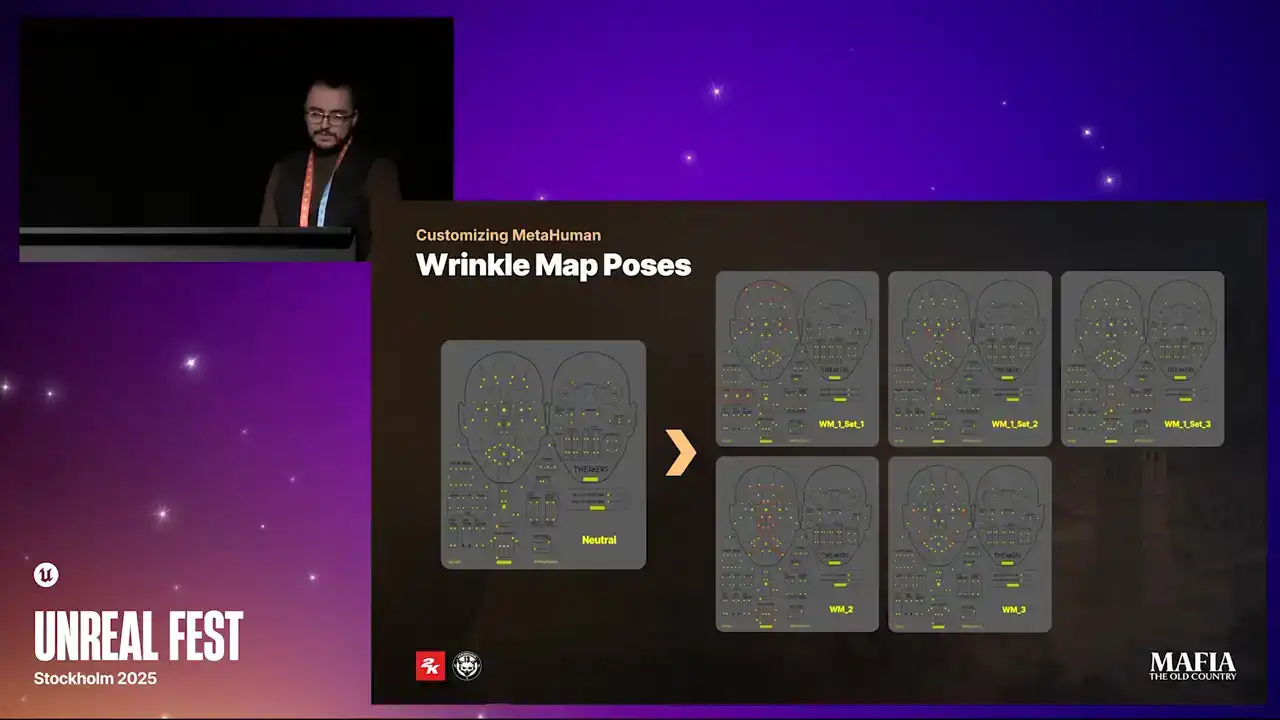
In those cases, there was no need for multiple sets.
As I already mentioned, Substance Designer is an important part of our texturing workflow and there are a few key reasons why we made this decision. The first reason is of course automation. For more technical parts, we wanted to avoid manual work as much as possible because of the limited amount of time and with large number of assets, manual steps can easily introduce bugs. Second reason is flexibility and ability to do batch updates. A big part of the functionality evolved during production. New parameters were added frequently, especially for NPCs and optimization. These changes required to re assets multiple times during production And the third reason handling large texture resources For main character assets we had to import a full set of MetaHuman sources.
Some of those came in 8K resolution and most of the graphs also using many texture masks. So Substance Designer really helped us to keep all that manageable,
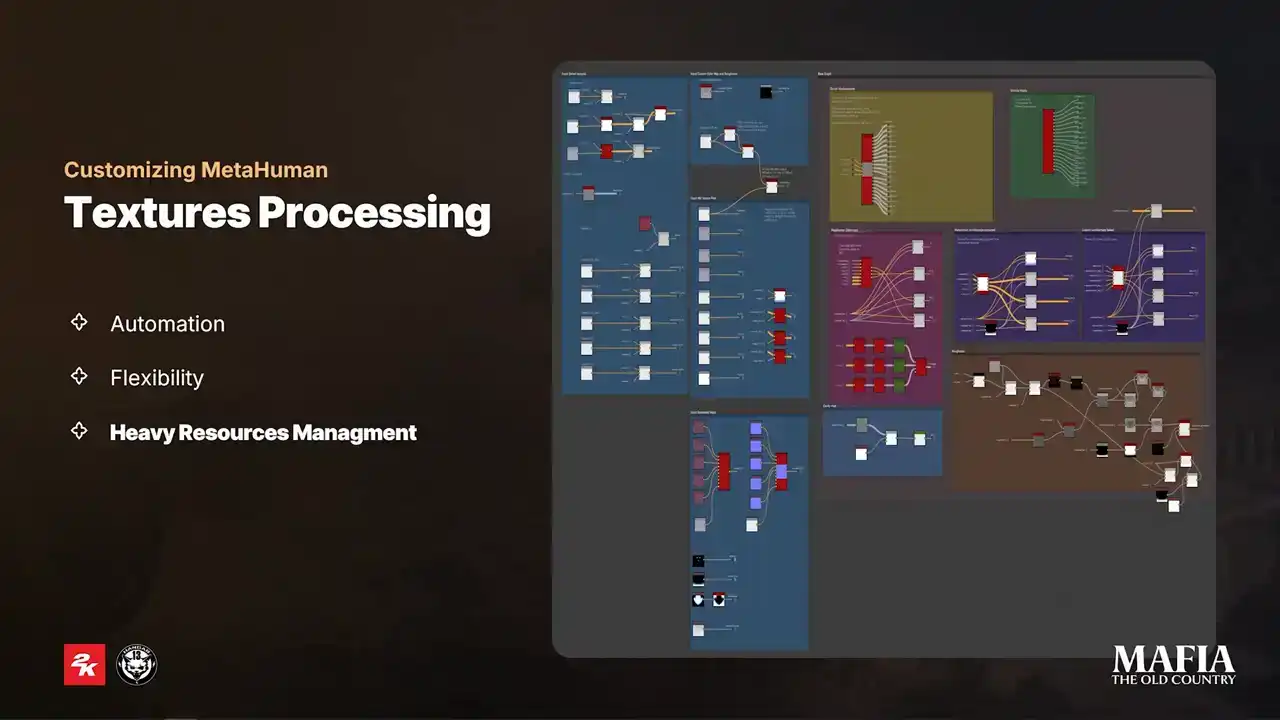
but the setup that we had at the very beginning, as you can see, was a bit maybe over complicated. For regular artists who weren't familiar with Substance Designer, it was really tough to follow. So, for this reason, later on, all of our processing tools were combined into one node, with all small graphs exposed as simple parameters.

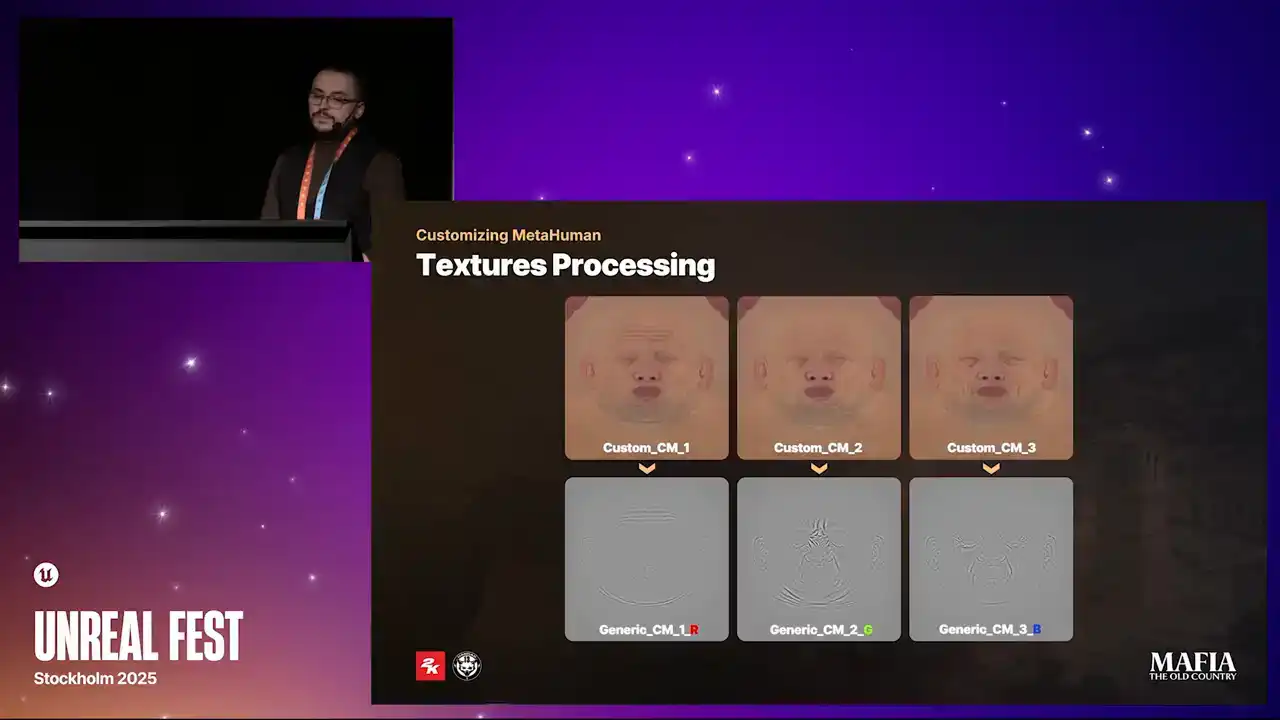
Here you can see four main texture outputs that we baked for scan-based assets. From this stage onward, we were already using MetaHuman LOD1 as our LOD0.

The first texture on the top is AO map. This texture comes from the blend between non-directional AO and green channel of the world space normal map. After multiple experiments in full ambient lighting scenarios, we found that this combination gave us the best result. The second texture is a cavity map. This one we
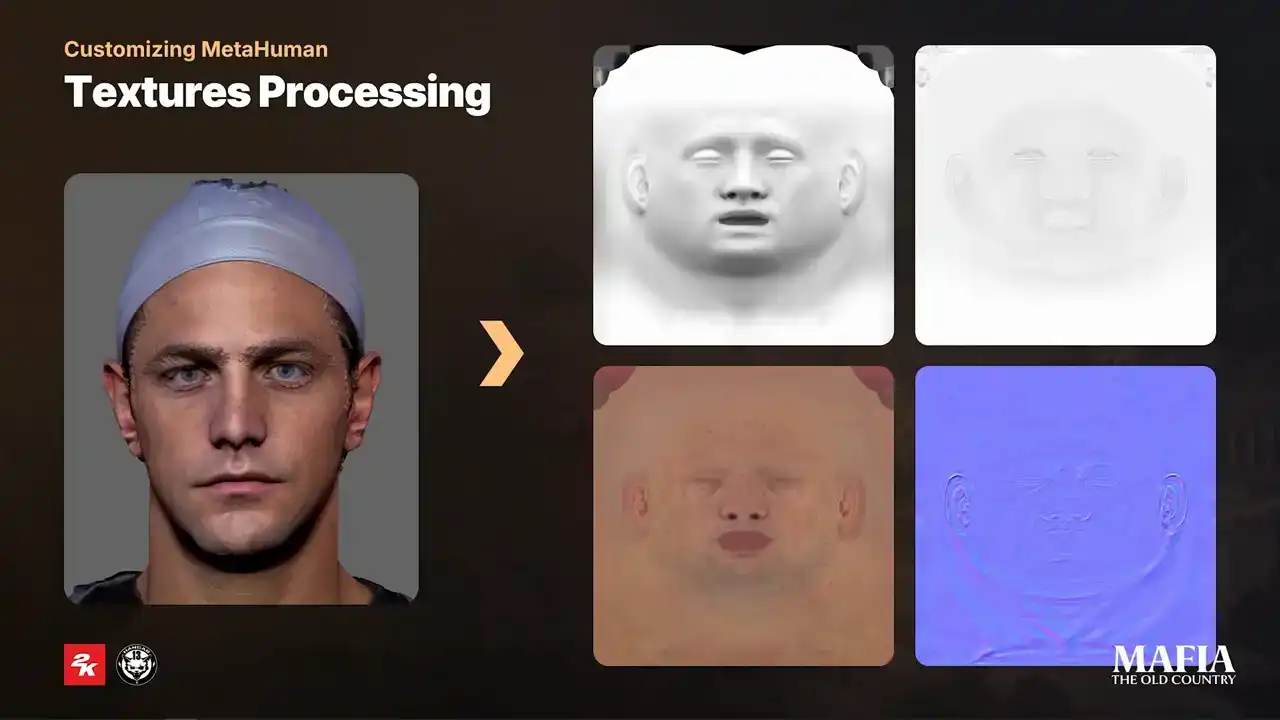
extracted from the final output of the normal map directly in Substance Designer. It turned out to be one of the most important passes for believable specular
breakups. As a good practice we applied a slight inflate deformation in ZBrush over the layer with fine details to give cavity map more flashy organic look.
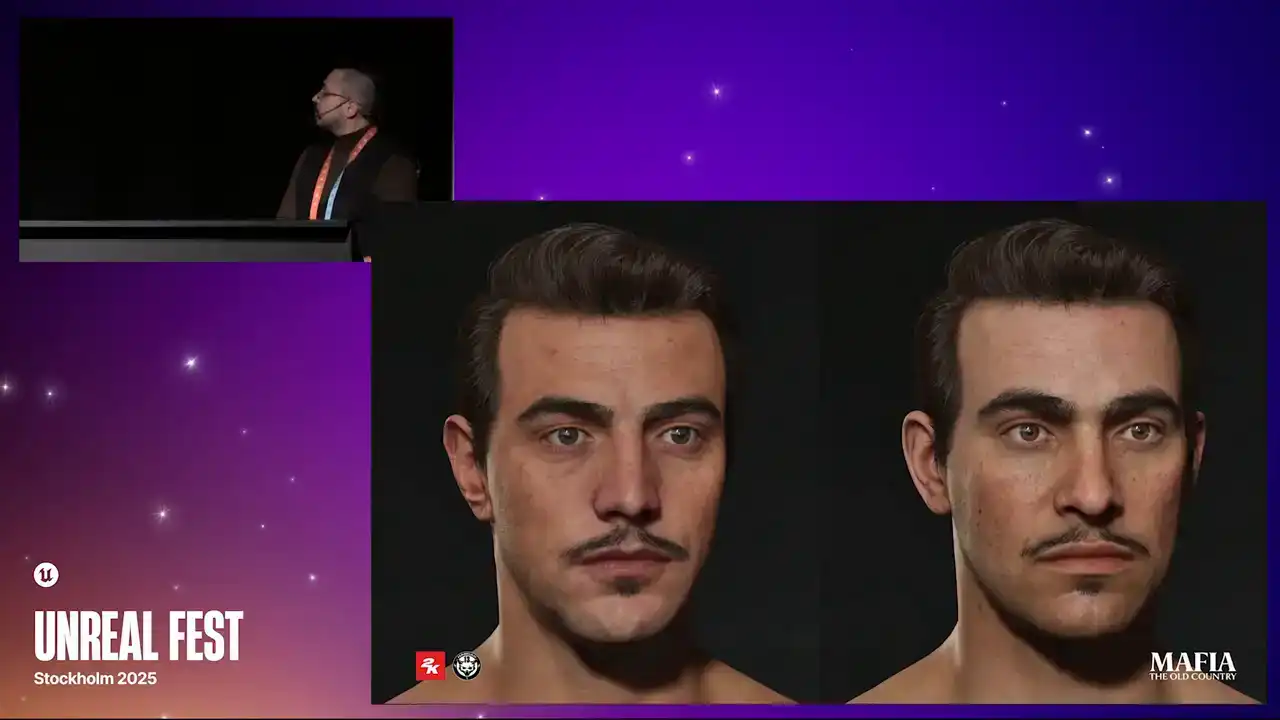
and yeah and the third texture is processed color map and the last one is of course normal map. On this comparison you can notice the difference in the
amount of secondary shapes baked into the texture. The MetaHuman textures looks a bit flatter since a lot of heavy lifting comes from the LOD0 geometry. Here I put comparison between the default MetaHuman color maps and and our custom results, our custom color maps were created by combining the original MetaHuman textures with additional information extracted from the baked wrinkle maps. For NPC characters, instead of using full set of individual textures, we modified shader to use a cheaper blending method.
We created a shared pool of generic wrinkle and color maps, and packed three color maps into a single RGB texture. But this setup was specifically just for the case if some NPC will require to load cinematic LODs for in-game scenarios, NPCs don't use wrinkle or color maps at all.
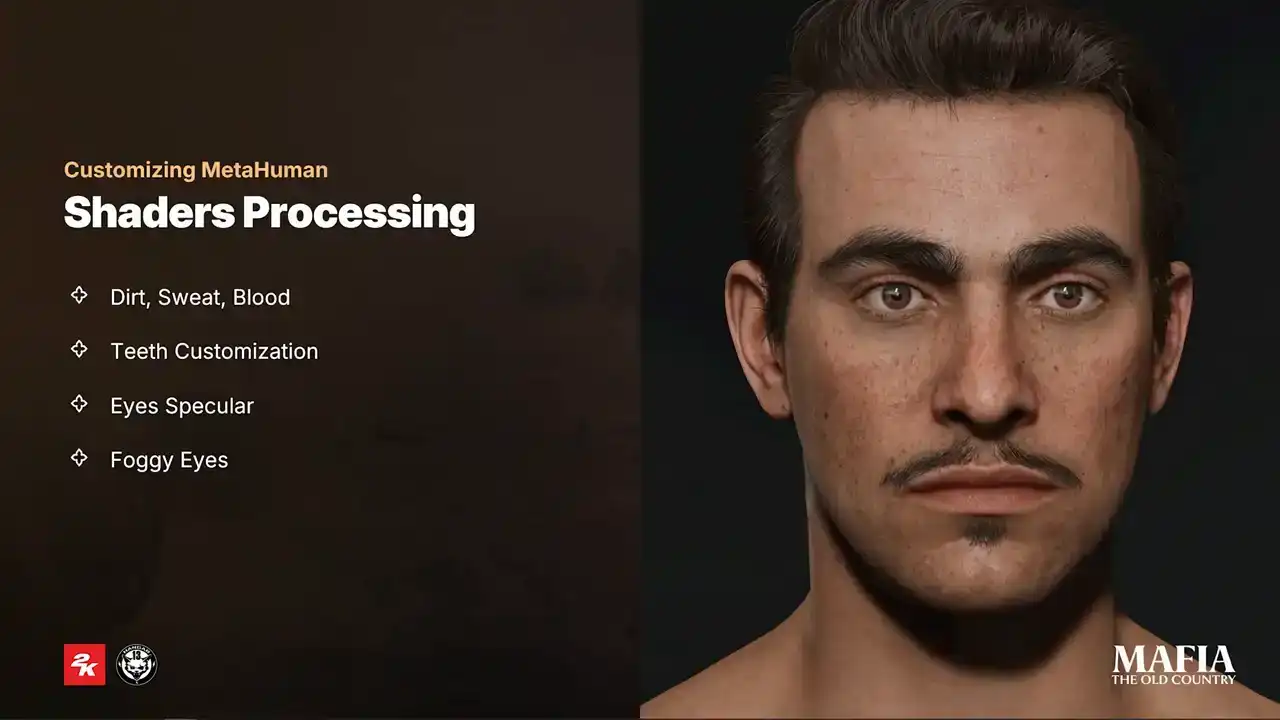
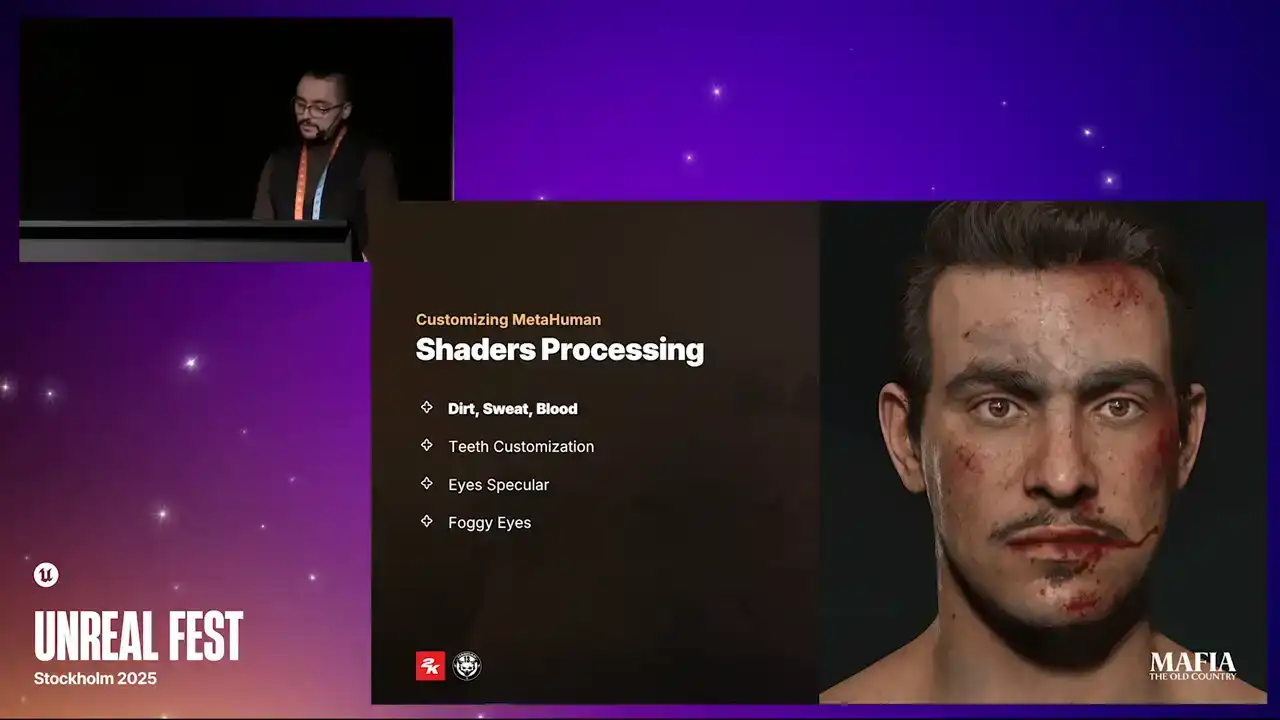
On the shader side, we did an extra optimization pass on all materials and also introduced some additional functionality that was required for our project. And I would like to share with you a couple of changes that we did. During story progression, our character is going through some pretty tough scenarios. To support the impact and to show progression, we introduced cinematic masks for dirt, sweat and blood. In this example, you can see how effects from early events remain visible and continue to overlap with effects from the new events. All of the masks were packed into the texture arrays and could be activated with a simple
selector slider. To better emphasize each character's in-game role,
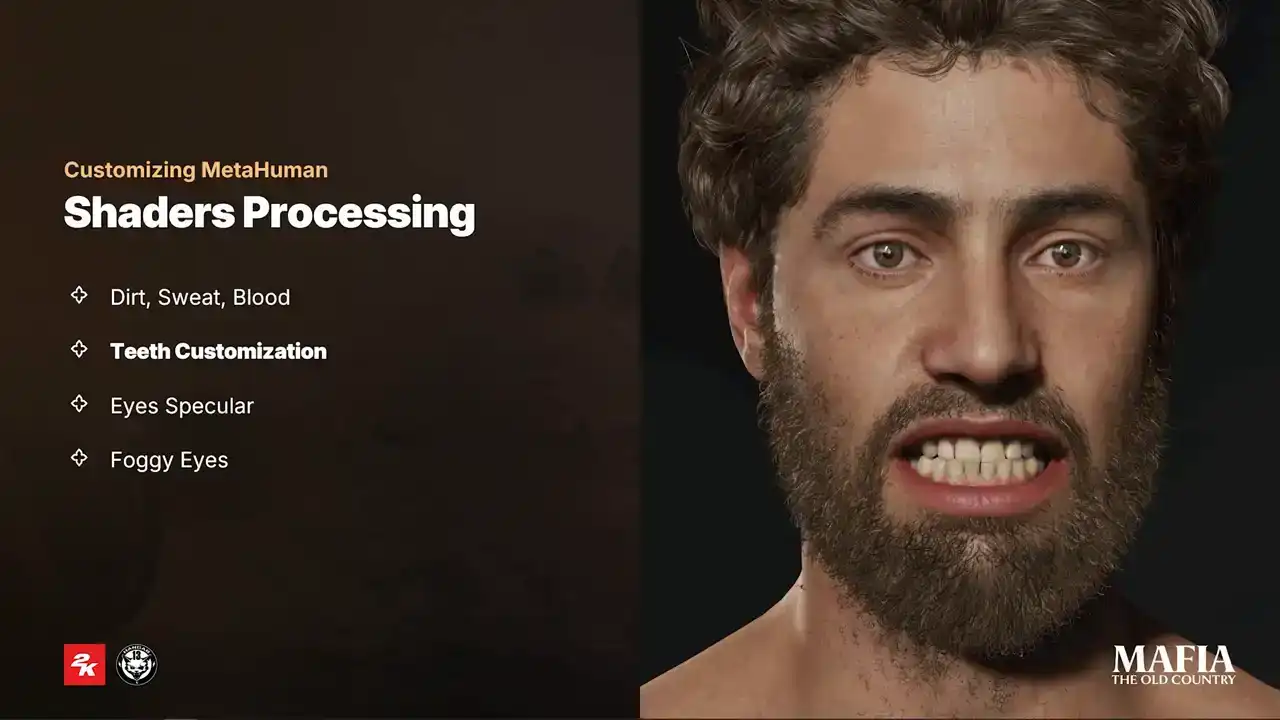
we also introduced multiple presets of teeth variations. For teeth color variations, we use simple one-channel masks. And for random scale or damage, we use the world position offset in combination with mask. This one of those tiny details that only a small amount

of players will notice, but when they do, it leaves a good impression.
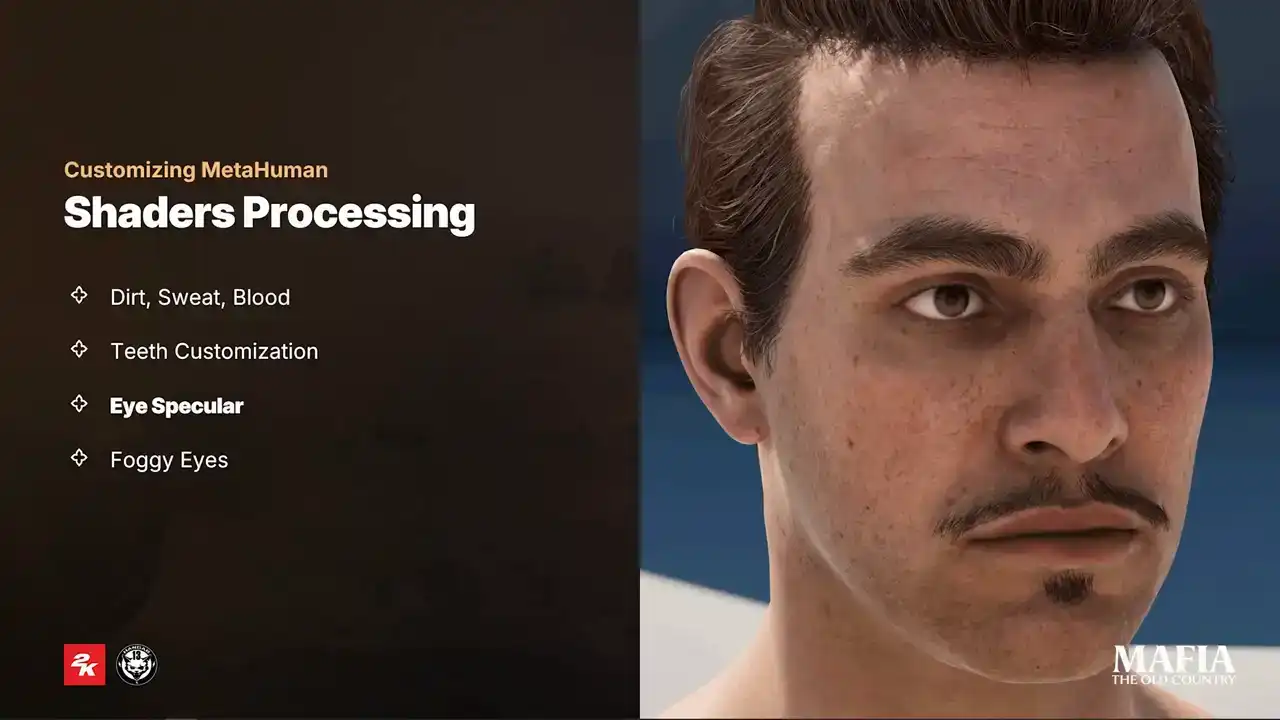
And the next adjustment we did is improvement over eye specular. It's quite common that because of the limitations of in-game lighting,
it's hard to achieve believable look for the eyes. And this becomes even more complicated under ambient lighting conditions. For that reason, we introduced a simple fake specular for the eye shader. It's basically a camera-aligned reflection vector combined with a texture, and we kept the option to adjust or even replace it for cinematic scenarios. The second challenge that we had with eyes is related to fog and occlusion mesh. This mesh is used for additional ambient occlusion and smoothing transition between the eyelid and the eyeball. Both effects were originally handled by a single shader with translucent blending method, but because of the complexity of the implementation, In this simulation we started to see some unpredictable shading behavior, for example glowing eyes in foggy scenes.
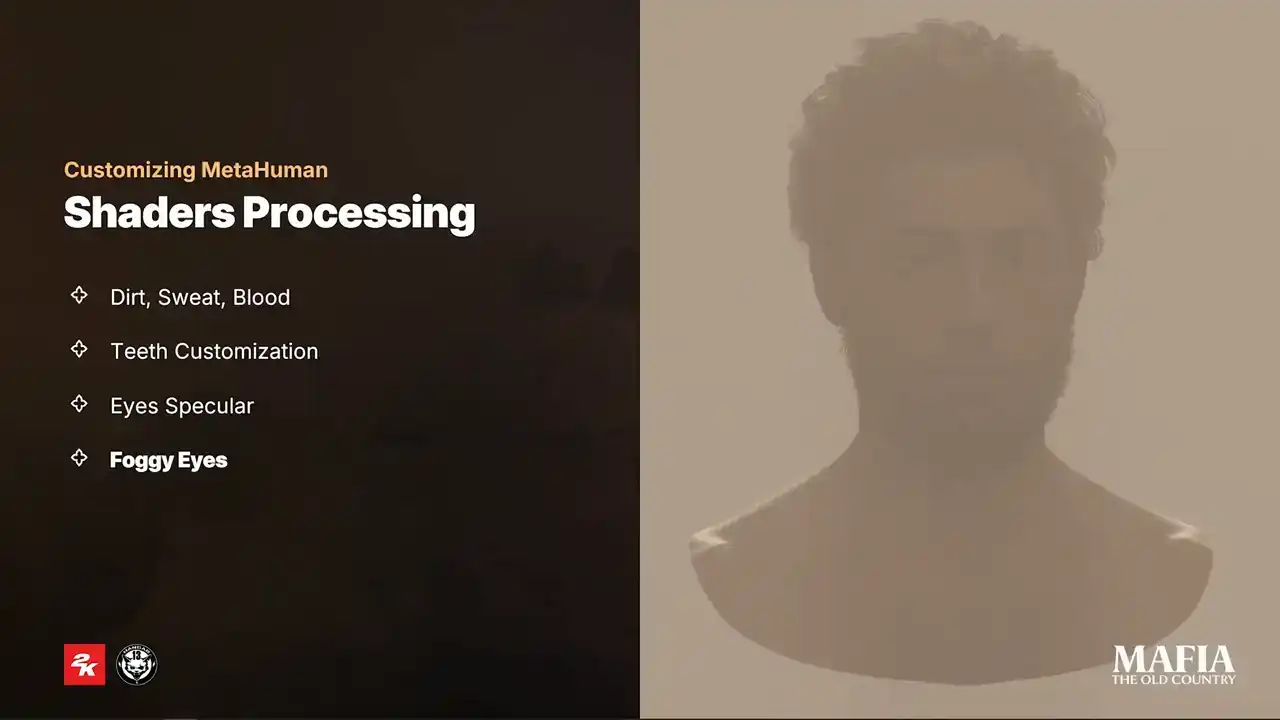
After multiple experiments our solution was to split eyelid transition and eyelid eye occlusion effects into two separated shaders and meshes. For the eyelid transition we kept the translucent blending method with the activated applied fogging. This is the new ash that we named Eye Blur. The occlusion shader we switched to Modulate Blending method instead of Translucent
and kept Apply Fogging active. So as you can see, the result was pretty successful.
Mentioned tweaks are only a few of many that we did during production. and here's a small comparison how character evolves with all changes applied. And here another example.

I want also to show a small comparison between a story character and NPC. The one on the left has custom color and wrinkle maps with all bells and whistles, and the one on the right is an NPC using wrinkle and color maps from generic pool. Of course there are some visible quality differences, but even if this NPC appears in a cutscenes together with main characters,
it still holds up pretty well, I think. Our main characters got the full high poly treatment,
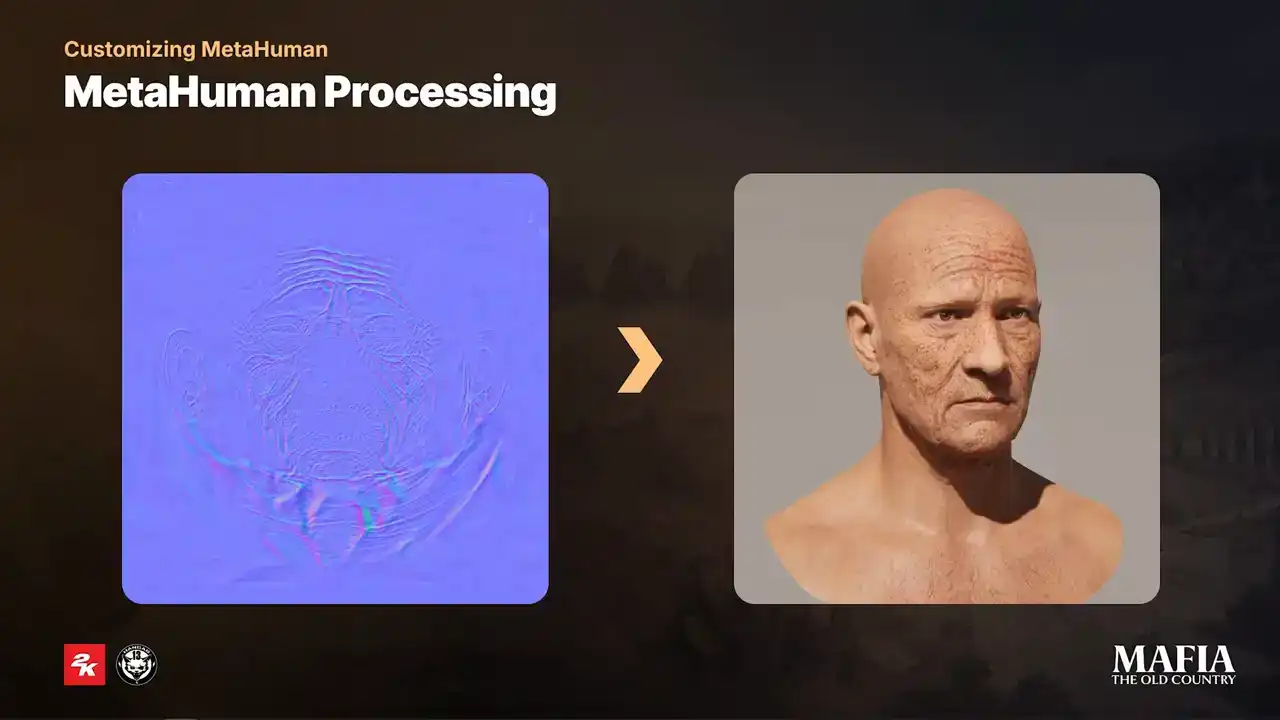
while NPCs were processed only on the level of the low poly mesh. Because of that, we saw quality loss between the LODs not only in expressions, but also in neutral normal map. Instead of baking from high poly,
we baked information directly from LOD0 mesh and then combined it with normal map that comes with metahuman sources.

To get smoother transitions and better shading on the faces at a distance, additionally we baked information from LOD0 to the last LOD. For this purpose we used just a small texture 256 by 256. And now a couple of words about the MetaHuman optimization that we did.

And the first one, yeah, we used only four LODs in total. MetaHuman LOD1 became our default LOD0, and LOD6 was used as the lowest LODs, which joins removes in further stages. Next, we implemented an additional LOD system, which dynamically shifted LOD distance based on the number of characters on the screen per specific mission. Third, toggling post-process and aggressive switching to leader pose on lower LODs. We also introduced our custom tick batching on the game thread. And the last one, we used Half-Res subsurface scattering for in-game scenarios. there was a slight quality drop for con but for consoles it was essential to say some performance and here a couple of more beauty shots of our main characters
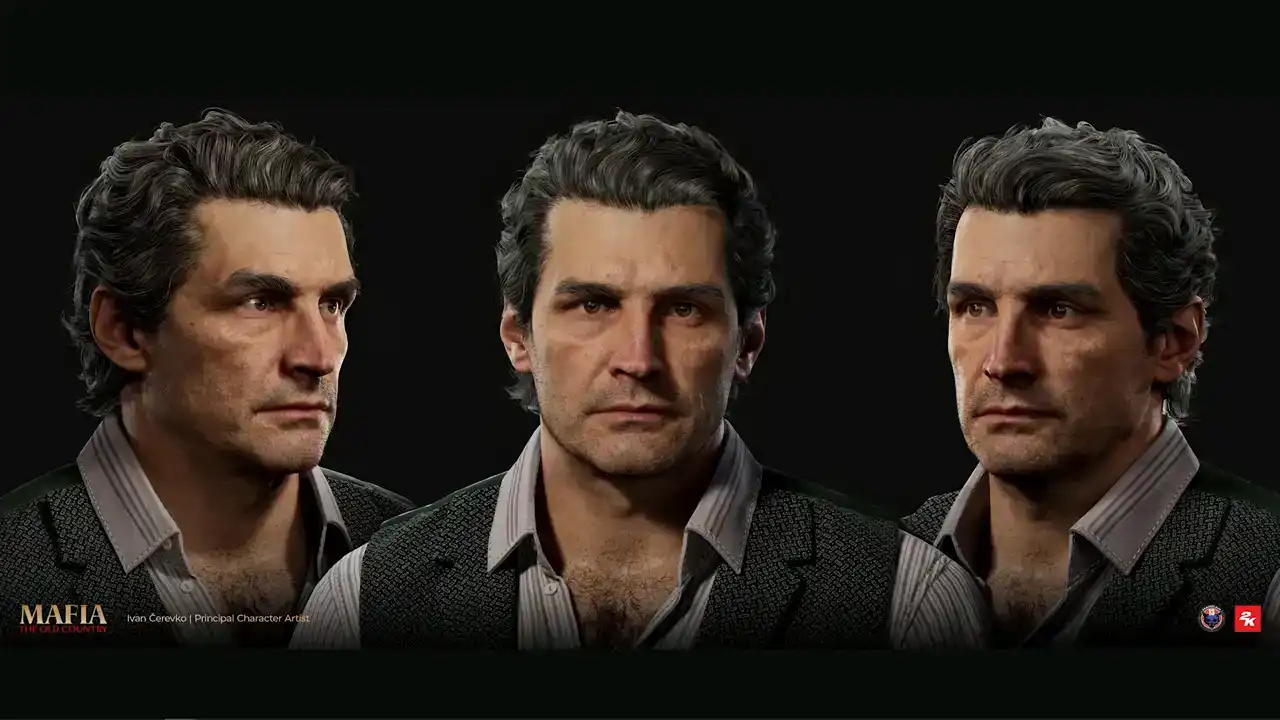
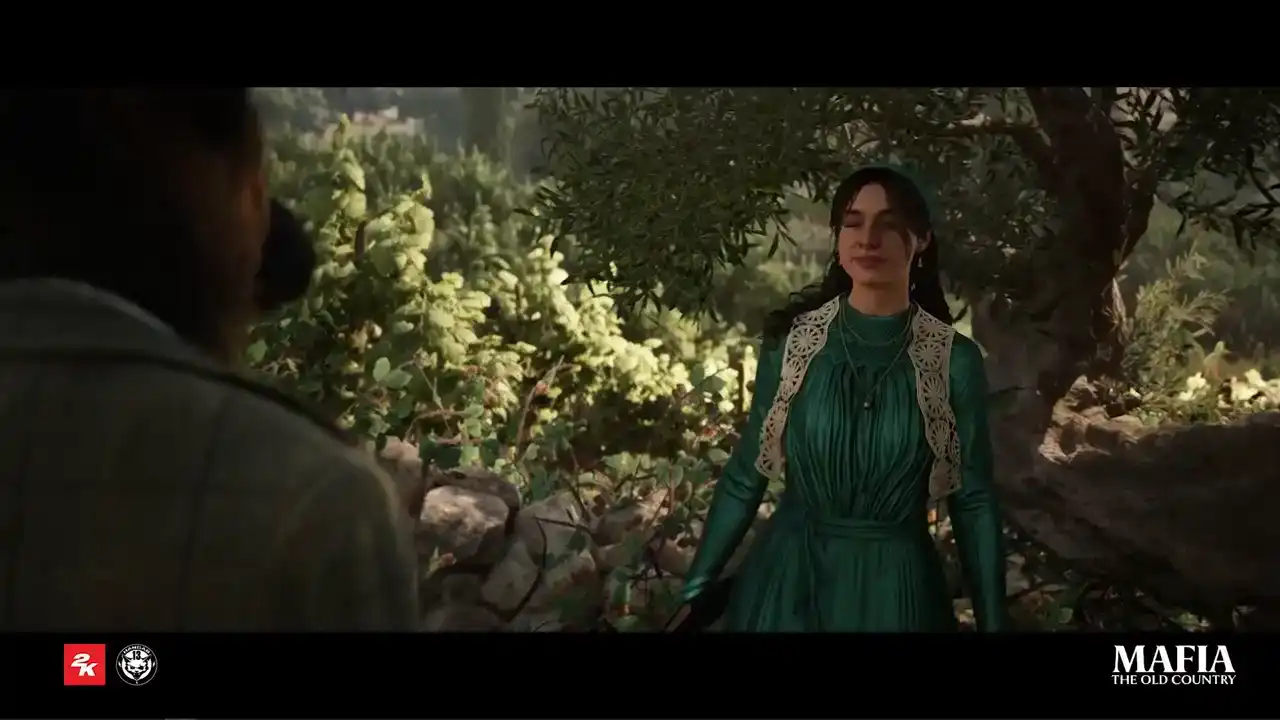
so this is our hero and Zofavara don't tourism Isabella tourism don galante and and Luca Trapani, friend and mentor of our main hero.

Here's some close-up shots from the engine. And now we got to the essential question.

To groom or not to groom? It was one of the first questions we faced at the beginning of the project,
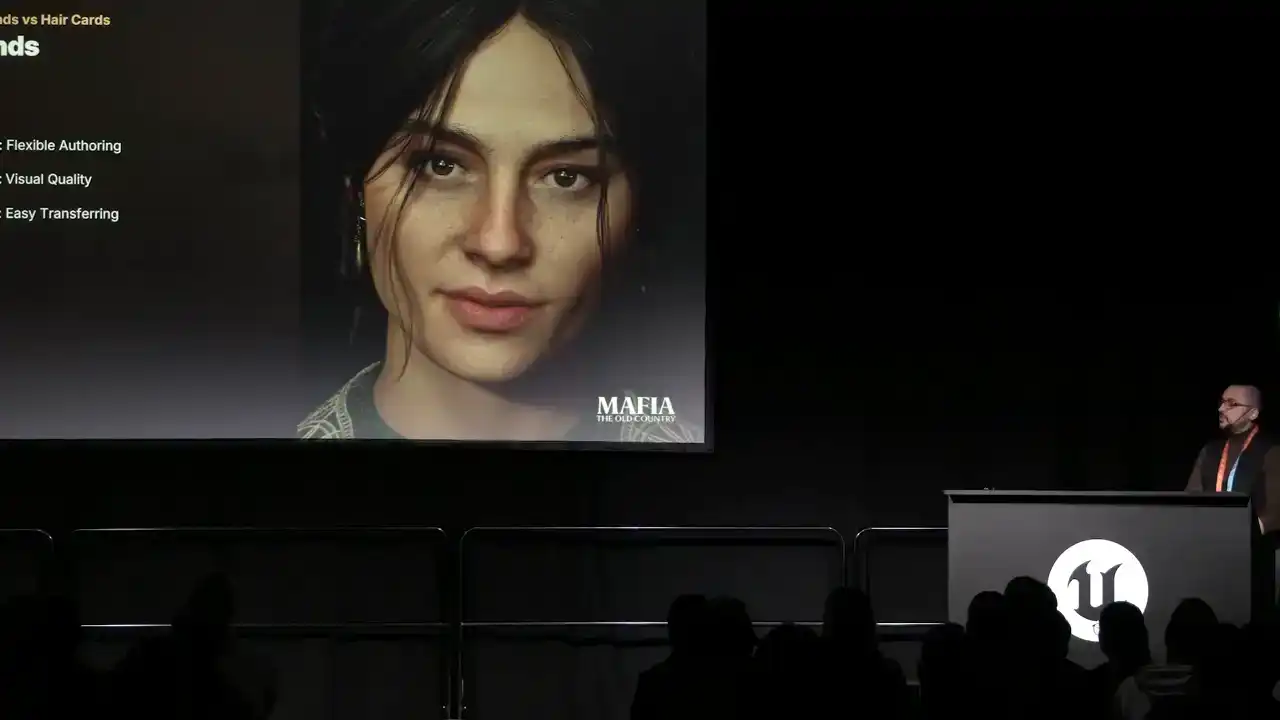
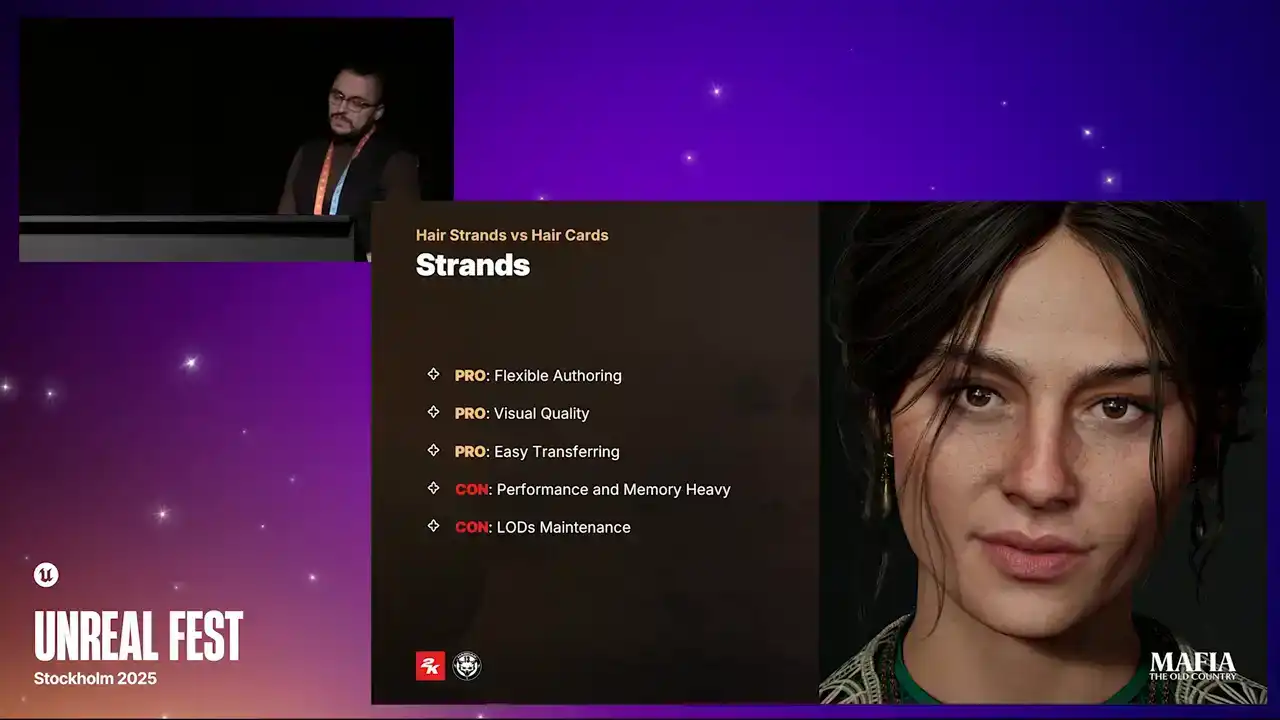
and it's also one of the questions I hear quite often from other game developers. So let's start with a quick comparison between strength-based system and card-based system. I will start with the pros of the strength-based system.
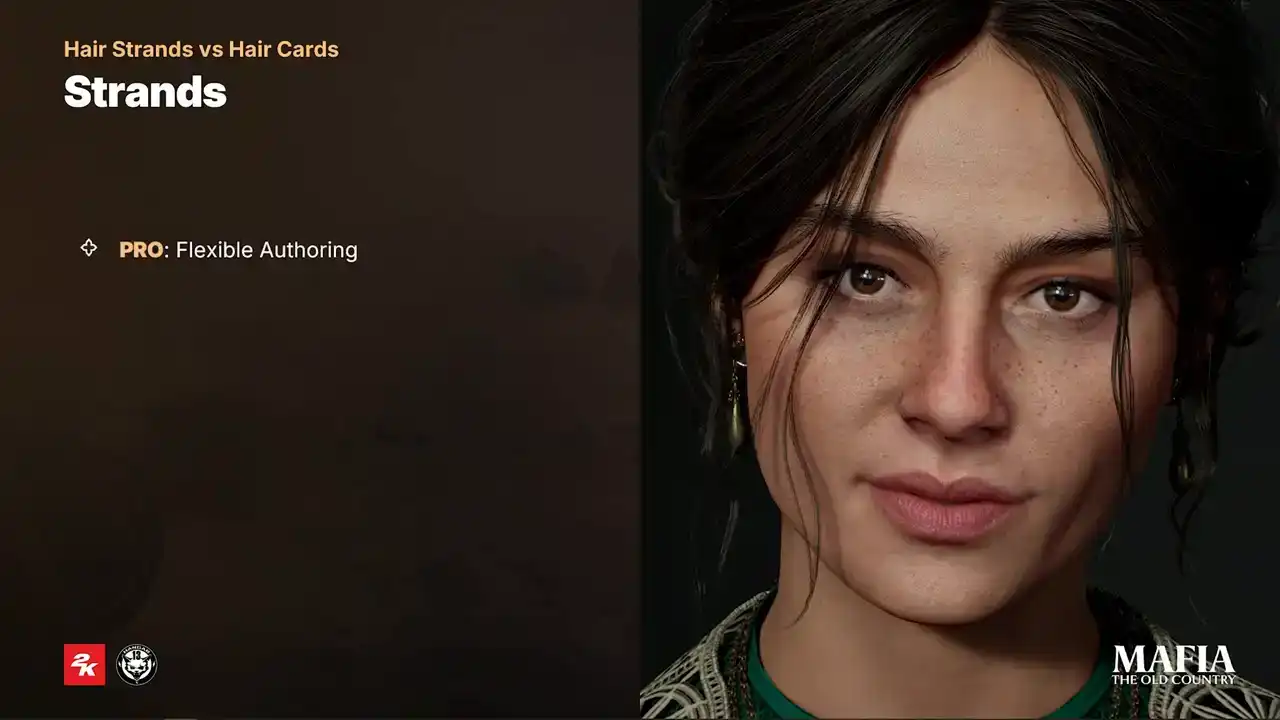
So first one is a flexible altering. Strengths are more iterations and artistic friendly. friendly. It's much easier to prevent situations when during the iterations artists spends more time on technical fixes instead of focusing on the

creative side. The second pro of course higher visual fidelity. Strength based hair give us more realistic hair specular, strength thickness, shadowing, line transmissions etc The third pro is easy transferring and runtime binding in Unreal Engine polygrooms thanks to binding assets are much easier to adapt across multiple assets
even when the geometry varies a lot. But of course, there are also some cons, and let's take a look on them. So, first one, performance and memory cost.
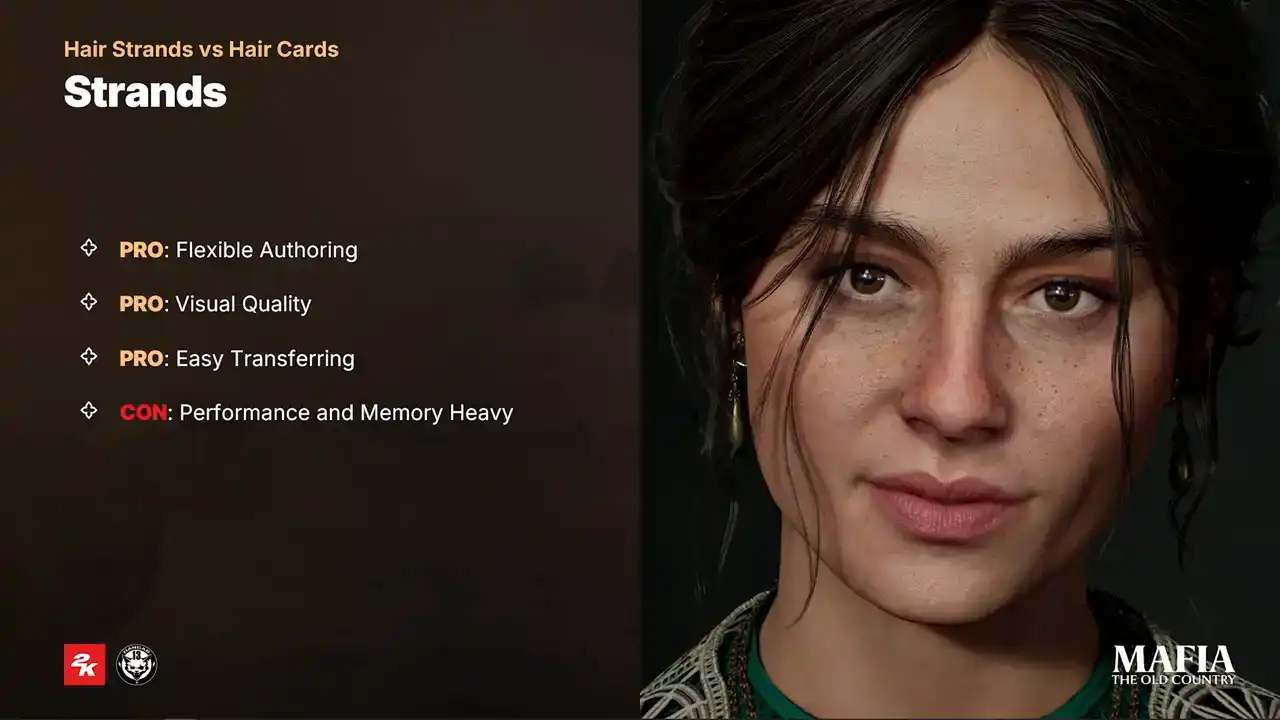
Strand-based hair is expensive to render. It requires advanced shading, and that can drop frame rates significantly,
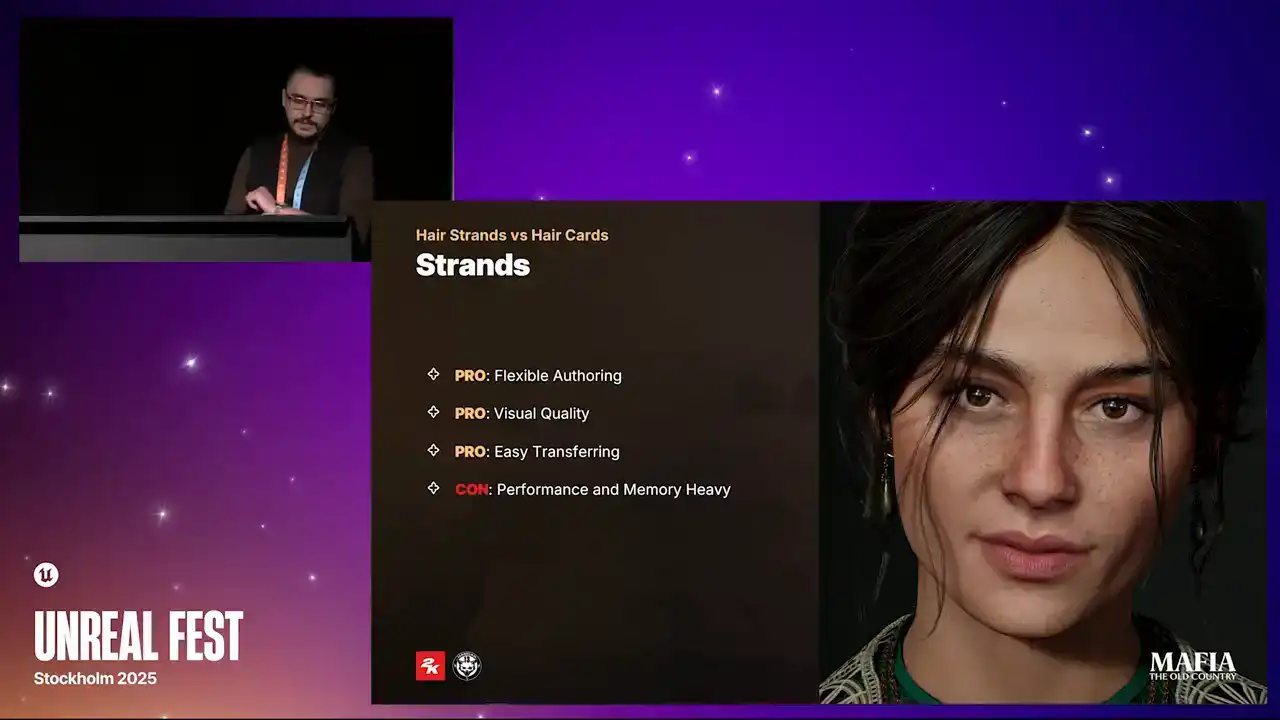
especially on low-end hardware. Also memory consumption from complex haircuts can grow exponentially and on top of that we have binding assets complexity which also connected to Groom assets.

The second one is loss maintains. Groom assets have strong tools for

controlling LODs but in practice for in-game scenarios especially on consoles and load low end PCs we still need cards based version of the haircut and tricky part is to prevent visible quality drop between strands and cards and
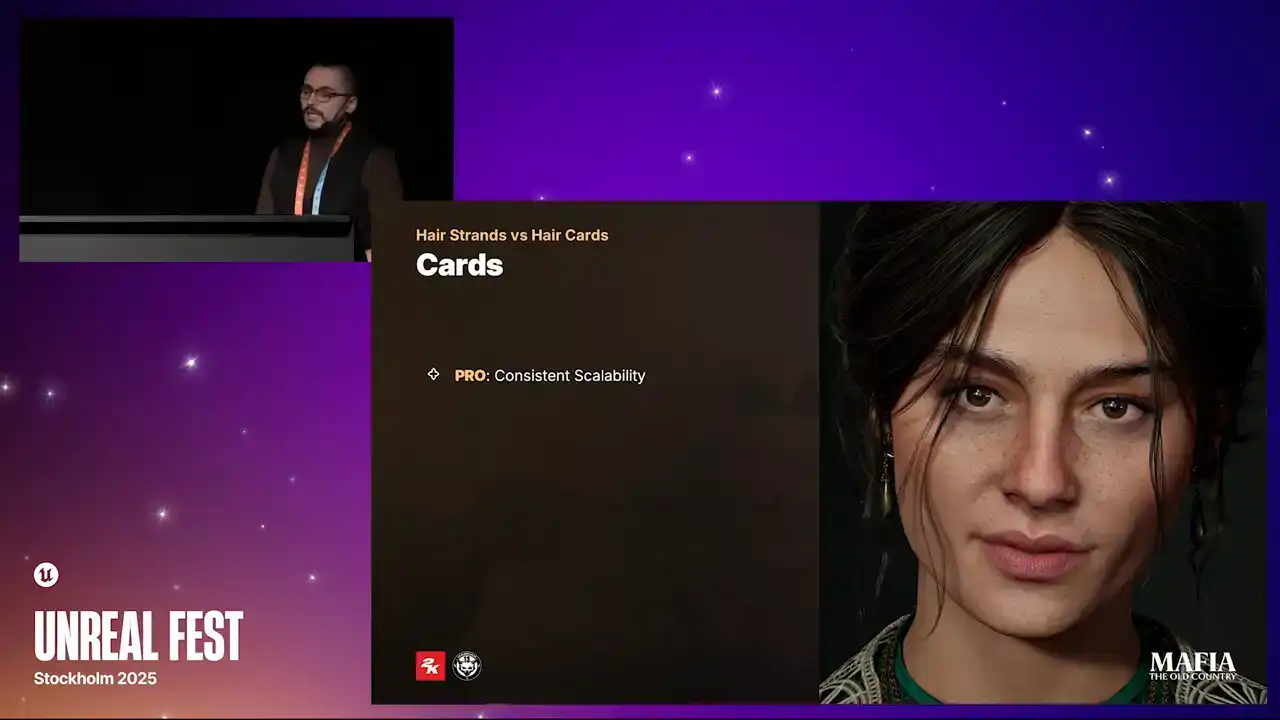
in many cases that almost means building the haircut twice once with strands once with cards which can extend production time a lot so now quick overview overview about card system and I will start with pros so first one of
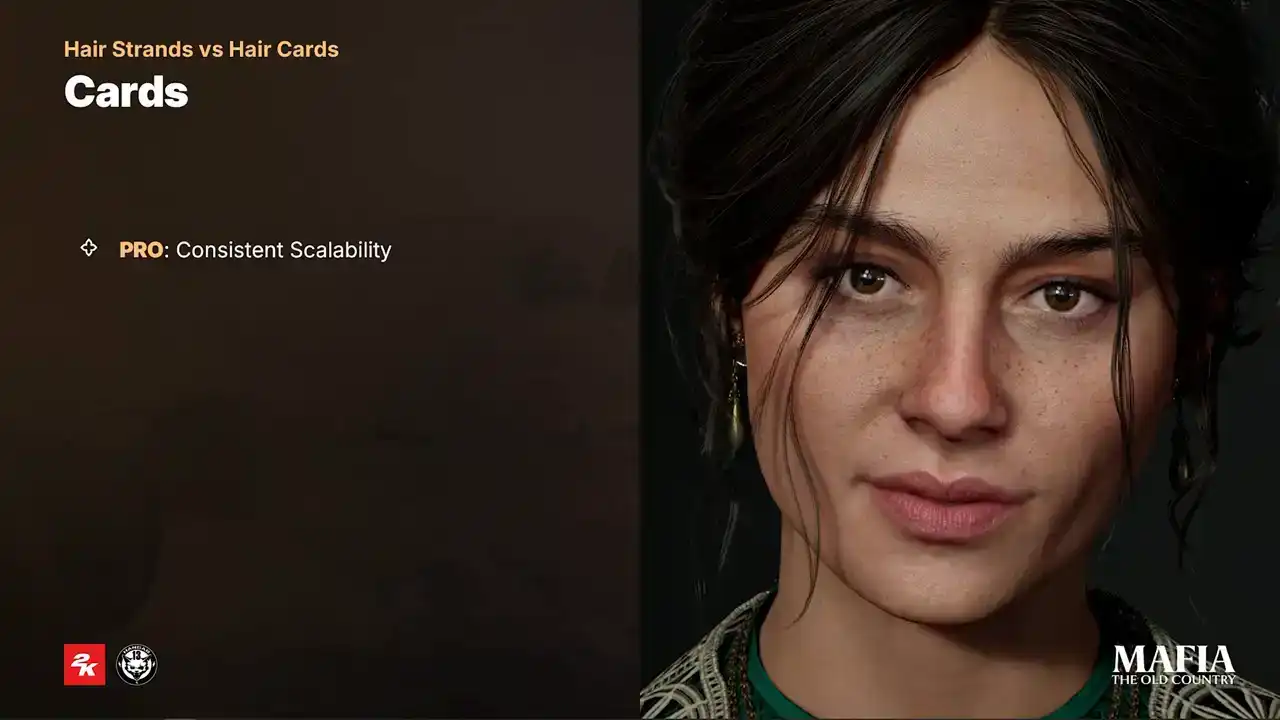
Of course, consistent scalability instead of automated strand decimation across whole asset as it is with strands.
Artists can choose exactly which clamps remain at distance to preserve silhouette. Stronger optimization can be also applied on the individual pieces like, for example, inner layers of the haircut. Second pro is modularity. Swapping modular hats or outfits is much smoother with cars since they are rigid meshes.
And when it comes to clips, ribbons or braids, this also works better with rigid clumps.
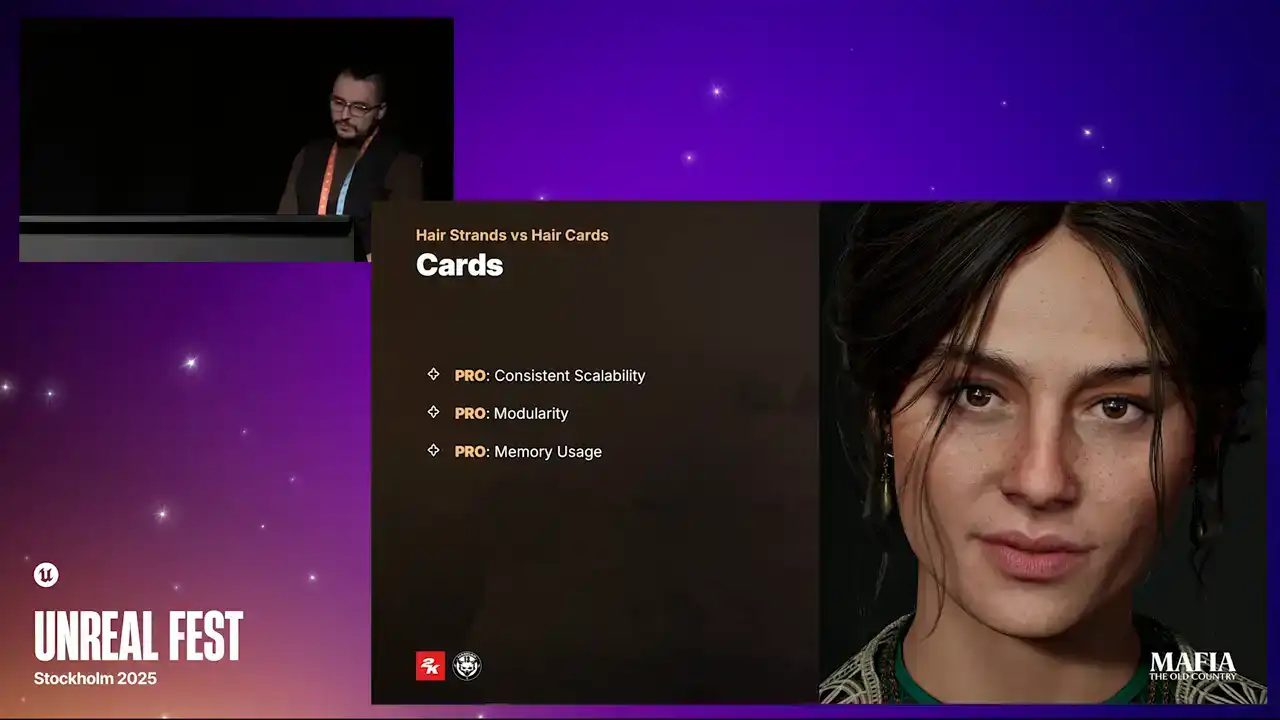
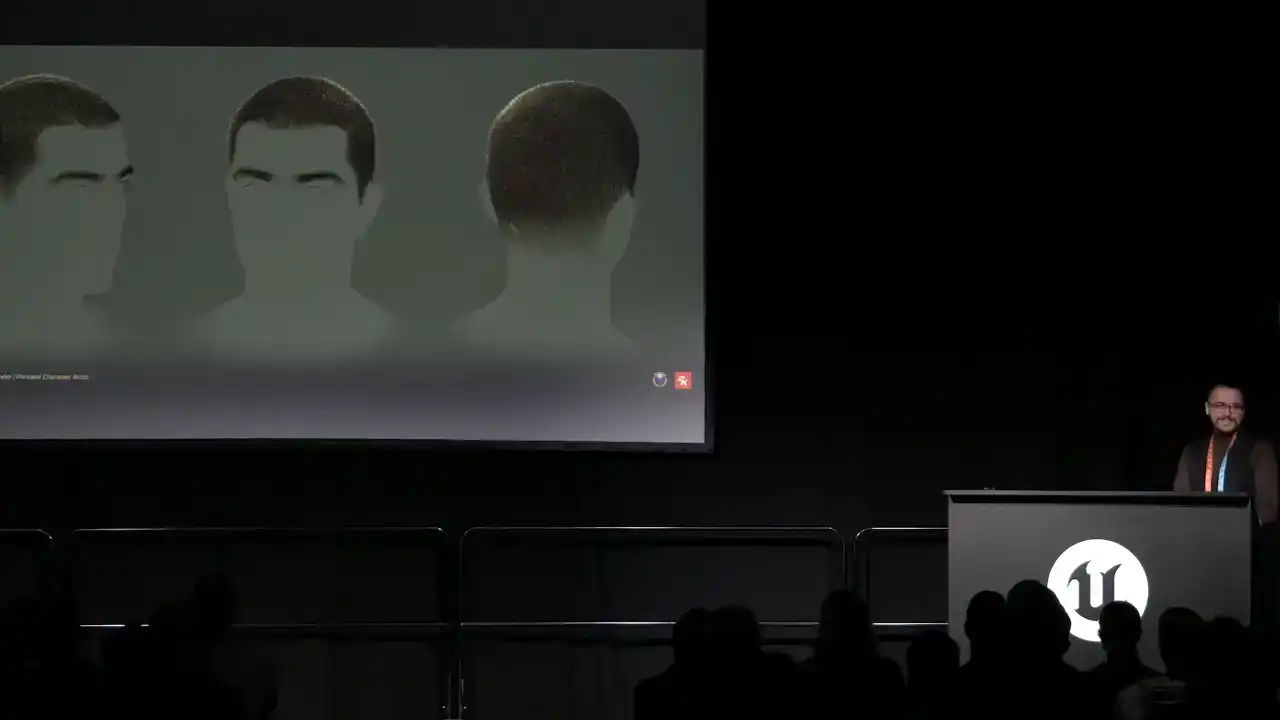
And the third pro is of course memory usage. Card-based meshes have much more predictable memory footprint. And here are the cons. And the first one, and probably the worst one, is long iteration time. Card still requires a lot of manual work.
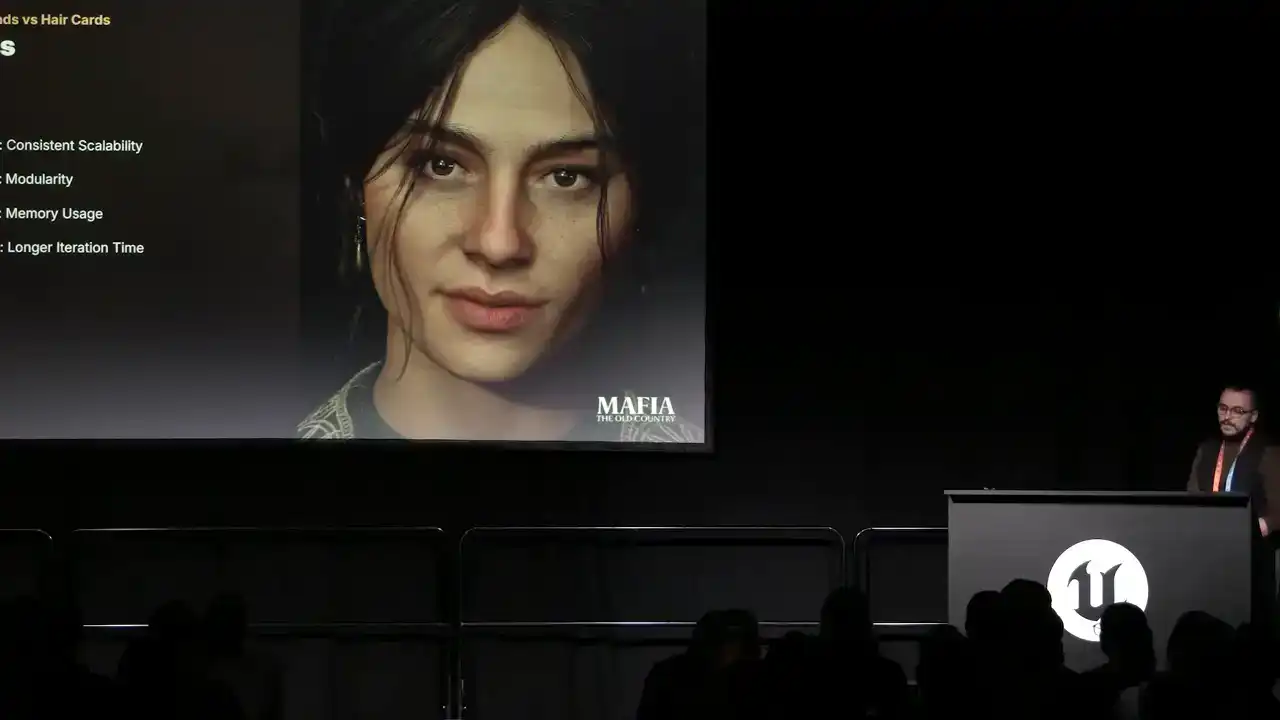
Not that long ago we were using maybe 10 to 20 thousand triangles for in-game hair. Now it's common for hero hair to go up around 100 thousand triangles. If the pipeline isn't flexible and we try to build the hair the old-school way,
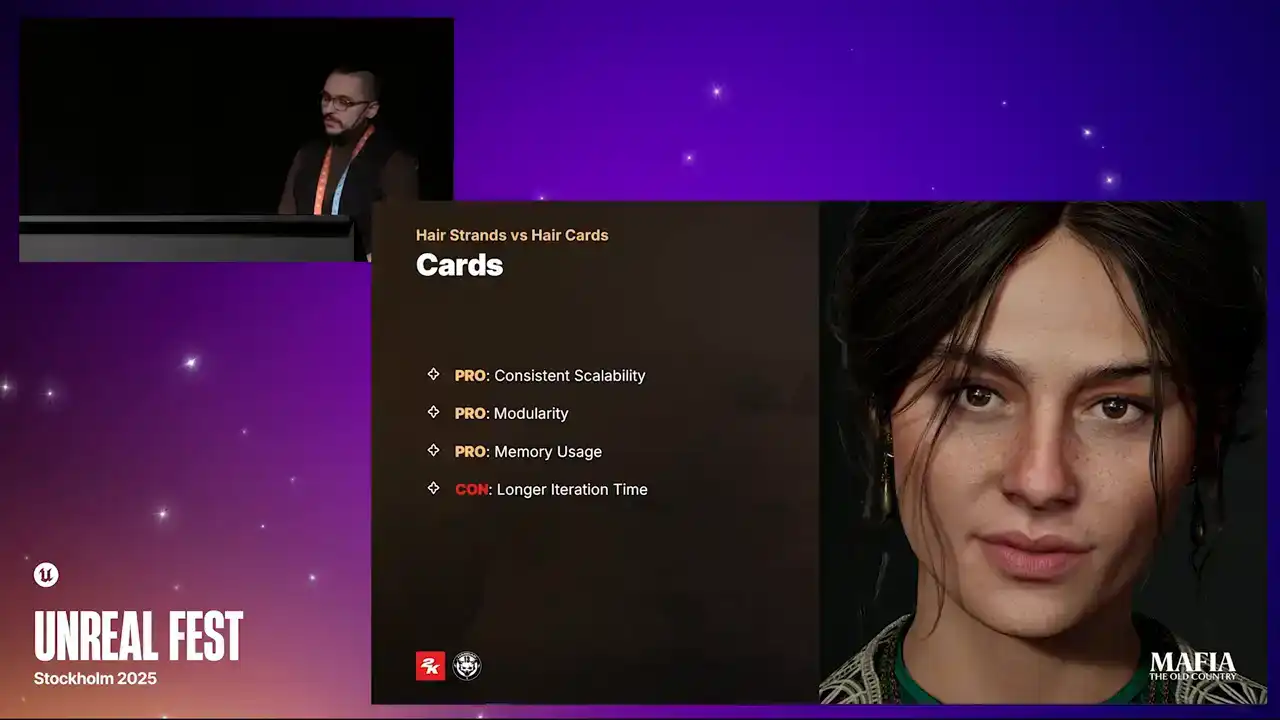
every feedback loop, every iteration can turn into never-ending nightmare for the artist, when five minutes of visual tweaks can introduce 30 minutes of technical fixes.
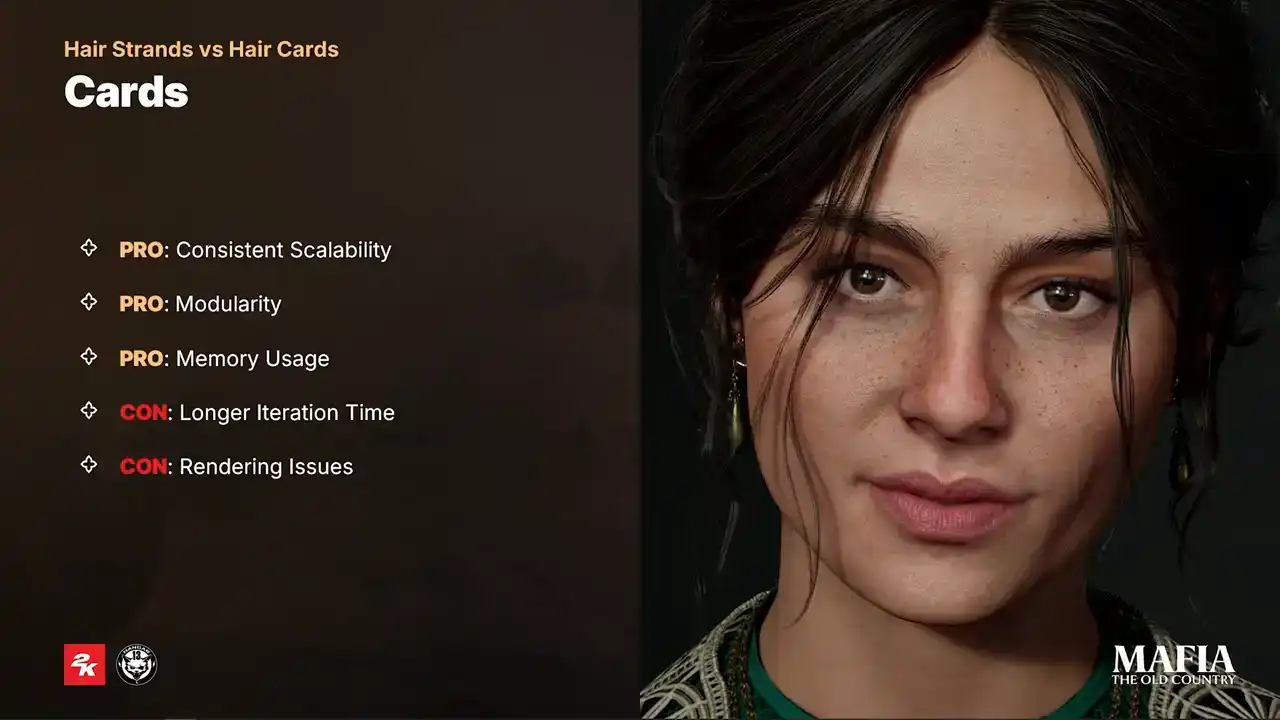
And the second one is rendering issues. It's much harder to achieve realistic shading with cards, and on top of that we still face problems with alpha-dealer and unpredictable hair shadowing.
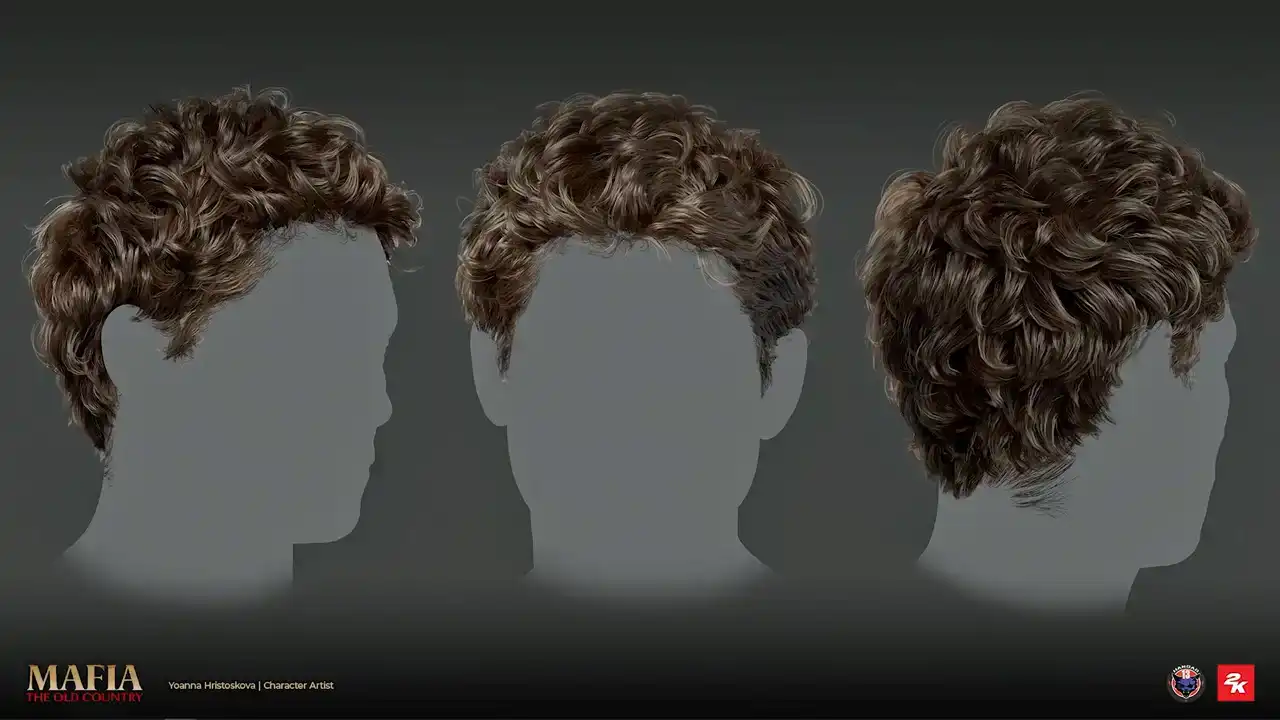
For our project we decided to take some aspects from high poly hair creation so that we could stay flexible with higher poly count numbers. And we also used Groom Assets in Unreal Engine to take the advantage of automated binding, which allows us to create a wider pool of variety of the characters.
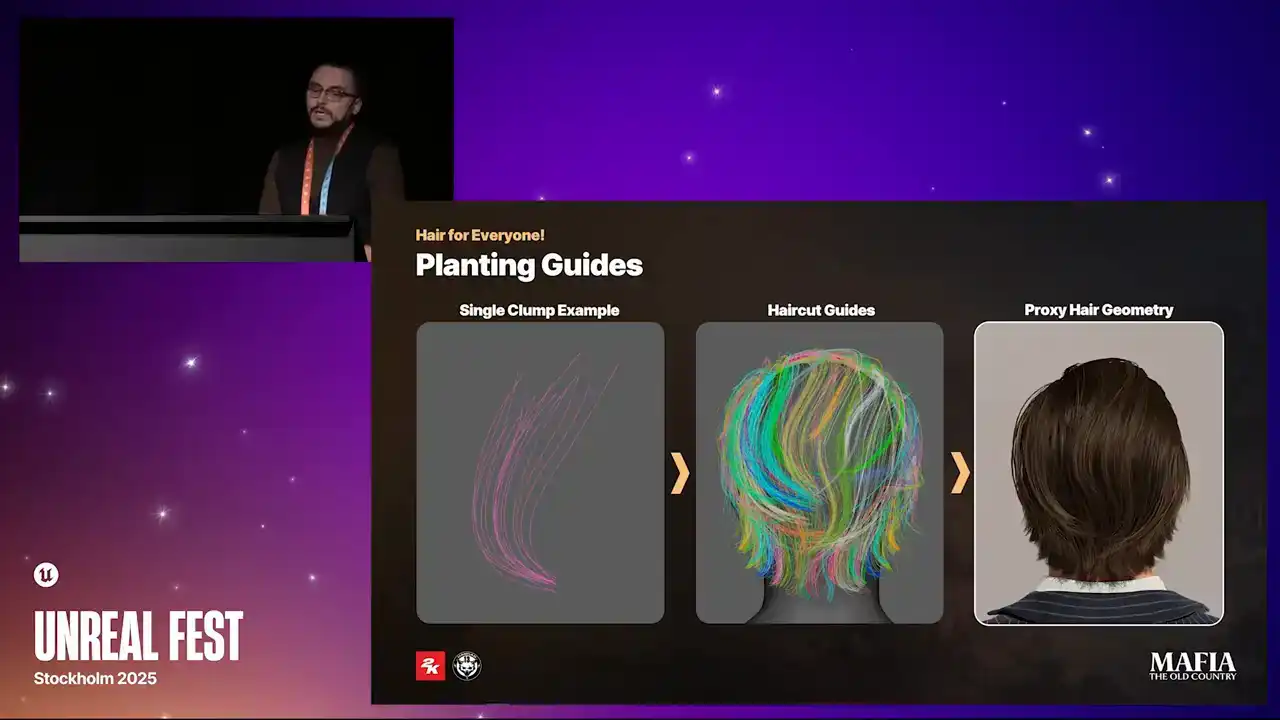
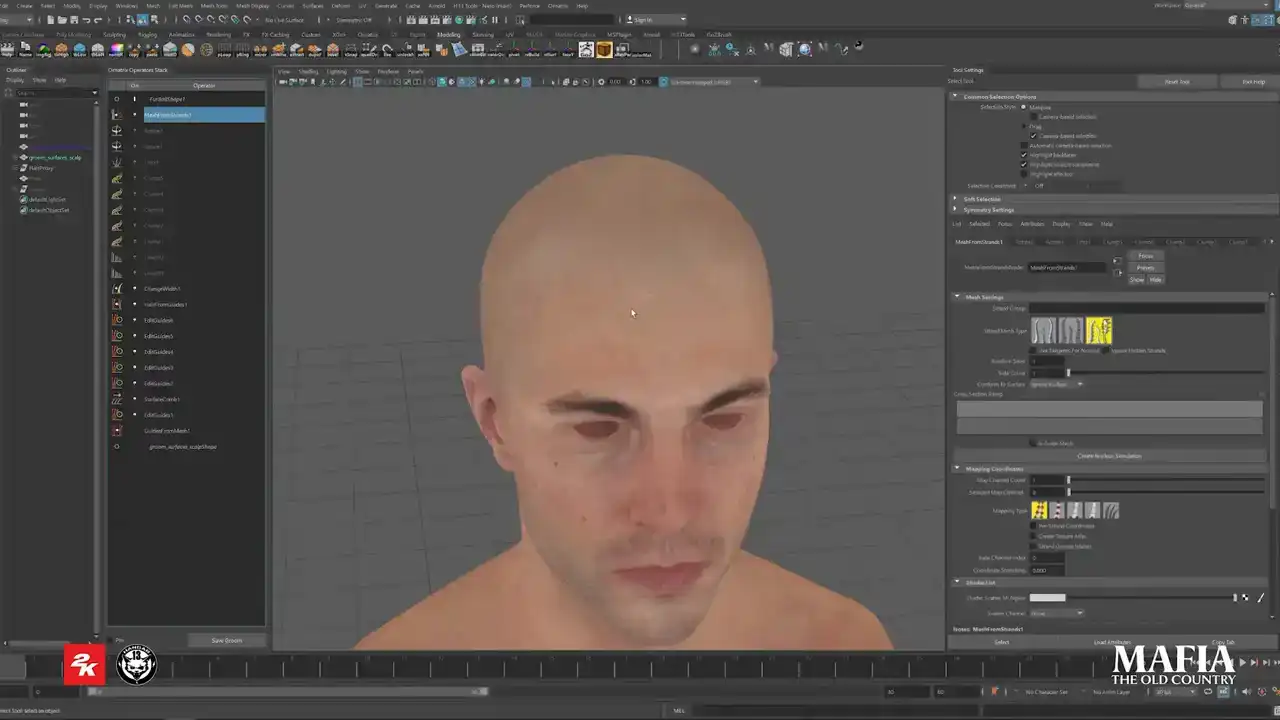
And here some brief overview of our process. The first stage is ZBrush block out. Here we try to solve most of the artistic challenges early on to prevent as much guesswork as possible in the later stages. Next is the hair guides placement. We used Ornatrix for this stage. For main characters the entire haircut was done inside Ornatrix. But for NPCs this step was more an in-between stage just to speed up the initial card's placement. And few words about the card's geometry. So here we see two options, proxy cards and bound cards. For hero haircuts the polycounts are much higher, that means the cards are thinner and we can treat them almost like a high polygroom and take an advantage of all procedural modifiers. For NPCs with their lower poly counts, we need more detailed control over the card placement and rotation. That kind of control could be achieved, for example, with GS curve plugin inside Maya. And the last step is Unreal Engine implementation. For both NPCs and hero assets, the implementation was the same. The only variable that affected our choice was physics. that required physics were implemented as skeletal meshes because Groom Assets physics was simply too expensive for our scenarios. And here a bit of practical part. And I will start with ZBrush block out. Here we mainly focused on solving any missing pieces of puzzle because usually it hard to get a photo or concept of the haircut from every possible angle That also where we establish hair layering volume and the silhouette Usually this stage took us a couple of days.

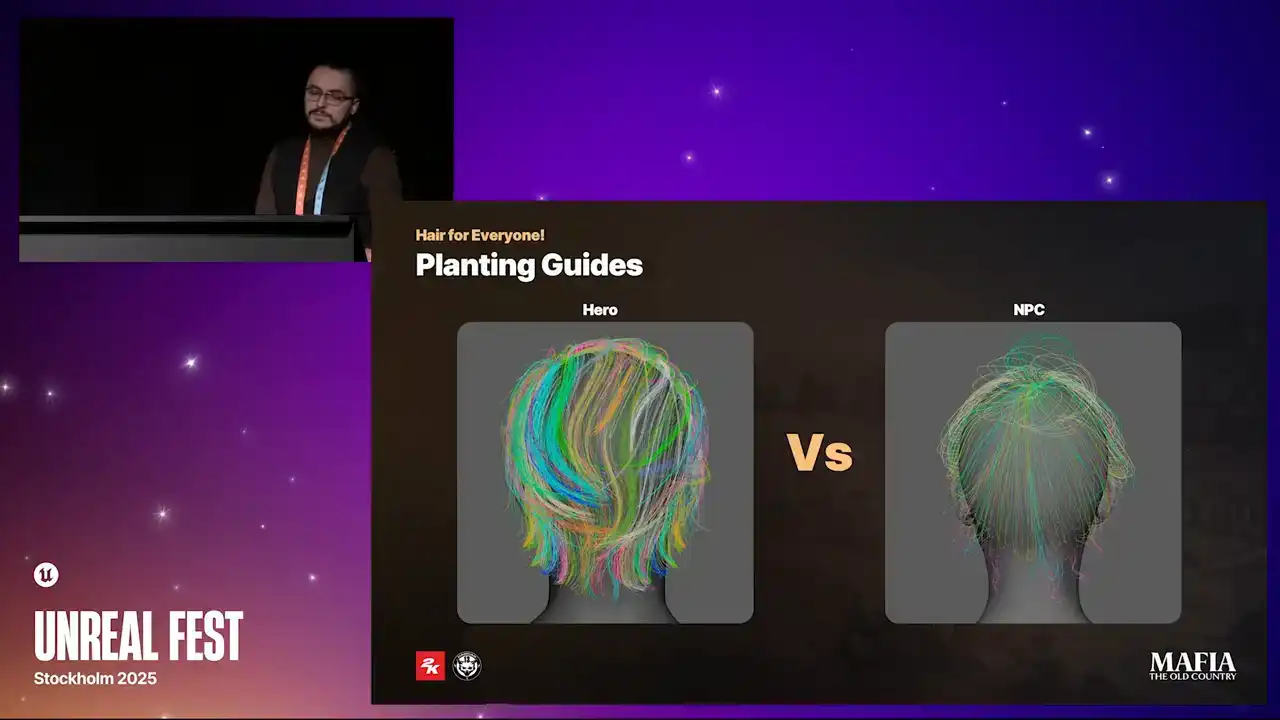
The more we solved, we'd block out the less guessing work we got later. Now a bit about planting guides.
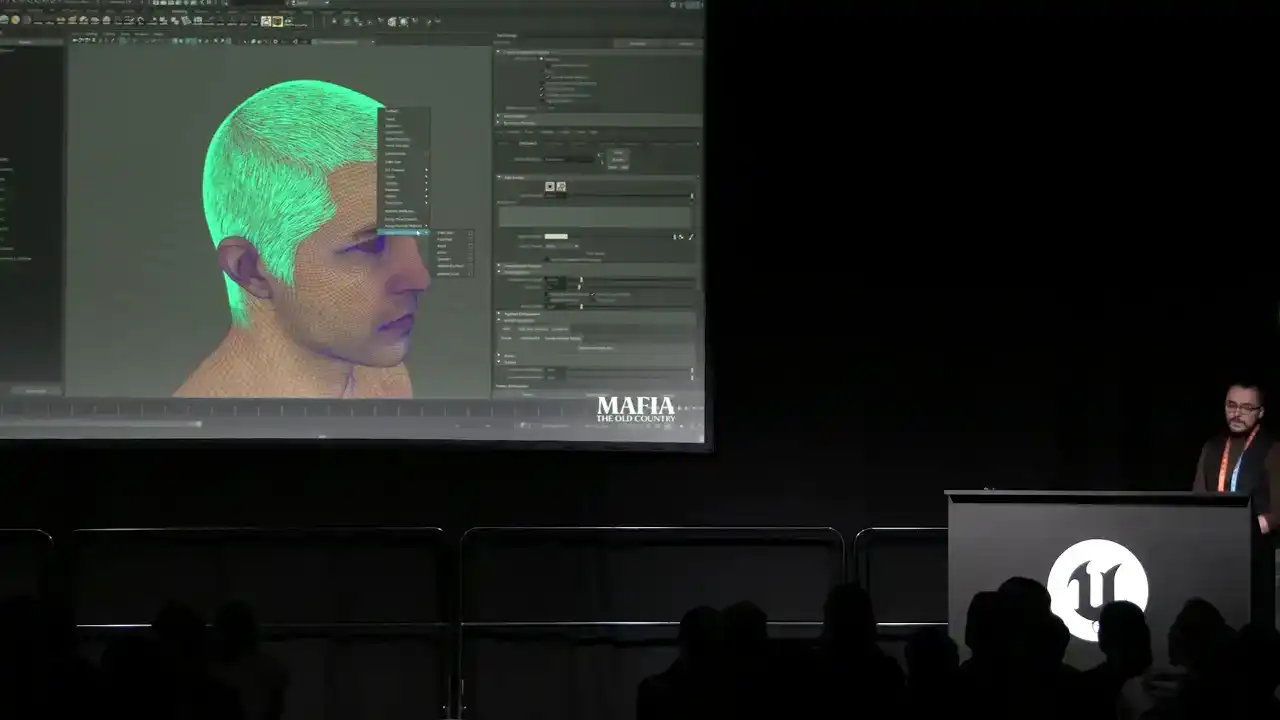
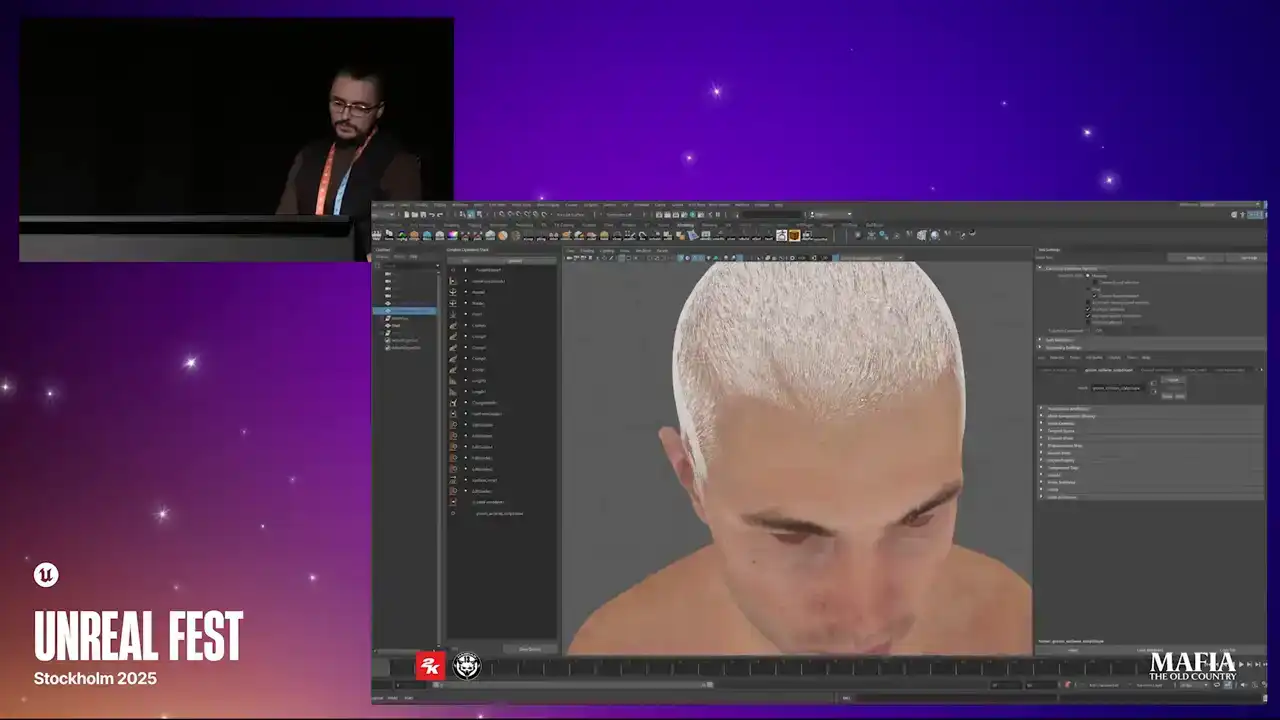
Here is a small demonstration on super simplified example. For this stage we used Ornatrix as I mentioned, but any other solution for high poly hair creation could be used as well. We started the placement by manual tracing the general shape and the rest filled using Ornatrix strands multiplier. And here is an example of complete hero haircut. To make the whole process more iteration friendly, we tried to work with multiple grooms and additionally we used Ornatrix strand groups to get more control over individual clumps.
From this point, depending on the complexity of the haircut, we had two options. Either use proxy meshes directly in Ornatrix or extract curves and bind cars over them.
In the case of Hero haircut, we went with proxy mesh option

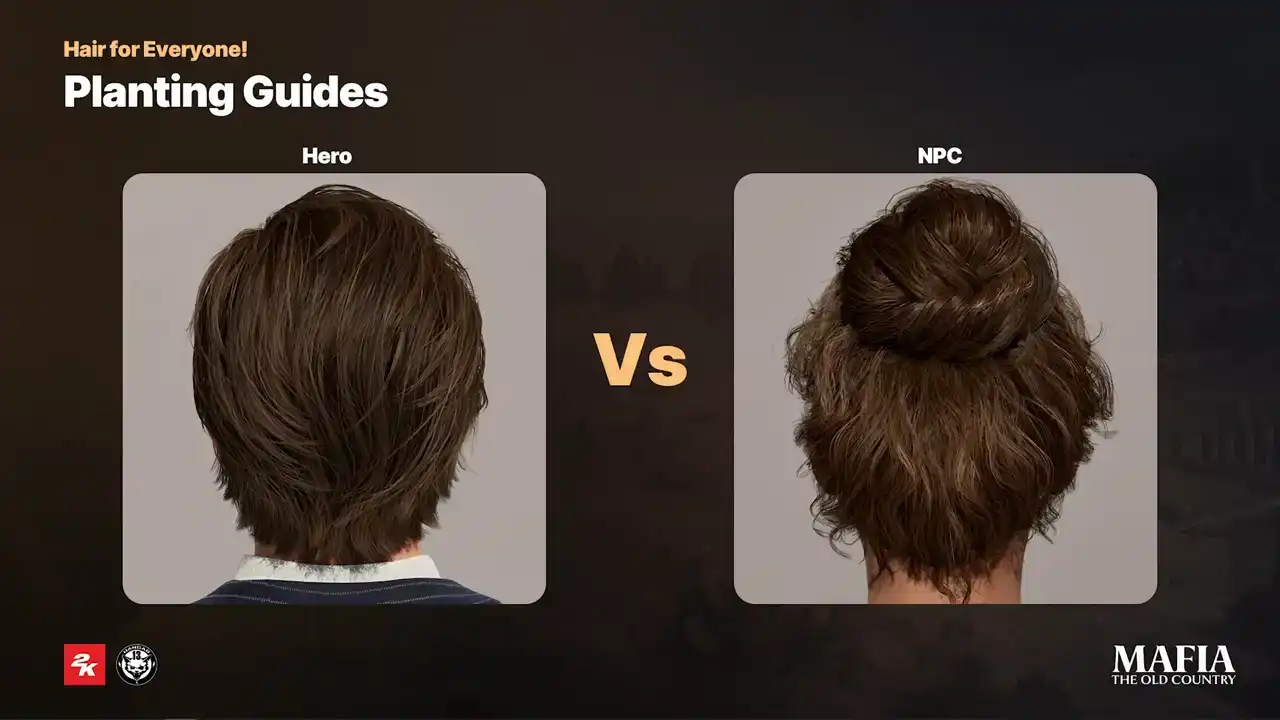
because the haircut had higher poly count, it was possible to use procedural modifiers in a similar way to how it works for high poly hair. And here a small comparison between the complexity of the hero and NPC haircuts.
For NPCs, we usually spend less time in Ornatrix because we already knew the poly count would be almost twice as low compared to hero asset. That meant we had to place each card more carefully.
For this reason, the final adjustments on the NPC haircuts were done manually or with the JS curve plugin in Maya, where we bound the cards over curves which were extracted
from Ornatrix.
And here's a small comparison between Hero and NPC haircuts. For short hair, facial hair and fur, we tried to keep the creation process as procedural possible. The main reason was that for this type of hairs it was more important
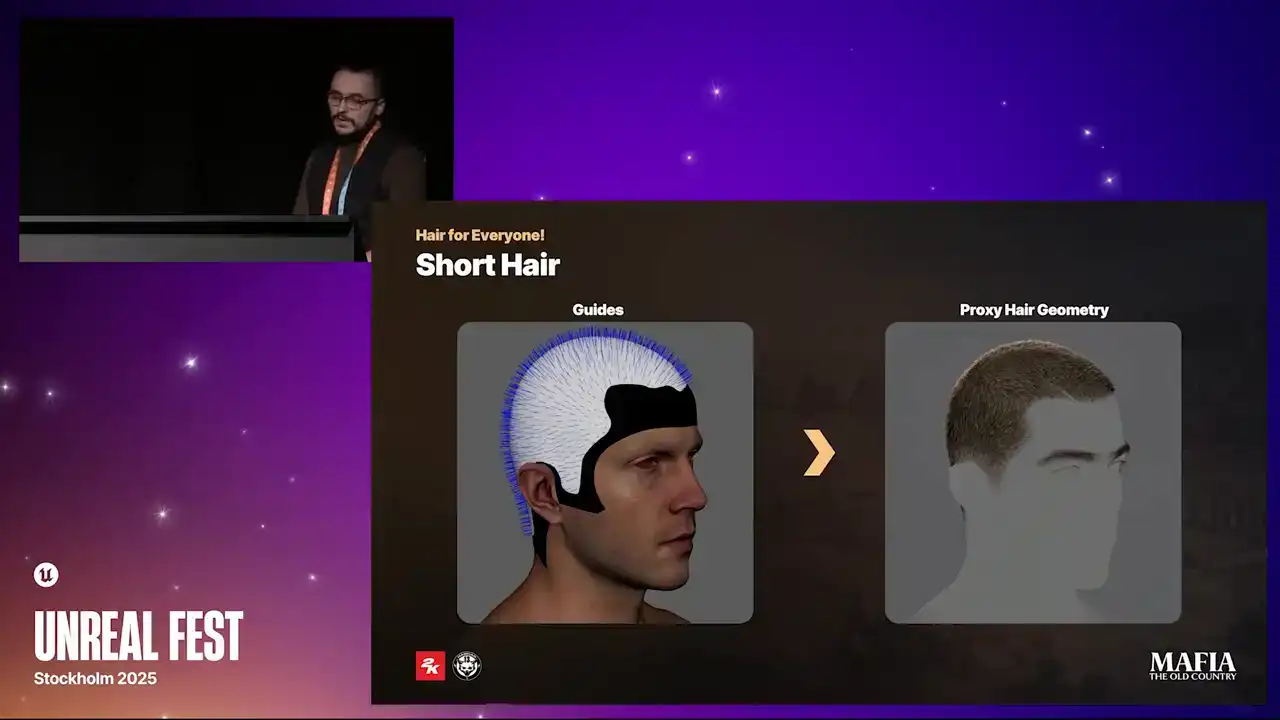
for us to control the overall look rather than focusing on small details. There was no need for detailed block out or manual guides placement here. The approach was basically the same as for high poly hair creation but instead of
strands the output was proxy meshes. Here I would like to demonstrate how we
we applied proxy meshes over a high polygroom. In this case, hairstyle only required a few different cards because a lot of variety came from the modifiers. Instead of assigning one card per guide, as we did for longer hair, here the number of cards was controlled by the amount of strands. This approach allowed us to use procedural modifiers to introduce natural breakups and variety. Of course, the effect from modifiers depends on the card's density and the card size. Also for short hair, big part of the final look came from the hair shell texture which we baked from the groom that was later converted into
the cards. Okay let's switch to Unreal part. So for groom export we used Ornatrix
Alembic and cars geometry was exported as simple static mesh. As I mentioned earlier we didn't use strands for our characters not even for cinematics. With a few engine modifications we made it possible to display cars instead of strands already for LOD 0. For here we worked with four LODs. Each LOD was reduced by 50% or more compared to previous one. And for the last LOD we switched to solid shell
mesh with a super optimized shader version. But for example for eyebrows we followed a slightly different approach. On NPC characters we kept cards only at
LOD 0 and all other LODs relied completely on the eyebrow shell texture.
For facial hair there was no need to export new alembic setup for every variation. After multiple experiments we ended up with a standardized setup that we used that you can see on this picture and those were used for 90% of our

scenarios. However haircuts were more complex for those it was necessary to create unique alembic setup for each variation. To stay more flexible with

texture usage and texture specking we decided not to use texture inputs inside groom asset Instead we did shader adjustments we used hair attribute node to pass information from
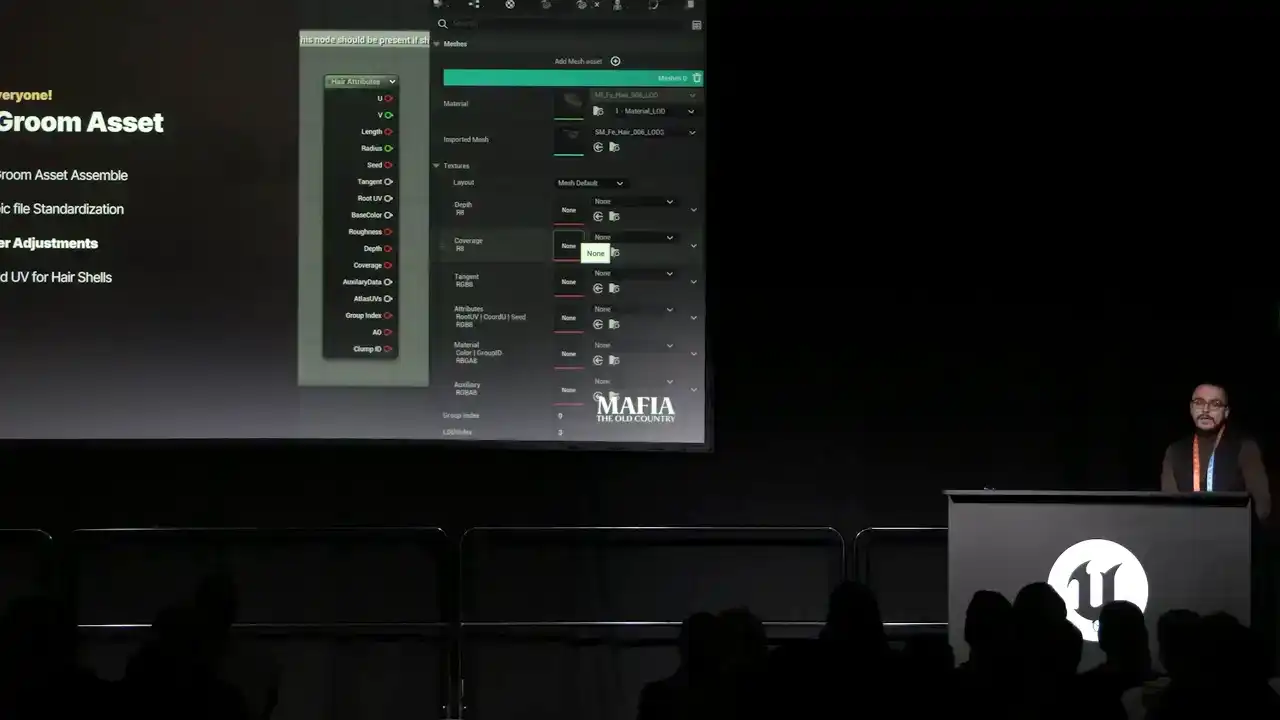
the groom into the material and that allowed us to override attributes directly from the material instance. To create more natural looking hair to skin

transition we used hair shell textures. As long as character haircut doesn't
change, shell could be painted directly into the head texture if haircut change. The usual way was to add extra shell topology over the head mesh. But in our case extra topology was an optimal solution even at MetaHuman LOD1.
The head topology is already quite dense, covering all necessary areas with shells would almost double the poly count of the head asset for each LODs.
On top of that, shell mesh could at least introduce three extra draw calls.
And one more thing to consider, that Unreal Engine using Masked Alpha for hair, which is very difficult to use for tiny strands like eyebrows or baby hairs.
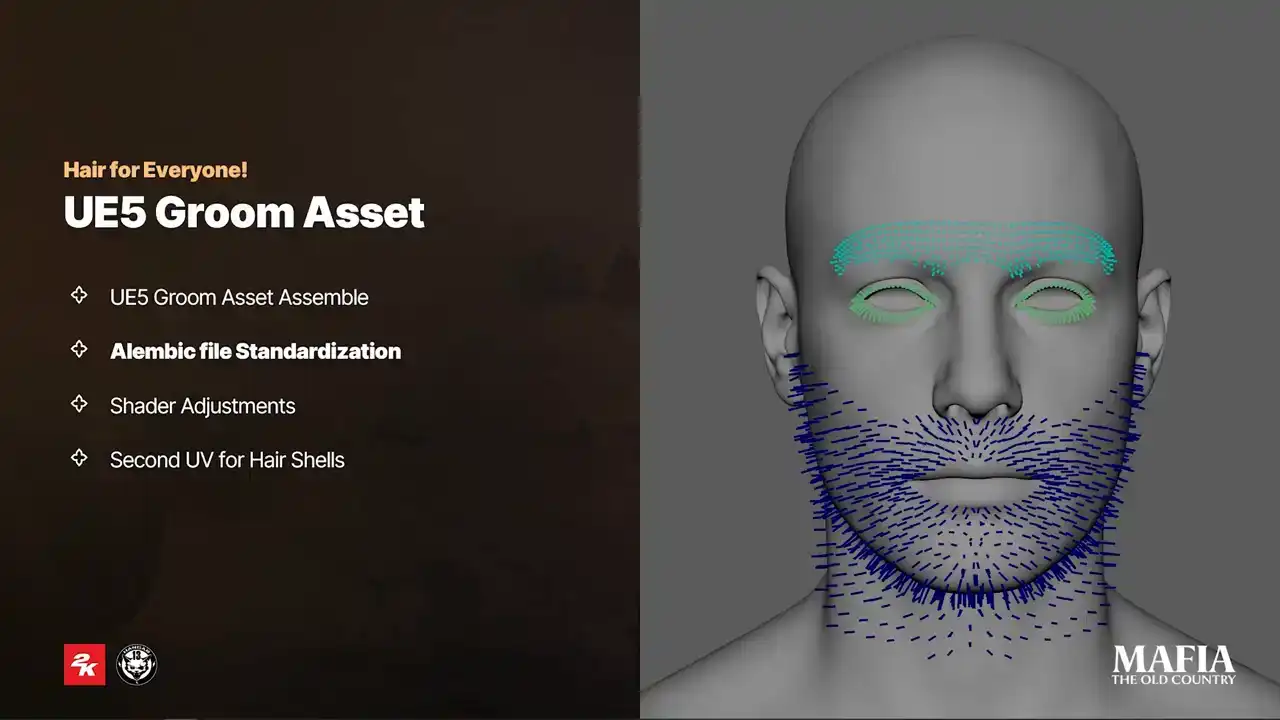
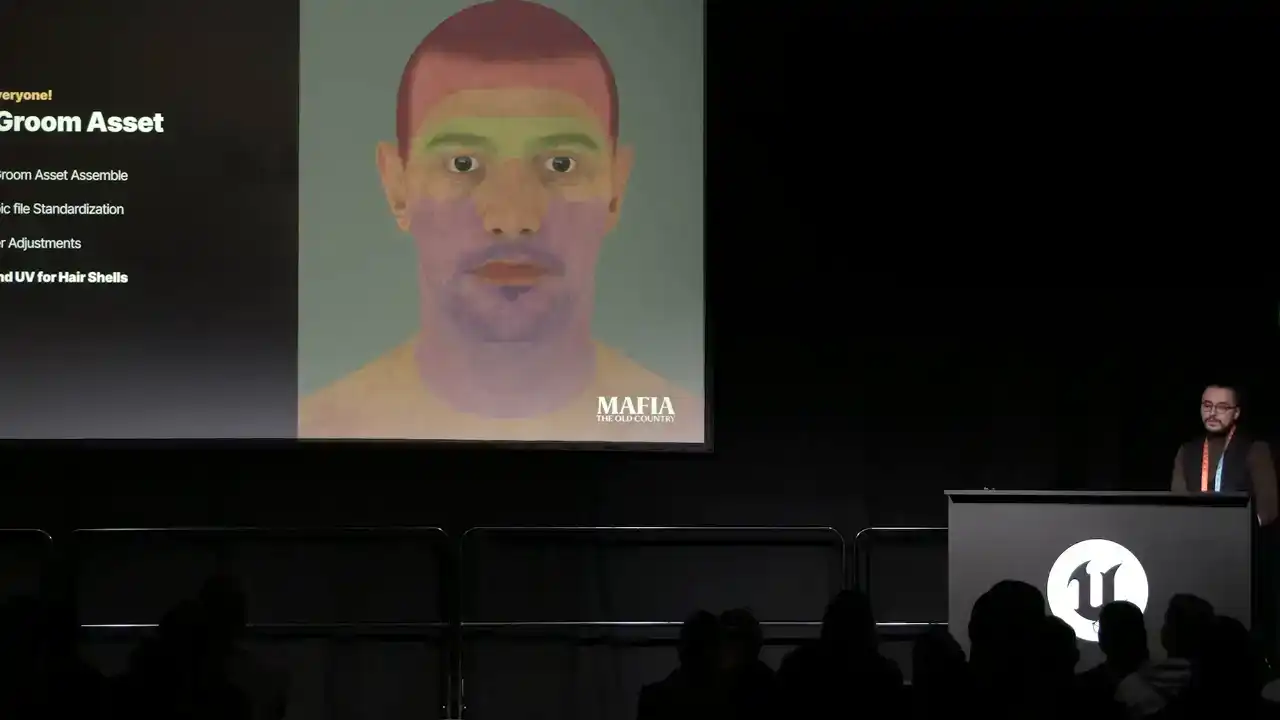
For this reason, we went with a different solution. We used second UV set on the head mesh instead of extra topology.
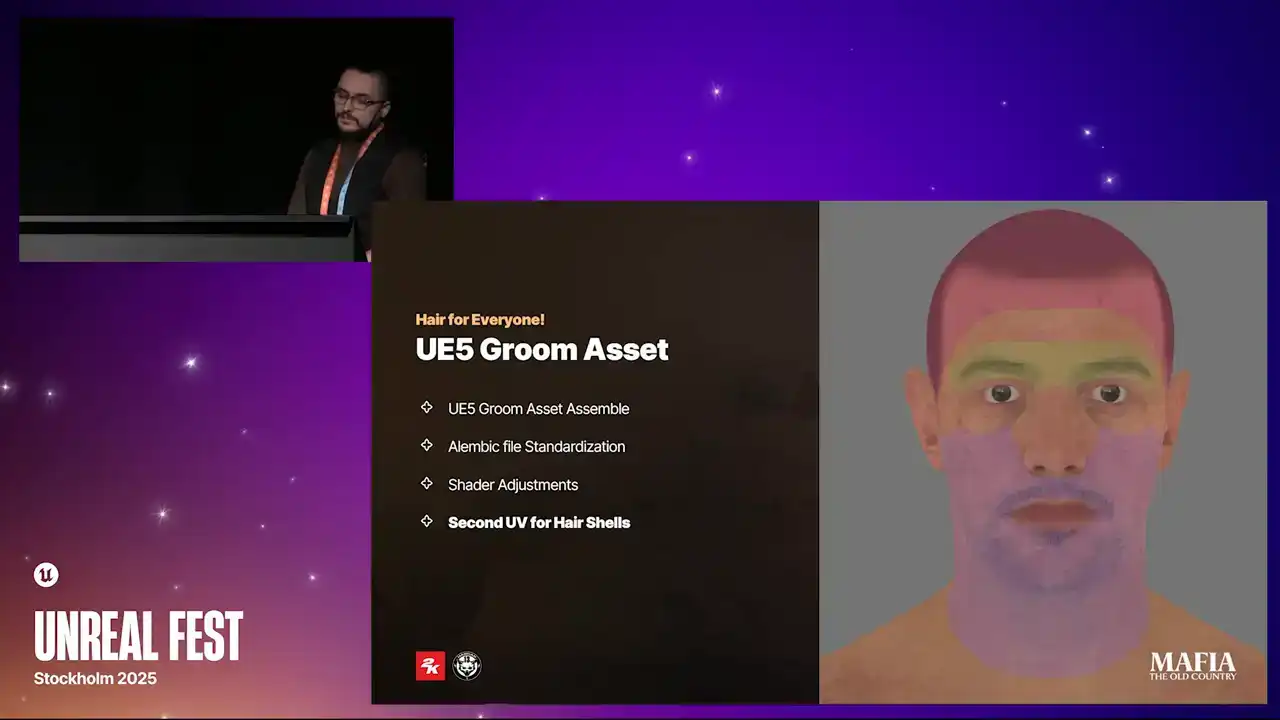
With this setup, all hair shells shared single draw call together with the head, and we could paint small hairs since it's direct blend with a skin texture instead of masked mesh. Now a couple of words about also groom optimizations.
So yeah, used cars, no strands. Next, on the lower LODs we switched rigid mode instead of skinned and cleared up per instance buffers. Third, we used parent bounds and disabled ticking whenever it was possible. For the last LODs, we used a simple static mesh shell as fallback. We also switched to an optimized shader version for the last LOD. And the most important optimization is Sicilian Sun. People in our game mostly wearing hats. heads. So yeah. And now I would like to share a couple of examples of our haircut
renders. So this is NPC haircut. This is also NPC. Here is an example of hero haircut. Another hero and the short hero haircut. And some of you may know that in

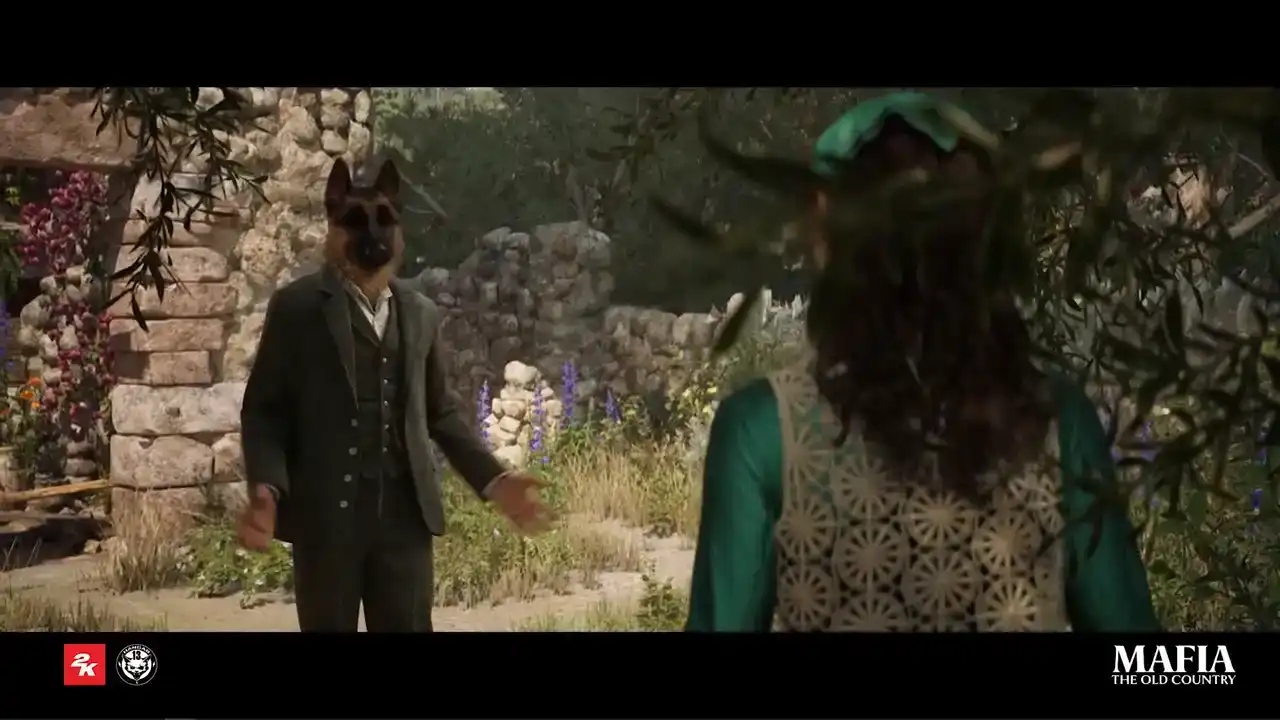
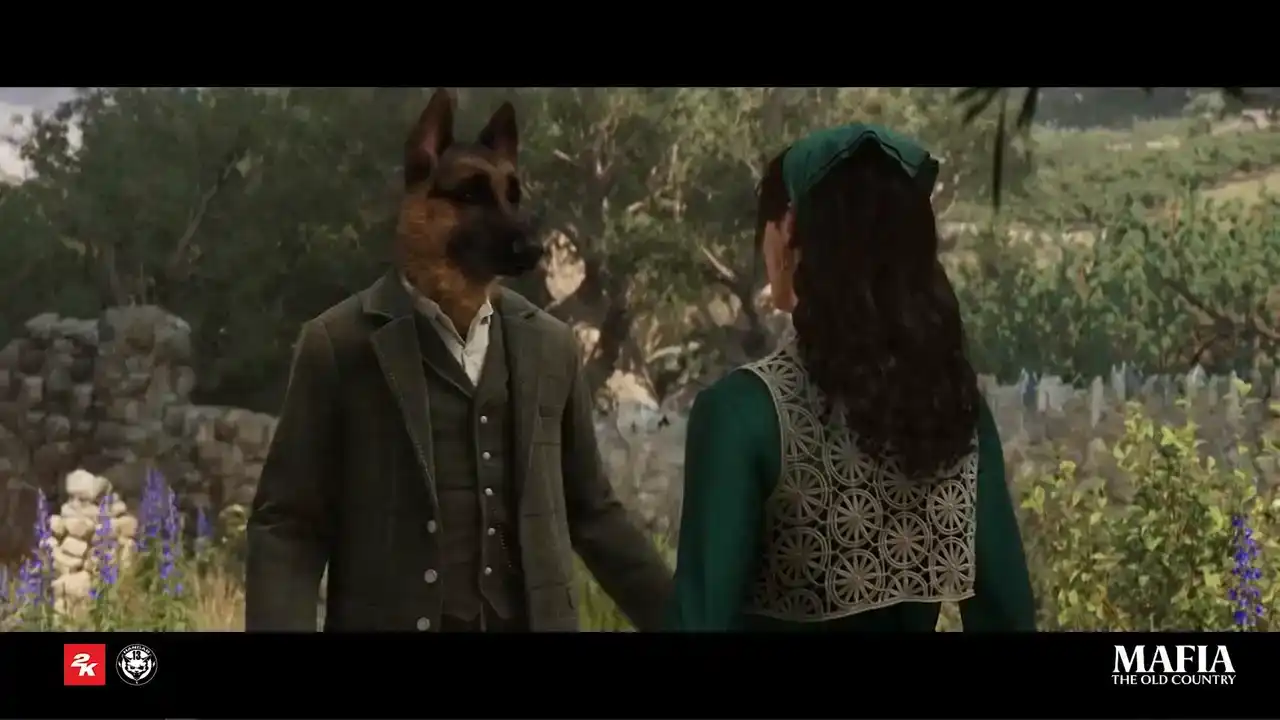
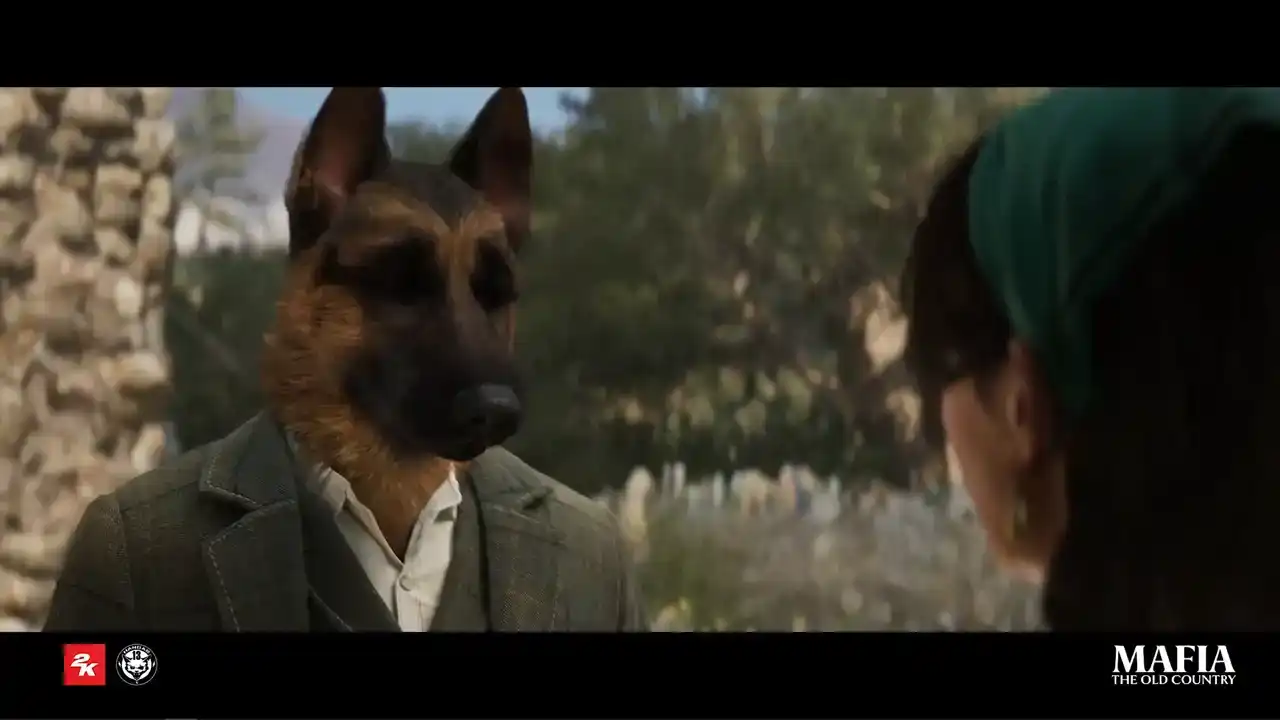
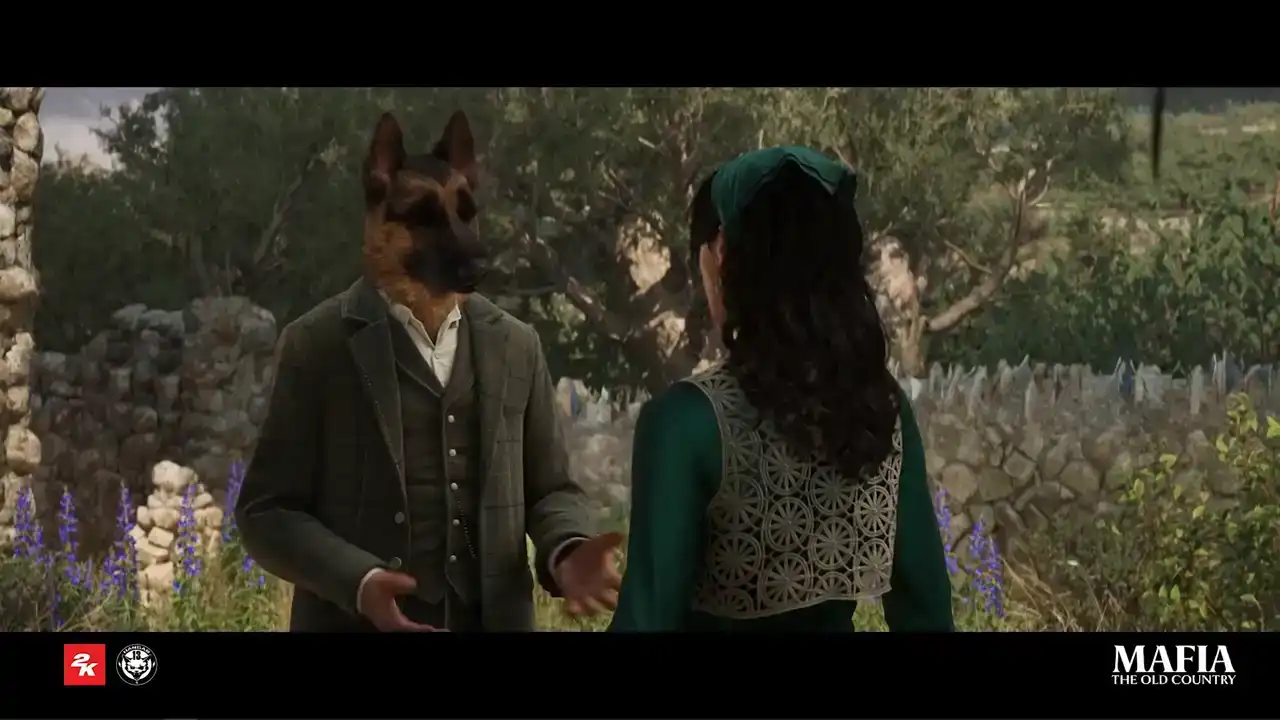
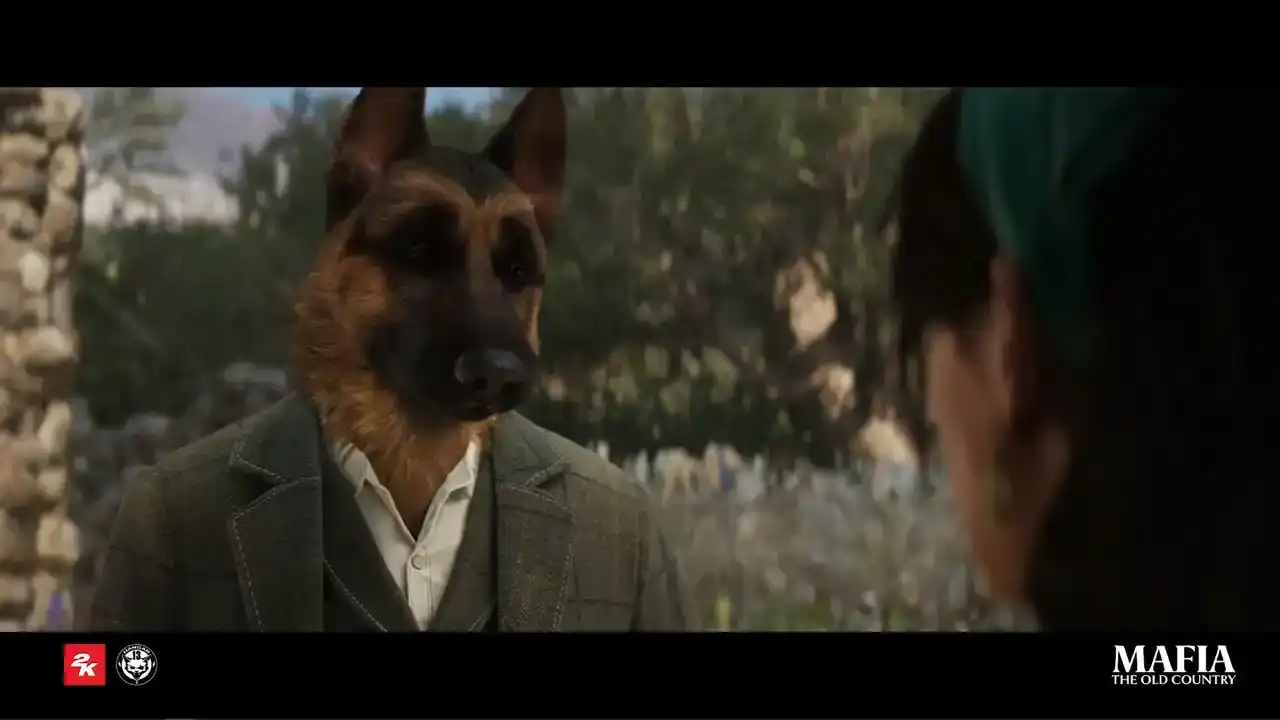
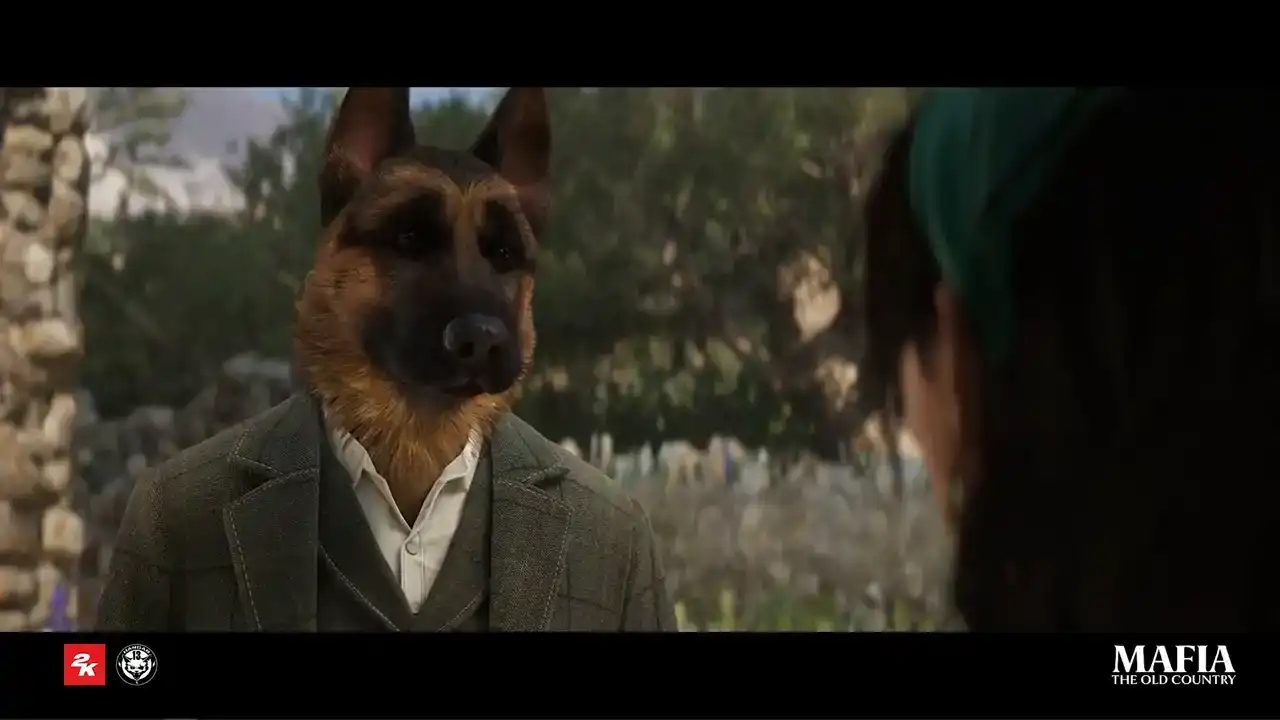
original Mafia game, there was one little Easter egg. Under specific conditions, the
player could equip dog's hat. Later on, this became known as Baskerville Outfit. So yeah, we are keeping tradition alive. So this asset was also created with
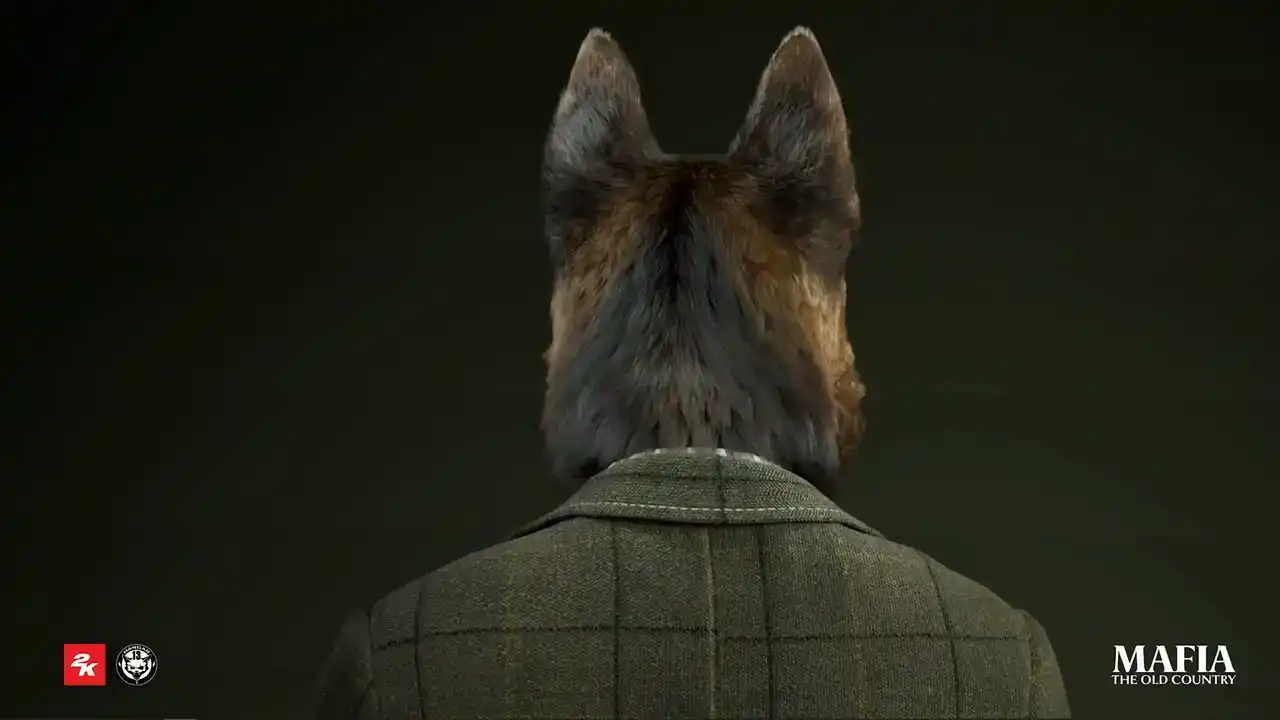
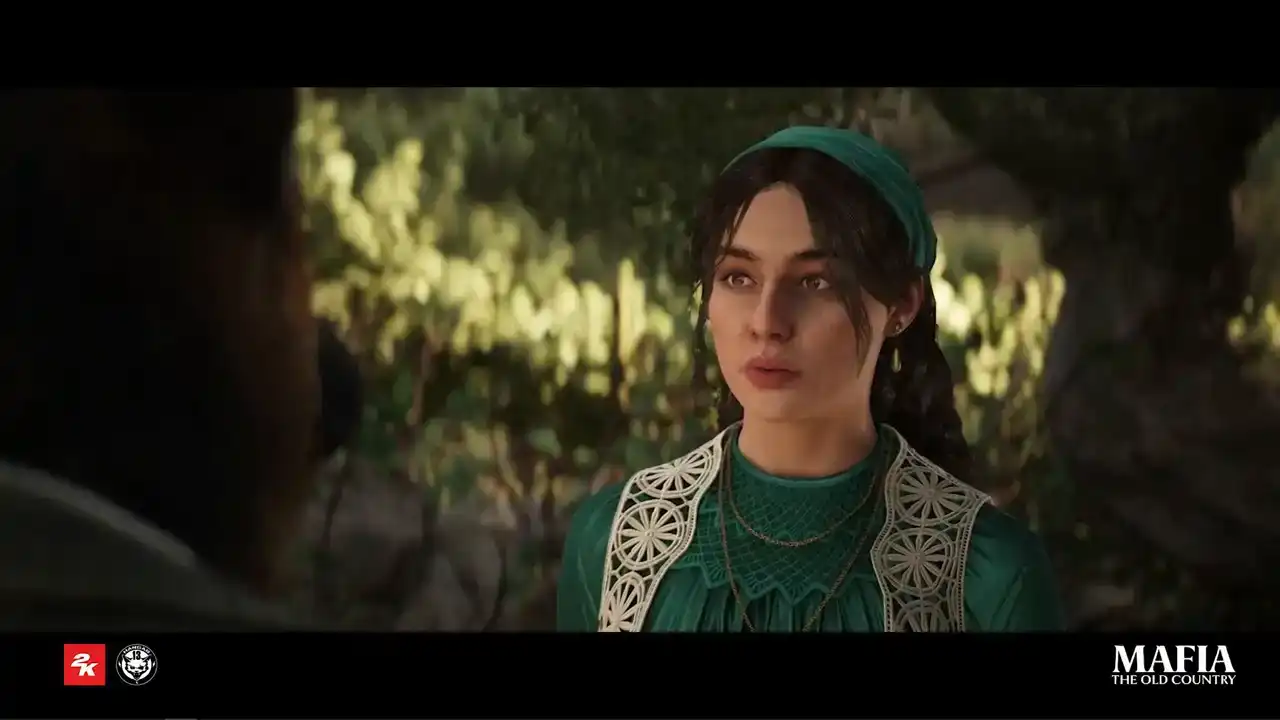
MetaHuman. I mean, it was not necessary, but you know, we decided to have fun. and fur was groomed, it's actually cards and they were groomed inside Ornatrix. And here is a small cutscene with speaking dog.
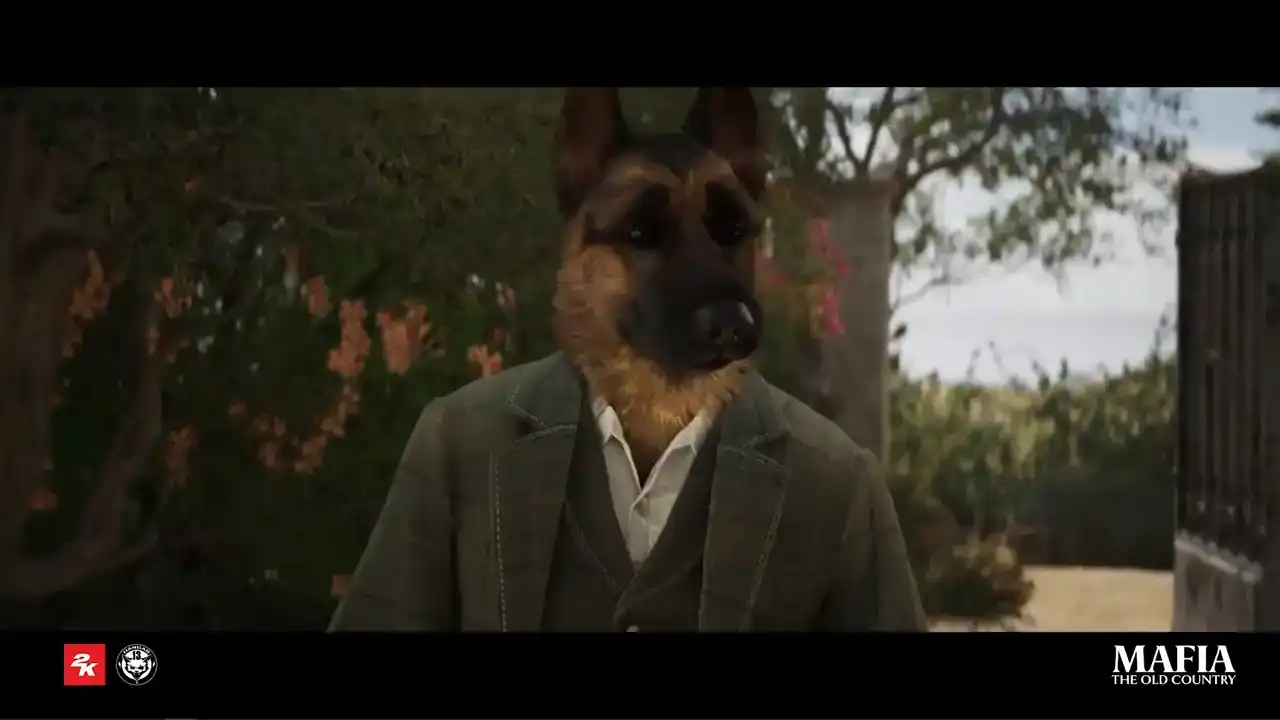
I was not sure you could read. You took the chance.
I did.
Why did you write to me?
Why did you come?
I wanted to say I'm sorry. About the fight. It should never have happened.
You are right.
Si, si. It's just... What is it? Maybe it's not a good idea. A meeting like that.
Like this. People might talk.
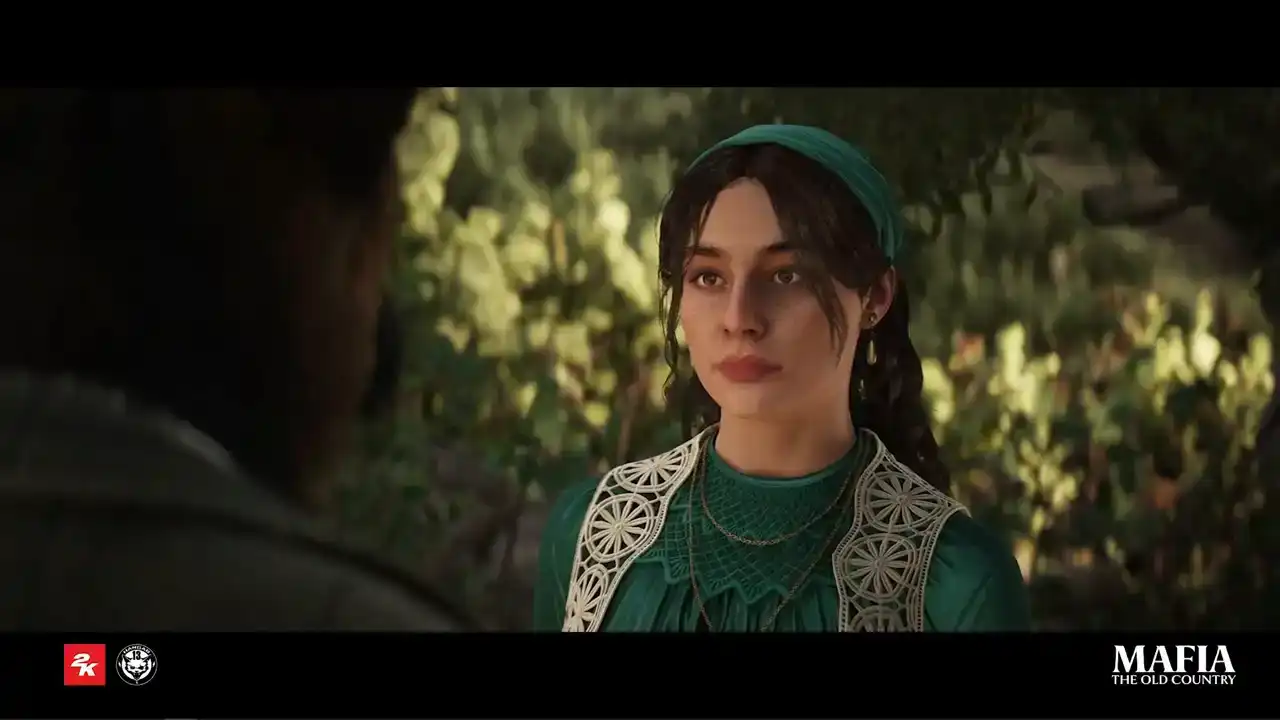
And what would they say?
I have to be careful and work hard. Your father is who he is.
And who are you, Enzo?
Does my father already control your life?
So yeah, you can go crazy with MetaHuman. And finally, I would like to say a big thank you to all teams on this screen on the screen for the old hard work they did and for all huge support they did during our metahuman journey and thank you all for your attention