Embark-Asset-Processor---Erik-Hallberg--
https://m.youtube.com/watch?v=HZd4hQJ2MfA&pp=ygUOZW1iYXJrIGhvdWRpbmk%3D
Hello and welcome. Sorry. Hello and welcome to this presentation. The asset processor, but it's also a two-part presentation. I'll be talking about the asset processor and Darko will present later also from Embark on our landscape tools. First, a bit of introduction about who we are. I'm the lead 3D artist at Embark and Darko is the lead environment artist. Embark Studios was founded in 2018 with the explicit goal of revolutionizing how games are created and played. We currently have three free-to-play projects ongoing.

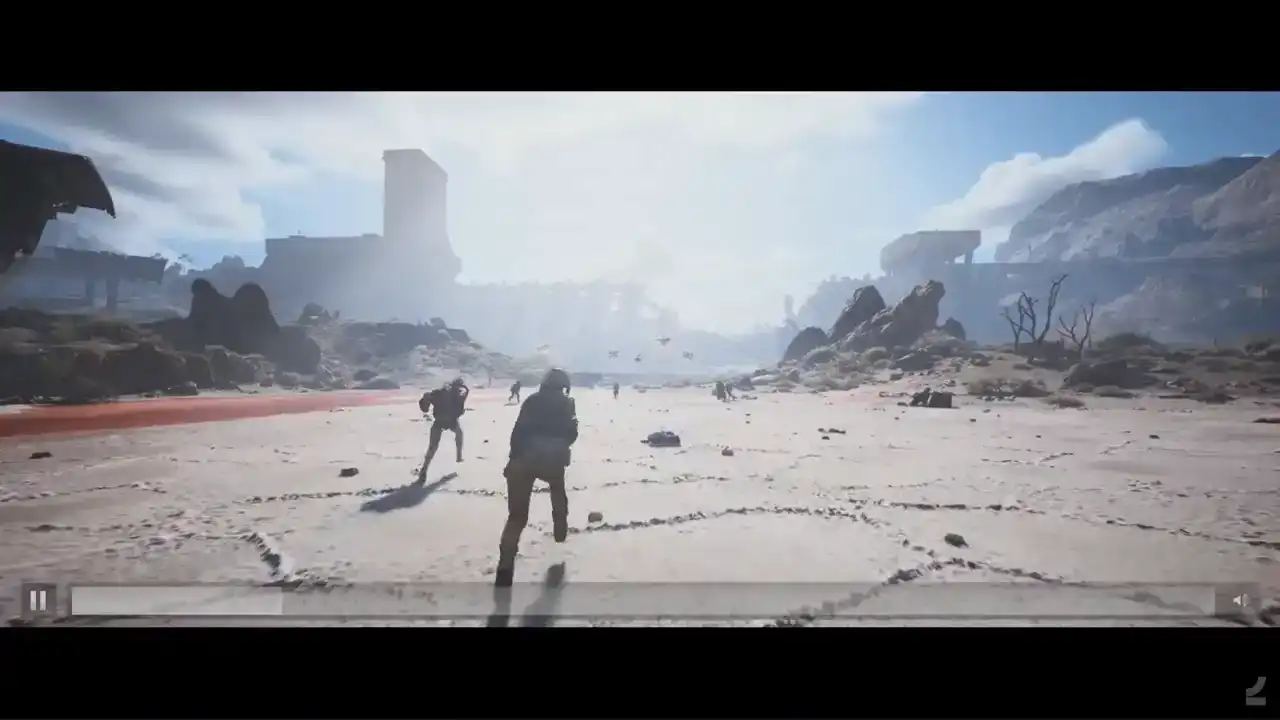
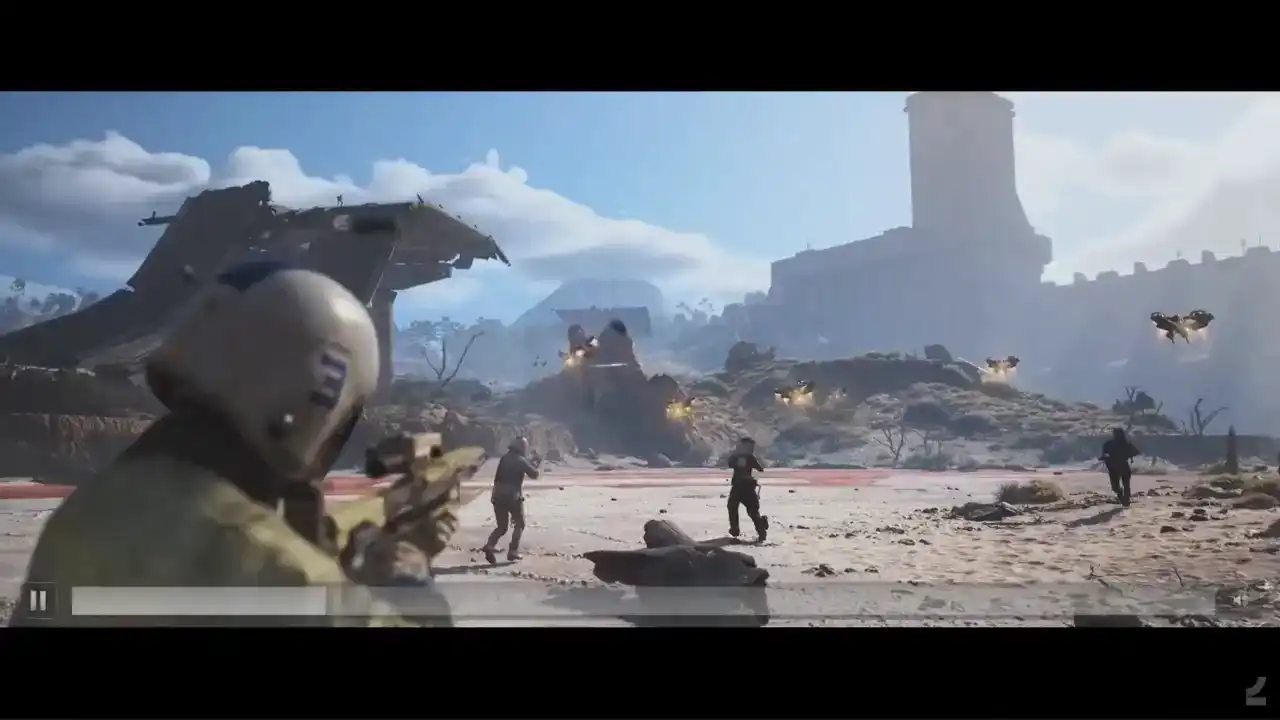
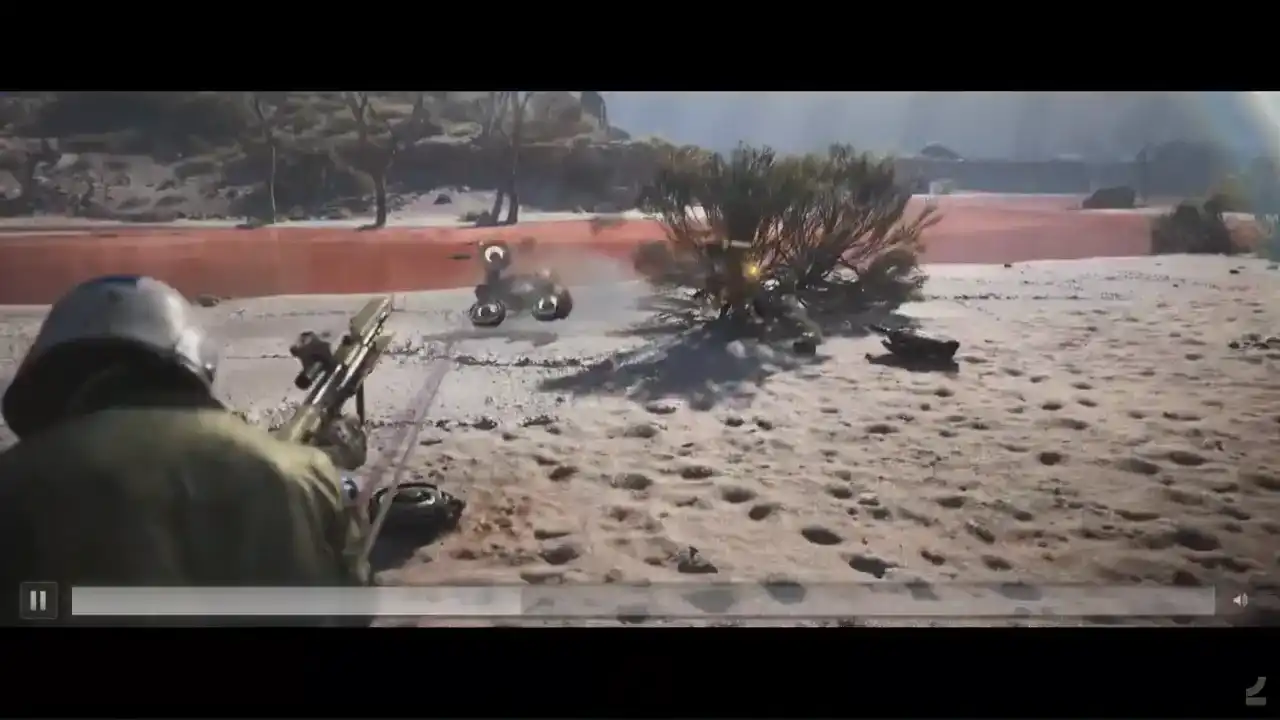
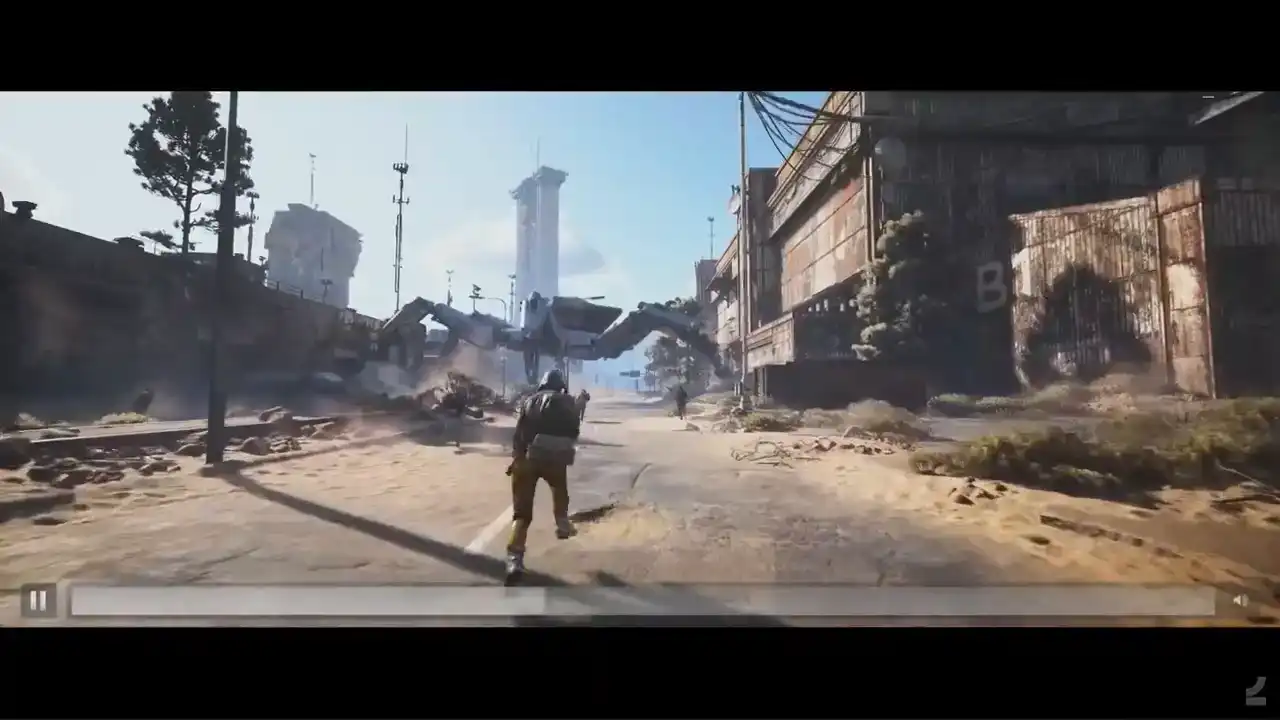
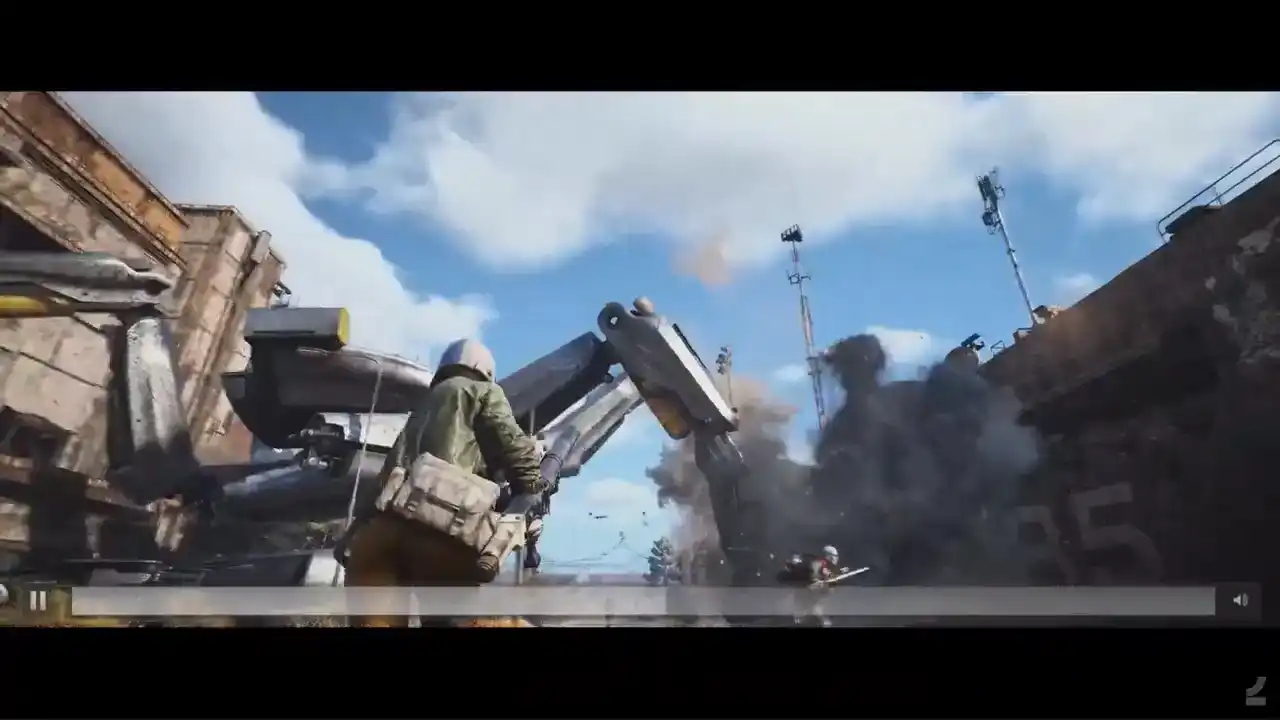
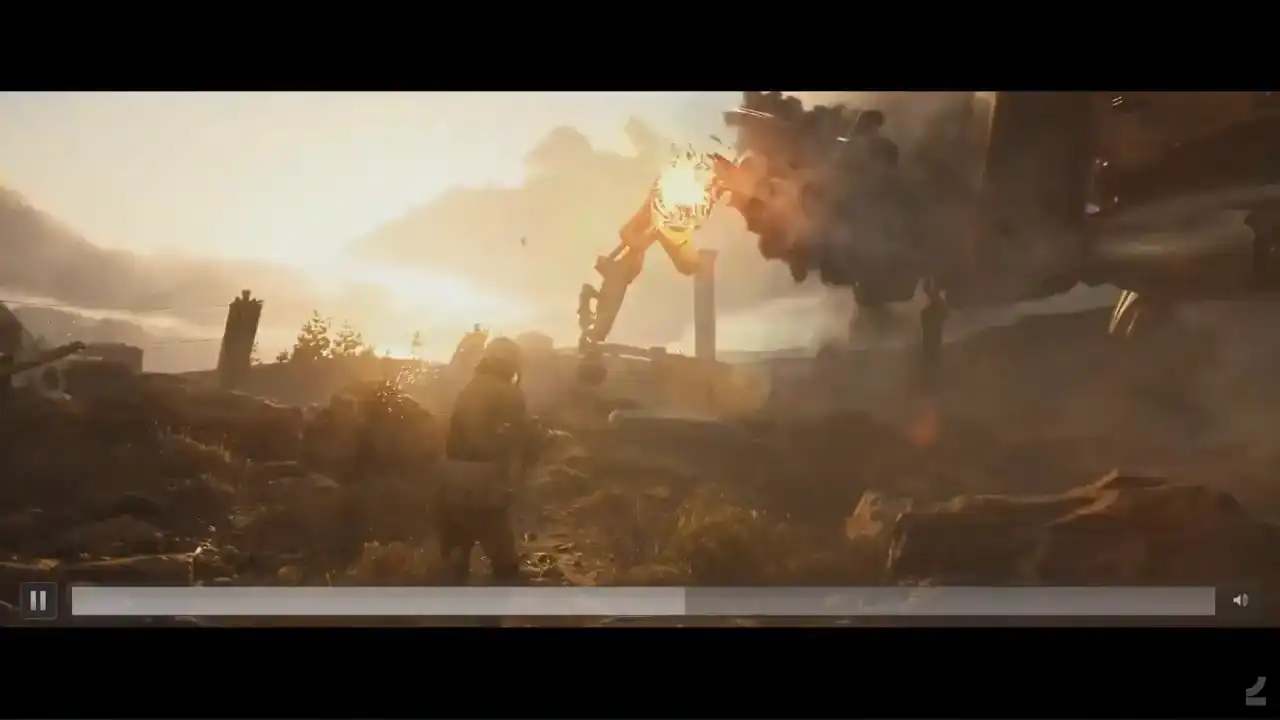
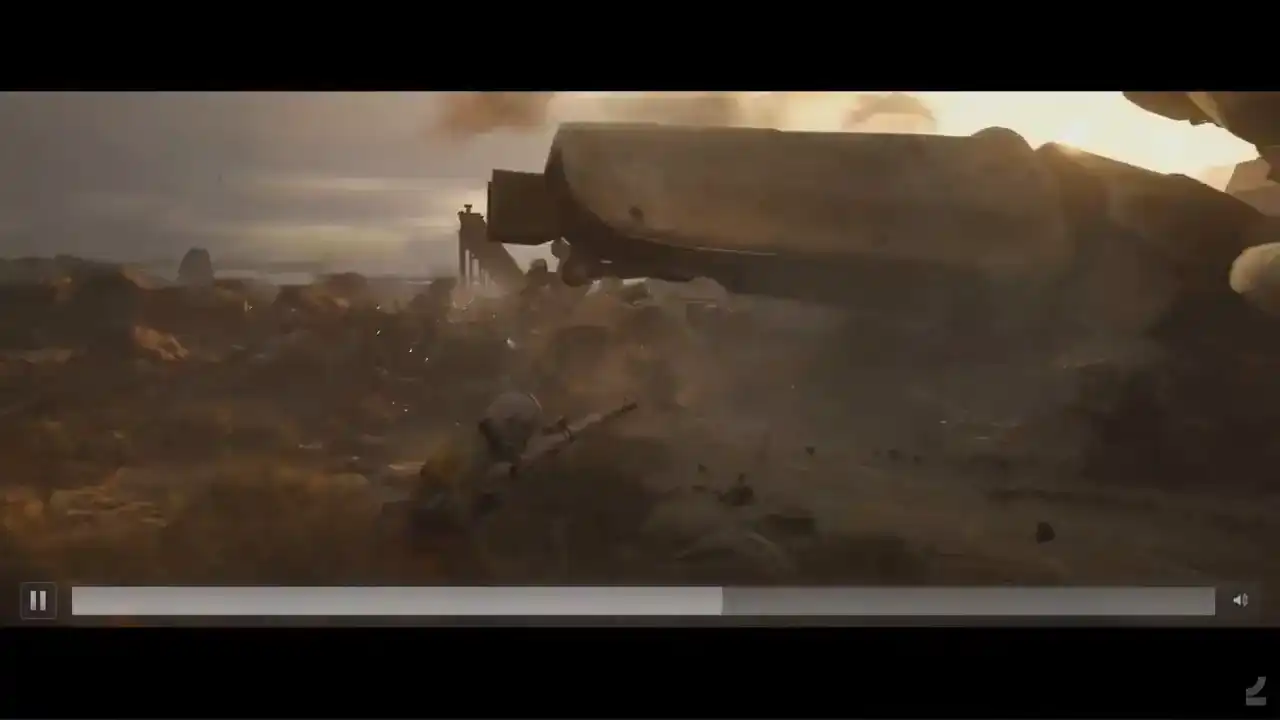
We have the finals that just, the beta just finished, I think, yesterday, which is a fast-paced first-person shooter with a lot of destruction. And the arc creators, third-person PvPV-E shooter. And then we have a platform for creative play being developed as well. We'll start by taking a look at...

I'm just a touchbird. Coming in damn hot.

Showtime.
Two buddies coming in hot.
Oh, it's on.
Yeah, let's go.
Let's do this. Come on, let's do this.
Hang on, hang on.
Hang on. He's not down.
Go! dancing on my own

so like daco mentioned yesterday it's not actually coming 2022. that's a bit out of update and obviously that's our creators and next we'll take a look at the trailer for the finals

út severa

- réal-

Ah, gee!
Move!
And he gets the backstab!

What a steal!
Let's go!
Oh

As I think you'll see from that trailer, there's a lot of other Houdini stuff involved in making these games as well. That's not right.
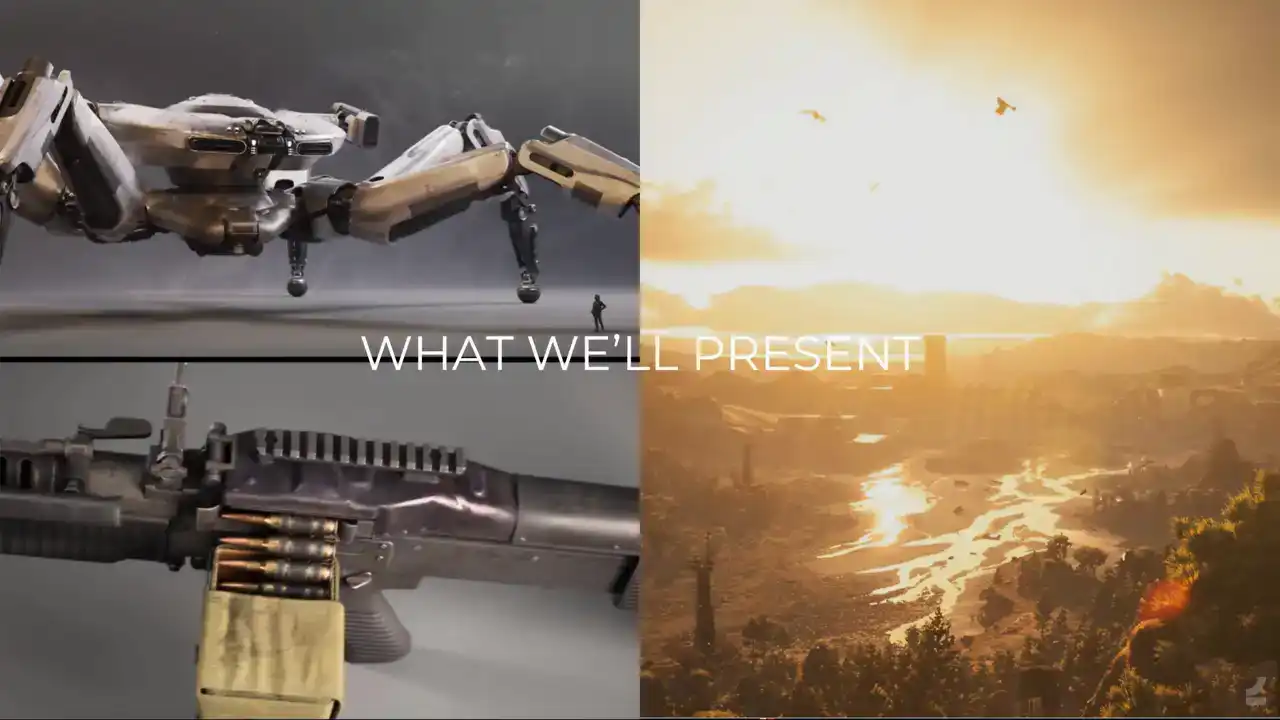
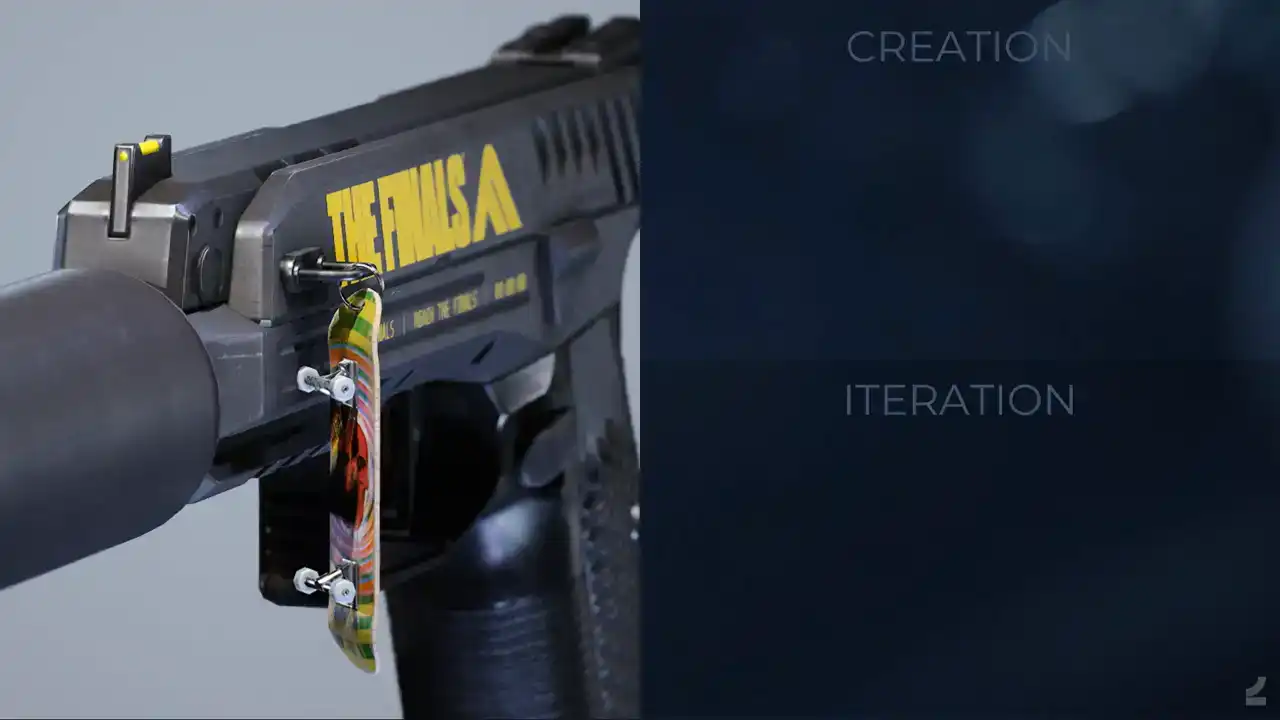
So, what we'll present today, I'll be presenting our Asset Processor, which is about making 3D assets, and then Darko will be talking about landscapes.
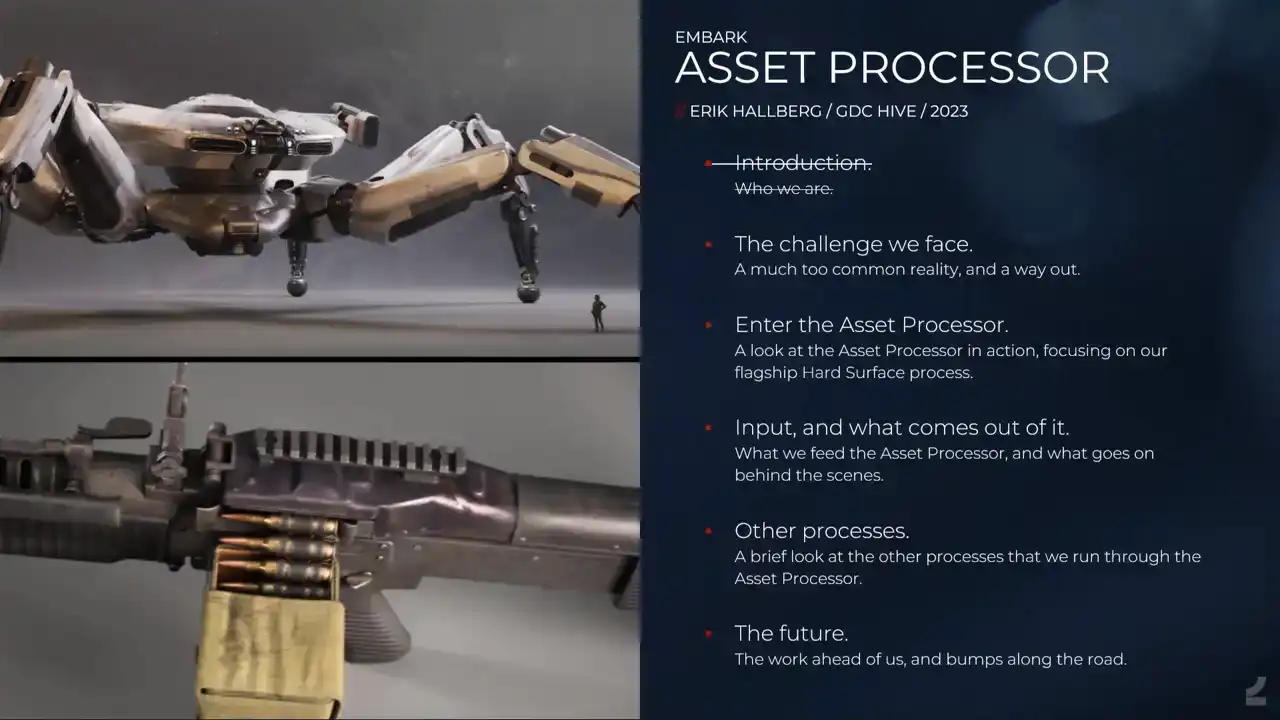
So, the asset processor presentation. This is the agenda for the presentation. I'll talk a bit about the challenges we face when it comes to creating high quality content that meets player expectations, while we simultaneously need to be faster than ever because of how quickly players turn through content As a solution to that I be presenting our internally built asset processor where we'll be focusing on one of the processes that we run through it, specifically the hard surface process. I've previously held a talk about it when it was still in its infancy back in 2021 at the Nexon developers conference. It covered a lot of philosophy and so on. But it didn't cover the crucial aspect of how players actually experience working with this tool. And I'll show some cool features that we haven't even thought about back then. And we'll go through what type of input it takes and what it spits out to the other end. And then we'll take a super brief look at some of our other processes that we also run through the asset processor. And lastly, I'll talk about some challenges and learnings and what the future looks like.

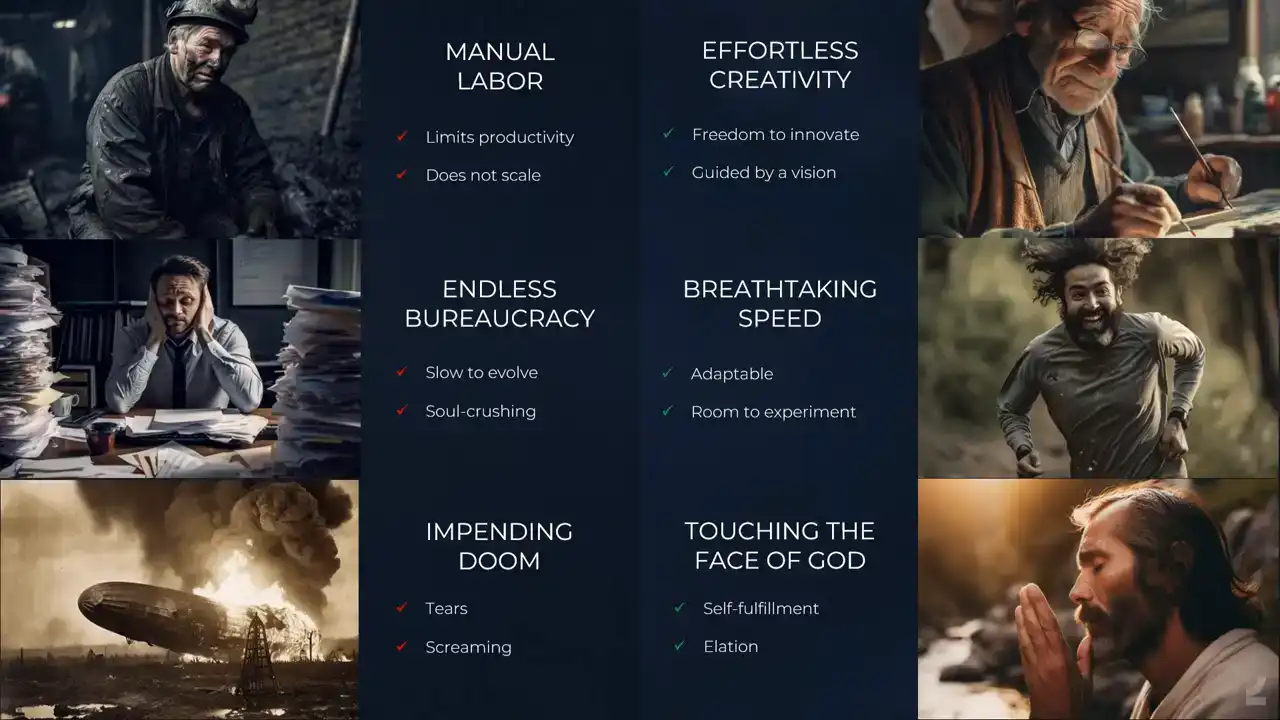
So the challenge we face, our needs, let's briefly go through what requirements for asset creation we have. We have free-to-play games, so this means that we need to be able to consistently make content drops that appeal to our players. And this is especially important as players' expectations for amounts of content continually increase. And then, since we can't perfectly predict what player tastes are, much less what they'll be tomorrow for that matter, we need to have lots of room to shift what type of content we produce. And there's another type of flexibility, not this one, that's really important too. that since we intend to maintain a relatively small content team, that we make sure that it's easy for people to do a wide range of tasks. And beyond that, that it's easy for people to pick up each other's work files. We also need to establish and maintain a high quality bar for all of our content in order to stay appealing to players. And of course, that's what we as artists do, strive for quality.

I will try to paint a picture of a sort of hell to the left and the type of world where we want to be, heaven, if you will, and what that would look like. So of course, there are many issues with doing certain things manually. The important ones are the fact that as human beings, we only have a limited amount of work that can be done. And it's important that that time can be spent on worthwhile tasks. With ever-growing teams, it's impossible to maintain a project without layers on top of layers of bureaucracy. The problem, of course, is the soul deadening effect that this has on creativity and how the rigidness of those structures goes against the fast-paced industry like ours. So we want to keep teams small. And of course, this should amount to a sense of impending doom. With that comes tears and screaming. Now, on the right side instead, where do we want to go? a world where realizing our creative dreams should be effortless and where we can speed ahead, unafraid to try things out, and knowing that we are able to meet whatever challenges
lie ahead. And that should amount to something like this would be ideal. And we'll see how

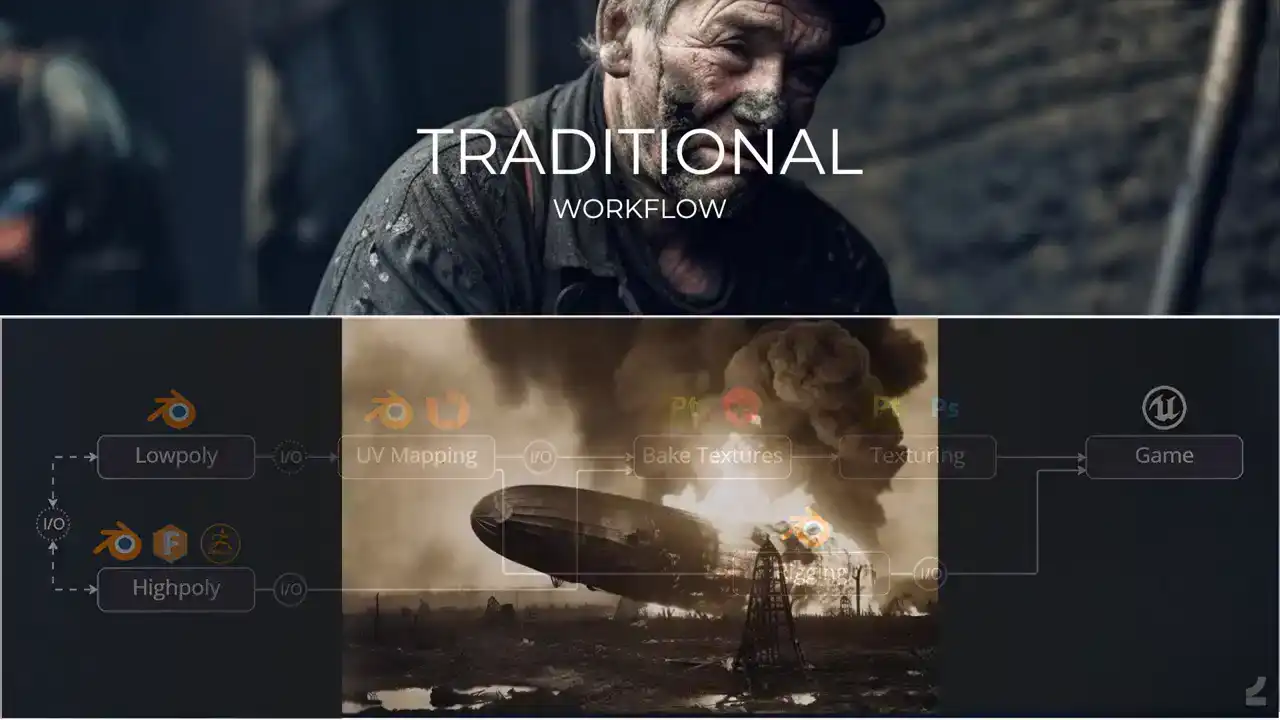
close we are. So, let's take a look at some of the current limitations and struggles we face with traditional 3D asset creation workflows. Current workflows that exist within the industry are slow and difficult to master. There are lots of separate steps that lack any real tie to each other, where artists have to juggle and maintain separate assets, often through multiple DCCs. There's also a lot of more or less manually shuffling data back and forth between these programs, and it all combines to create a huge barrier of entry to making content for games. What's probably worse, though, is that this way of working makes iterations cumbersome, and I think we've all experienced that iterations is where quality comes from, since we rarely get things right the first time around. But with this workflow, whenever we want to adjust something at an earlier stage, we have to go through all of the following steps again. And the hesitancy to revisit already completed work also forces us to purposefully slow down to thoroughly analyze our work in fear of having to go back and redo work later, which ends up in that continually just looking at your asset and turning it around and being like am I sure that I happy with this which is just not a very fun way to work
And again, there's that impending sense of doom.

Each step of the chain also comes with their own challenges no matter what approach we take to them. If we take high poly creation as an example, which is often both the first and most difficult and time-consuming step of the asset creation workflow, we can review the current methods that are most commonly used and find them lacking in multiple respects. So, subdivision modeling has been around for a long time and it's still in common use, but it has problems with being difficult to master and to adjust. It requires a deep understanding of topology and if you wanna change shapes, you need to rebuild the topology of the asset. Creases were a welcome addition since they meant fewer like sliding edge issues and support edge loops. But even with creases, the workflow still relies on the topological structure of the mesh. So the issues with slowness in flexibility and remain. This is an old model of mine, so I know the topic deeply and the pains of it. something that happened many years ago now, but it's like Dynameshing assets in ZBrush that got rid of both the difficulty and the inflexibility of subdivision modeling to some extent. It can still, however, be considered difficult since it means that artists need to navigate ZBrush. And especially if you don't already know ZBrush, like getting into ZBrush only to get like, rounded corners on assets is a hassle. And it's still slow and inflexible in that the workflow is destructive. Like, if you want to go back and change something, it's going through that chain again, which is pain. It seems that a lot of hard surface artists have picked up CAD modeling, which is pretty cool. It gives insanely precise results, but to a point that goes beyond what most games would need. So it's a bit overkill. And it's still another piece of software to be learned and incorporated into a pipeline. And as a starting point for low poly creation, it's perhaps the furthest away from any of these methods. And they all suffer from the same deeper issues. They're difficult to master, they're destructive, and you still need to create a separate low poly model
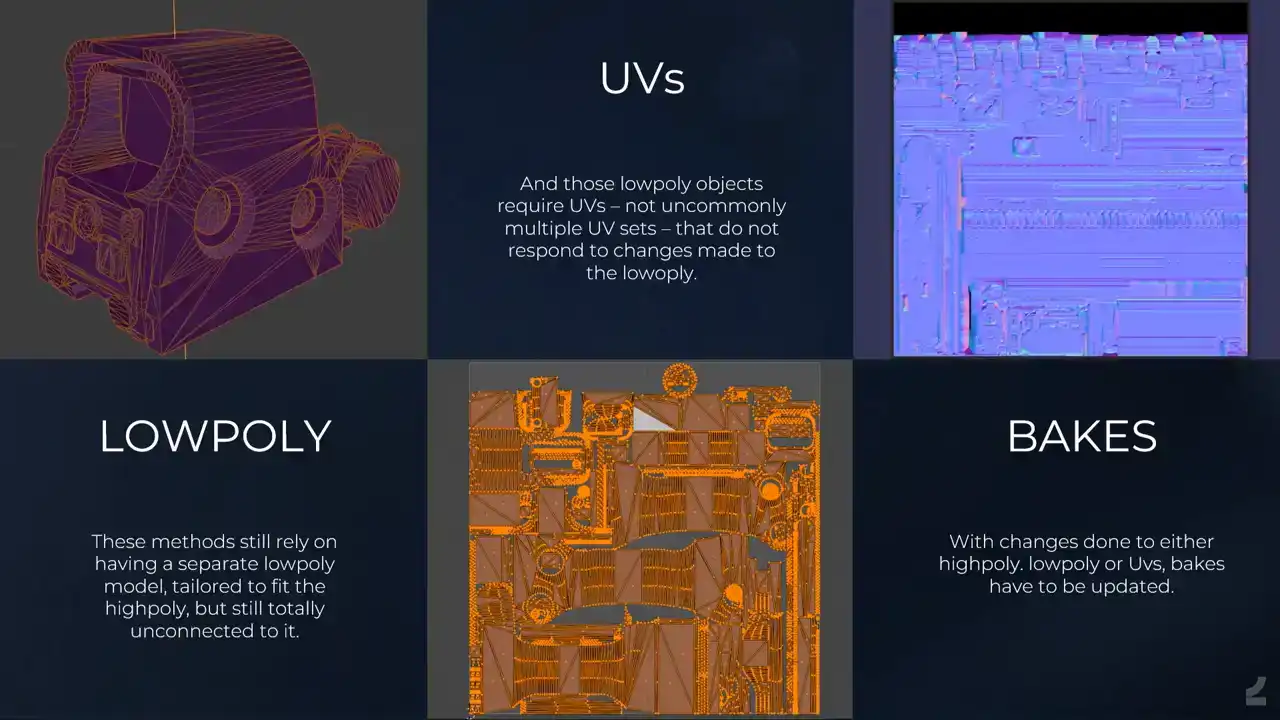
with its own UVs and with a setup for baking down the necessary information.
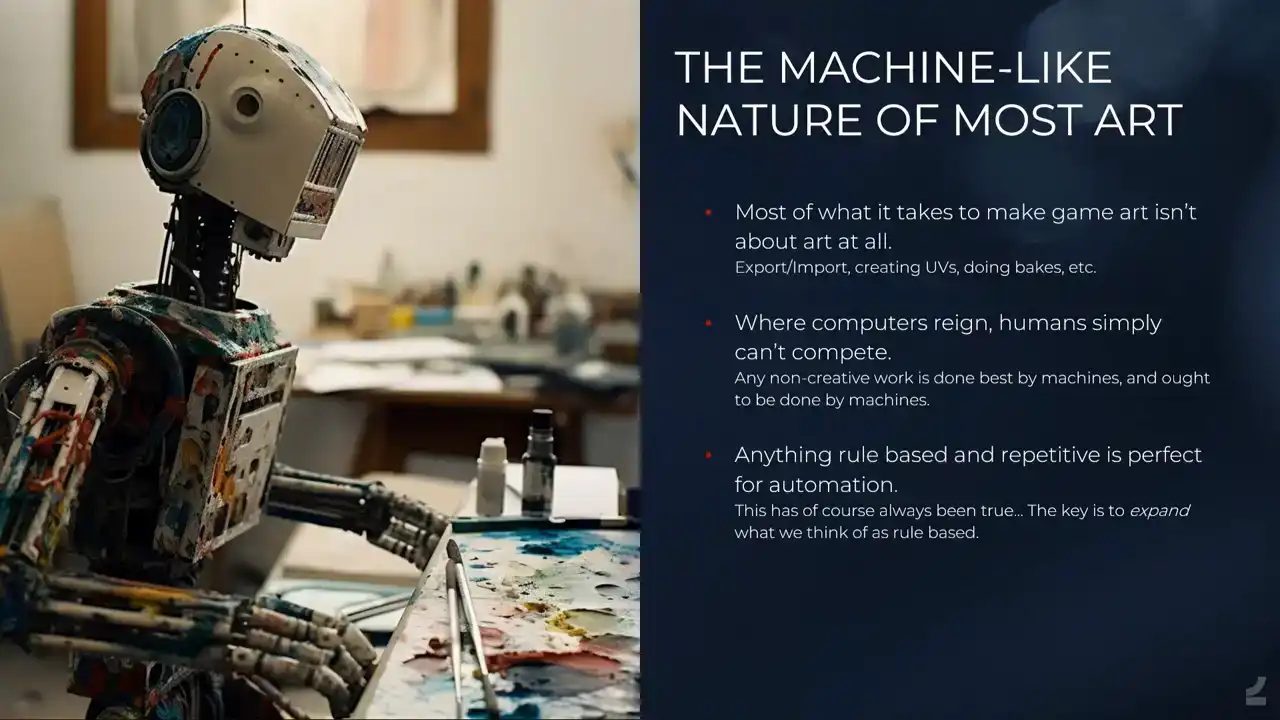
As anybody who has made games assets will have noticed, only a small fraction of time is spent on actually exploring anything creative. We go through the motions of the necessary steps, but in themselves, they don't allow for any meaningful expression. Sure, there's room for excellence. UVs can be better or worse, and the same goes, of course, for the less technical parts too, like building a high poly model. But humans simply can't compete with computers when it comes to precision of execution. When we've perfected something, like say a baking setup, we want to cement it forever so that everybody has instant access to that setup, preferably without even knowing that they do. It's easy to get into a mindset of, yeah, but there are so many factors that goes into doing X, and we can deal with a lot of factors. It just takes more time to solve, is all.

So, what we are striving for is a tool that's easy to use, gives us fast results, creates
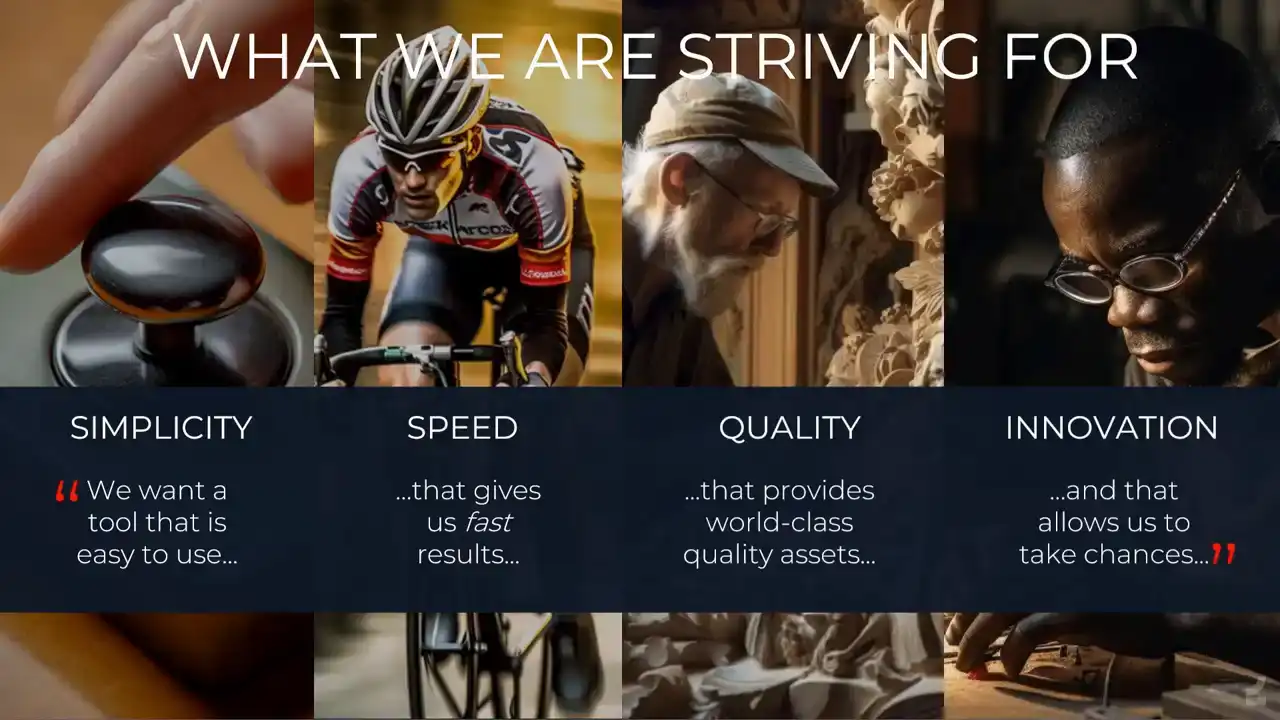
assets of world-class quality, and makes us afford taking chances to experiment. We want something that allows us to reinvent our craft and make it about true creativity instead of dealing with technical hassle. We want the simplest possible input and have it be automatically converted to our desired end result of a shippable game asset.

So enter the asset processor. To solve this, we have our internally built asset processor.
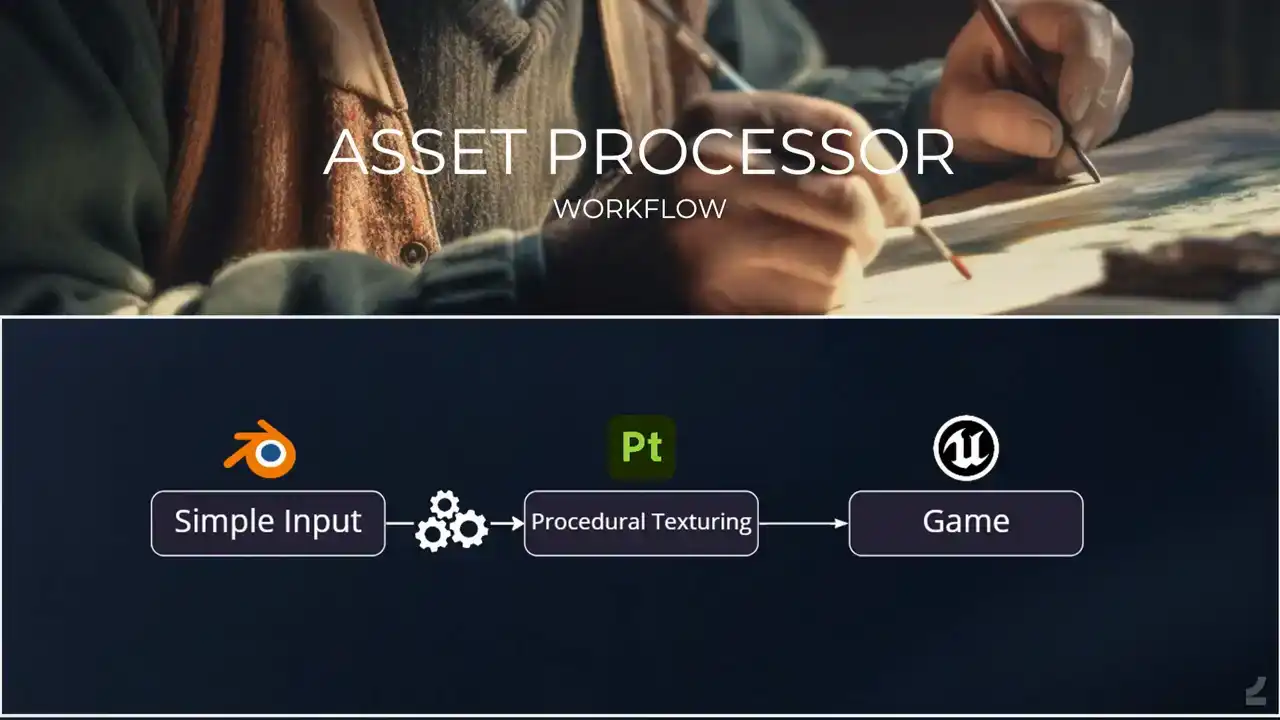
And it looks like something like this instead. Having a single point of input where the smallest possible amount of input is needed gets rid of most of the traditional steps. We start by setting up the input inside of Blender. From there, all of the behind the scenes magical Houdini stuff happens. That's why the Houdini process gears is the only step that doesn't actually have the Houdini logo. Sorry, side effects. But that's the important part. But from a user perspective they don even know and they shouldn care And outcomes and assets ready for texturing complete with UVs bakes and rig ready to be textured and submitted to the game

And there's that touching the face of God.
And this adds up to bringing assets creation time down from weeks to days, and iteration times from days to mere minutes.
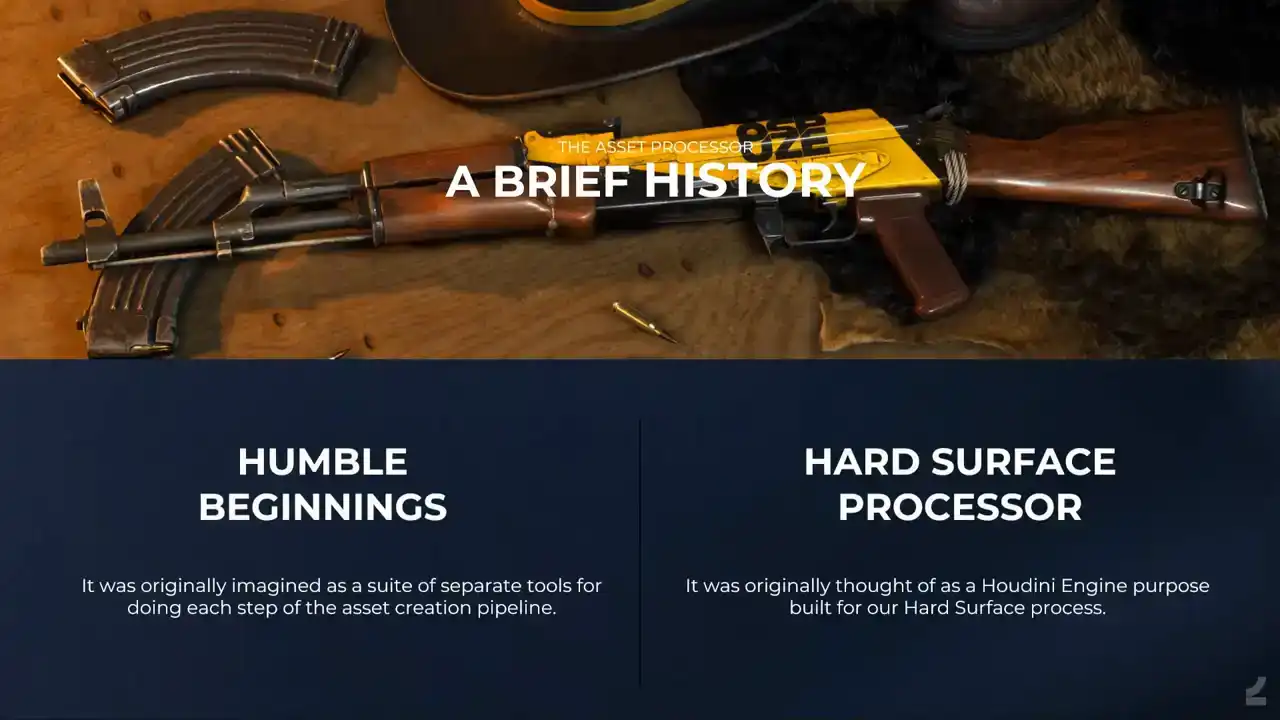
I think a brief history of how we got here. And the process had grown really organically. It originated with the thought that automating certain hard surface assets should be possible. You'll see that a lot of that part of the process looks like an automated the ZBrush workflow. It then moved over towards thinking that automating certain hard surface UVs should be possible as well. Mostly the basic cutting of hard edges and automatic layout stuff that a lot of people are using already. And why shouldn't baking be able to be automated as well? Like matching high poly objects to their respective low poly meshes shouldn't have to be a name-based manual task since it's all an issue of overlapping volumes and cage meshes and bake settings should be able to be the same across assets if they only have a normalized size. It took a while before it was clear that the true power came from stringing all of these steps together, and that once such a set up existed, we could attach any additional features on top of that framework. Hence, we needed sort of a purpose built Houdini engine for it all so that the input could easily be set up by artists. It wasn't initially clear that such a set up could run any process, and hence the asset processor was originally called the hard surface processor. Let's start by taking a look at what it looks like in practice on a simple asset in a dress
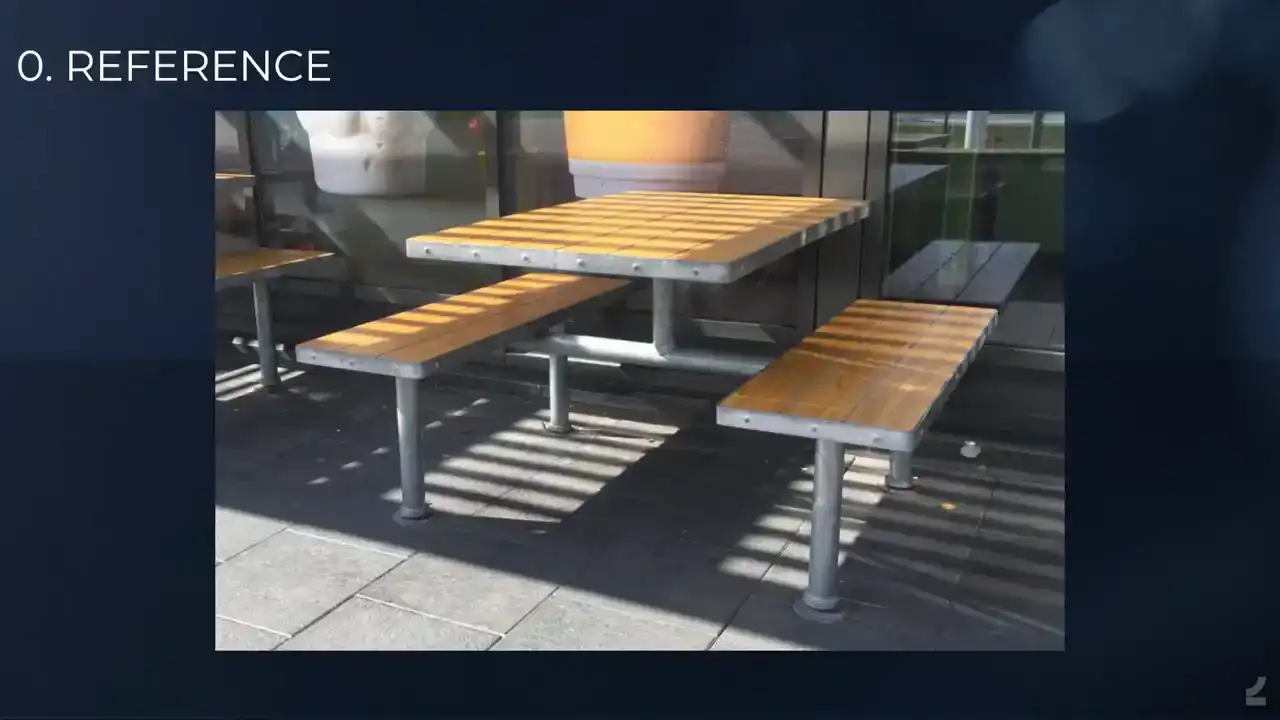
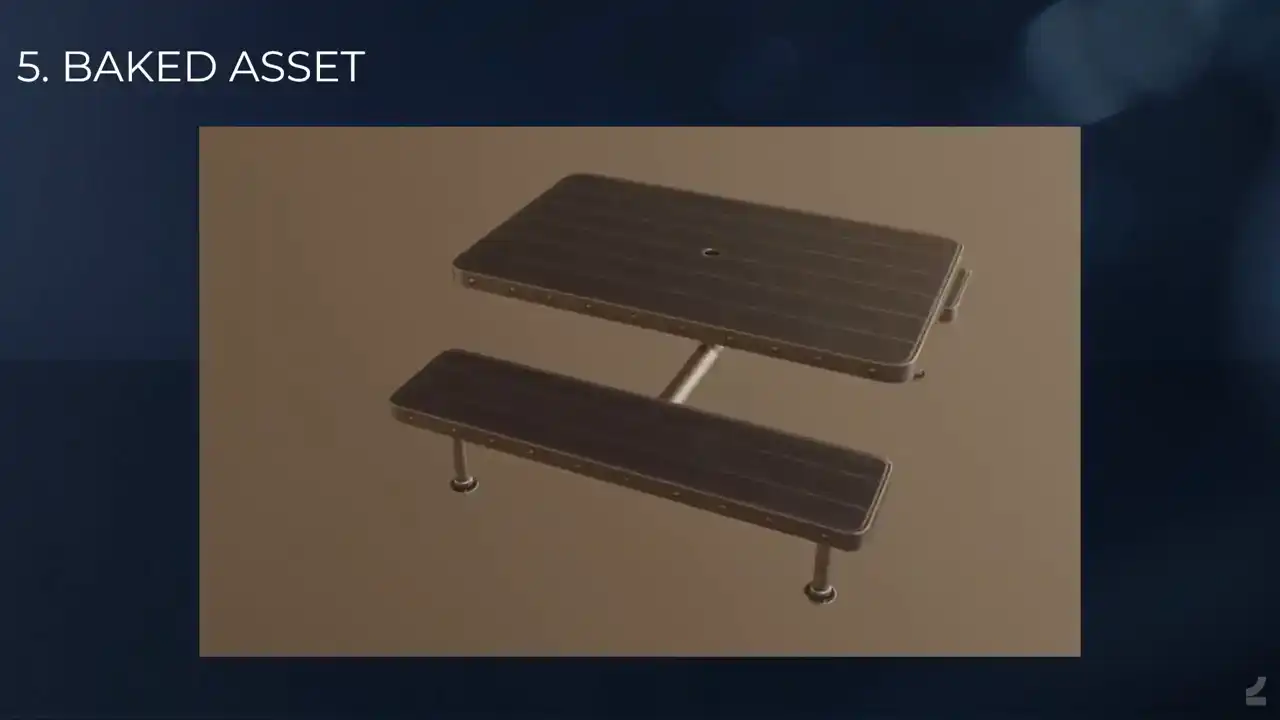
down way before getting deeper into it. As always, we begin by finding a reference for whatever it is that we want to recreate for our game. In this case, it's a fast food restaurant table.
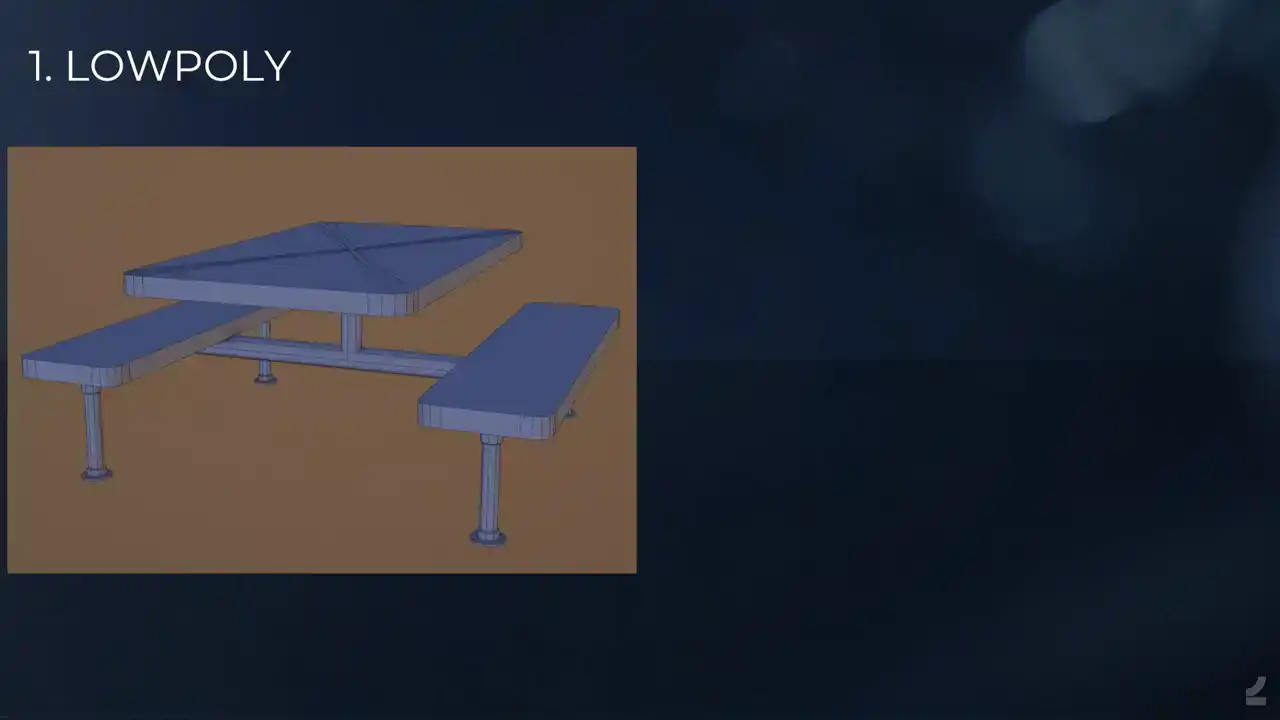
We begin by building the low poly, much like it will appear in game later. If we run the asset processor now, we'll see that it has already created UVs, a high poly and bakes for us to review inside of Blender. But we're obviously missing some important features from our reference, so let's attend to that next. We create intersection objects that will separate out the wooden parts of the tabletop and seat. If we process again and review the results, we'll see that these parts of the assets have now been separated in the high poly and that that information has been transferred to our low poly. We might have to look really closely for this. This arrow points you to what has changed. Of course, this processing between each step is just for clarity presentation purposes. You don't actually have to do it. Next, we add the slice planes to separate the wooden chunks into individual planks. We process again and we see that this indeed did the trick. There's an arrow again showing you what happened. And next we turn to adding the smaller details, like the bolts along the edge of the table and the welds where the metal parts have been attached. We do this through adding simple cylinders and boxes and if we process again, we can observe the results. So we have the bolt stuff and the little weld thingy. And now we're happy with the asset and we can spend a moment to marvel at our creation. This will have demonstrated some of the basic functionality of our hard surface process,
but it's of course important to realize that this won't only make tables for us. We run the very
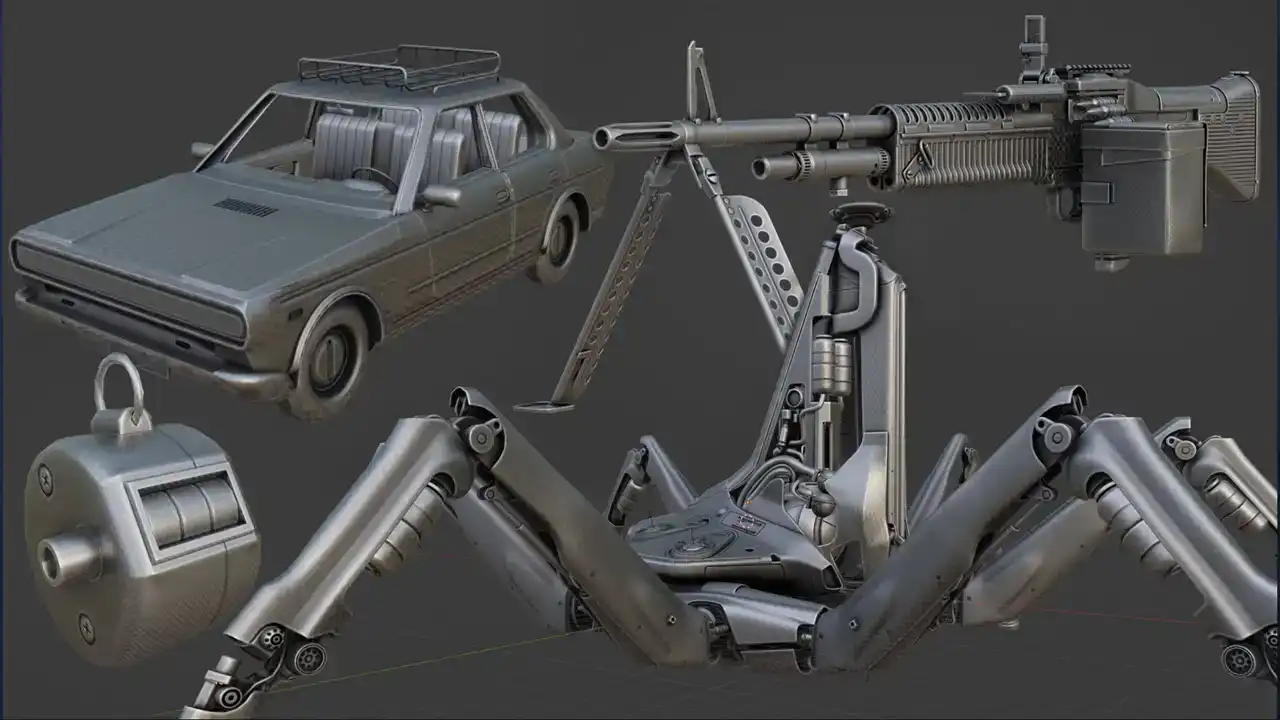
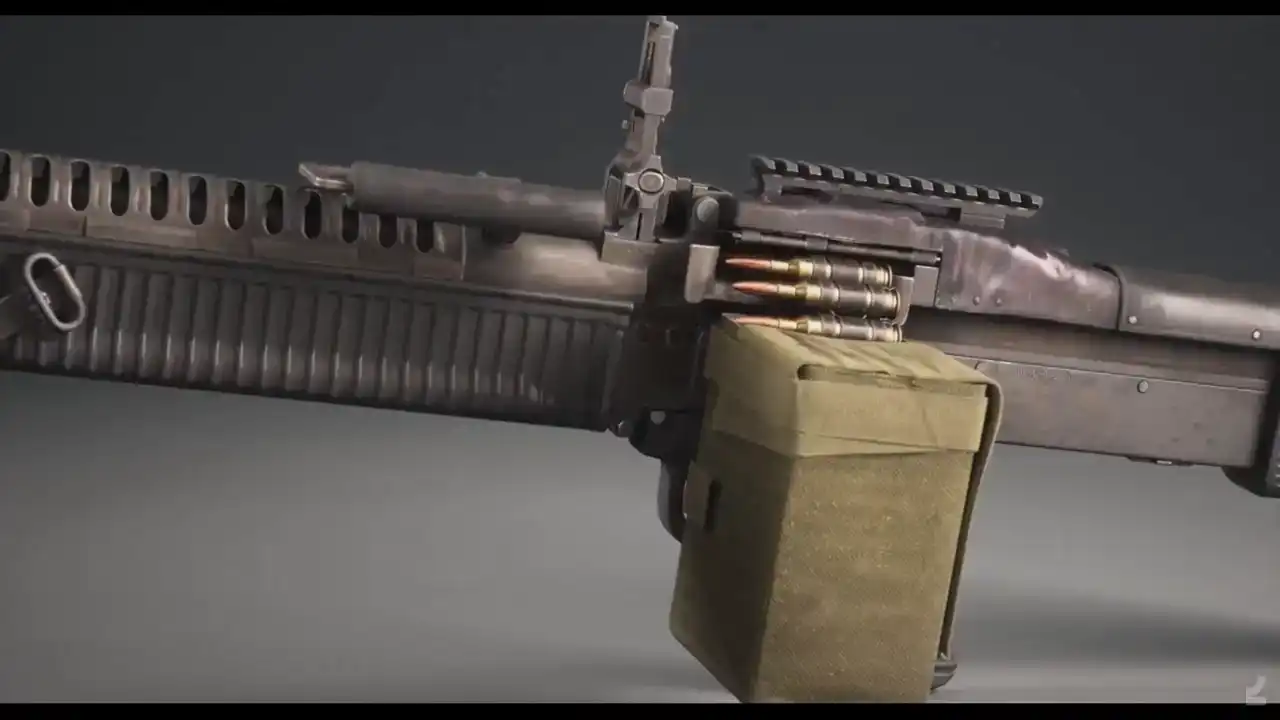
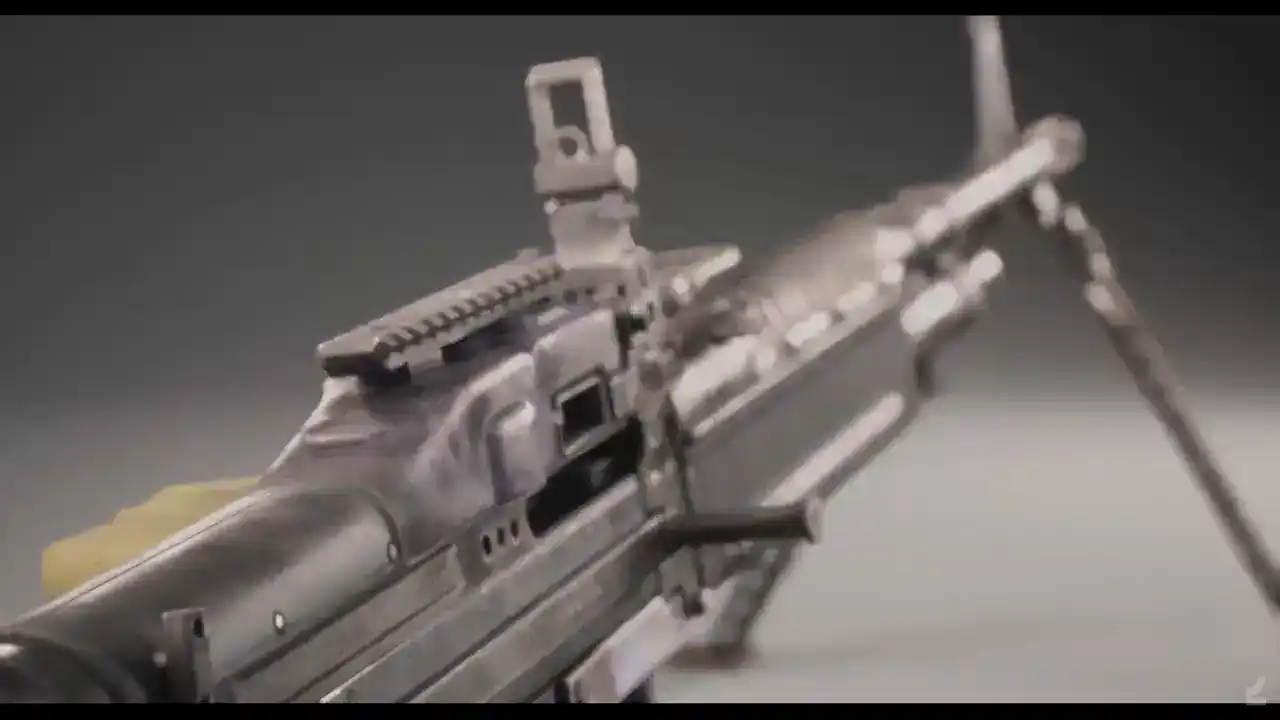
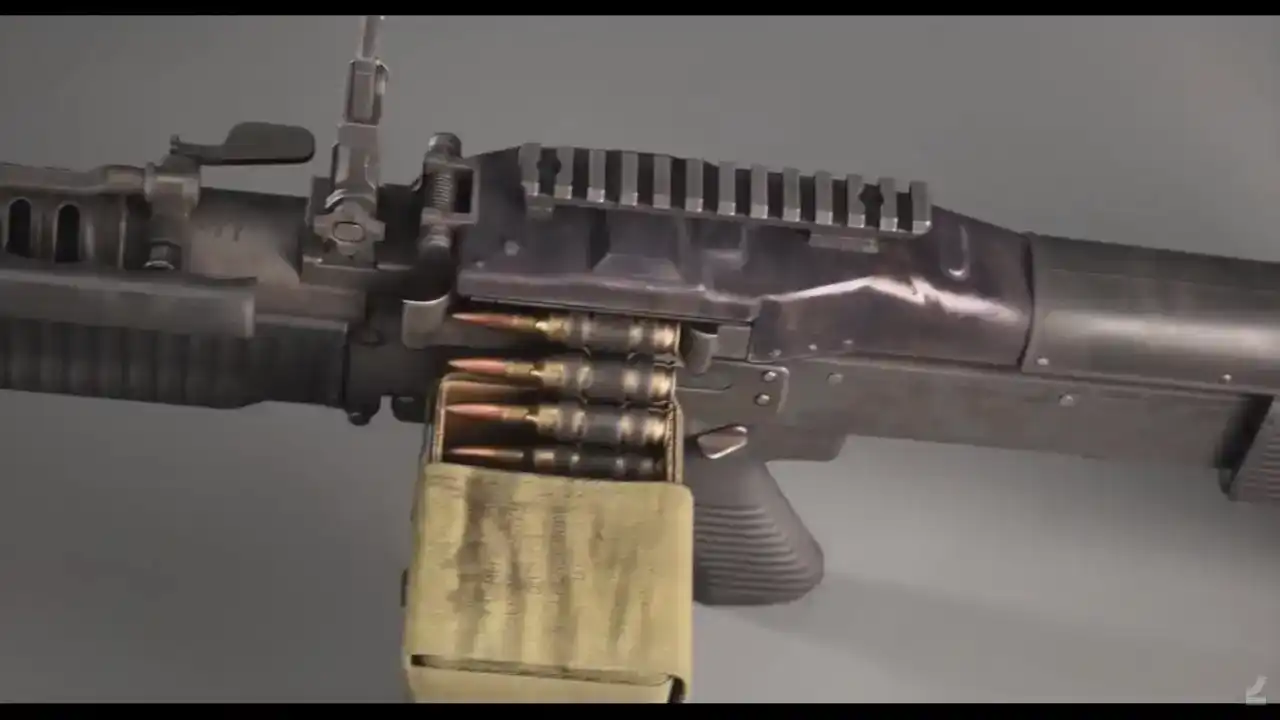
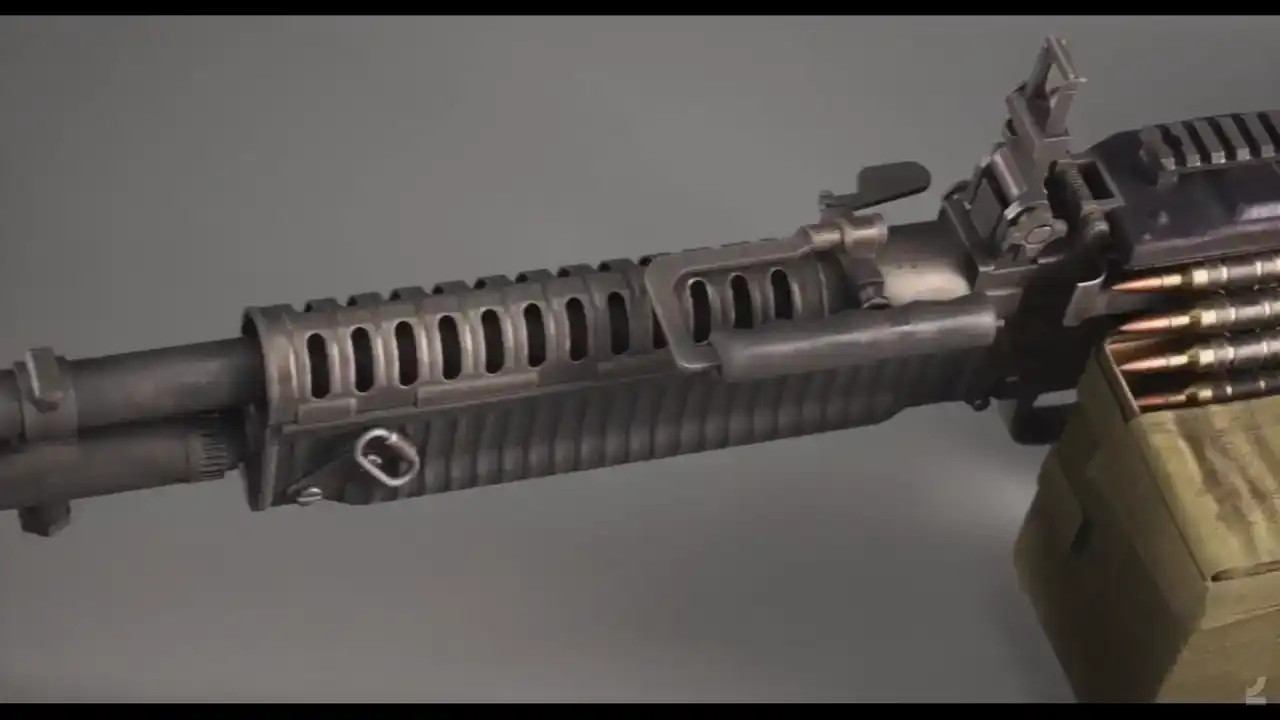
same process for all kinds of assets, weapons, vehicles, tiny weapon charms, enormous killer robots from space, and everything in between. Next up, we'll take a closer look at how the asset processor is used for a weapons asset, since those have traditionally been some of the most difficult and time-consuming assets to create. Here's what it looks like inside
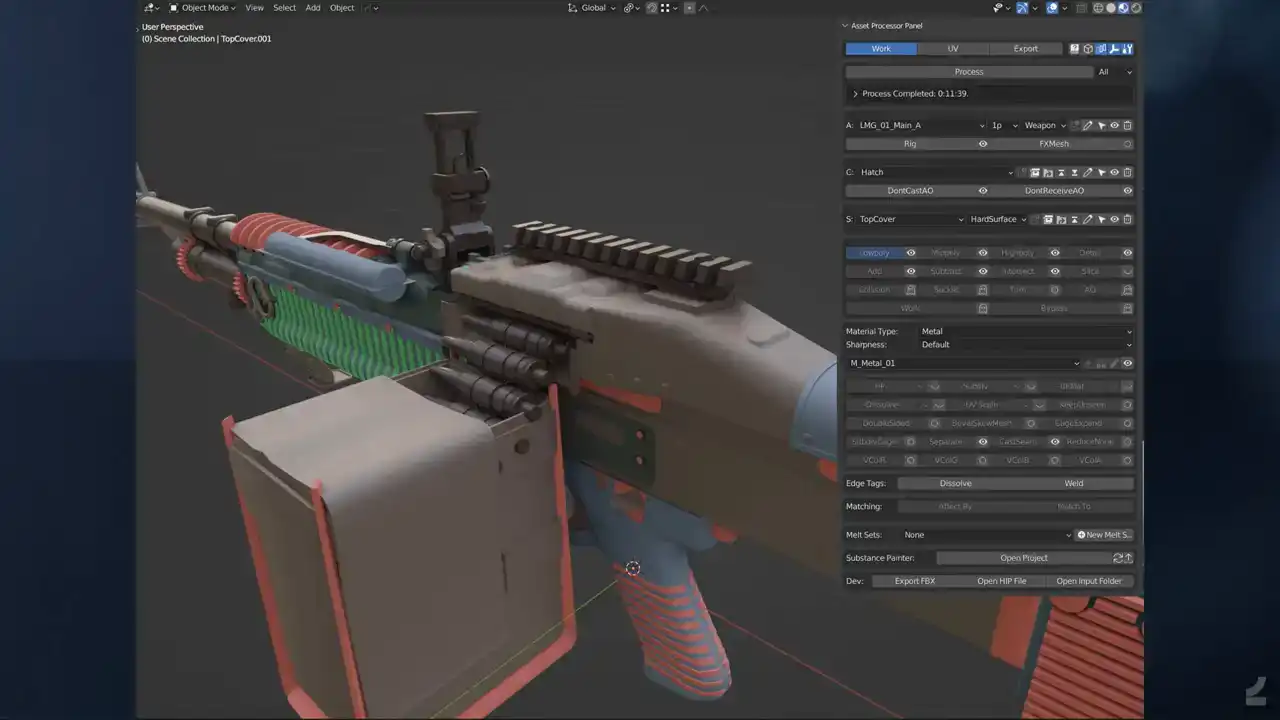
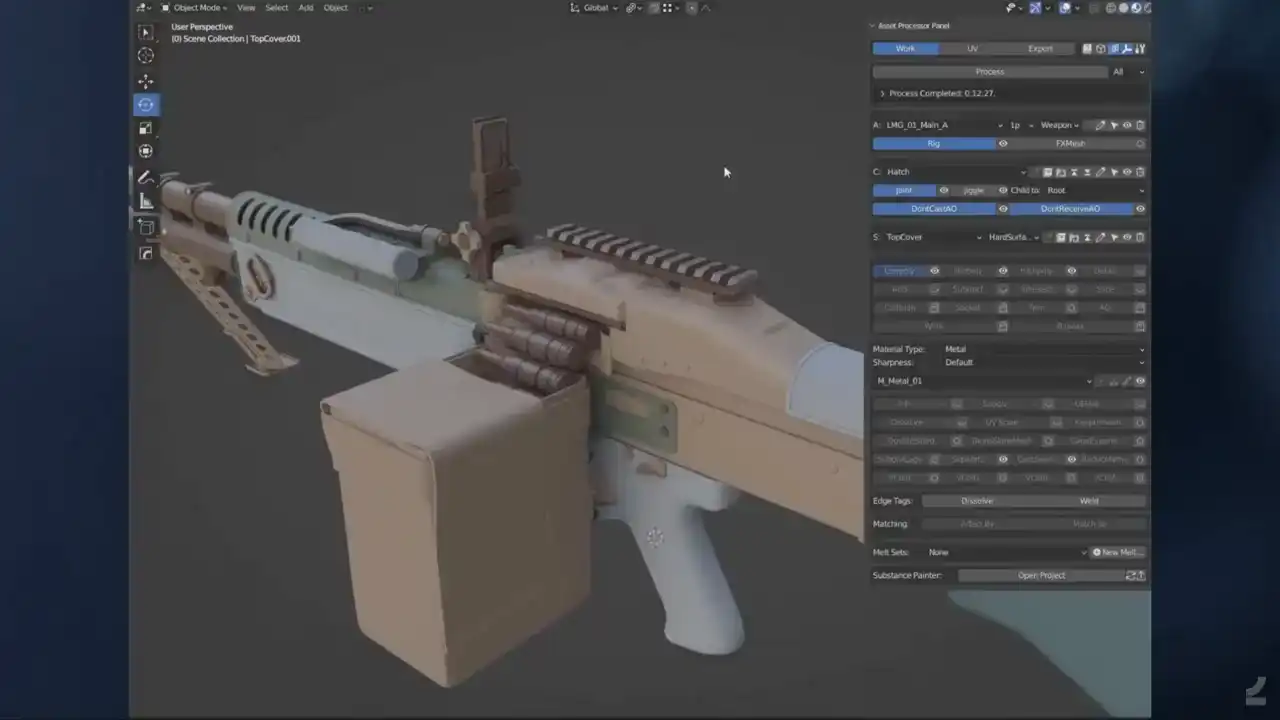
of Blender with the asset processor UI open. And let me pause here straight away, because internally we've been discussing the level of fear that a UI should be allowed to instill in users. And I'll actually go through this section by section and explain what it does.

But first, let me take a quick detour, if you'll allow. A quick aside on UI. The way I see it, there are two types of UI. UI that is made for novice users, which need to be instantly understandable and non-threatening, where getting deeper into something is designed to take time so as to ease the time. these users into it. The other type of UI is one that's built for expert users where what matters most is instant access to functionality without having to go through submenus of submenus to find what you're after.
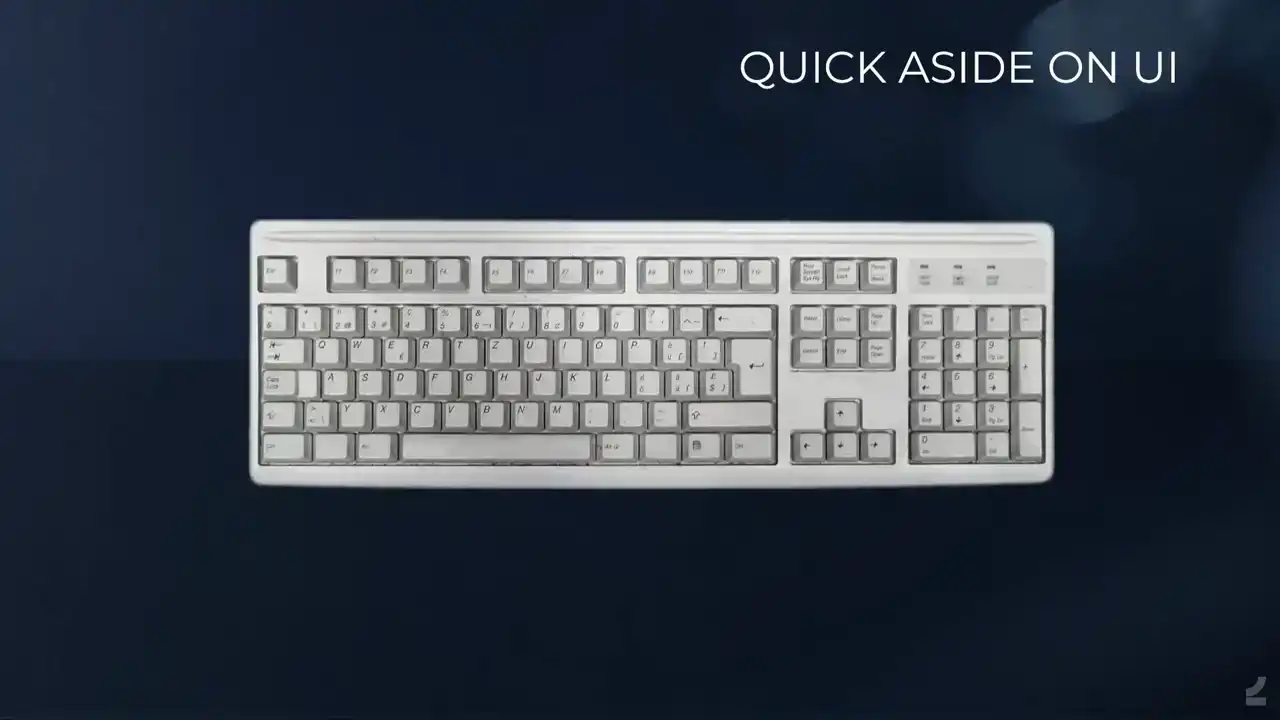
To demonstrate this, consider the common keyboard, for instance, it has a plethora of buttons with very little obvious categorization at a first or even second glance. But since all of us are expert keyboard users, I presume, we've learned that there are letters and numbers and the numpad and the F keys and the special characters and special buttons and other special buttons and arrows and maybe most importantly, the space bar. And it's just to show, people should be scared, but they're not because this is the type of functionality that you want when you're an expert user.

And my favorite example of this is actually the, if somebody's familiar with the Nightshade UV Editor for Maya, which is, this goes way back, but it presents everything for you immediately and it was so awesome to work with, like when doing manual UVs was a thing, it's not anymore. And then when Autodesk went about implementing this into native Maya, they lost some stuff in translation. So the same functionality exists, but they hid it in menus and submenus and it just made working with UVs difficult again for no obvious reason other than probably making sure that novice users weren't afraid by all of the power at their fingertips. Let me get back to the asset processor. So let's go through the asset processor UI properly. Not that I expect you to be using this directly after the presentation, but I think it would be good Anyways, so at the top, we have the scenes that we use to separate out. I mean, it makes dealing with work easier when you're like, here's the input and I get the output in a different scene. Next up, we have the process button, which is what runs the process. You also have a little setting to determine if you want to run all of the assets in the scene or just part of an asset and so on to speed up iteration times. And the log, and I'll return to the log later. And then you have the asset settings, where you set the name of the asset and what type of asset it is and so on with asset specific tags. You have the component section, which is the parts that make up an asset. And then the sub component setting, which is the parts that make up the sub component. And then you have the object settings where you say what type of object and input is. And all of this, of course, works then as a hierarchy within the asset. And at the bottom we have the substance painter to open the automatically set up project and reload all of the resources and so on when you've processed. And then there's some more UI. Where we have the object specific settings. So depending on what object type you've set, you'll have different settings here where you can set the material for instance. In the hard surface process, It's used to set the ID colors on the output bakes, and it's also used to set the level of roundness on the generated high poly with presets like sharp, sharpest, and that's bad naming, so now we also have sharpest plus plus. And then you have object tags. Some of these are absolutely essential, like being able to set what type of Unreal Engine material slot an object gets after the fact, if you need to override that type of stuff. Other things is just, it's my limited monkey brain not being able to figure out how to do certain things automatically yet, but I know it should be possible and I'll get there eventually. Like overriding, getting more subdivision steps on the automatic high-poly generation and so on. Like nobody should have to do it, but currently sometimes we do, and just to make sure that it always works, we have these extra tags to make sure that it does. Then we also have some additional edge tags. I'll get to the, no I won't, but they do stuff. And then there's, we have automatic matching for most things, but that's another step where like, if it fails for some reason, you can override it by setting the matching automatically, and that's like matching a subtract boolean to a mid poly object or whatever. And anytime you want to match an object to multiple other objects, you also have to set up the matching manually, but it's as easy as clicking the object and clicking match too, so that's really nice. And then we have something called the Melt Set, which is, I'll get to that maybe, it's Melt Set. And that's what that looks like. And the log it a tiny window into a black box Since any type of process depends on the input being correctly set up and there only so much that can be done automatically inside of Houdini to try to fix it, we need a way of letting artists know whenever there's something that's either been set up incorrectly or that has gone wrong during the process. This is a log from an asset that wasn't, or that was built before these log messages were implemented. So it showcases nicely the number of things that we can catch now that would be difficult for an artist to notice or even know about before. The log tells users about process time, errors, warnings, and generally information. Some of the log messages also come with operators for either selecting the problematic objects or automatically cleaning up things that the asset processor thinks are likely to be input errors. The log messages themselves are output from really neat SOPs and TOPs HDAs, which makes adding more of them from inside of Houdini super easy. We'll now take a look at what running the process from inside of Blender actually looks like on a real asset,
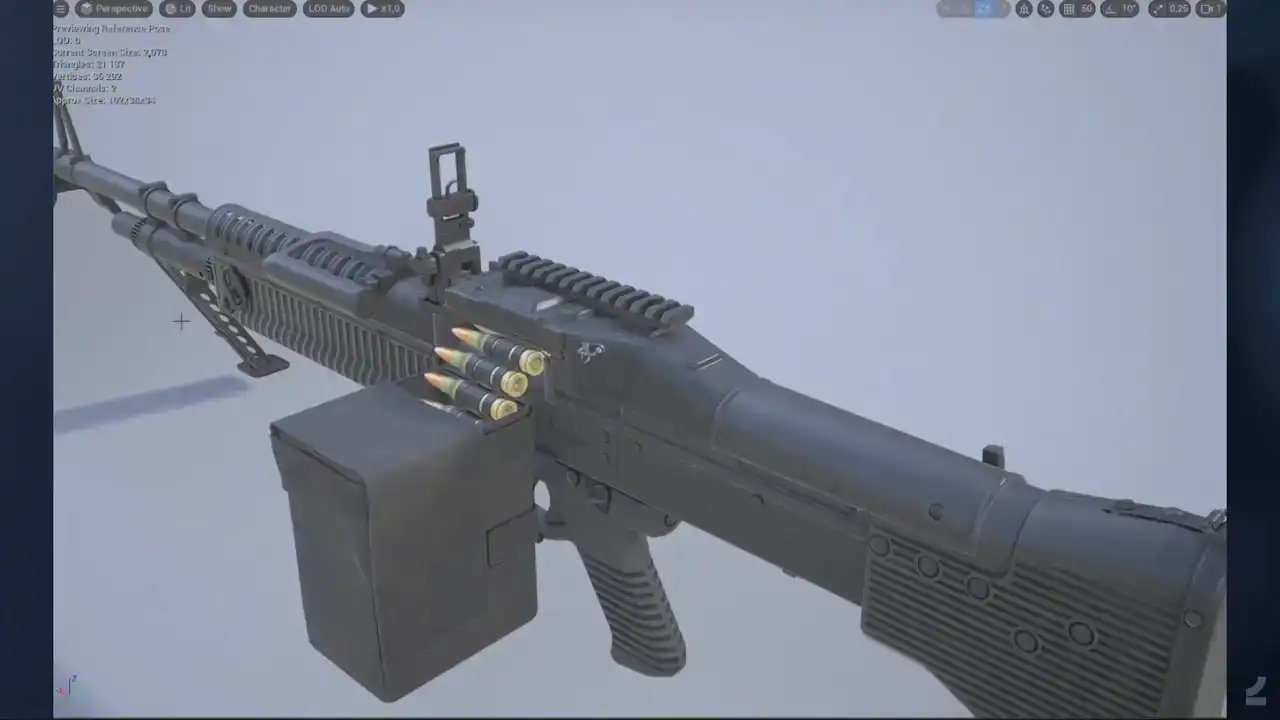
not a table asset, it's a silly demonstration object. So we have the same low poly input, and I'll just unhide some other object types here. So there we have a cast plane for making those plastic cast seams. And here's some add the booleans to add some details to the front grip and some subtract booleans to, well, subtract. And some intersection booleans on the back of those shell casings to get some additional detail there as well. And then I think it's time to press process. And I'll speed up the process time here for your consideration. But this is, so you have a progress bar, it tells you what's going on in the, and this is where I realized that I can showcase that you can continue working on the asset while you're processing, obviously. I won't do any productive work here, I'll just showcase the functionality. so I'll do some silly edits to the low poly mesh while it's processing in the background, make this grip a bit longer, extend that cast seam a bit to make sure that it still matches up, and then we'll go back to me patiently waiting for the process to run. And it opens up the painter to do all the baking stuff, and if we go to the export scene, we'll see that it has generated a high poly, generated UVs, generated bakes, and output it all into the proper painter setups and everything, and for us to review it inside of Blender. And if we go back here, we see that obviously the silly changes I made, hadn't made it into that round of process, so I'll process again just to show what that iteration looks like. Of course, I could have showcased something more useful here, like adding more details or adding a scope or whatever, but the important thing is seeing that, oh, look at that, it has made a new high poly and new UVs and new bakes and actually a new rig and so on as well.

So that's the gist of it.
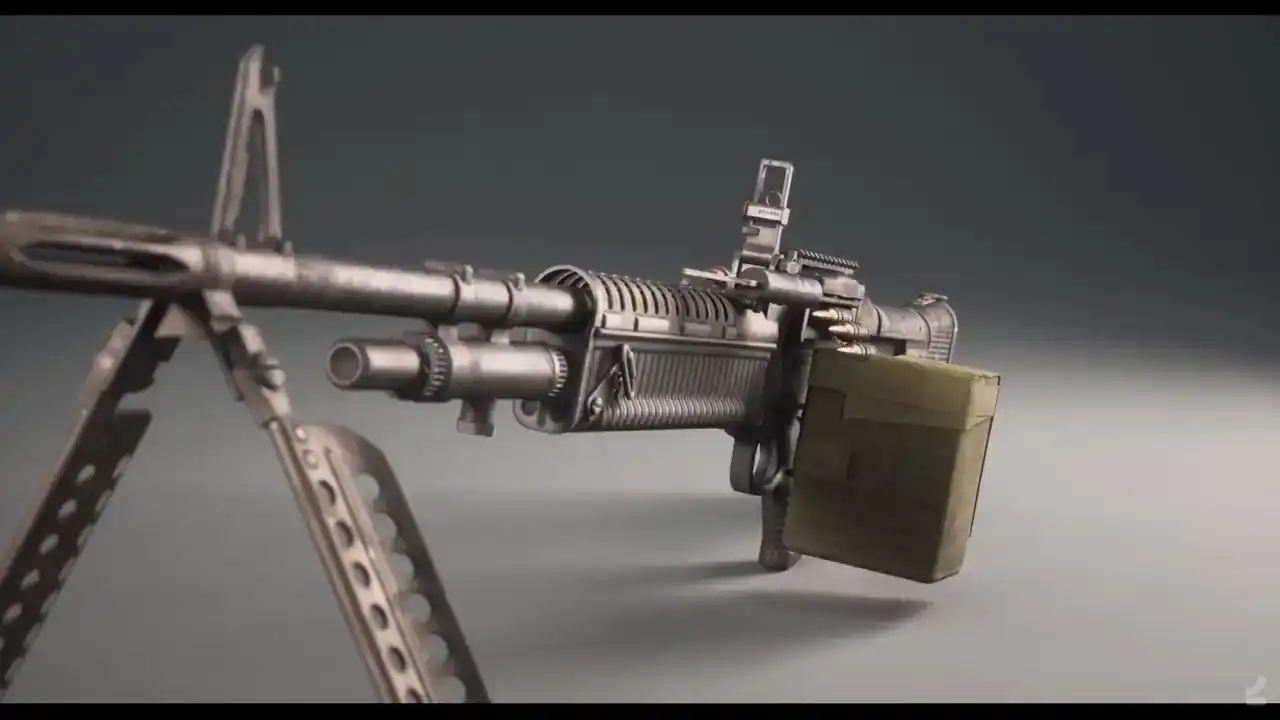
And here's what that asset looks like inside of Unreal with textures applied to it.
And I was actually surprised by, like initially I imagined
that we would have to do a lot more, like I mentioned,
that these automatic setups would work in some cases,
maybe half of the cases, but it turns out that I think

this mesh has maybe like one or two actual high poly inputs and everything else is just automated,

and those are like some minor springs, and I'll get around to why that is. Talk a bit about the input that we use,
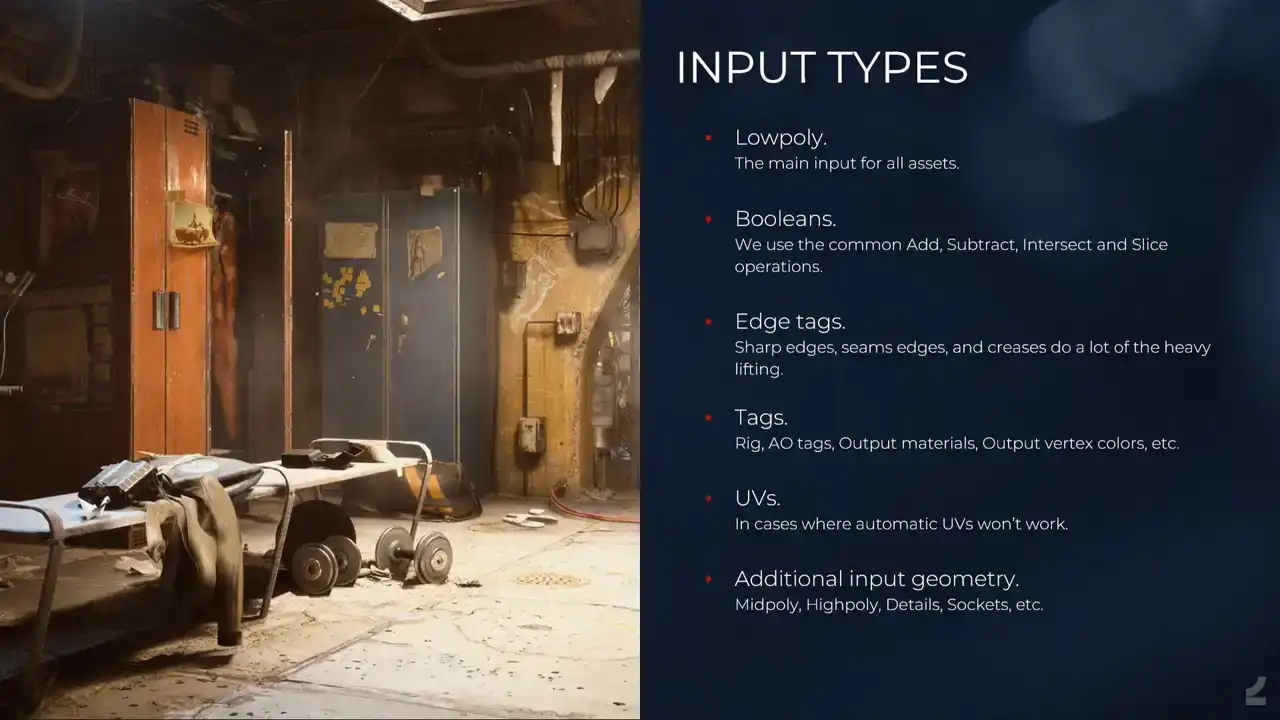
and what comes out of it. So the main input is the low poly, and there are a number of reasons for this. I mean, the low poly is what matters most, because in games, that's the only thing that actually makes it into the game. The rest is just data. And it's also the thing that's most easy to build. Like if you would have approached it from a different direction, say you build a high poly and you generate the rest, not only would it be difficult, but of course it's more difficult to build a high poly than it is to build a low poly. And then we have the booleans, like I showed, all of the common basic ones. We also set edge tags, which is a major thing, like setting sharp edges to have them act as creases for the high poly generation and as UV splits in the UV process and so on And then the tags that you saw like enabling automatic rigging of facets and so on And we can also, we can input UVs because I can't rely on automatic UVs always doing the trick, and I'll get back to how that works. And then we have the additional input geometry. So you can input an actual high poly or what we call a mid poly, which is, I won't talk about it, but it makes sense. And some of the other details and so on.
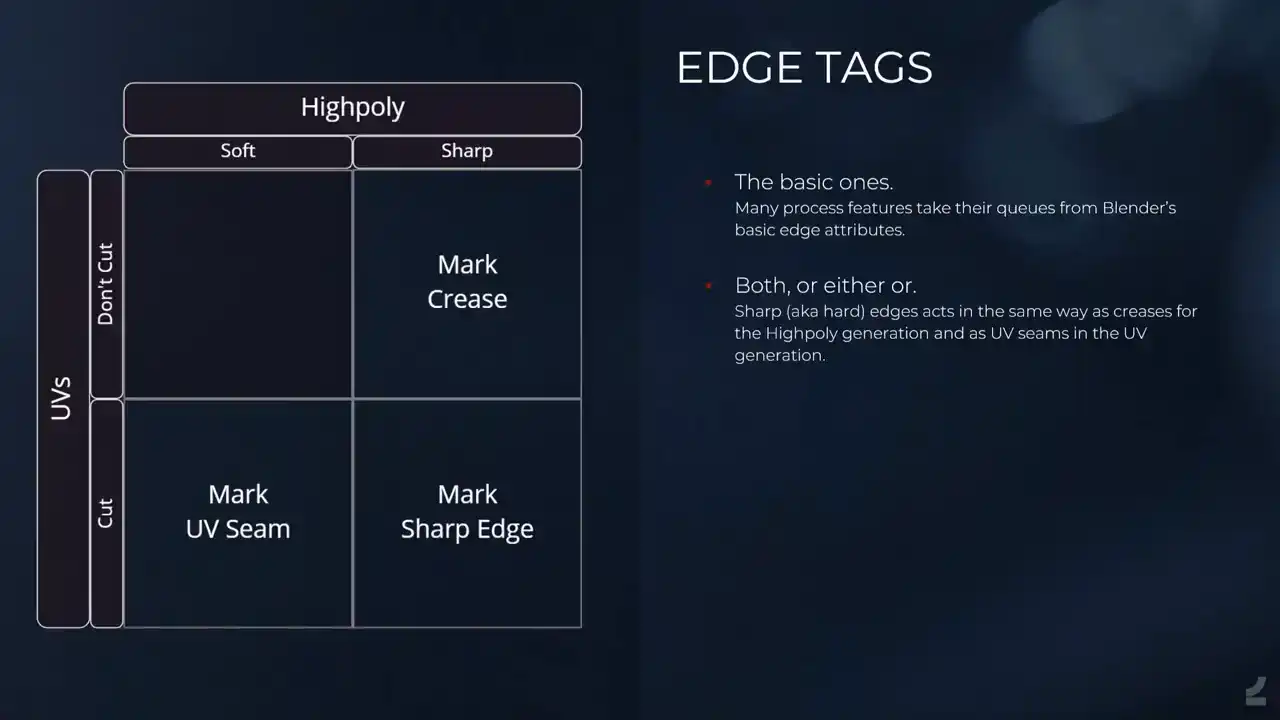
And that's the type of input that it takes. Just to go through the edge tags, because they're important, it looks complicated, and it's not, so we use Blender's default, like, edge tags where you can mark sharp, you can mark seam, and you can crease. And it's just the mark sharp does the creasing and the UV splitting, but if you only want one or the other, you use the crease or UV seam instead. And Houdini awakens and does all of the hidden magical things. So we run everything through a PDG net. It looks simple here, but it's subnets in subnets and so on. Most of this is the same for any type of asset and any type of process that we run, with the important thing being the processes right after the import, where it's dynamically spawns processes depending on what processes exist in the thing currently being processed. And we did that because we noticed that since our processes are quite heavy, it took a long time, like additional time to process just because we spawned in all of the processes. I don't know if this has changed. Like something happened in Houdini 19.5 where it shaved off like minutes on the processing just on the opening files, and it's glorious. Like spending a lot of time optimizing stuff and then suddenly just updating Houdini and getting huge optimizations. It's like, thank you. And then it does the export and the baking and so on. And the input, I'll talk a bit about how it's being treated inside of Houdini.
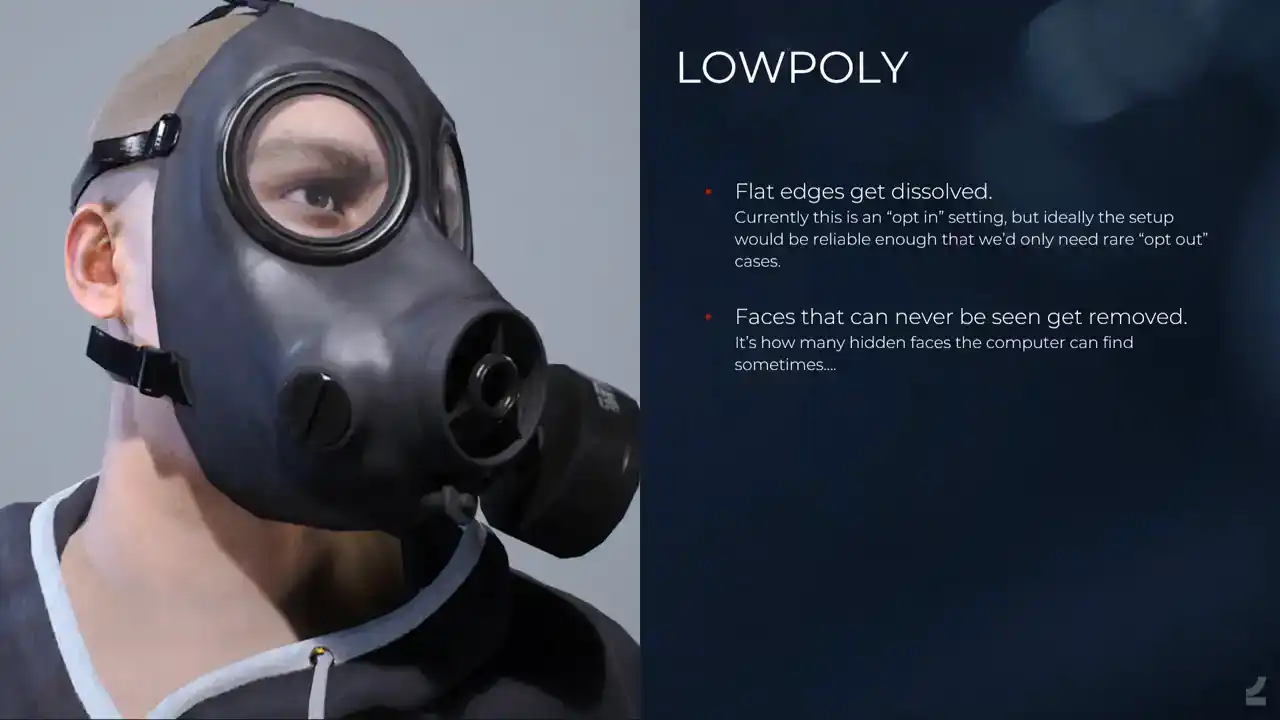
And not a lot of things happen to the low poly because it's close to what it needs to be, but like flat edges get dissolved and so on, and hidden faces get removed as well, so it's just checking whether faces are actually exposed and if they're not, why not remove them, and it's a nice treat for artists where they're like, oh, 200 faces were removed and I didn't even have to care. I'm like, yes, there's more.

And the UVs, it's trickier automating UVs. automating UVs. I know that there's a lot of like automatic UV solutions and I mean Houdini has its own auto UVs and it's not, I mean it gives you UVs but it doesn't give you the UVs you want when you're making games. So this is I think like the most complex part of the setup because there's a
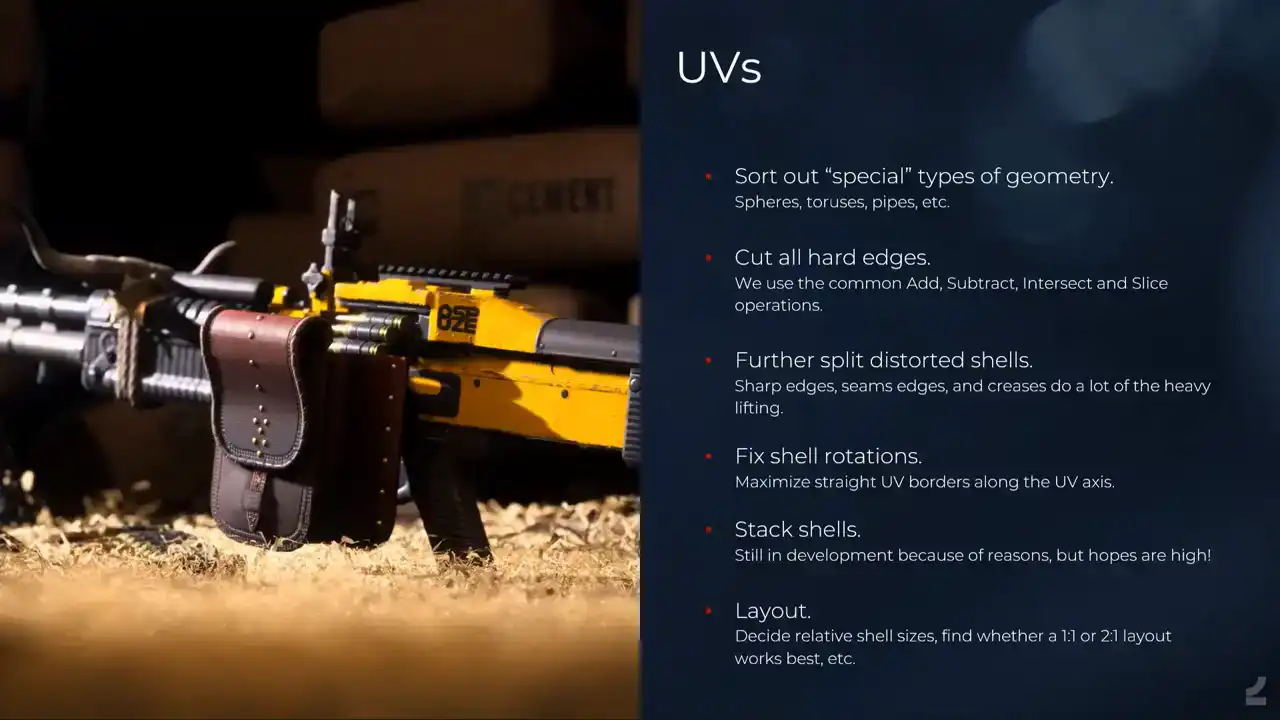
lot of edge cases and I'll go through like a basic overview of what the setup does. So first it It sorts out special types of geometry. So like toruses, googled it, and you can also say tori would be the Latin plural of the torus, and pipes and spheres and so on that have like quite special requirements for UVs. And it's just, it's been a lot of fun finding ways to detect these geometries in Houdini, being like what makes a torus a torus? That's the type of thing that we enjoy talking about at Embark. We've solved it. And you think nobody's ever gonna use this. Like how many toruses do we have on our assets? And then it shows up all the time. And then again, people don't know that this is difficult. They just add a torus and it gets automatically UV unwrapped and so on and it works. And you're like, yes, we got it. And then it does the standardized, like cutting off all of the hard edges, splitting those into, I noticed now that I haven't updated the text for this. So we used to come and add, that's not right. We split up all of the hard edges into separate shells, and then we determine which shells still have a lot of distortion, and then we do some checks to find where the ideal seam location would be for those shells, and we split them and unwrap them, and we determine whether or not that was successful, and so on, and once we have nice shells, we need to make sure that they're properly aligned. A lot of the time they are automatically from the flattened node, but sometimes also they aren't, so if you're interested in this stuff, I mean, you want them to align because you want the pixels to align with the borders of the shells and so on, so what we do is we take the borders of UV shells and we look at all of the edge angles, and we take the accumulated length of all of the parallel or perpendicular edges and we align it to those and it glorious Next up, this isn't actually implemented yet and it's been in development for years now and I saw a post just this morning where somebody is like, shouldn't these be stacked? Yes, they should, I'm sorry. But what it does is it takes a lot of things into consideration like the area of a shell and the number of points and the AO requirements or whether there are any details on it and from what angle you can see them and so on and then it tries to determine what shells you can overlap because this is obviously doing it manually. It's a painful and slow work and people get it wrong and then they have to redo stuff and so it needs to be automated. And then it does the layout which is, I mean the default UV layout node in Houdini is amazing and it's fast and it does a great job. And we just need to make sure that we check for additional things like whether or not it should be a square layout or a non-square layout and so on to optimize for UV coverage. And also determine things like the amount of padding between shells depending on what type of asset it is and how big it is and what the ideal output texture resolution is and what shells should be scaled up and scaled down and so on depending on how much they're seen and from what angle, and there's a lot of that stuff that needs to happen. That's the basic, then you have automatic UVs for hard surface stuff at least.

And then we have some additional UV features, which is like I call them closed strips for instance, which they're not distorted, but we wanna split them anyways and we wanna straighten them so that we optimize UV space and it's one of those things that's very neat. And for a mesh like this that doesn't have perfect grid topology, it's a bit more difficult, but we can still make a medial axis skeleton and then we point deform it and so on. And it's a lot of just trying to do things and then after the fact evaluating it and going back a step. It didn't work for this one, but it works sometimes. So we do that a lot.
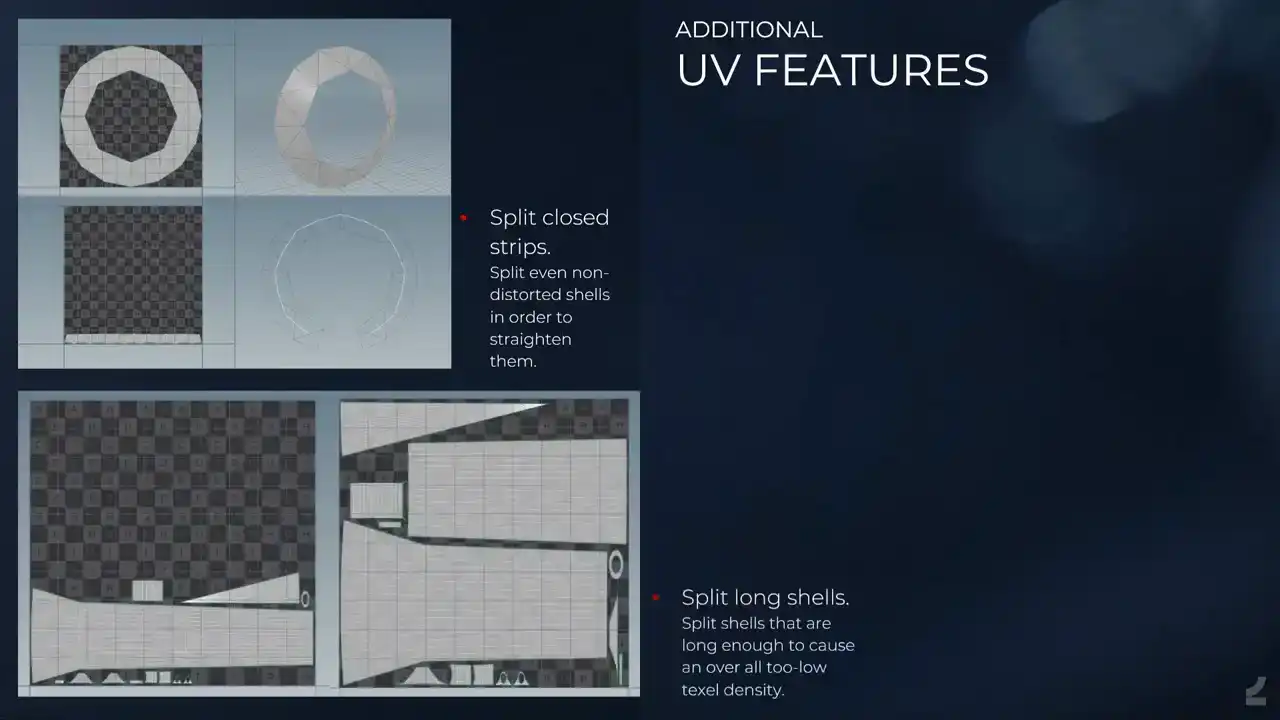
And then there's this neat feature, which is like a lot of the time, when people expect automatic UVs, they'll just accept whatever they get, and they shouldn't, they should review work. But the super nice feature is when you have really long shells, of course, the entire layout will be limited by the size of that one shell. So what the process does is it says, it says, wait a minute, this is long, you're gonna get super bad coverage, even with a non-square layout like this one. So I'll split it for you, and then I'll do that, and then you get much better coverage, which is nice. And then the scaling, so we have like input locator, or like empty in Blender, that's like this is the camera position for the weapon, please scale up and scale down UVs and so on.

And then, this is incredible. We also, for weapons and gadgets and anything that needs skins, we get a secondary UV set with tileable UVs. It looks horrible, but if you know about this, it's supposed to. It's difficult to work with because it's so horrible, but computers are good at this stuff once we've figured it out. It's like, you start with the shell and then you get another one and try to align it and match it up, and so you have nicely flowing patterns across assets, actually, and across UV shells and across everything, which is, like, it takes days per asset doing just this UV set, and it's one of those things, like, iteration times, going back, changing this weapon to something else or adding something and then being all like, oh, I have to revisit this UV nightmare. No, no, you don't. It's automated. Beautiful.
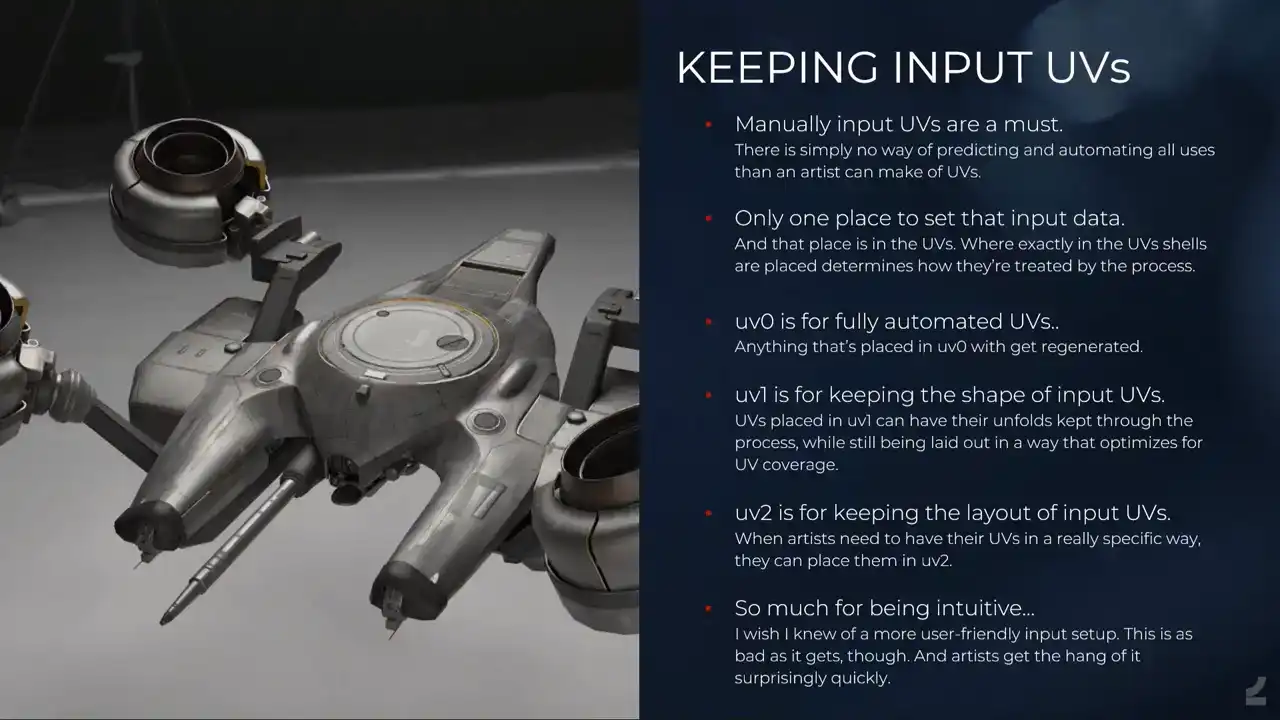
But then, of course, we need to be able to keep input UVs because what if there's something that the automatic UVs can't do yet? And see how silly this is. The way that I've thought about doing it, and it's not optimal and it's not intuitive, and I'm ashamed and I'm being vulnerable right now, is it's the only type of input that we're currently setting on a per-face basis. So everything else, I mean, we can set it on the mesh as a tag and so on, but this, since this, I mean, you want to be able to have a large complex mesh and then say, oh, it fails on this one difficult area, I just want to make that one shell manually and then do all of the rest automatically, which means that we have to make that UV in the UVs anyway. So the way that we do it is we set up multiple UV channels on the input. and they do different things. And then depending on where you place those UV shells in the UV space, you either keep them or you make them automatically, or you say, I don't even want any UVs for this thing, so I'll place that shell over here. And it's proven to be a very important thing to have. Surprisingly though, I thought it would be used mostly for shells that just don't unwrap nicely, but it's used mostly for things like having a secondary UV set with decals on it. So it's really like this one phase should just be mapped to the zero to one space in the secondary UV space. And it's like, I can't do that automatically. So we have this.

And next onto the high poly, it's all about volume.
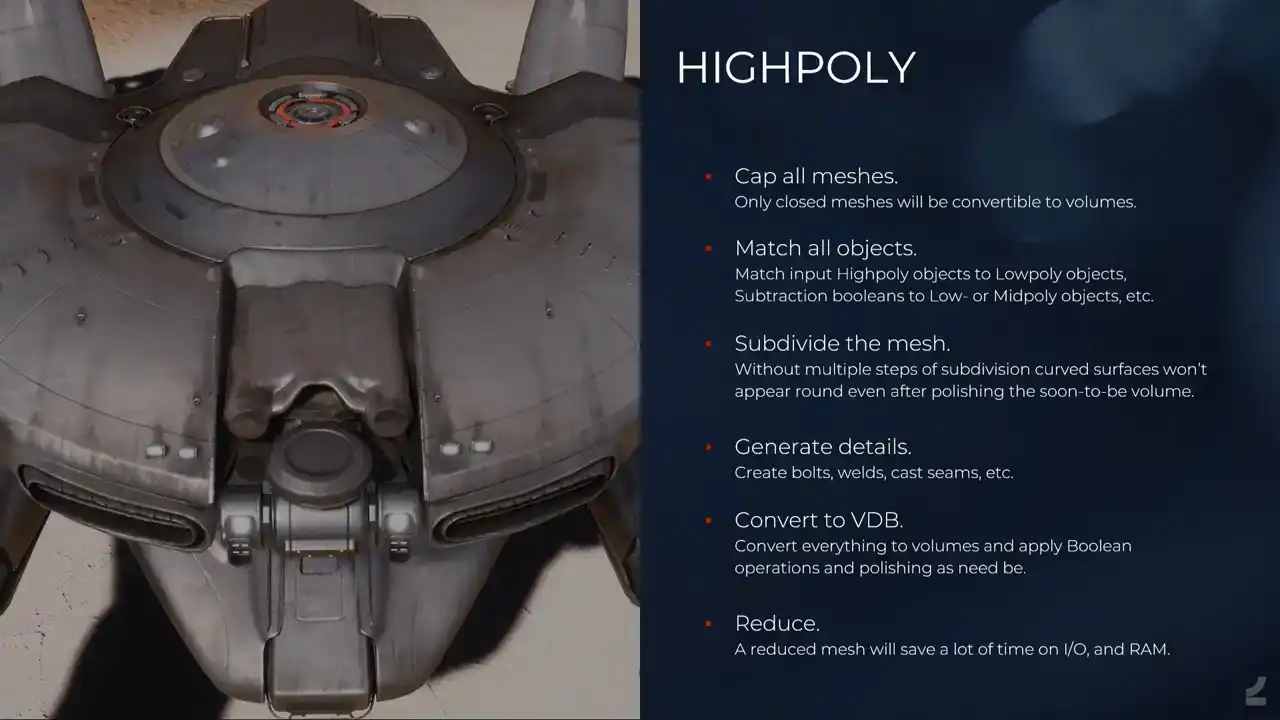
And I'll do the same thing where I just go through the like an overview of what it looks like. First, we need to make sure that we cap all of our meshes since otherwise we can't convert them to volumes. The process tries to cap everything automatically, but since that's also difficult sometimes, what we do is you actually, you can cap the mesh inside of Blender and then we add what we call a delete material to those faces, which just tells the process that for the low poly generation, remove these faces, but for the high poly, we want to keep them for volume conversion. And it does a matching of all of the objects. It creates everything that objects can match to gets converted to a point cloud, and then all of the objects that need to match to something, they just group those points by volume, and then determines which one do I belong to, and which points can I actually be matched to, and so on. And it sounds straightforward, but then it turns out that when you have so many object types that can match in so many ways and so on, it's a bit complicated. In Houdini, not for users, but for me. And then it does a subdivision of the mesh, so it takes all of the hard edges and all of the input creases, and it creases them just to a maximum, and then does a subdivision. And this is also something that I figured that it would fail a lot for these slightly round shapes, because it's, I mean, being a subdivision, it obviously still relies on topology and so on, but since we later turn this into BDBs and polish them and so on. A lot of those, like the pinching that happens and so on gets smoothed out anyway. So it works almost all of the time. And when it doesn't, you just add a few more loops like if you were building subdivision models and those that just get dissolved in the low poly generation anyways. And then we have details. So it's all those boxes that we added for like saying I want to weld here. It generates those welds and so on. I mean, it's simple creating splines and adding things to them. And we have bolts and cast seams, and I'll talk more about those. And then it converts everything to VDB and applies all of the Boolean operations. In the previous talk that I held in 2021, we did the Booleans on geometry, and I applauded Houdini for having such a solid Boolean Boolean system, even on geometry. But then I figured what's more solid? Volumes. And since we convert everything to volumes anyways, why not do it instead of doing the, because what I was doing then was converting everything multiple times to volumes and back and forth, and it doesn't make sense, and this is a lot faster just doing everything with volumes. And then the polishing and so on, and it looks like a high poly. And then of course we automatically as well reduce it and this is mostly because it saves a lot of time on reading and writing those files and we would, especially for like the big robot enemies that you saw, like when those are volumes and converted to geometry and then you try to save those out and even with like 256 gigs of RAM the computer would be upset, and so this helps a lot. Even if it takes time reducing the meshes, it saves time. Taking time saves time. And then we have some, I'll go in a bit deeper on the high poly, how much am I, I'm talking a lot, sorry, Darko. We have Bolt, which is like, I don't know, it's proceduralism 101, But it's, yeah, you make all of the possible bolts with all of the possible inputs. And people set this in the asset processor UI where it's like, I would want this type of bolt. And of course, all of the permutations gives us hundreds and hundreds of bolt types. And so we input the cylinders in Blender to the left. And in the high poly generation, we see that we have. And it one of those things where if you feedbacked on other people meshes and they built bolts and the bolts don look like bolts You wanna fix bolts forever so that people don have to model their own ugly bolts
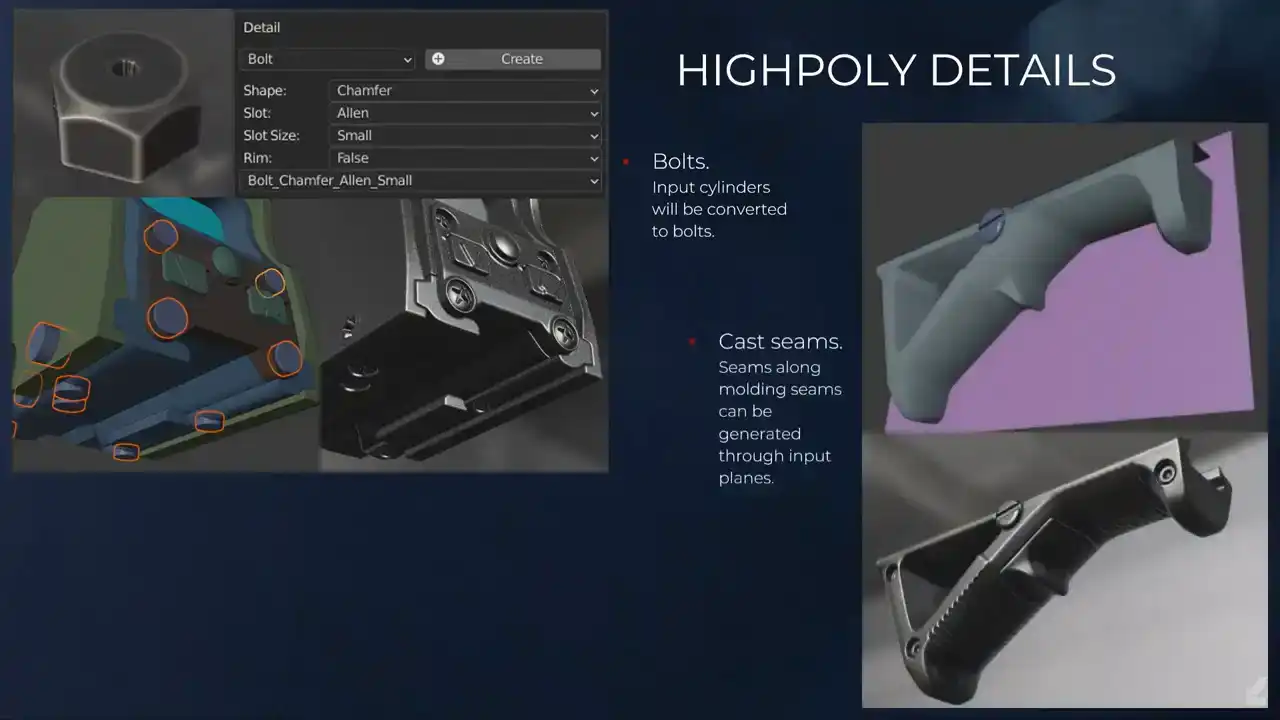
And then we have cast seams, which is you input this plane and where the plane cuts the mesh, you get these. Maybe it's hard to see here, but it's those subtle details to get like plastic to look like plastic and so on. It's also one of those things where like people would do it in other, like a subdivision model and you add the splits and you just move it out a bit, and it's too wide, and it messes up the volumes. And then welds, what they look like currently is what they look like to the left, and it works most of the time. I did some tests on improving them and making them look more nice and so on, but it hasn't been implemented yet. But it's one of those things, again, where everything is procedural. When I push this, everybody will suddenly just automatically be able to make nicer looking welds forever, which is what we want, progress.

I'll talk a bit about some of the limitations with doing automatic high poly generation with VDBs, which is of course, say we want to shape like this, but we're good 3D artists, so we want to optimize what the low poly looks like. Of course, if we process that, it will look like this, which is wrong. How do we solve this? We input the high poly. That's the way to do it. And then we get a nice baked result because even if we were to process this low poly, since everything is VDB, it would just melt it, right? And it wouldn't look the way it should, so we have the option to input high polys. Another limitation is it doesn't deal very well with the super tight geometry. Ah, it broke. And the way to fix this is, of course, adding a lot of voxels, which is heavy and silly and so on. So it's another good case where maybe you just want to input the high poly instead or make the mesh ticker. Baking, transfer the glorious information. So we've automated like mesh explosion. If you ever baked AO, you know that it has specialty. Duplicate everything and you move it out and you export everything and it's a hassle. So instead we have shown at the top here, we have those two tags for our components, which are parts of our assets, where we say, I want this one to not cast AO on the surrounding components, or I want this one to not receive AO from the other components. And then of course you can enable both of them to say that this acts as an isolated bake, which just makes this super easy. And we also have the option to like, when you've split something, so what happens is of course you duplicate a lot of the asset a lot of the time. This is a very simple setup, but some of them, they go on for miles. You can add additional AO objects. You can actually, like, you can have an isolated bake for something, but then you can say, oh, I still want to fake some AO shadows here, so you add a box or whatever to still get those. And it's easy, finally.
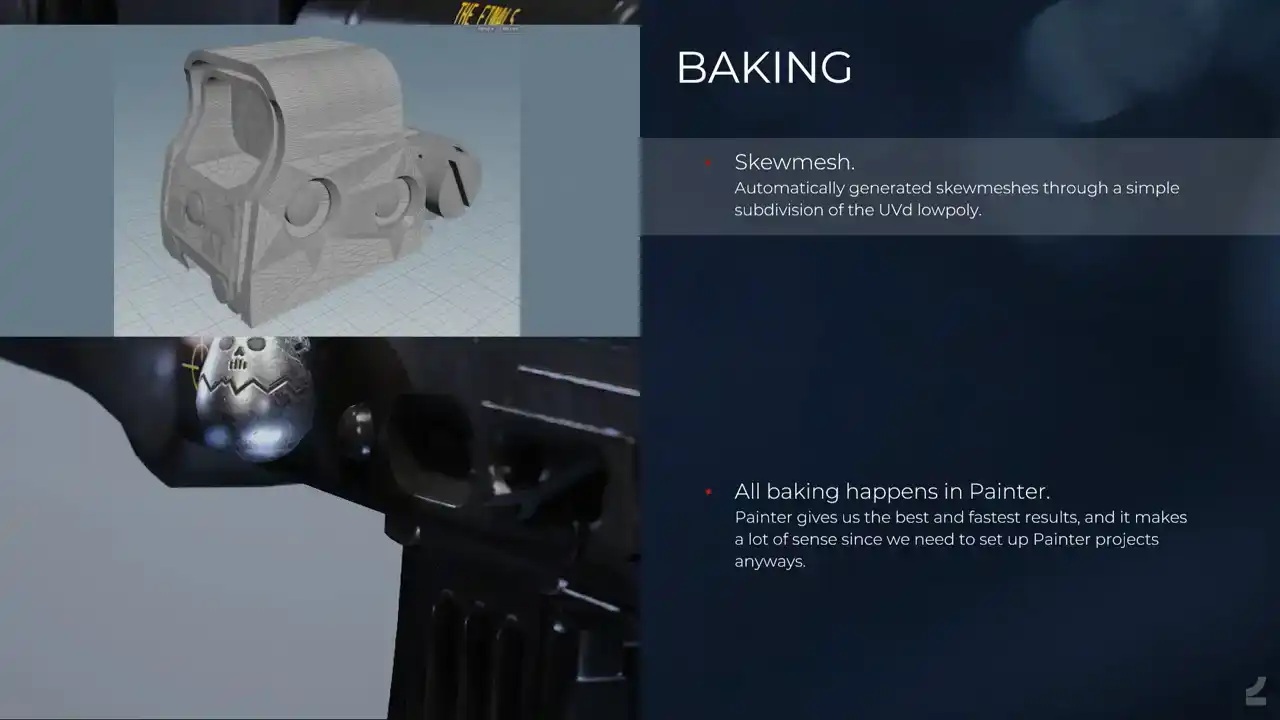
And for the baking, it also automatically creates the skew mesh, and this is done by simply subdividing the UV, the low poly, which works also surprisingly well, like almost all of the time. There are some cases when it doesn't. So say you have a low poly, like low poly, low poly cylinder like this for instance, where you have baked details along the edge. You'll get a fair amount of skewing. So we have a tag for low poly objects where you can enable bevel skew mesh, where what it does instead is it tries to bevel. So this is on geometry, which is always tricky, which is why it isn't on by default, because it will fail sometimes. But it bevels the low poly instead, and then you don't get any skewing. And again, if that doesn't work, you can also do the thing where you just add more geometry to the low poly and you dissolve those edges anyways, but that's of course more manual.
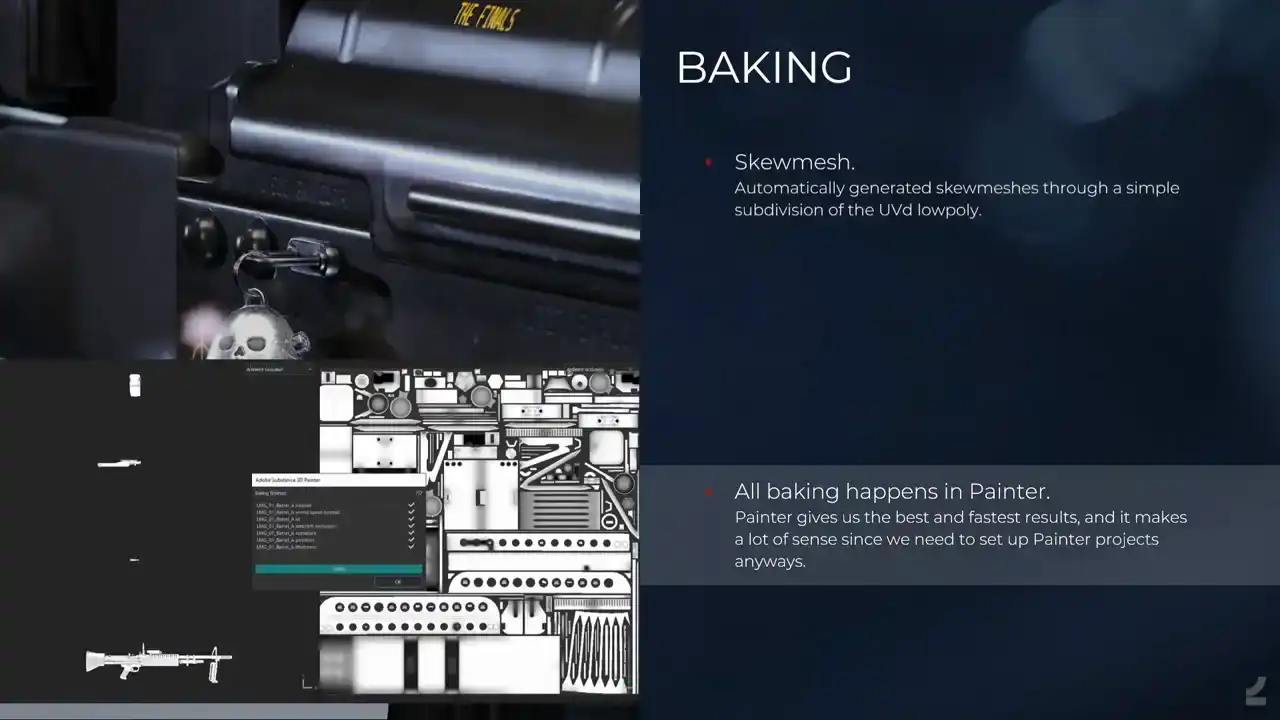
And all of the baking happens in Painter. We tried out a lot of baking softwares, but the Painter just gives really nice, it was tricky from the start because how do you automate to Painter? Nobody can, nobody can, but you hack it a lot until it works, until in their latest update, They've updated the baker and there's a lot more hacking that needs to happen to make it work on the latest version again. But everything goes into Painter anyways and it gives us exactly what we need and what we want and it's super, super fast. So it's, in hindsight, it's an obvious choice. That's not how obviousness works.
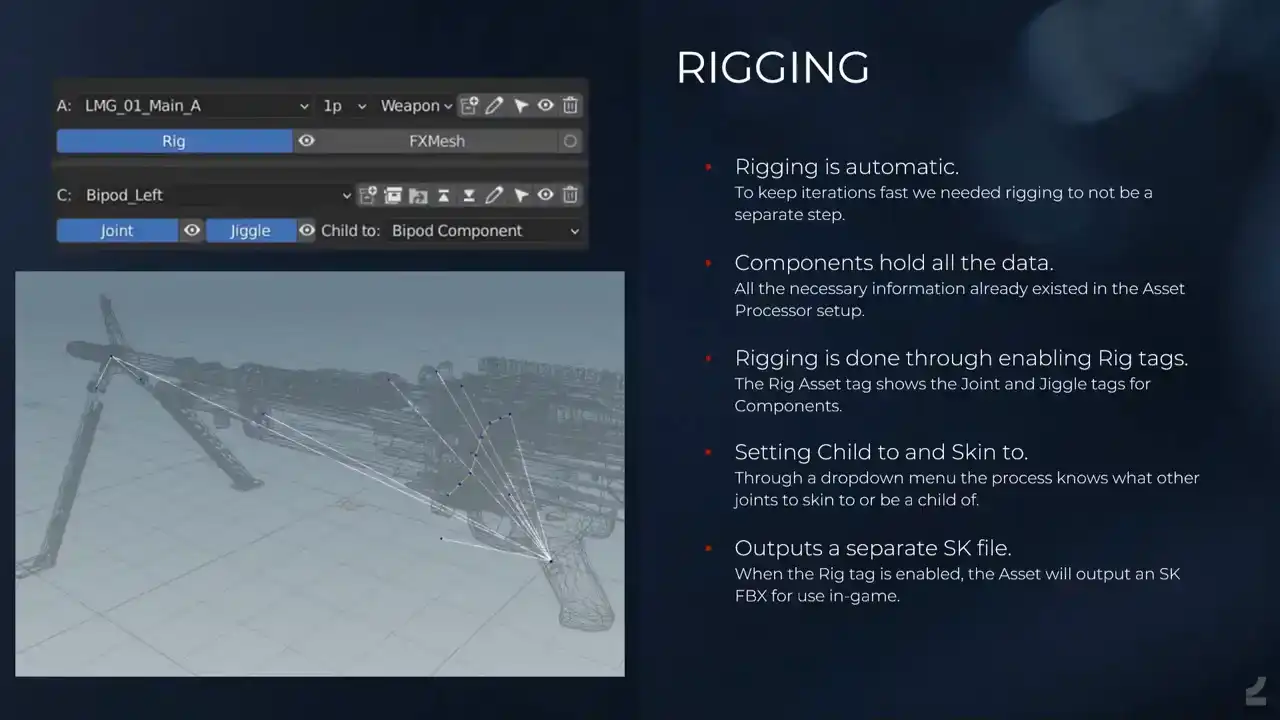
And rigging, which was also one of those things where we had this entire setup. All procedural, we can make iterations in a matter of minutes. But then of course our assets are rigged. So even if you made those updates where you just like, I wanna change what the site picture of this weapon looks like, you update it, and then it's like, you gotta tap on the shoulder of a tech animator, and you're like, I've updated it again, and they're like, that the fourth time this morning what are you So we figured why not automate the rigging also So whenever you process you actually create a new rig since we have all of the information already. I mean, everything is split up into the components and we have origins for location. Then if we just read all of those and we treat them as joints and we have some simple tags and settings to set up these hierarchies where we say, oh, this is the bipod. It should have a joint. That should be a jiggle joint. So it does the little tech anime jiggly stuff. And it should be a child of the bipod so that the bipod itself can also move. And then we just figure out the rest in Houdini. And it's been amazing. And it's one of those things where we're like, we can do it, sort of, but what happens when we want soft skinning and what happens when we, it's just luckily we haven't encountered it yet. So currently all of the weapons and so on are actually rigged automatically by the 3D artists by using these tools instead. The only learning thing that has to happen, of course, is that they need to know a bit about where do you place joints and so on. I figured they can learn, and they have. Or they, he, we have one.
And just to showcase, this is what the, I mean, you all know what the rig looks like, but this is what it looks like in Unreal. is an auto rig and me trying to use controls.
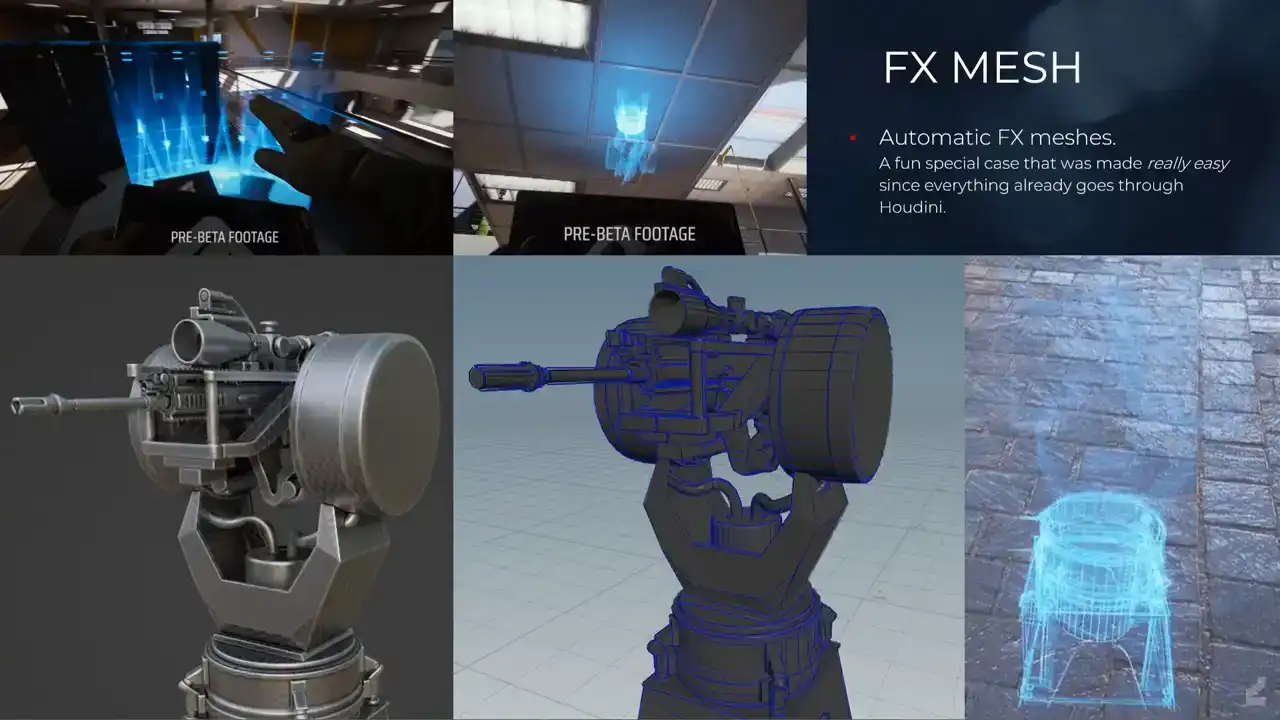
And like I mentioned, when we have this entire setup, it means that we can attach more processes to it whenever. So a fun, special example of this was our effects artists were like, we wanna make this cool holographic effect on meshes, can you build, can you build like mesh strips? for the wireframe of the mesh, but also clean it up and also combine it all into one asset, and also, and I'm like, yes. It would have been a pain before, also in terms of iterations, where it's like we make updates to this asset, and then we also have this effects mesh to think about, but now what we do is we enable the effects mesh tag, and with some simple, straightforward Houdini work, it just always outputs that effects mesh. So it's, and again, it would have been problematic. I mean, we could have made the same Houdini process, but it's also the building, and then the artists would have to go into Houdini and run that thing manually. Now it's just that tag is enabled, that happens automatically, and everyone's a winner.
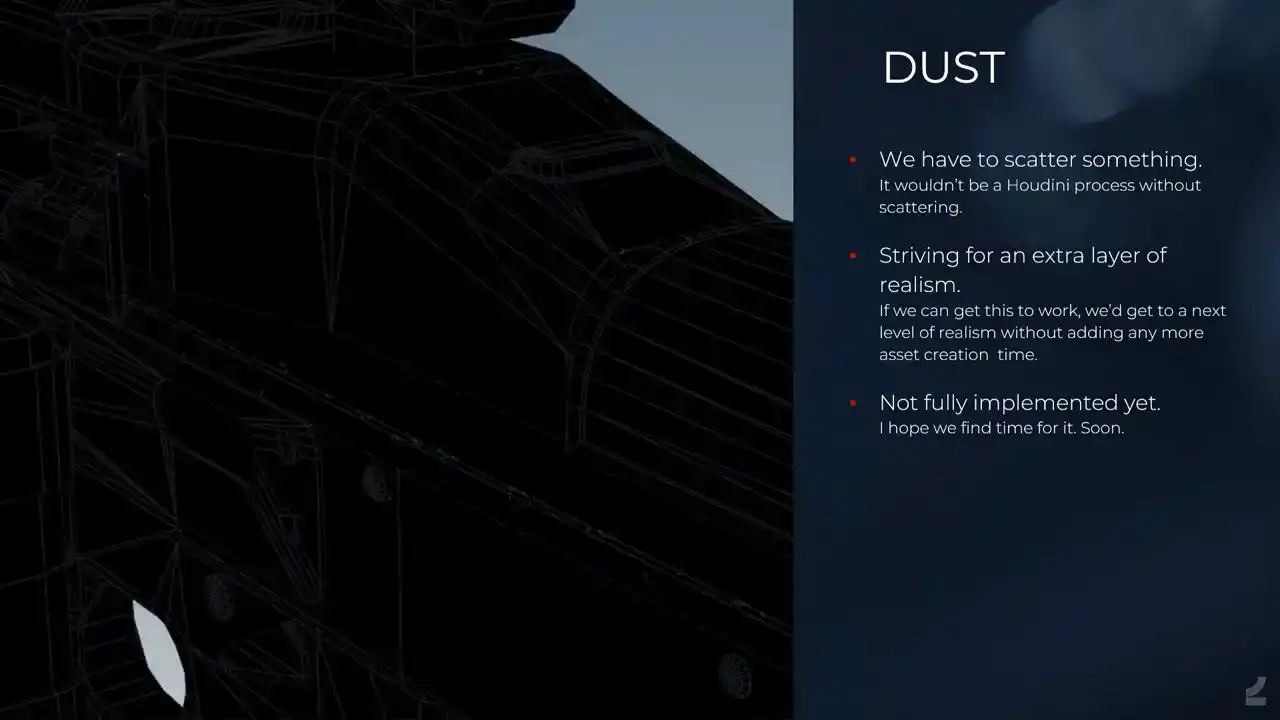
And then we have to scatter something, because it's Houdini. So I've been investigating in my spare time, if my boss is watching this, Scattering of dust particles on weapons, just seeing like, can we push things to the next level? Because I've been, for a long time, super inspired by, I don't know if you've seen those, like, Marek Denko renders of chess pieces with bits of hair on them and so on, and you're like, that's real. And if we can do the same thing in games, it would probably have to be, like, alpha cards and so on. a lot to not only have it in the texture, or in the material rather, but have like fibers and so on, like cross borders and mesh changes and it's amazing. It'll look a bit disgusting
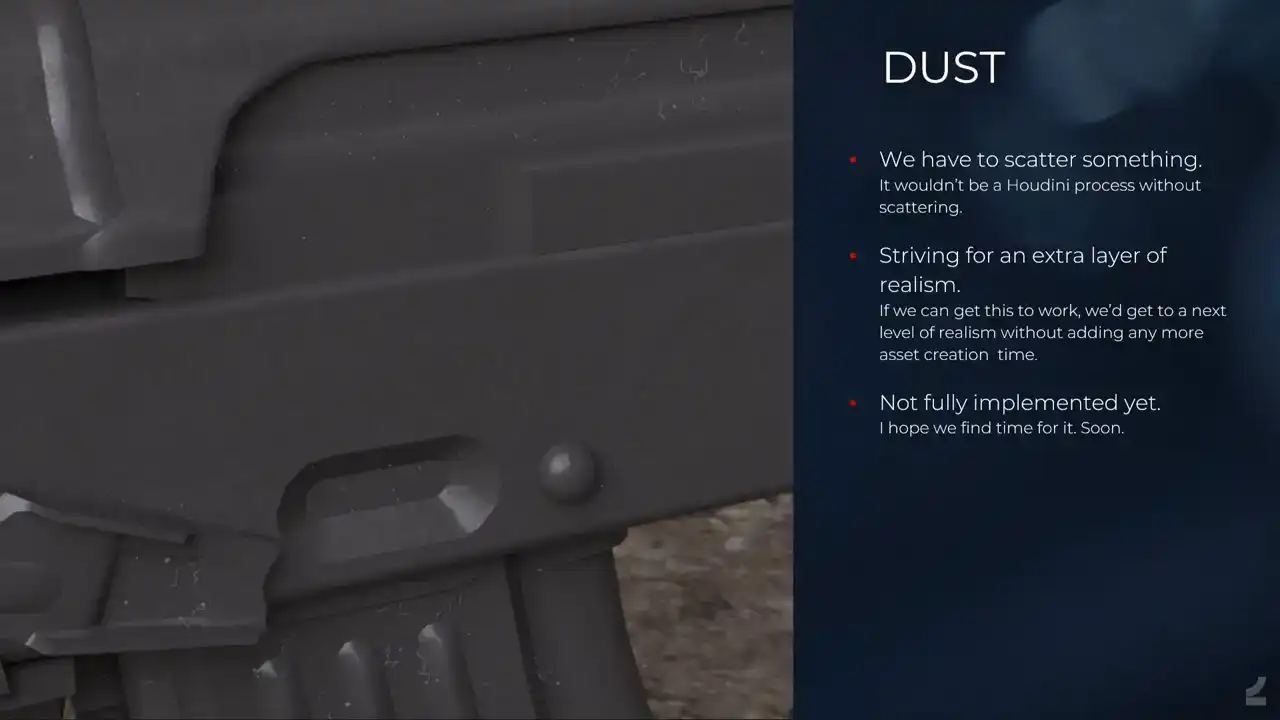
because it's too much. Somebody's cat slept on this AK. But it does a lot to sell the of a piece, if only it's actually visible in game, which is yet to be determined. And now I'll briefly, before I end, go through our other processes
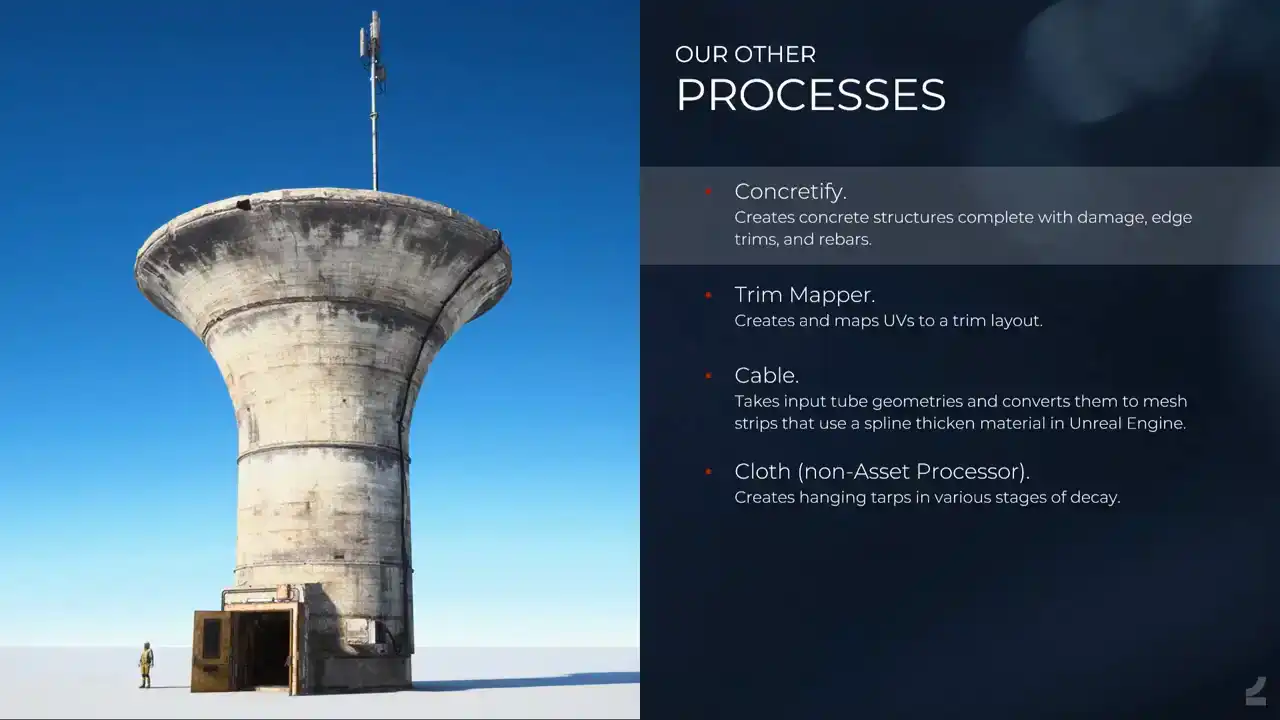
that we also run through the asset processor. So we have Concretefy, now just last week it was, it's no longer Concretefy, it's Edgeware. Yeah, but it does those like concrete structures concrete structures that you saw in the, it's a simple proceduralism in that it's edge damage and it's UV mapping and it's adding edge, I mean, it's not simple, it takes time to develop, but it's straightforward, like how it works, and the fact that we can also run it just straight from Blender, like it has, at one point it was a Houdini engine tool, and at one point we used like a live link to Houdini where we ran it and so on, but now it's just, you work in Blender, you set it up just as you would set up any other asset and you run process and it gives you this.
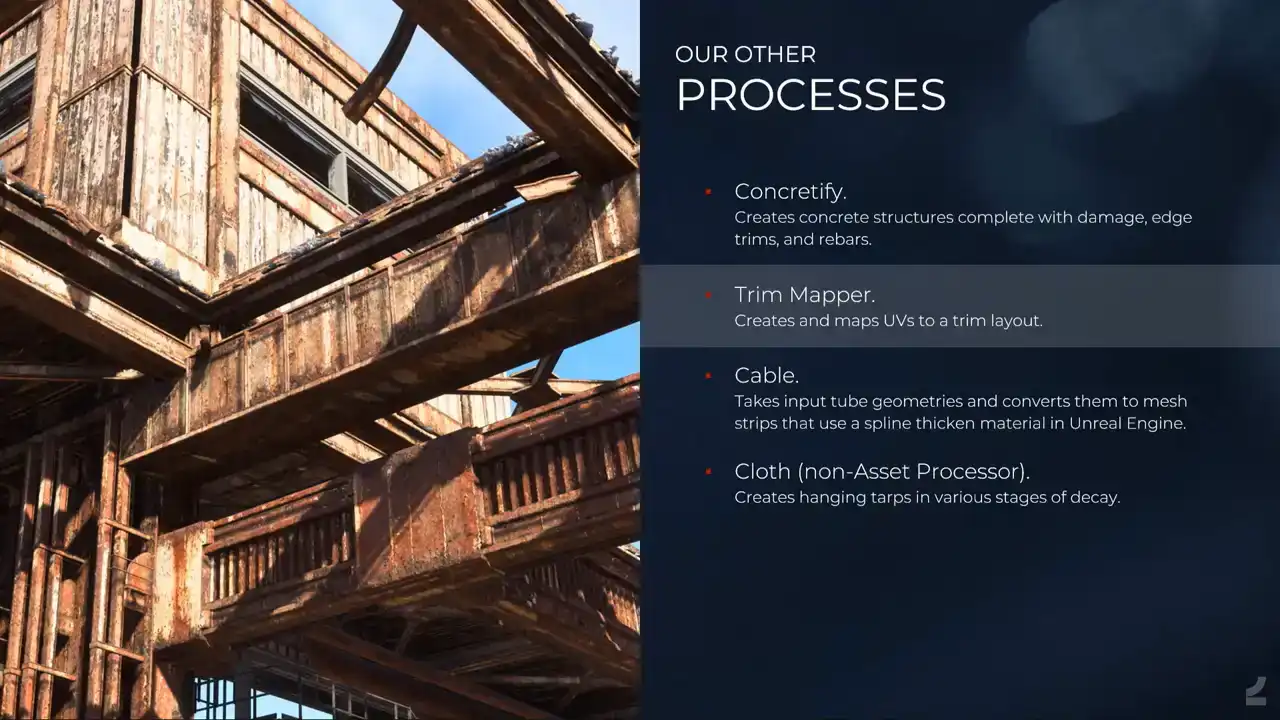
And then we have the trim mapper, which is just, I mean, you take basic geometry and it just creates UVs, which is pretty straightforward with these types of assets compared to the other things that we've seen. And then maps it to a predefined trim layout and applies vertex colors for inverting the normals, depending on, there's a lot of things going on, but it's there and it works and it's cool.
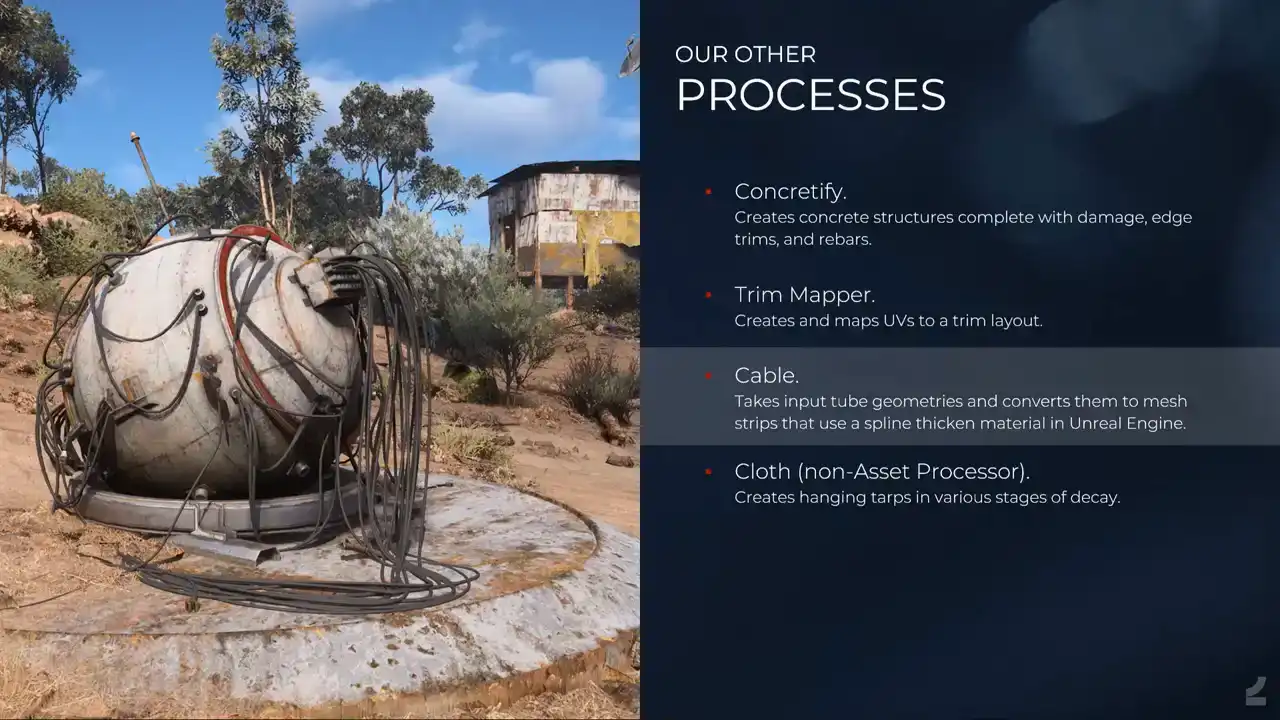
And then the tiniest process that we have with the cable process. So, we realized that in our creators, we have a lot of cables everywhere because they nice and it makes things look organic But it added a lot of narrow triangles long narrow triangles everywhere So what we wanted to do instead is adding like thin mesh strips and use a spline thicken shader in Unreal instead. But of course, building those thin mesh strips and UV mapping them manually and so on, they're difficult to work with because you basically can't see them because they're tiny. And so instead the artist will input like proper tubes and so on in Blender, and Houdini will take care of the rest. Which is also nice, because then we can also actually, I don't think that was implemented here yet, but we can also, I mean, it's part of the entire asset, so those splines, like those cables, will also affect the AO bake of the hard surface parts and then so on, which is nice.
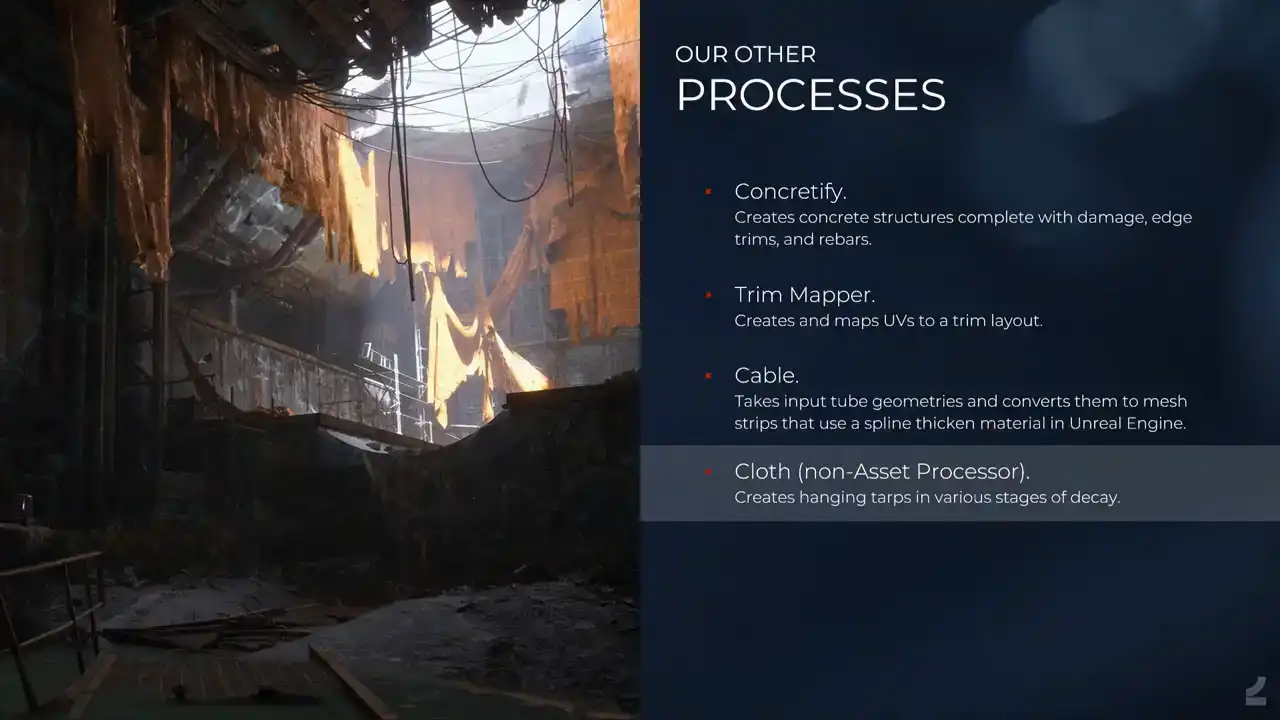
And then we have cloth process, which is not actually run through the asset processor, but I thought this was a nice image to showcase a lot of the other processes that we run, and the cloth looks good, but it's Houdini. So, Houdini engine in Unreal. And that's it for the presentation. I'll talk a bit about the future and where we're at and so on. And there's still a lot of work left to be done, of course. We have like 10 of our artists, which is basically all of our artists using it now. And some tech artists are using it as well to create art, which they're happy about. And the concept artists as well, which is something that we've been striving for all the time. Like, concept artists are good artists. They just don't want to be bothered with all of the technical stuff. Now they don't have to. So why don't they build games assets? And they do, which is super nice. And we still encounter issues almost daily. I wake up now every morning, doing, looking in the processor channel and being like, what has happened now? And it's mostly because we've ramped up so much in terms of usage. But the issues are, of course, smaller and smaller all the time. It used to be I can't process. And now it's like, why did this UV shell do this thing? And it's like, we can fix it. And the biggest issue that we face is actually one of, like, in terms of setup, where a lot of this needs, Like, you need to have Houdini installed and Painter installed and Blender installed with the right versions and GitHub and pulling things from Perforce. Whenever people haven't followed the documentation on how to set that up properly, things will fail and it's like nothing works! Which is a hassle. But once people have it set up, it works. So it's a super big issue. It's just what you get when you have artists building tools. You don't have the neat batch, exe, set up, everything works. Another struggle that we have is too high user expectations. Whenever you try to sell easy and automatic, people expect super easy and fully automatic.

And it makes, like I mentioned before, it makes people not review the output properly all the time, which again, the log helps with, because it's gonna tell you, like, this didn't work. please investigate. And it also makes it easier for people to get into it knowing that it's not magic, it's just super awesome. And I think what's needed there is just better documentation on the limitations that we still have to manage expectations a bit, because expectations go through the roof. And I think that's it for my part of the presentation. Thank you. Do we want to do questions now, or do we want to do Daku's presentation? I'm sorry, Daku. I'm a timed thief. We're okay. We're just going to talk to the rest of it. Yeah, we can, if there are any questions, can take a few questions, and then Daku can do his stuff. Yes? Yes? Hi, are you using the interface between Blender and Houdini, or are you using Houdini Engine, or is it still a custom? No, Houdini Engine, because Houdini Engine doesn't exist for Blender, because Blender is free to everyone forever and so on, and they can't do any of that stuff. So it's only custom, all internally built, everything. Awesome. Yeah. Yes? How do you do technical artists? We have quite a lot of technical artists. I think we have probably more technical artists than we have actual artists. They're also actual artists, just for the record. But this was actually built mostly, like primarily, with the help of tech artists. But it was built primarily by me and another artist. So it's, but with a lot of help whenever we're like, we're too dumb, and then they help out. We have a lot of really talented tech artists.