Create-Image-Rich-PDFs-Using-AI-Agents-(
https://m.youtube.com/watch?v=jvUOy6UiH5w&pp=ugUEEgJlbg%3D%3D
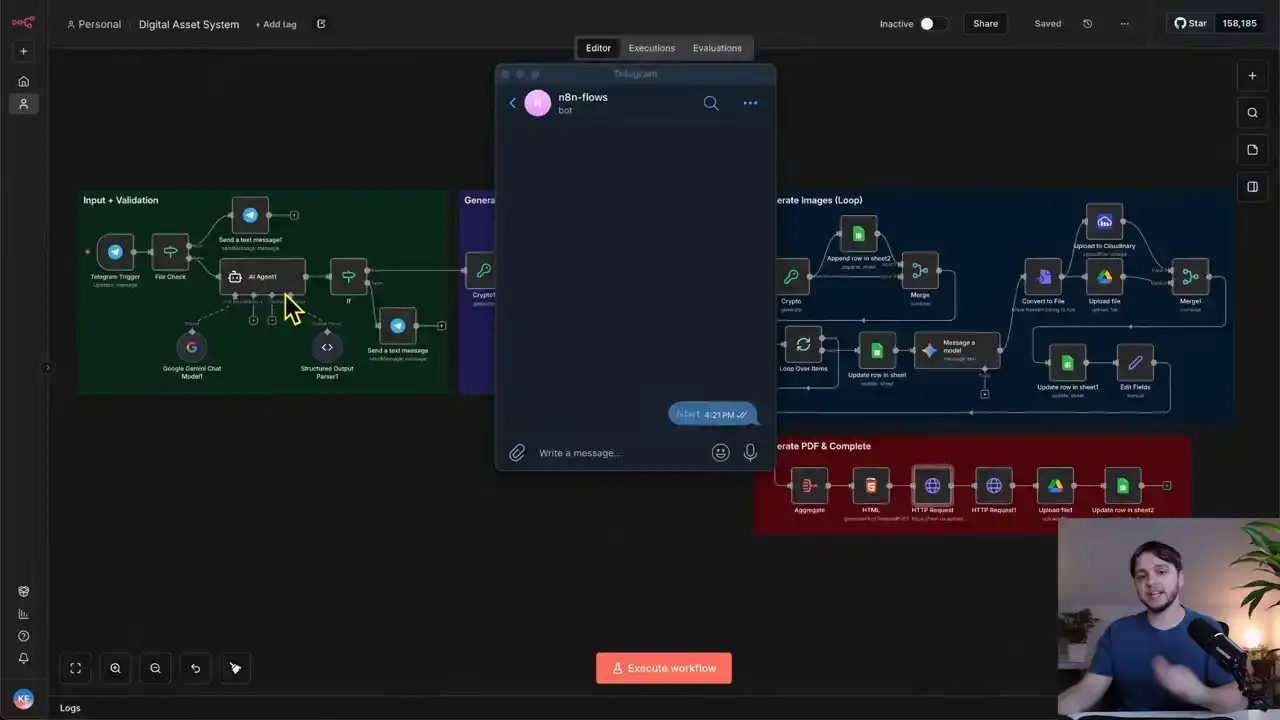
Alright, so I opened up Telegram and I'm going to send a topic and this workflow will start writing chapters, generating images, and I'll put a full PDF to our Google Drive. I'll say Apollo 11 moon landing. The workflow starts executing right away and our first AI agent in this first section is determining if this message is a valid topic and it's refining it into a professional version for the rest of the automation. That topic, which in this case is the Apollo 11 moon landing, is then added to our Google Sheet as a new job. Then our second AI agent starts researching the web, writing five chapters, and optimized image prompts for each chapter. This next section loops through every one of the five chapters and uses Nano Banana Pro to generate the images. They're uploaded to our Google Drive, and the Google Sheet is updated to track the statuses along with the links. Once this last one finishes up, we're adding those chapters to a structured HTML design and then converting that HTML into a PDF. The PDF is uploaded to our Google Drive. And finally, our Google Sheet is updated with the link and we're able to view it. Here's the Google Sheet and this is really well structured. There's the row for the job and rows for each of the generated images. All the statuses are completed with image links and the finalized PDF link is right here. So this is what the simple telegram message that I sent was able to produce. As you can see, we've got all five chapters and each chapter has a title, a date, and three to four sentences along with a really good looking image that complements the text. Each part is in chronological order. As you can see by the dates, the structure looks professional, and each of these images looks just really realistic, and it's hard to believe that some of these are AI generated. Here we have Neil Armstrong descending off Eagle's Ladder. I guarantee you, if you start generating these, you're going to learn something new. This final image down here shows the spaceship descending and them getting rescued in the ocean. So with this system, you can upload any historical event topic and it will automatically generate a full textbook style PDF just like this one. I think this is really cool because we're not just having the agents describe the historical events, we're also generating the visuals so you can actually see things you might have never seen before. So in this video, I'm going to show you how to build this entire workflow step by step and by the end, you'll be able to generate these PDFs by yourself. If you want to follow along faster, you can download the full template using the link in the description. take you to my free school community where I post these templates. Later in this video, I'll also show you how to scale the system to generate any number of chapters that you want. And once you understand the structure, you can easily adapt it to any other use cases, like creating different types of educational content or automated document generation. Real quick, I'll show you some more PDFs that were generated with this system. Here's the fall of Rome. Next up, we've got the Industrial Revolution. And as you can see, these images just look phenomenal. Okay, let's start breaking down the workflow. I'm going to go section by section and explain each node. So of course, to start off, we have our trigger node for Telegram. This Telegram trigger is watching and waiting for new messages to come in. As you can see, I've connected my Telegram account via a credential, and it's set to trigger on new message. Now, the reason I hooked up Telegram is so that I can use the workflow no matter where I'm at, since I can just send a new message on my phone through the Telegram app But you do not need to use Telegram you could totally just connect a regular chat trigger here and use the built NAN chat to start the workflow Whatever chat you do decide to use once a chat message does come in it gets routed to this if node. I renamed it file check because that's essentially what it's doing. It looks at the json.message.document and checks whether that object exists. Essentially, Telegram only sends two types of messages, pure text messages and messages that include a document, like images, videos, or files. If the incoming message does contain a document, the workflow will follow the true branch, which will just send a telegram reply saying files are not supported. Then we stop the workflow. That way, only text-based messages continue through the rest of the automation. Those messages will route into the first AI agent node. This agent doesn't have any tools or memory. its only job is to validate the incoming message. Since the purpose of this workflow is to create educational textbook style PDFs about historical events, we need this agent to determine whether the incoming message actually contains a historical topic and extract and properly format that topic. For example, if someone sends, please write a PDF about the Roman Empire, I love the Roman Empire and I'm curious about it, yada yada yada, the rest of our automation does not care about all that filler text, all we need is the actual historical topic, so this agent should simply output Roman Empire in that case. Inside of the AI agent configuration, we set the source for prompt to define below and pull in the raw text message from the telegram trigger. We then enable require specific output format and attach an output parser that defines the JSON structure we expect the agent to output. It contains three properties, is valid, refine topic, and reply to user. And I'll explain these when we go through the system prompt. Here is the system prompt. This is where we give the agent its actual instructions. It needs to be detailed so that the agent behaves consistently. It starts by defining its role. You are a topic classifier for an educational content engine. Your job is to filter user requests and ensure that they are related to historical events, biographies, or educational concepts. Then we explain the logic. One, analyze if the input is a valid topic for a visual history slash concept briefing. If it is valid, then set is valid to true, refine topic to a professional version of the title, and leave reply to user empty. For example, if the input is Napoleon, the refined topic should be the military campaigns of Napoleon. If the message is invalid, like casual chatting, coding questions, math problems, or nonsense, then set is valid to false, refine topic to an empty string, and then reply to user should be a short, polite response explaining that we only generate visual briefings for historical or educational concepts, acknowledging what they asked for, but declining the request. We restate the structured output format at the bottom of the prompt, and the output parser that we went over earlier guarantees the structure. We're powering this agent with Gemini 2.5 Flash model from Google Gemini, and we're connecting our Google Gemini credential up top. Though you could totally swap this out with OpenAI or another model if you want. I found that Gemini 2.5 Flash is working well for this use case, but if you do want to switch it out, all you would do is remove this click the plus icon and then select the model provider that you want from the sidebar here Once the agent returns its structured response we pass it into an if node to check whether the is valid is true or false If it false then we send a telegram message using the reply to user value generated by the agent. If it's true, then we continue through the next section of the workflow. This is the section responsible for generating the text content and image prompts for the PDF. So first off, this node here is the crypto node. It's used to generate a random string, specifically a UUID, so that we have a unique identifier for the current job. And by current job, I mean the specific topic the user just submitted, which represents one full run through our entire workflow. Everything involved in generating the PDF and the images for that one topic. And of course, we're going to want to keep track of these jobs in a Google Sheet to keep track of the statuses, finalized images, and finalized PDFs. So this next node, takes that UUID and creates a new row in the Google Sheet, essentially creating a new job. We're connecting our Google credentials, which I have an entire video about that I'll link here if you need help with that. And then we're choosing the correct document and sheet from our Google Drive. And like I said, passing in the ID along with the refined topic that our AI agent generated, a job type called briefing job and the status generating. Here in the sheet it's connected to, which by the way, I'll provide this template for you in the description for you to download. Each row in the sheet includes the ID, the concept, which is the actual historical event, and the type. There are two type options in the dropdown, briefing job and asset creation. A briefing job row represents one full workflow execution. And since each PDF requires five separate images to be generated, instead of adding five separate columns to track each of them, we just use the asset creation type to create separate rows for each image generation task. This makes the system scalable because if we ever want to add more or fewer chapters, we can just have the agent generate a different number of chapters without needing to redesign the Google Sheet structure. A quick note on structure, designing workflows in a scalable way is really important because as your automations grow, you don't want to rebuild everything from scratch. A lot of tutorials skip over that part, but I want to make sure you're learning not just how to make something work, but how to build it the right way so it holds up when you scale. Anyway, when a row is for asset creation, there's also a parent ID column that stores the ID of the job that the asset belongs to, keeping everything linked and organized. Then there's a status column which has a number of different options that reflect where the job is in the process. There's also a prompt column which is where we store the image generation prompts created in the next step. And of course we have columns for the finalized assets like the image link and the PDF link once everything is completed. Okay, so let's get back to the workflow. Next up, there's the AI agent that's taking our historical event and writing all five chapters along with the image generation prompts for each one. Here is the configuration. Source for prompt is defined below, and we pass in the concept. Again, we're requiring a specific output format and then attaching an output parser so that the agent knows how to structure the output. Here's what it looks like. There's a chapter's property whose value is a list, and each item in the list represents a chapter that contains a chapter ID, a title, date, content, and image prompt. Now let's go over the system prompt and see what the agent's instructions actually are. You are an expert historian and visual storyteller Your goal is to take a user request about a historical event and transform it into a structured five visual narrative So we're summarizing its role and its job, and then this next section goes over the step-by-step process. One, research. Use your search tools to verify the exact dates, key figures, locations, and visual details of the user's topic. Do not hallucinate dates. Two, structure. Break the event down into exactly five chronological chapters. Three, drafting. For each chapter, generate the following fields. Then it outlines the details for each field. The content is a deeply engaging educational paragraph, approximately three to four sentences explaining what happened and why it matters. Then the image prompt, a highly detailed prompt for an AI image generator. And then we're telling it the exact image generator is going to be using, Nano Banana Pro. The next section just goes over some additional guidelines. And then the final section is describing the output format, which is just clarifying that the chapters list needs to contain five items representing the five chapters. And like I mentioned a minute ago, this system is easily scalable. All you need to do to have it generate more than five chapters is update the system prompt to say six, seven, even 20 chapters if you want. And that's it. The AI model processing this request is OpenAI GPT 5.1, though you can switch this out with any other model you prefer. if you think another model will be better suited to write the PDF content. Something new about the OpenAI chat model is that you can select a built-in tool for web search. So if you want this agent to search the web for your historical events before generating the chapters, you can turn this on. Or you can add a tool for the web search like SERP API or Tavali right here. For now though, I'm going to hold off on that and revisit it later in the video. So the chapters list outputted from this AI agent is sent to the split out node, which will take that one list and split out each item one by one. So one by one, each chapter is sent to this next section, which is for generating the images. First off, we're generating an ID for each of our five chapters by using the crypto node. Then it's creating rows in the sheet that are of type asset creation, and the parent ID is set to the ID we created earlier for the job. The status is set to queued, since all of these images are technically in a queue or line waiting to be generated. And of course, it's saving the image prompt that the agent generated. So in the Google Sheet, at this point in the workflow, it would look something like this. All five chapter images are queued and the parent IDs are set to the job ID. This merge node is just waiting for both the nodes connected to it to be finished before continuing on. And really the only reason I have this here is so that we can pass on the data outputted from the crypto node, which includes all the data from our AI agent. If that doesn't make much sense, then that's fine. Technically it's not even necessary. It just makes configuring the upcoming nodes a bit more easy. Anyways, next up, each chapter is sent to this loop over items node, which sends each chapter through this chain of nodes one by one instead of all five at once. And that's really just so we don't overwhelm the message a model node here. If you send too many requests to an external service like Gemini, you could get blocked. So again, each chapter will go through this one by one. First off, the chapter has its status updated to generating via this update row and sheets node. And then in the Google Sheet, it would look something like this. Next, we're using the Gemini Message A Model node to use the NanoName and a pro image generation model. And here it's sending in the image prompt that we generated for this chapter. After a few seconds of this running, the image will finish generating and the output will contain a stringified version of our image called Base64. Here's what that stringified version would look like. Now, since we want to upload our image to Google Drive, we'll need to convert the stringified version into an actual file. And that's exactly what this next node does. It converts the Base64 into a binary file. And here in the configuration, we're just telling it where in the Gemini output the base64 is. Also, we added an option down here to define the file name and we're using the ID of the row to name the file. So that means this ID here would be the file name in our Google Drive. Right after that, this upload file to drive node will take that binary file and upload it to a specific folder in our Google Drive. In this case, I chose the images folder. Of course, you'll need to go into your own Google Drive and create a folder to use here. Also, we're leaving the file name field blank. That way it uses the original file name, which is what we defined in the previous node. Once that's finished, we update the row in the sheet, set the status to completed, and store the web view link returned from the Google Drive upload. That way we can simply click on the link in the sheet to view the generated image. So at this point, this is what the sheet would look like. It would be completed and have a link for the image right here. This final node is an edit fields node that'll put all of our chapter data into one unified object that we'll use in the next section to generate our HTML. It bundles everything together, our ID, title, date, content, image prompt, and Base64, which represents our image. Okay, so that is gonna do it for this section. Each chapter is gonna go through this loop and the images will be generated one by one. And eventually the Google sheet is gonna look like this with all the rows marked as completed and the images uploaded. Now we're on to the final section. After all the chapters finish looping, they're sent into this aggregation node, which combines the individual items back into a single list. This list of chapters is then passed into the HTML node. HTML stands for Hypertext Markup Language, and it's basically the structure and formatting layer used to build webpages and styled documents. In this case, we're using it to take all of our chapter content and convert it into a styled layout that looks like a real textbook style PDF. But if you're not happy with the layout and you'll see what the output looks like in a minute, you can totally copy this HTML, paste it into ChatTBT, and then ask it to update the styling however you want. The most important thing is that the logic for mapping each chapter into the layout is correct, and that the chapter data is inserted into the right HTML elements. And something I just wanna point out real quick, to render the images for each chapter, we just use the standard image element and then pass in the base64 string as the source. So this node will output the full HTML, And then we pass it on to this HTTP request node, which uses an external API to convert the HTML into a PDF. We have to do it this way because there's no node in NAN that allows us to create a PDF from HTML. The service is called API template. And as you can see, it allows you to create PDFs among other things. And once you log in and create an account, the free tier gives you 50 free PDF generations I already used four out of 50 generations and I don plan on making over 50 PDFs so this will remain free in my case All you need to do is create an account grab the API key and then paste it into the API key field here in the headers. This xAPI key header makes it so your HTTP requests can authenticate with your API template account. As for the request body, the content type is JSON. So let me open this up into a bigger view. This body property is where we pass in the HTML from the previous node, but we run it through a set of replace functions to ensure it's formatted correctly for a JSON. Then there's a data property with a name property that becomes the actual title of the PDF. So we send in the concept that our first AI agent generated, aka the historical event. And finally, down here, we have a bunch of optional PDF settings, paper size, orientation, font sizes, margins. So you can tweak the output however you like. Most of the styling comes from the HTML itself, and these settings are more for layout adjustments that affect the physical PDF. Once the PDF is finished generating, the node outputs a download URL link where we can download the file. So we use a second HTTP request node, pass in that download URL link, and that returns the PDF in a binary file format. We take that downloaded file and upload it to Google Drive with the file name as the concept and the ID, separated by a dash. Finally, we update the row in the sheet, set the status to completed and store the web view link for the PDF. And in our Google sheet, this is what those updates would look like. All the images are completed and the job is completed and we have all the finalized links. So that's the entire breakdown. Now let's give it a thorough test and follow the data flow. I'm going to clear all the rows out in the sheet so that we can start fresh. I'm also going to set the OpenAI chat model to use the web search tool. Okay, I've got Telegram opened up and for this first test, let's send an image. Okay, it's sent and we got files not supported as a response. So our validation for that is working. We only allow text messages. So now let's say something completely random that has nothing to do with a historical event. Like how you doing? Okay, the agent is thinking and it looks like it deemed that message as random and not about a historical event. So it said, I'm doing well. Thank you for asking. I can only generate visual briefings for history or educational concepts. So from that, you can see that the validation is working. Now let's send the message about an actual historical event to see if it all works. So how about we do the Boston Tea Party? Send that off. The agent's thinking. It deemed it as an actual historical event, so we moved on to the next section. And if we look at the if node, we can see that the is valid is true, and the refined topic is the Boston Tea Party. Our ID was generated, and our row in the sheet was created. So let's go check that out. There it is. The type is briefing job and the status is generating and the concept is the Boston Tea Party. Look at that. Now we have all our images queued. So it looks like our agent generated each paragraph or each chapter for our story along with the image prompt. So now each of those images is being created within this loop. Looks like it's still on the first one. Okay, there goes the second one. And that first one was marked as completed and here is the image link Let check it out Awesome that looks really good So I going to wait for this to complete and I see you when it done Okay It looks like we're on the final image here. All four of these other ones have been completed. Let's check out the images. Yeah, it's looking really good. There we go. It's uploading. And now we're going on to this final section here where it aggregates all of them into a list, creates the HTML. and it looks like we have an issue, unfortunately. The request is invalid or cannot be processed by the service. Hmm, what is wrong? So the error says the request is too long, and if we look at the incoming data in this HTTP request node, it's 5.6 MB worth of data, which is a lot. So I'm thinking that's the issue. We somehow need to reduce the size of this HTML in order for it to work. The blaringly obvious thing that I think we can do is not use the base64 image strings in the HTML. These strings of text are just massive. Let me show you one example here. If I show the data, here is the base64 string, and I could just keep scrolling here. I could keep scrolling here for probably like a minute and not be done. So sending five of those into the HTML, it's going to create a massive amount of data, 5.6 MB, and that's too much for our API template to handle. What we need to do instead is upload each image to the internet and make them publicly accessible, then pass in those URLs to the HTML instead of the base64 text. All right, I've got everything working again. I made a few updates. The first is adding this upload to Cloudinary node that takes the binary file and uploads it to Cloudinary and returns a public facing URL. I still want to upload the file to our Google Drive. So I kept that node and then added a merge node afterwards so that it waits for both of these uploads to finish before moving on. In the config, the mode is combined and combined by is position. So that'll output the web view link like before and a public facing URL from Cloudinary. I added a new column in the Google Sheet for that public link. And in this update row and sheet node, I added the public link and passed in the URL. And in the edit fields node, I just removed the base64 since we don't need it anymore and added the public URL here. So then that public URL is sent through to our HTML. And so in here, I replaced our base64 usage with the public URL usage for the source on the image. And that's all the updates I made. So I'm going to reset everything and then try this again. All right, here we go. I'm going to say Mayflower. Agent's thinking. It deemed it as an actual historical event. So the job is created in the sheet. Let's check. There it is. Then the agent is creating all of those chapters right now. and again it's using the web search tool to search the web for that historical event. There we go. All of the images were added to our Google Sheet in the queued state and that first one is generating. The files are being uploaded to the drive and Cloudinary once that's finished and then our second one starts. If we check the drive, the status is completed, the prompt is in there, the image link is in there, and the public link is in there. So if we go to this public link we'll see it's publicly accessible and there's our first photo. This final one is finishing up And this is where it failed last time, right around this part. So I'm going to record this entire thing here. It going There we go Uploaded to Cloudinary and the Google Drive Awesome The HTML was generated and it looks like it was successful It uploading the PDF to our drive It updating the sheet in the row or it's updating the row in the sheet. Let's check it. Awesome. All these are marked as completed and the image links are in, the public links are in, and our PDF link is in as well. Let's go to it. Here we are. So each chapter has the title of the chapter and the date. and then we have the three to four sentences about this picture and it is in chronological order. So it starts off at 1608 and then this next one is 1620. Two ships, one chance, Mayfauer and Speedwell. Okay, that looks awesome. Really, really realistic photos. Nano Banana Pro is a beast. Across the burning seas, a perilous Atlantic crossing. Looks really good. And all of that, just from this little text we sent right here that I could have sent on my phone as well. So that's really, really awesome. I'm going to have the system create a couple more PDFs and then I'll show you the end result. So this first one is going to be for the Industrial Revolution. that execution took two minutes and 32 seconds to complete and in our google sheet everything looks good to go they're all completed and we have all of our links so here is the actual pdf All right, we start off with sparks in the loom. Britain begins to transform in 1760. All right, wow. These images just keep blowing me away. Look at that. Awesome. Cool, looks good. Let's do one more now. Then I'll tell you how much these cost. So we'll do the fall of Rome. That took about two minutes and 30 seconds. So I believe each image costs about 10 cents to generate. So that means each generation for a PDF is going to cost about 50 cents. And then the cost to run OpenAI, it's probably like a penny at most. So 51 cents per PDF. Here in the Google Sheet, we've got the fall of the Roman Empire. And here is the PDF link. we start off with the cracks in a colossus third and fourth century ce the images again look really good the goss cross the danube i think that's pronounced like that 376 ce looks awesome the sack of rome barbarian kings and roman lands and the last emperor falls all right guys that's going to do it for today again if you want to download this template there's a link in the description to my free community where I provide all the resources for all of my YouTube videos. I'll also provide the Google Sheet template so you'll be ready to run this automation in no time. Also, joining the community is a great way to network with like-minded people. There's over 1.4 thousand members who are also interested in AI automation. Anyways guys, if you enjoyed this video and found it helpful, please leave a like on the video. It really helps the channel out. Thanks for watching the entire video. I'll see you in the next one.