Building-the-World-of--The-Ascent-
https://m.youtube.com/watch?v=FodXp5BkENk&t=1066s&pp=ygUKZ2RjIGVtYmFyaw%3D%3D
Hey everyone, I am Torfrig. I'm the Creative Director and General Art Person at Neon Giant.
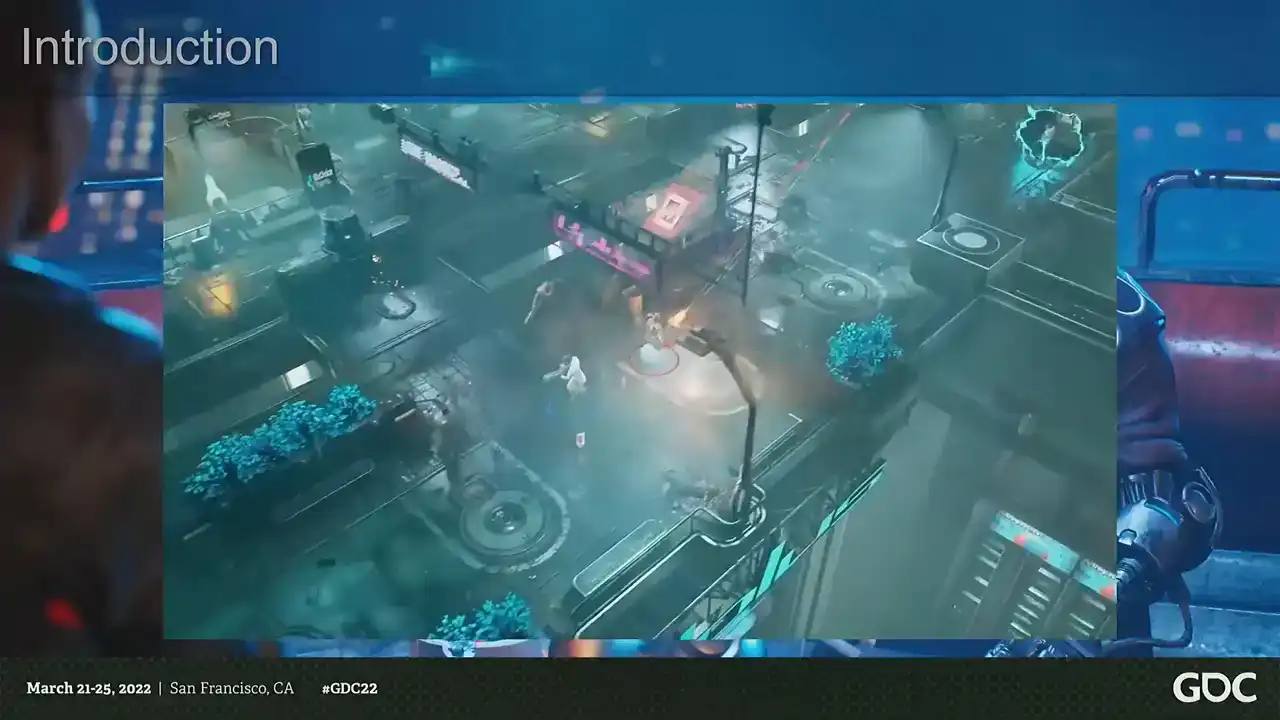
And welcome to my talk, Building the World of the Ascent. And this talk is diving into how we approached and solved some of the specific challenges we faced when we built the world of the Ascent. And a big chunk of it is talking about the process that made us arrive where we are with our pipeline and deep dive into some of the tools we created to make the world and some general Unreal advice sprinkled in. So this is like a short trailer for the game without sound.
You have shown an aptitude for applying lethal solutions to conflicted situations.
It looks like we're going to have to work together on this one.
Let's get it done.
So, what is The Ascent?

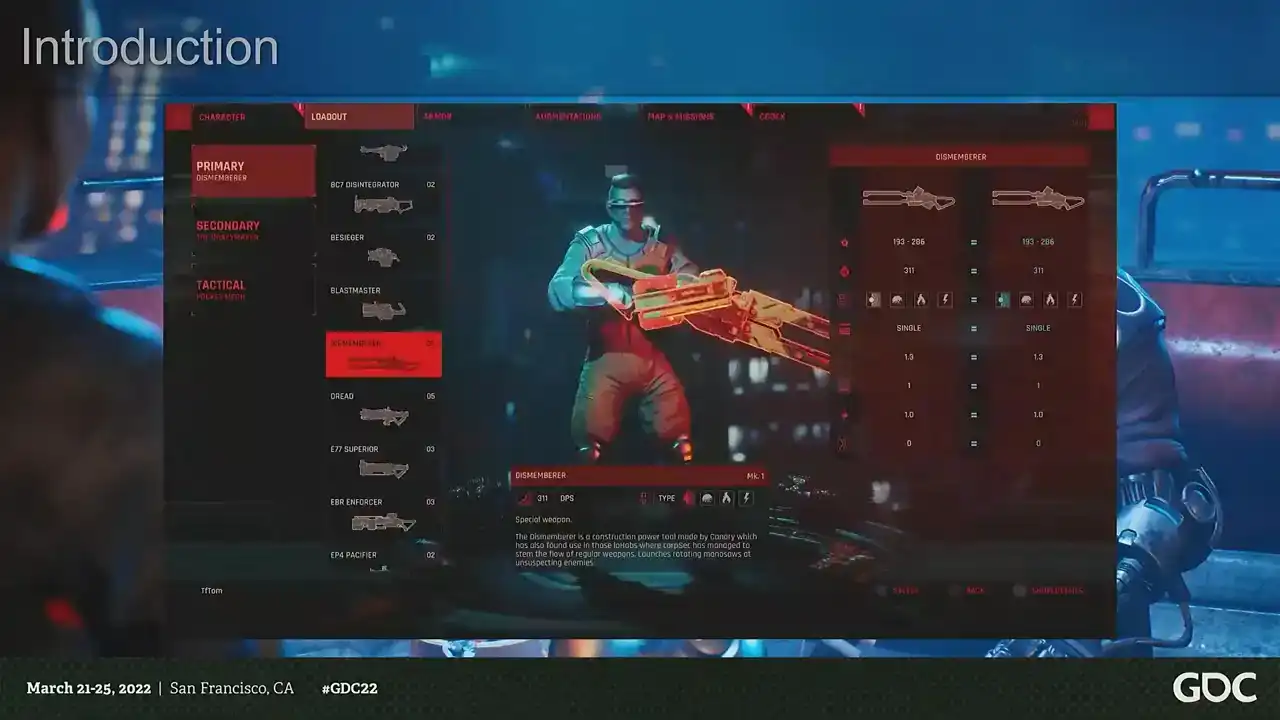
It's a solo and co-op action RPG set in a dystopian cyberpunk future, and it's made in Unreal Engine 4, and it's available on PC, Xbox One, Xbox Series, PS4, and 5. And we released it last year on Xbox and PC and yesterday on PlayStation. So please go and buy it. And it's the first game from Neon Giant. And we are a small indie studio from Uppsala in Sweden. And we are 11 people, a team of extremely talented and awesome developers. And I'm very honored to work alongside. And we all come from AAA, various parts of the AAA industry. And we've been around as a studio for about four years now. So from the very beginning when we made this game, we had a couple of both really obvious and some non-obvious challenges ahead of us. Being a new small developer, of course, we made it easy for ourselves, and we picked the easiest subject, an open-world, dense sci-fi cityscape, handcrafted and rich with storytelling. And we started with one artist, that was me, and we peaked with four artists, including tech art and VFX. And this meant, of course, several things. I mean, we are a small team and we're working with what is essentially one of the most time-consuming topics. An urban imaginary environment where every single object needs to be both designed and built. And making sci-fi means that almost every asset needs to be designed. And we didn't have any concept artists at all on the team, which means it's very demanding from a design point of view. point of view, so the subject itself. And we needed a very fast and flexible content pipeline, a very fast pipeline, because we needed to build a lot of objects to cover the world. And also the art style, because we were making a dirty, slummy, lived in kind of cityscape, and we had to push shaders and content a lot further. If you make something that is a bit more clean and shiny, it would be a lot easier to find a suitable pipeline. So not only do we need to find a fast pipeline, we also need to find a pipeline that didn't sacrifice the art style. And then the third major challenge we had, which is assembling the world itself. It's a large scale game with a very, very high acid density. And not only that, we also wanted to make a world that feel alive and handcrafted with a lot of storytelling. So that in itself was another challenge. So how do we make a large urban world and achieve the high degree of the world building that we want to aim for? So to give you an idea of the scale of the world, this is maybe like a third of the game world or so. And then we go full CSI and start zooming in a little bit and into the city. This is one of the hubs in the game, cluster 13. And we zoom in closer, we start to see the asset density. This is a weapon shop, and then inside the weapon shop, and then enhance. So that's kind of the scale that we were working with. So we always knew that there was no way we could compete with larger titles without picking our battles extremely carefully. And we needed a very fast and transparent pipeline that allowed artists to not only create art very quickly, but also stay in the creative flow. And not just being fast, but also removing distractions. And the two main themes that allowed us to do that was simplicity and limitations. And that might sound a little bit counterintuitive considering the complex subject matter. But what it allowed us to do was to focus on the big picture and leave room to polish. And it's also not the sexiest words to use to pitch a pipeline to artists. But we're a studio with a pretty strong background in technical art. So an alternative title for this talk would have been Tech Art All the Things, because that's what we did. So if we start with the very building box of the game, the 3D models themselves. So from the very beginning, we knew that we couldn't have a traditional approach to making models. We needed speed. And we also needed something that would help in making visuals consistent with a minimum of iteration. So we needed to support art direction at every turn so we could just maintain momentum. And thankfully, there was no point in making AAA quality assets because of the camera distance. So we had a lot of options to explore different approaches. So let's look at the options. First of all a traditional method like with high poly low poly modeling that just wouldn work for several reasons Like first of all the whole thing you building two different models you need to bake you need to import textures it's just too many steps. There's like no way. And another problem with that is that the traditional concept art to in-game model workflow doesn't work either because we don't have any concept art. So we built the entire world and all the assets without any concept art. And we need a workflow where we can iterate on assets really, really quickly without bakes and so on. So, how about tiling materials and decals? Which is great for cleaner art styles, but it doesn't really... With more abstract shapes, but it doesn't work for the detail level and the busy art style that we're going for. And we want lots of paneling, fine detail, and... The workload would just be intense if we were doing it that way. Plus, we couldn't really support that amount of geometry that would be needed. so we can't rely on the title textures. How about trim sheets? I mean, they are standard sci-fi solution. They're great for getting a lot of shapes and details, perfect for sci-fi panels, trims like that. It also helps a lot with the art direction because you get a lot of the art direction built into the texture, so it's very good for keeping down the iteration and maintaining a shared shape language. But trim sheets on their own, they're too expensive to make the kind of granular detail that we wanted. We wanted a lot of mechanical pieces, chunky engine bits, and it's a pain in the ass to unwrap those. Plus, you get a lot of... To get that kind of density, you need so many polygons. And the only really way to have shapes that are smoother than the amount of polygons you have is to bake them. But we already said that we didn't want to bake things. So that was a bit of a problem. So how about we use one set of baked assets and one set of trim sheets? That could work, but then we would need to have two materials for each asset. And we're going for a very, very dense world. So that would just explode the amount of draw calls. And not to mention the setup time. Because then we need to set up two materials for each asset. And that would also just be very time consuming. But at the same time, we really need those baked bits to get the detail level. that we wanted. So we solved that by just putting the baked parts in the trim sheet, and that was problem solved. So we sacrificed a bit of space in our trim sheet and then put the baked bits in there. And that was great, I mean, because then we can do both. But at the same time, that also makes it a little bit less flexible because you have essentially a 4K texture and you can't really scale that however much you want. You can't make giant assets because it can't scale forever. right it also makes it really really time consuming to make a set of textures because not only do you make a trim sheet which is pretty simple but you also need to make all those little mechanical bits and baked bits and that's that's a bit of a pain in the ass so so we just didn't so we made this texture uh and then we left some space in it even so because we thought well we surely you know the texture is not perfect we're gonna need lots of different bits which we then never did so we just have like a semi-finished texture and this is where the uh the limitations and the simplicity comes in so with a modern engine and modern workflows i mean you have basically infinite possibilities you know how do we approach it's each asset like you use a unique texture do you use you know a mix of the tiling textures do have like multiple detail normal maps Do I make the details in Painter or in the mesh? Do artists pick different workflows? And how do you keep them consistent? So when you're dealing with assets, that's not necessarily a great thing. Like we want to focus on the big picture and get there as quickly as possible so we can iterate on it. That's the goal. Like the assets don't actually matter that much compared to the big picture. So what we did was that we enforced this single workflow for the vast, vast majority of all the assets in the game. And that meant we had to cut a lot of corners visually, but the speed was very high. So if you look at certain assets, they don't look very good. And that's on purpose. And since we knew the camera distance, we can kind of put a cap on how detailed we want to make our assets because there are details that you can't just see, right? It's just wasteful. So we picked a polygon density and a detail density that fit our camera distance because we have a bit of a zoomed out camera, right? And this put a little bit of a cap on the fidelity that we could reach. But at the same time, there was no reason to stop and think. We put this limitation on ourselves so that we could stop second guessing and always just focus on creating. And since we're using a shared texture sheet and a Kipesh library, a lot of the design language just comes from that, which cuts down on the design feedback and the iteration on assets like like a lot but once we do need to iterate we have like a shared system for the assets so every hard surface object in the entire game is using the same texture so every mech every vehicle every sci-fi wall computer plastic chair box whatever is using the same texture and same shader so for example in this scene you have you know the ship in the background you have the the railings the yeah everything basically is using the same texture so you know to summarize it like we we split between a modular trim sheet for you know for the flexibility but then we use the the baked parts for the fidelity and then we used you know weighted normals because it's the year 2022 and we're not barbarians and uh and then we just only used one texture for all objects all hardships of these objects in the entire game and we only used low poly geometry it was like or like mid poly like there was no high polys and so on and then we extended this with you know mesh decals that we could uh for flexibility to hide the fact that we only have one texture in the entire game sometimes you want a little bit of extra so that good because then you can have normal decals and you can all bend and stretch them and that works great so we use that a lot for more intricate pieces right But now that we have the modeling in place the second challenge we needed to face was you know, how do we even texture this? How do we even, you know, shave this? So, like I said before, we were aiming for like a very dirty and gritty art style, you know, full of detail. And, you know, clean is a little bit more simple and more predictable. Dirt is very contextual. Like, you know, you can't just put like random dirt everywhere, right? It needs to be in the right places. So we need to find a way of doing this with as little to no work. We also need a lot of variety. So for example, how do we even have colors? So we can't just use one color per asset because that's boring. And several materials are out of the question. So how about we just use a mask for different textures or different colors? that would mean creating thousands of textures. And just adding them in perforce would be a giant pain in the ass. And we don't have time for that. So what we did was we essentially used the UV sets for the meshes. And then we just basically used the UDIM approach where we just offset the UVs and use that as a mask. And that way we could just have different colors without having any textures. So using that, you know, the primary materials we needed in the game was, you know, because it's hard surface. So it's either, you know, bare or painted metal or sometimes plastic, you know, when we're going a bit crazy. And the main shading difference is basically, you know, either metal or non-metals, right? So we used the same method of just shifting the UVs to mask between metals. So that was kind of our, you know, key base feature set. And now that we had those basics in place, we could focus on adding rust, dirt, and other effects in a decently believable way. And we wanted to have something that looked as close to hand-authored as possible, but without putting in any work. So we ended up experimenting and adding several layers. So first of all, we're using a trim sheet, so it's very easy to just add some texture masks that can drive things like details around bolts. and very fine detail like dirt and wear and tear and so on. And that's great. It gives you a little bit of a base pass, right? But it doesn't give you any contextual dirt. It doesn't use the shapes of the mesh. You want dirt behind some pipes. You want dirt in some little hatch. You want some scratched metal on the exposed parts of a mech. So we still can't use textures. So we just use vertex colors. So we bake down the ambient occlusion and the convexity. And we use that to drive dirt, wear and tear and rust just in a generalized way. So assets now work much better on their own. But we're still thinking about the scene and the big picture. It's not about the assets. It's about the scene. So now we have the case where we have some very clean surfaces that meet some very dirty ones. And this is not a world where everything is not a bunch of clean objects that we just put in a pile. Right? It's dirty. things have been sitting there for a while so we needed to to to get like that cohesion in and we can't just uh you know vertex paint the entire world manually because first of all it would take an insane amount of time and it would also eat up like all the memory for all the instances so that was another question so this is where the the light baking in in unreal comes in handy. So when you bake light in Unreal, you can use the option to also bake out an ambient occlusion mask. So that's what we use to just drive like the third aspect of the dirt. So assets that are next to each other are actually getting like dirt, you know, under the crates, behind some pipe meshes, things like that. So, you know, we swap back and forth. You can see some of the, some of the objects like they're in the background for example and it comes with a pretty hefty texture cost but you know more on that later and it also doesn't require any hand authoring which is good so we don't need to put in any actual work but even with you know this we you know it's it's still sci-fi we need glowy bits we need decals So what we did was that, and this is the little guy that you use. So we used a secondary UV set, and then we used the same approach with the UDIMs to just mask between decals and emissive surfaces. And that, you know, now we have like a whole bunch of little tricks to use to make the asset look handcrafted without, you know, actually, you know, doing anything. And once we have the dirt, it's very easy to turn it back off again. So we could share the materials across a very wide range of props and assets. So for example, we have this slum seed and then we have this little lab from later in the game. And they're sharing the same textures, the same materials, the same assets. So it gives us a lot of perceived variety because we didn't actually have the time to create that much variety. And now that we have a pretty flexible approach that can give us all these different things, we need to speed it back up again, because we're back to having super many choices and a very complicated setup. And we needed this very fast pipeline. So to tackle this, we set a lot of limitations on what we could do on ourselves. So we set the amount of colors to three colors and three metals. And that was the maximum amount that we had in a shader. and that was on purpose. Then we built our tools to fit that pipeline. Because we have a very simple tagging system in Modo with just a little pie chart, like pie menu to just complete with a preview shading like that. So you can just see roughly what it looks like. Then we combine that just with a very simple preset vertex color bake. All of that is just applied when we export the model. So it's like a one click thing. And one of the additional benefits is because, you know, we made the pipeline simpler by putting a limitation on the amount of colors But what it also do with that is that it helps with the art direction because it sets a very simple framework on the assets you only have three colors so when you designing the assets you already know the limitations you start designing your assets with the primary secondary tertiary color because that's all you get and this was one of the uh one of the tools that were like it just helped with the visual polish and and the design of the game because we need to balance the visuals so so with all these things in place there was like quite a few things that happened like automatically first of all we have very low texture usage it's very easy to have 4k textures when you only have one so we managed to lower the texture pool on console for example to from the default is like one gig and unreal we had 400 megabytes and the vast vast majority of that was things like reflection probes light maps and and the volumetric light for example so we had less the way less than 100 megs spent on the actual textures for the game at any time so it was very easy to scale it down to you know basically whatever but we also have the additional benefit of having reusable materials because and this was a very very big thing and we didn't really intend for this to happen either because we we enforced this limited palette and a single workflow what happened is that we have the same texture set for all the assets we have the same shader set up for all the assets so we can just swap materials back and forth and we can iterate on the look of an area really really quickly because if you make one material for a mech it's going to fit the railings as well so if you want to share the color palettes that's very easy and also we're using material instances in unreal and the way that works is that you make an instance of something it inherits from the the properties any properties that you don't override from the parent so what you can do is that you can very simply make a chain of inheritance and then you can iterate on for example you know how dirty is a scene you know the color balance and you can do that on an entire scene with just a few sliders so that's also something like we're We're like, well, that makes a lot of sense now that we have built it, but it wasn't really on purpose. So we could reuse a lot of content really, really quickly. So for example, we have this data core, but we also have this dirty sewer. And it's using the same models, same textures, same base materials, but it's just very different setups. So that gave us a lot of extra mileage. We also have the benefit of enforcing the art direction. So texture details and kitbash pieces, they are forced to be shared, which means that everything will have the same artistic direction by default. No one will make pieces that stand out because they will be consistent, the shape language will be shared without having any concept art and without anyone having to point that out. And it also made it very easy to tweak because all the materials, all the meshes are using the same setup. So if you ever wanted to grab someone else's models, someone else's materials, like you always know where to look because it's the same setup. It also cuts down on things like iteration. And we also have very iteratable models because there's no baking process. So, you know, I built a mech and now it needs like a hatch that can open and a new gun. It's just go in, build it, export, done. Same thing, like, you know, we need more guns for the game. just grab a gun, add some more stuff to it, you know, done. It was very, very efficient. And it also feeds into like a loop of everything you do since everything is sharing the same texture. Like we made this cool looking pipe into the kit patch library. You know, we made this cool chunk of cables that looks really nice into the kit patch library. Like every time we found like a nice pleasing shape, something that, you know, looked good, we could just reuse that. Just copy paste it to a different model, you know, You find all these new ways to make cool details, and then you can just reuse that instantly in any other model. So we also had the benefit of no technical surprises. Everything was built with the same polygon density, shader complexity, amount of materials. So it was very easy to extend the feature set. We want to have rain puddles, we want to have a little randomized blinky bits, better shading, detail normal maps. Very easy to just add it because it's just one place to do so. This took out a very big chunk of work when it comes to optimizing because we never had to care about polygon density, material complexity, for almost anything. When we did, it was very easy because there was only one place to go. So very easy to optimize. It also allowed us to, you know, go beyond what we thought was the limit visually. So, as I said before, we were like very smart and we were like, okay, we know our camera distance. So we're going to put a cap on, you know, how much detail we have. And that was completely wrong because it turns out when we're kitbashing, we could just, you know, for example, we have this little, well, it's called fuel station, but I don't know what it is. And then you're like, well, you can put it on the sci-fi pillar thing and it still looks good. And it's actually really detailed, but that's not at all what we intended to do. So it kind of allowed us to push beyond what we thought we should do visually. And same thing, we made these pipes sets and things like that, that were meant to be this big. And then we just scaled them down to half the size. And we're like, actually, it looks better. So we were a bit wrong in a good way. And the end result is that we created over 8,000 assets. which is like roughly three assets per artist per day. But most of the time we did not make any assets. So it's a bit of a skewed number. And I mean, even the biggest assets, like the biggest set piece pieces took like three days, like, you know, the big mechs took like one and a half a day. So it was very, very quick. So that really achieved what we wanted. So, you know, armed with this very large pile of models, you know, we had the next challenge, which is, you know, assembling the world itself. And it's a very cluttered cityscape, with layers, movable parts and a very lived in feeling. And that was, you know, that was a challenge in itself because not only do we have a lot of literal ground to cover, we also wanted to make a game full of, you know, life and world building and, you know, movement. I mean, it's a sci-fi metropolis. It's not an empty forest, right? You know, we need a lot of shit happening. So that meant not only did we have to build the world really quickly, We have to build it quickly enough that we had time to go back and just add lots of life. So we need to get to the part where we put the cherry on top really quickly. And this is where all these limitations that we put in earlier in the pipeline comes in. So we had a lot of content to create and place in the world. So we tried to create tools that allowed us to get rid of monotonous tasks. So we didn't create, you know, like this giant advanced things, you know, to solve big problems. We tried to get rid of all the monotonous boring tasks for artists so that they can focus more on the creative parts and less on the monotonous stuff. And we used Houdini for a lot of this and we created, you know, multiple tools to help us. So, for example, our pipe generation tool. So this is for making modular sets of pipes. and it started like as a very simple well not very simple it's amazing but just used the the profile of the pipe and it created an entire modular set of pipes from that and and then Magnus worked some you know black magic so not only is it a simple set of pipes but it also fits the art direction of the game you have all these little bendy bits and you know tons and tons of extra detail. And then, you know, it's all tiles, both mesh-wise and texture-wise. And that's, you know, like the kind of stuff, like you don't want to create 20 variations of the same pipe, right? It's pretty boring. So what we then did was we also had the placement of the pipes, you know, placing lots and lots and lots of pipes in a game is really, really boring. So we have a tool that's using splines to place those sets of modular assets that we made. made and we can also just change sets for you know changing visuals instantly and you know swap between different visuals and what this allowed us to do was not only does this speed up you know placing pipes but since placing pipes is now less boring and more you know satis you know it's more satisfying artists can now create things that they didn't think about creating before because it lowered like the mental barrier of like oh god i don't want to place more pipes So the game looks a lot better for it because we have a lot of pipes in our game. We also have the aptly named Room Maker, which just makes rooms or buildings based on sets of defined assets. Same thing there. We have modular sets that have all the pieces. And then we can just add cubes and basically make Boolean operations. And it would just make buildings out of that. So we use this a lot in some places in the game, like in the sewers, for example, a big, big chunk of the set dressing is basically just these boxes that then just placed all of these assets in an optimal fashion automatically. And then we have the destruction. We love destruction. But it's also very time-consuming to make.
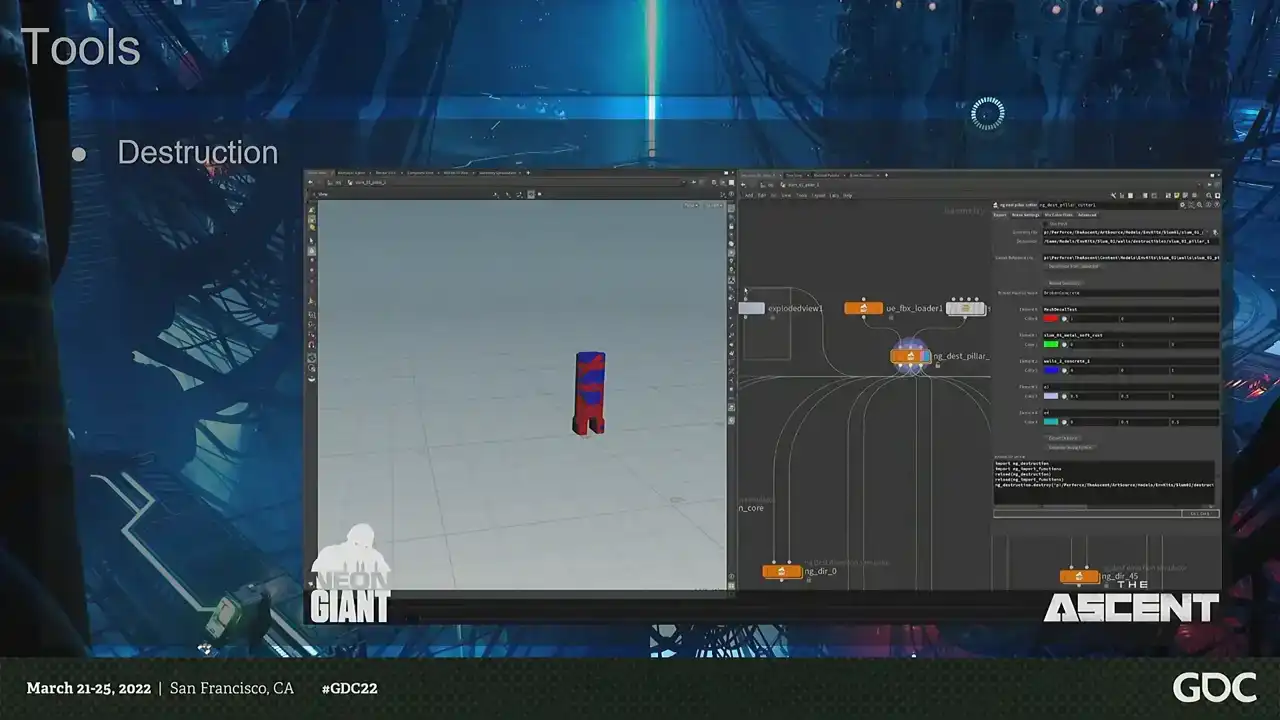
So we had two main goals with the destruction. First of all, making it very, very fast to author and also make it very, very cheap to render. So since the game is essentially taking place in a two-dimensional plane, we always know the direction the shots will come from. What we could do is just cheat. So instead of having actual destruction, what we're doing is that we're playing animations based on the direction that you hit the meshes. So we just baked out simulations based on multiple directions, and then we just pick which one to play. So it looks like destruction, but it's just an animation. That allowed us to have a lot of destruction that looked like it was reacting to the player's explosions, shooting rocket launchers and stuff, but actually it's just fake. And to take things further, like what you can do, for example, is that you can have an animation blueprint and you can just blend between different animations to make it even more precise. But we didn't do that because we thought this looked good enough, but you could.
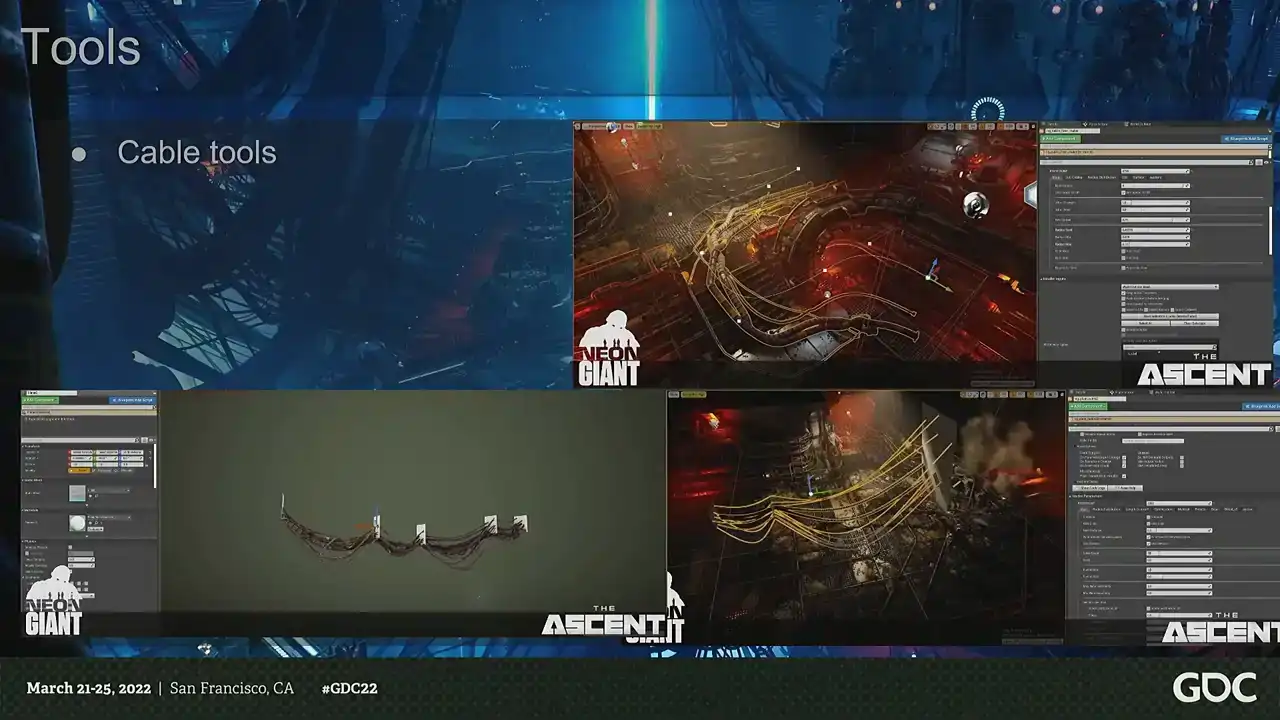
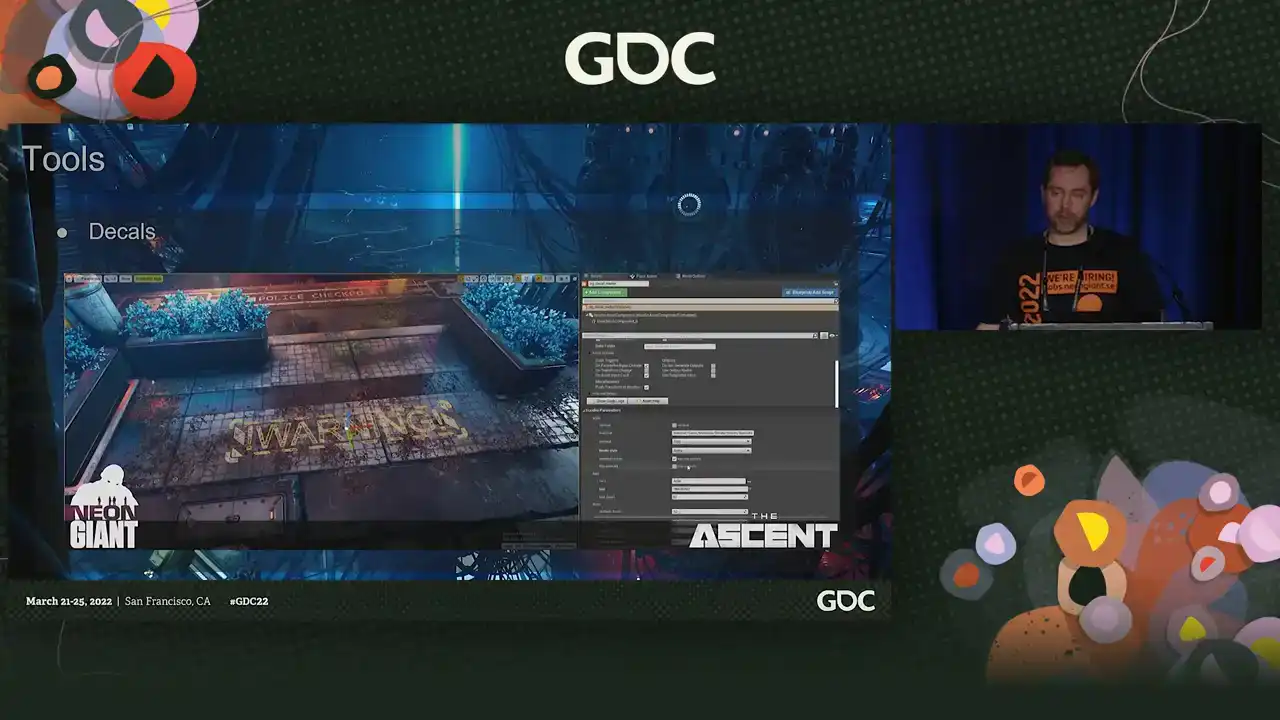
And then we had the cables. We have a lot of cables in our world. We love cables. They're also very tedious to make, just drawing splines. So we had a whole array of tools for making different types of cables. We had everything from kind of fake simulated ones on the ground to making cables between different, just two different walls. You could just put, you know, add lots of cables. And what made this work really well is because the tool itself, you know, was the hard part is making it look good and fit the art direction. And that's, I think, where they really shined because the amount of complexity we can have in the cables to making them by hand would be very time consuming. But we also here made like a whole bunch of like smaller tools instead of having like one enormous mega tool. We just had like four or five different cable tools. And we mostly limited ourselves to not making any custom models because we just didn't have time. But when we did, we tried to use tools to speed up the process so we can help with the world building. So, for example, we have the decal tool, which does exactly what it says on the box. You type out text and you get decals, mesh decals in the editor.
and it's very, very efficient because this is one of those things that takes you out of the flow. You're going to make a sign. You have to go back to your content application. You're going to make that. You're going to export it. You're going to set it up. Instead, we could just type things directly in the editor and just output mesh decals. And then we had a bunch of features in it to make them a bit more visually interesting than just text. But this also allowed us to do a lot more world building and very context-specific decals really, really quickly. And we also had lots and lots of signs because it's a cyberpunk cityscape. So everything from neon signs with model letters to different kind of generic plastic signs handmade signs and these tools ended up being pretty much of a beast but it could handle everything from the simpler signs to even complicated animated signs where using preset vertex shaders. So you can have blinky signs, and we can just type out whatever we wanted into the editor and get output geometry. So with the basic construction of the world out of the way, we could focus on adding life to the world. And something we noticed during the project was that whenever we tried doing these things and adding more life and movement to the world, it was never enough. We just always had to revisit it over and over again. And we evaluated it, we realized we wanted or needed more, and then we went back and then we improved what we had. The running theme that happened was that we ended up doing multiple solutions for almost every single thing. Instead of having this mega complex advanced systems, instead we just made multiple things to solve each problem. Because we didn't have a separate team that would go in and add stuff after the artists were done. Everything needed to be functional and usable enough for the artists to just go crazy with it. because they did all of it. So it was very much a collaborative and iterative effort. And we worked a lot on adding new features and options to extend the tools so that we could get more mileage out of them. And we developed many ways to add life to a scene, and these are some of the highlights. So one of the things that we did different was that we had... A big goal that we wanted to have was to make the vistas in the world not feel like a vista. And, you know, even when we used like the same kind of art and it was like very high fidelity, the Vista still, you know, they still felt pretty dead. You had this enormous cityscape with, you know, nothing in it. Right. So we needed to add people and we started adding, you know, NPCs standing on the balconies, which, you know, you couldn't really appreciate that they were moving. So we added, you know, more wavy animations and, you know, that worked, but, you know, still not enough. So we had, you know, NPCs walking on splines in the background, which, you know, give you a lot more movement in the background, feels a bit alive. But then we got this weird thing that this city is like completely dead where you are and everyone is just like walking over there in the background. So the goal was always to have those, you know, characters in the playable space. And eventually we added AIs for this. So here's before and after, for example, before we added more life to the world. so we added lots and lots of people like everywhere and as we added them we kept adding more visual variations setups reactions so what we could now do that we could we could set dress using npcs so instead of you know like you know lots of people talking fighting going about their business and you know this helped a lot with making the world more alive because Because instead of having some system that will place crowds in the scene, we made them part of the set dressing process. So that the artist could actually start when they're making a scene, they plan for using the NPCs and they would make all these little setups. Like, oh, here are the hobos and here's the guys in the cafe. So they could actually build the scene up in one go using all of these kind of features that normally artists would not use. So the best part of getting them into the game was really making them part of the set dressing and then making sure that they actually just worked. And another thing, when it comes to mind, when you're thinking of cyberpunk, cityscapes, it's like all these big commercials, animated things. So I thought I was going to make shaders for that. But that's super time-consuming. So we're like, okay, let's use actual movies instead and just play those because you have a lot more potential there, right? But they're super expensive to render in Unreal. And each movie you have, have a fixed cost on the CPU threads, especially on consoles. So you can't just have 10 movies. You have a fixed limitation of how many you can have. So what we did was that we just made a whole pile of models, or like movies, and we put them into one movie, and we made sure that they were equal length. And then we just scaled that down to be a small movie. And that meant that we can actually have these different commercials playing. But the problem was that they didn't cast light. And with our camera, we don't get so much screen space reflections and things like that. So really wanted this feeling where they're casting light dynamically. So we wanted to use the colors from the movies to drive a light source. But when you have the light functions in Unreal, they don't support RGB. So what we did instead was that we took the movies, each movie, and we blurred them down to one pixel, the average color in Houdini, and then we outputted that as a CSV file. And then we just animate the light source using that CSV file. And that allowed us to have this light animate. And it looks like they're casting light from the movie, but they are not. And since we then had all these movies in one texture, what we could do is that we could just move the texture in UV space. And we're swapping channels. So we just made a very simple playlist system and then just swapping the color curve at the same time. So it could look like you have randomized movies playing on these big screens and you have giant blimps flying past and casting light with the commercials. And it's basically just a shader that moves around in UV space. And an additional benefit was then, well, we have all these cool blinky color curves. So then we start adding them to the window shaders. So it looks like people are watching TVs or other light sources that are off screen. So we can have big dynamic light that changes color all the time So we got a lot of usage out of that And another thing we added as well things like traffic and moving parts And same thing there, we just realized that the amount of stuff you need is just insane because it's the variety, right? So we kept adding layers of layers. So for the traffic, we also had three types of traffic. We had like five types of random spinny moving bits for all the different sci-fi stuff. It's really like the variety that is the key. So we needed a lot of very simple things. So having successfully built all these things, we have so much stuff. We have too much stuff. So we removed a lot of the technical guesswork from the asset pipeline with our workflow. right uh problem was that we just move that forward in the into later into the chain because our ambition grew throughout the project so thanks thanks to the very you know like simple content pipeline we had a very very limited part of optimizations that we could focus on so we had draw calls they were a major problem same thing with streaming so for draw calls what what we did was a combination of tech art, some hand optimization, and lighting optimization. So I'm going to focus on the lighting optimizations. So it's an extremely, extremely important part of the game, the lighting. We have artificial light at all times. There's almost no sunlight. And we wanted to have a softer look, but also have a very, very scalable game in terms of rendering. and we evaluated both dynamic and static light. And, you know, dynamic is great, but it doesn't really scale very well. So we ended up with a hybrid mix. So we used a very, very large scale static lights that we hand placed. We couldn't use a skylight because, you know, we want to have a different feeling in different areas, right? And when we optimized, we actually switched a lot of lights to static because, you know, we basically used the default texture, like the default light map resolution in Unreal with some tweaks, which, you know, doesn't work great when you're making FPS, but when you're making this kind of game, it works really well. And we don't really have any textures, so we have plenty of space for light maps. So we actually used a lot of static lighting. But static lighting actually doesn't look very good if you don't have reflection probes. And they are like the real heroes of the lighting. So this is how it looks like without reflection probes. And making a game from this camera angle, we can't really use reflection probes in the regular way, because it looks kind of meh. So what we did essentially was that we hand painted the world using reflection probes, because you just pick where they look good. Because, I mean, it doesn't matter, because you're not going to be in the first person and see if they align well. So we just like, we just place like, here's a water puddle. water puddle we're gonna have a reflection probe and it's gonna look all nice and dynamic so a lot of what people think is dynamic lighting is actually just reflection probes but they're super expensive like they take like a megabyte of memory but once again with our camera distance we don't really care because we don't need that we don't need that resolution so we just put them to like 64 by 64 cube maps and then we just maxed out the amount at all times and we just basically painted lighting. And then to fight the draw calls, another thing we did was that the light map resolution by default in Unreal is 1K. And we increased it to 2K. And that saved us 10% of draw calls. And why does that happen? Well, by default, when you increase the light map resolution in Unreal, it doesn't actually increase the resolution, right? It packs all the assets into a texture. So you just pack more assets into the same texture. And Unreal have an automated or automatic instancing. But you can only instance if it's the same mesh, same material, also the same light map. So by increasing the light map size, you just have more assets on the same texture. So the likelihood that they can auto instance is just higher. But that means we also needed to load more light maps that was, once again, very okay, because we didn't really use textures. So it cost us about 50 megs on Xbox One, but cut draw calls by 10%. That allowed us to really have that kind of density that we wanted. And then another key part of the lighting was the volumetric light. And we wanted to have this Blade Runner feeling, lots of volumetric lights all the time, but that's also really expensive. So we used the baked light for that. But that's also a bit challenging because it's built for making like, you know, a first person or things like that. And all the volumetric light is like, it keeps close to the geometry to keep the density high. The problem is that we have a lot of vistas and we don't really need like, you know, probes every like one meter, like 100 meters into the background. So we use these, the volumetric light map density volumes to optimize all of that. And that was great. It freed up some memory, but it still took an enormous chunk of memory because the default lighting grid just doesn't go any lower by default. It's not really built for making an open-world game with baked lighting. So I Googled it, and I just added an extra MIP to the volumetric light grid, which is just changing a variable. That allowed it to optimize itself a lot heavier, which took the cost down from 150 to 40 megs. But we also had to optimize the lighting. And one of the things that you think about culling, I mean, we're basically having an isometric type game. So you don't think that you have to use culling a lot, but Unreal is very, very forgiving. So what we did was we actually went in and we just placed a distance-based fading on all the lights so that they would fade out nicely at the edge of the screen. And that was the biggest optimization we did because like I said Unreal is very forgiving and they have like a fading for light but it super super uh conservative so we just did that because we thought like surely we don't need to do that we're you know top-down camera but it was actually the single biggest optimization we did in the entire project and uh that was uh that was like the biggest optimization and the other was just you know basically turning lights static. But we also didn't want to sacrifice fidelity on any platform. So we built tools so we could turn off shadows per platform, per light, because you can't really do that. Either you turn on shadows or you turn them off. And there's not really anything that you can do there. So we made, you know, tools, and then we basically made a hand pass on the entire world and turned off shadows in problematic areas. No one noticed, so it worked. But that allowed us to really have the, you know, you know shadows on everything on next gen shadows or not really anything on the current gen so in the end uh our enforced limitations was a great success it allowed us to uh you know maintain momentum when we're building things and it allowed us to focus our attention but it also removed a lot of visual and technical noise because you know we didn't have many colors we have a very busy game visually and we restrained the use of colors and helped the art direction along the way. And we also unlocked a lot of new possibilities like the sharing of materials, which also helped with reinforcing the art direction. And it saved us a lot of time that you normally spend on assets so we can focus on creating the world, because that was the whole thing we wanted to do. We wanted to move a lot of the time spent from the assets to working on the world and making sure the world felt alive and polished. So we moved a lot of those savings along the line. And it's some of the downsides of working with a pipeline like this, it's that it's really scary. Because you're making a prototype and you're like, this is really cool, but you don't really know, well, in six month will we be really, really tired of using the same kind of privets, the same kind of sci-fi bits that we're using all the time? So it's a little bit scary to commit to it because you don't know. But I think it worked out well. And it's also very easy to set rules and it's very, very boring to follow them. If there's one thing I know, it's that everyone loves making really, really smart systems and then no one likes to use them and uh it takes discipline and it's not always fun you know it's uh because sometimes you're like i want to do this thing like well i can't do exactly that thing and you're like and they're like now i'm gonna abandon the pipeline it's like it takes a lot of you know discipline to to maintain that throughout the entire project and you know thinking of the big picture but you know if if i would do all of this again which you which, you know, spoiler alert, we are because we're making another game. We definitely underestimated the end result. And I have a pie chart. We focused a lot of the time on quantity instead of quality because in the end, you know, we, instead of spending like one month setting everything up and then just like three years, just like, we could have spent, you know, maybe five months making sure the game actually looked a lot better and then focus less on the quantity. So that would probably make the game look better. We also didn't apply the same kind of similar thinking that we did on the asset pipeline. The asset pipeline was very, very thought out, but the rest of the pipeline was very reactive. We're like, we're adding some stuff. Not enough, we're adding more stuff. So we didn't really have the same kind of discipline. So that's something that I hope that we can improve on. And, yeah, that's it. And if you think this sounds very exciting and cool and you want to do that, we are hiring for basically all positions and working on our next game, which is a next-gen sci-fi slash cyberpunk immersive sim. So, thank you.
And please remember to leave feedback on the way out. And yeah, questions? Thank you. Could you talk a bit more about why you guys decided not to use skylights? Or was there at least any HDR used? Because it looks like the light is very nicely filled and a lot of bounce light. Basically, a bit more about the lighting process and iterations and all. I mean, basically, we wanted to have like a soft look to the lighting. So that's why we had a very, very soft base pass. And then we used the dynamic lighting much more for spotlighting because it's having the kind of camera distance that we have. It doesn't really work nicely to have full screen light, so it was very much divided up into smaller spotlights for shadows and high fidelity lighting. And then we had a very, very strong base pass with the baked lighting. And then we just abused the reflection probes like crazy. Like, instead of just having them by default, we just cranked up the intensity to whatever we felt looked good. So it's like 100% not physically correct. Thank you. All right. Thank you.